
Start here
Pika brings video, image, speech, music and editing tools into one workspace. This guide explains where to start, what each control does, and how to turn a simple idea into a finished piece.
I recommend starting with one photo, one short movement and one generation. We’ll follow that process first, then explore the studios, editing tools and model apps when you need more control.
| Your situation | Where to begin |
|---|---|
| First visit | Read the navigation map and common controls, then follow the first-video exercise. |
| Want to animate a photo | Use Pika 2.5 or Video Studio with an image; use Pikaframes for multiple anchor images. |
| Want a product image | Use Product Shot; use Product Ad for a guided video-ad project. |
| Want a talking presenter | Use Talking Head Video; Speech Studio alone produces audio. |
| Already have footage | Choose an editing tool: Trim, Extend, Relight, Color Grade, Camera Director or Swap Anything. |
| Need a precise option | Open the relevant app’s menu gallery. Options may change after selecting another model. |
Understand the workspace
| Control | What it means |
|---|---|
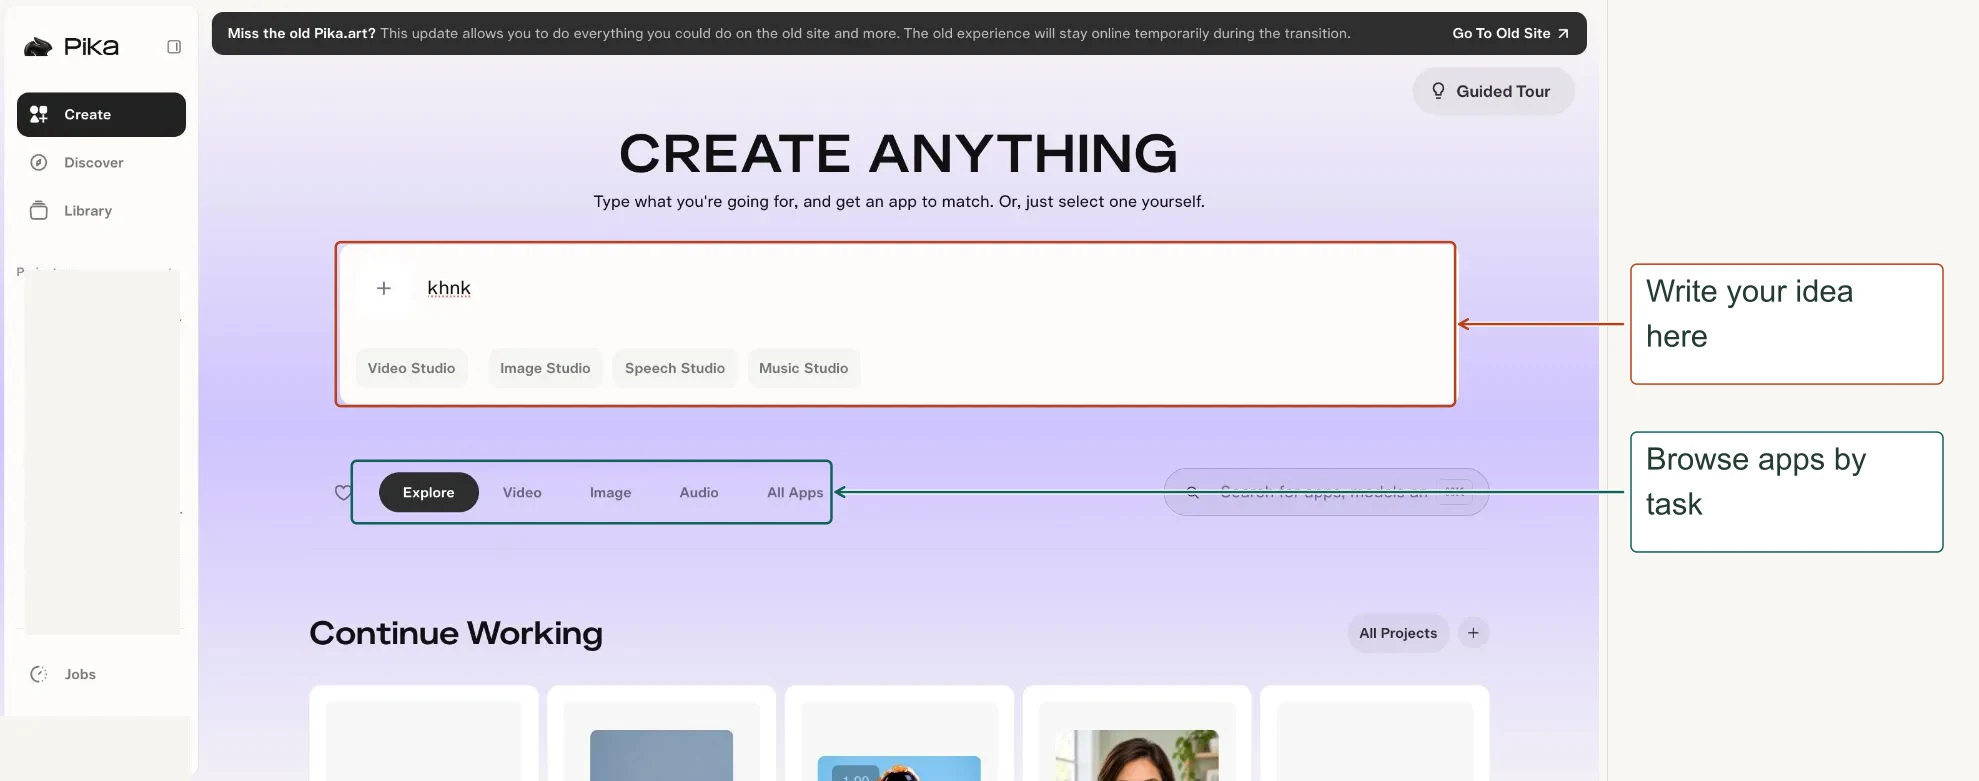
| Create | The starting page for prompts, app categories, search, favorites and studio shortcuts. |
| Explore / Video / Image / Audio / All Apps | Filters the app catalog. All Apps separates studios, editing tools, kits and models. |
| Search apps | Find a named tool. The homepage displayed a ⌘K hint. |
| Favorites | A personal shortlist. The heart on an app adds or removes it from this view. |
| Discover | Community work and remix entry points. Featured, Video, Image and Favorites filters and a Search field were visible. |
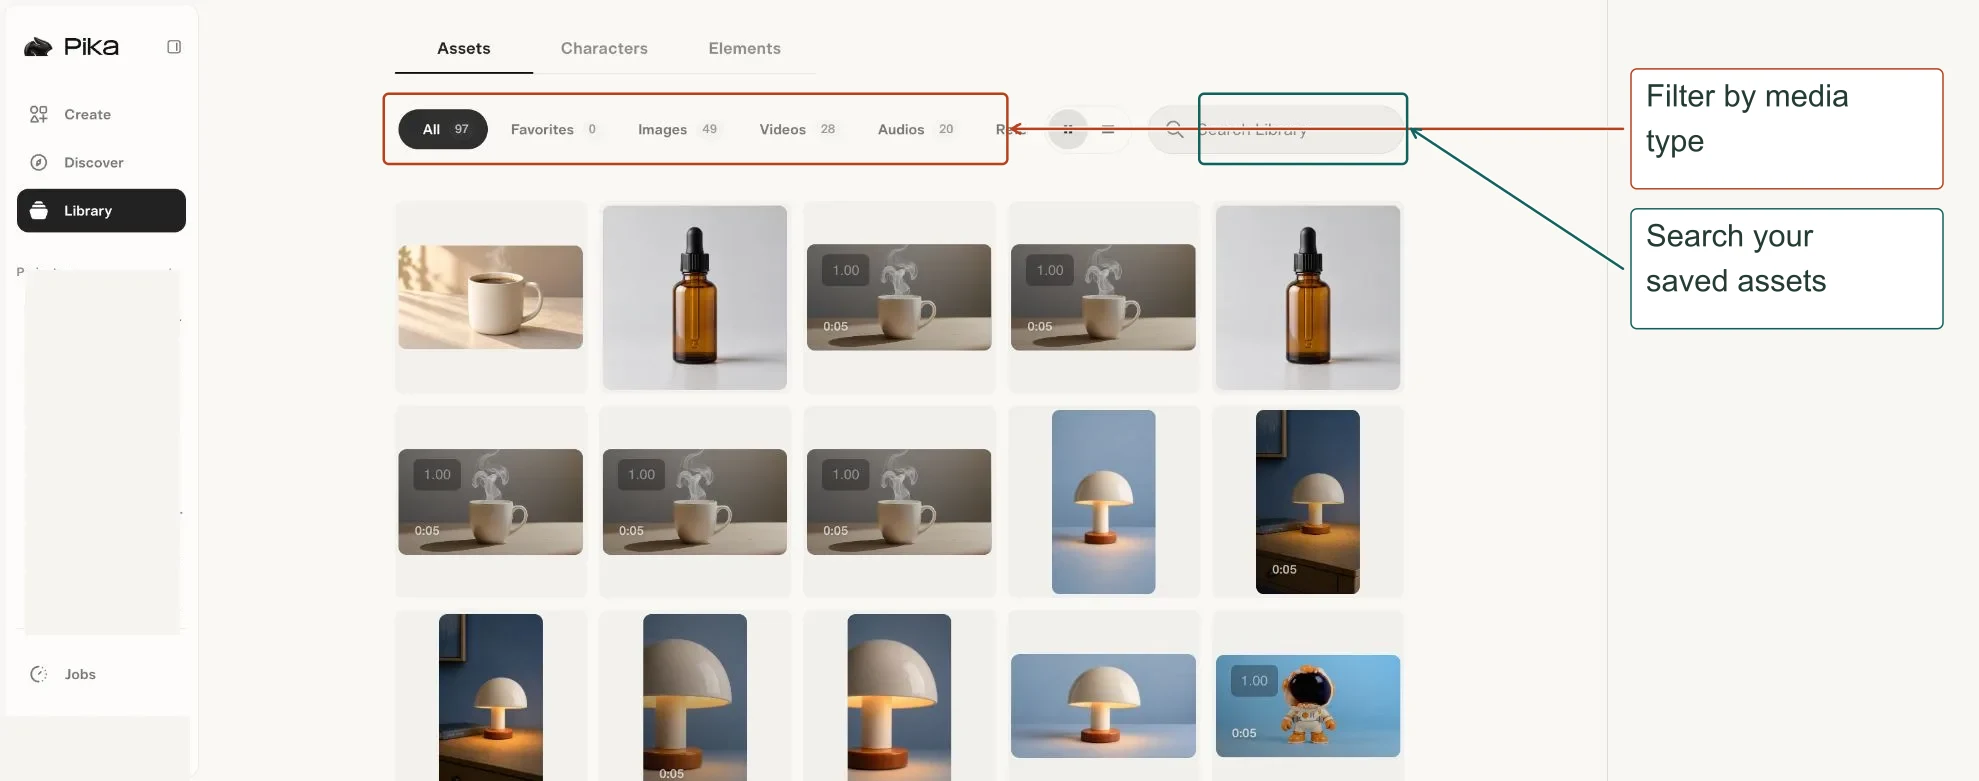
| Library | Assets, Characters and Elements. Assets can be filtered by All, Favorites, Images, Videos, Audios, References and Exports. |
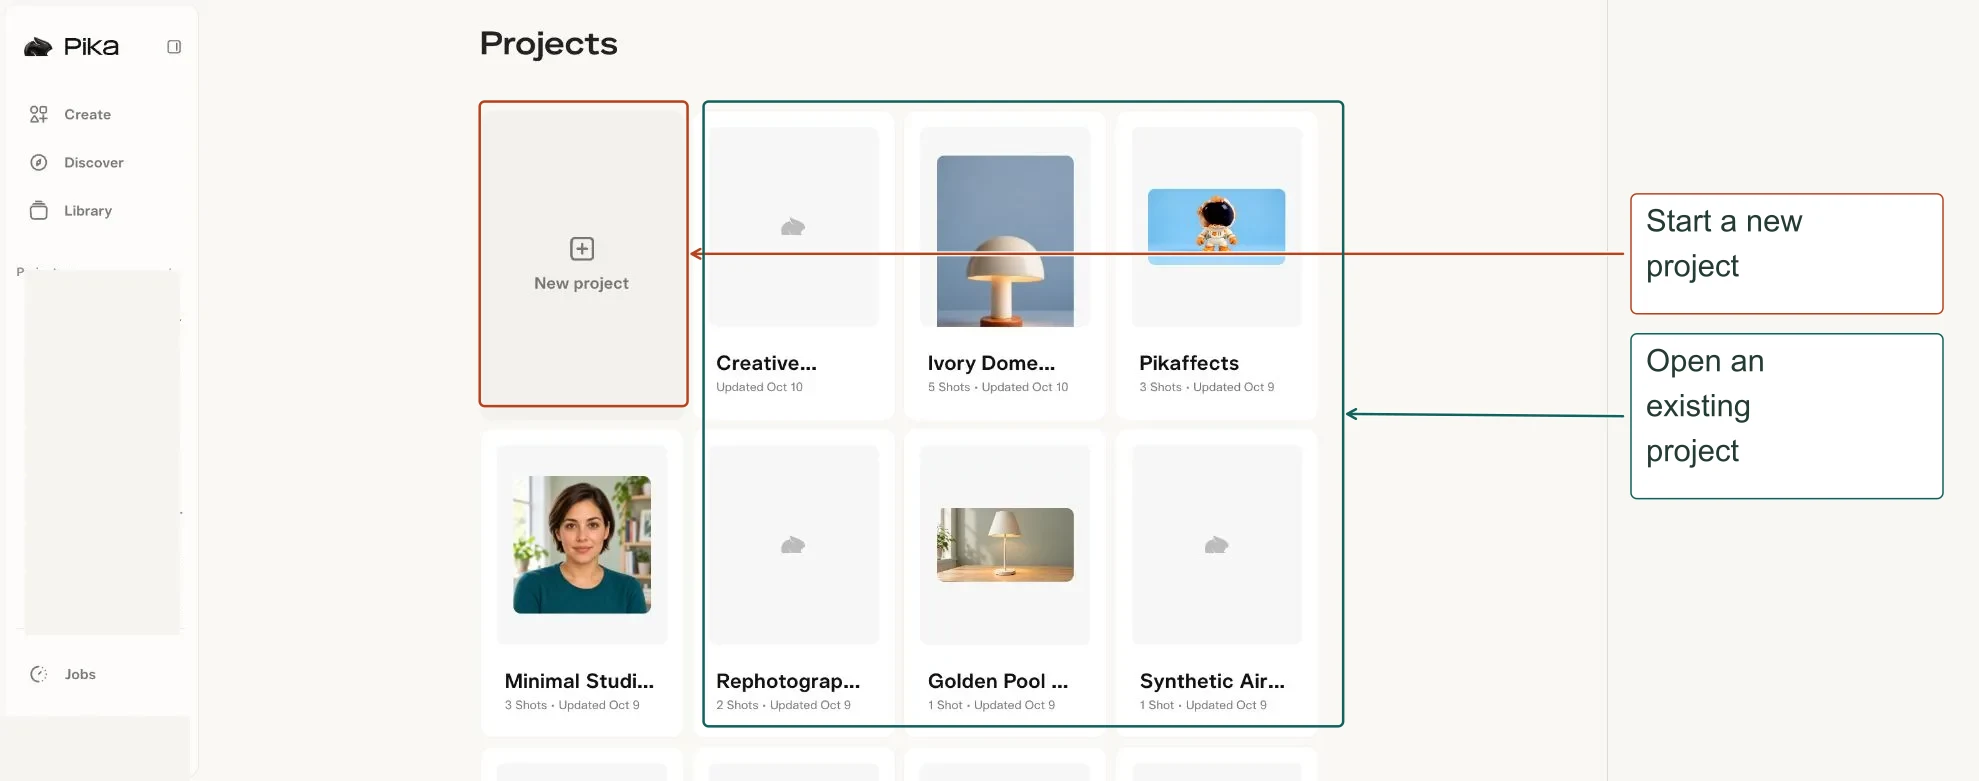
| Projects | Organizes a body of work, shots, inputs and results. Recent projects also appear in the sidebar. |
| Jobs | Shows In Progress work and Complete or Failed finished-job filters, plus Start Something New. |
| Credits and Account | The sidebar displays credits. The account menu includes Top-up Credits, Account, Subscription, Help and Log out. |
| Guided Tour | A homepage introduction control. Follow the on-screen introduction to learn the main controls. |
| Previous Pika workspace | The home banner linked to old.pika.art and said the old experience would remain temporarily during transition. This guide covers the new workspace. |
A studio is a flexible workspace. A model is the engine behind a generation. A kit guides you through a larger task. An editing tool transforms something you already have. Several entries can open a shared form, so always check the selected model and mode.
Your first successful video
Start with a clear product photo and a short motion prompt. Use the steps below to make your first clip.
- Prepare one clear photo of a mug. Use a simple background and the final frame shape you want.
- Open Create → All Apps → Pika 2.5. Add the image through Image Reference. If you want more model choices, use Video Studio instead.
- Write: “Gentle steam rises from the mug. The cup and camera remain still. Soft morning light. One continuous shot.”
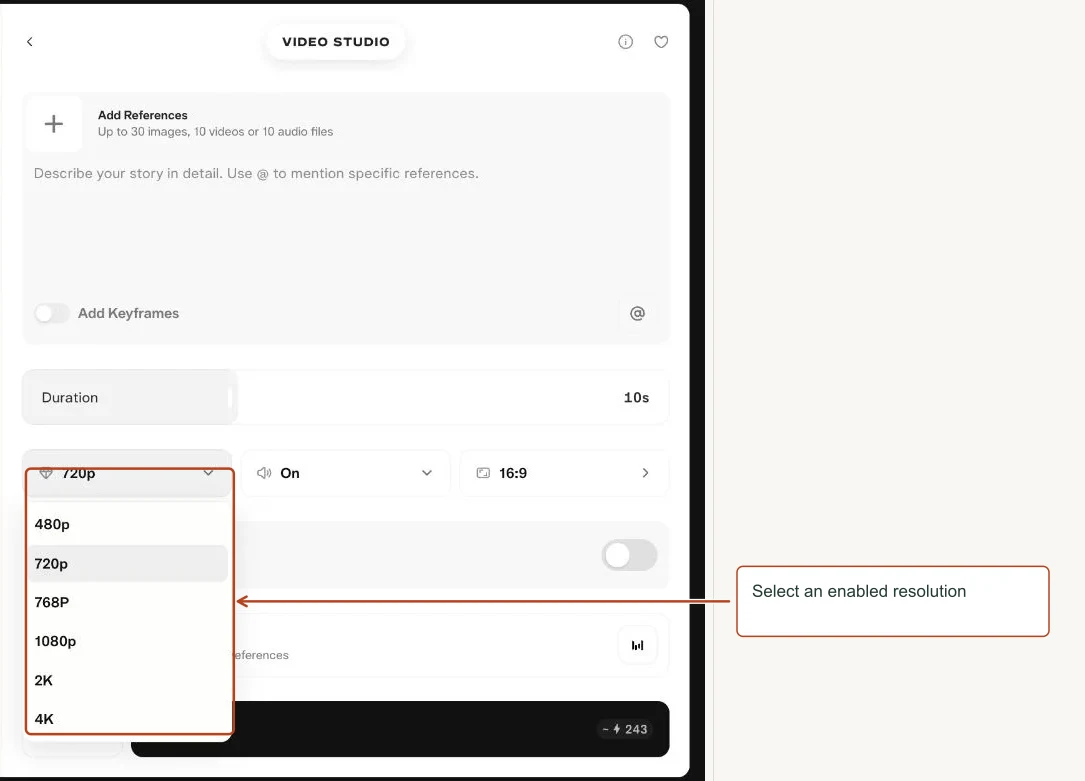
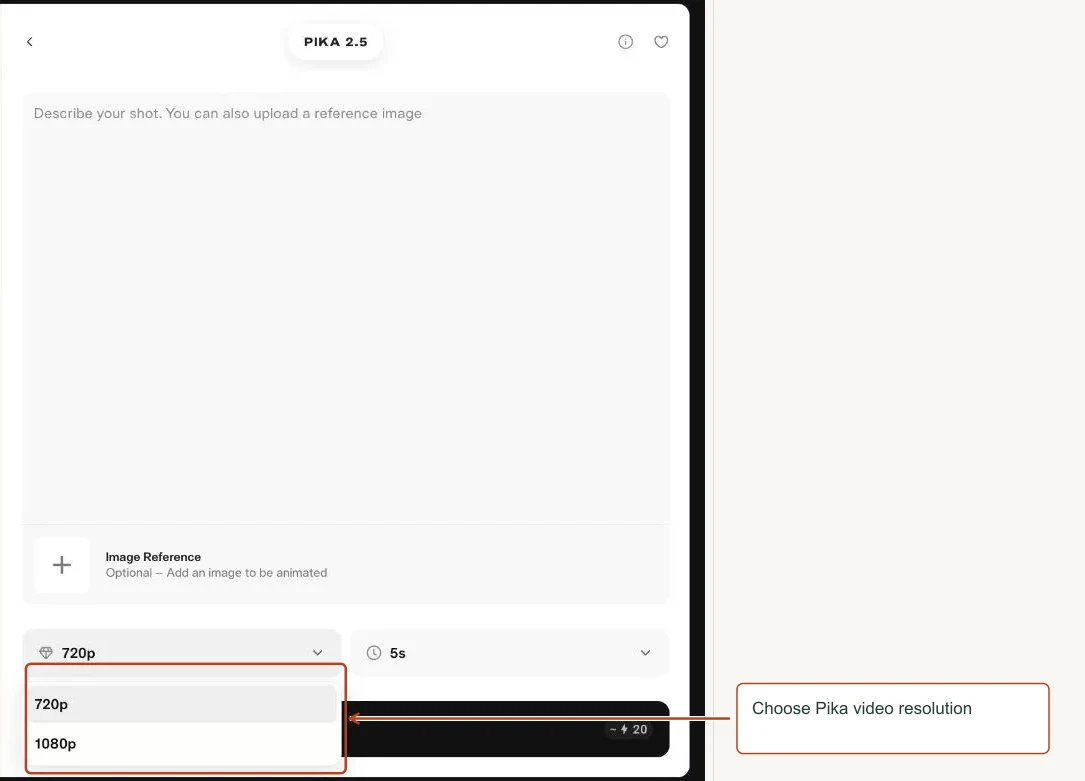
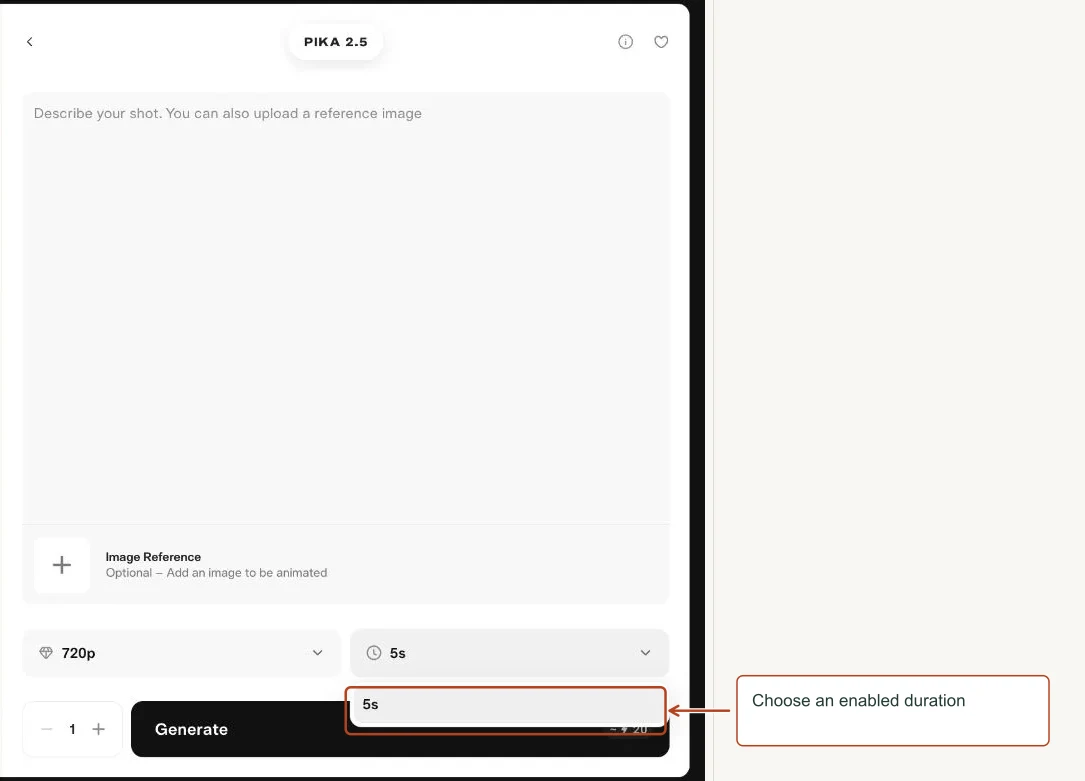
- Choose an enabled resolution and duration. The pictured Pika 2.5 text-to-video form offered 720p or 1080p and a 5-second duration; image mode may change what is available.
- Keep Generations at 1. Read the current credit estimate and confirm you have enough credits before clicking Generate.
- Wait for the result in its project or check Jobs. Avoid repeated clicks while a request is already processing.
- Play the whole result. Check the mug silhouette, handle, table edge, steam and any unexpected camera motion.
- If the mug deforms, simplify motion. If the image is good but the timing is awkward, trim. If you want more ending time, use Extend.
- Add sound later with Pika Soundtrack, or generate separate music or effects through the audio apps.
- Use the output’s available actions or the project timeline to prepare your final result. Export and download controls should be checked in the live interface before delivery.
Success means a clean usable shot, not the longest or highest-resolution output. Save the prompt and reference that worked before making a second variation.
Common controls without the jargon
| Control | What it means |
|---|---|
| Prompt | Your written instruction. State the subject, action, camera, setting, lighting and constraints that matter. |
| Reference | An attached example used to guide appearance, motion, sound or style. Specify which role each file serves. |
| @ mention | Names an attachment in the prompt. Use the name inserted by the interface rather than inventing an attachment identifier. |
| Start and end frames | Anchor images for the beginning and end of a shot. They guide an in-between transition. |
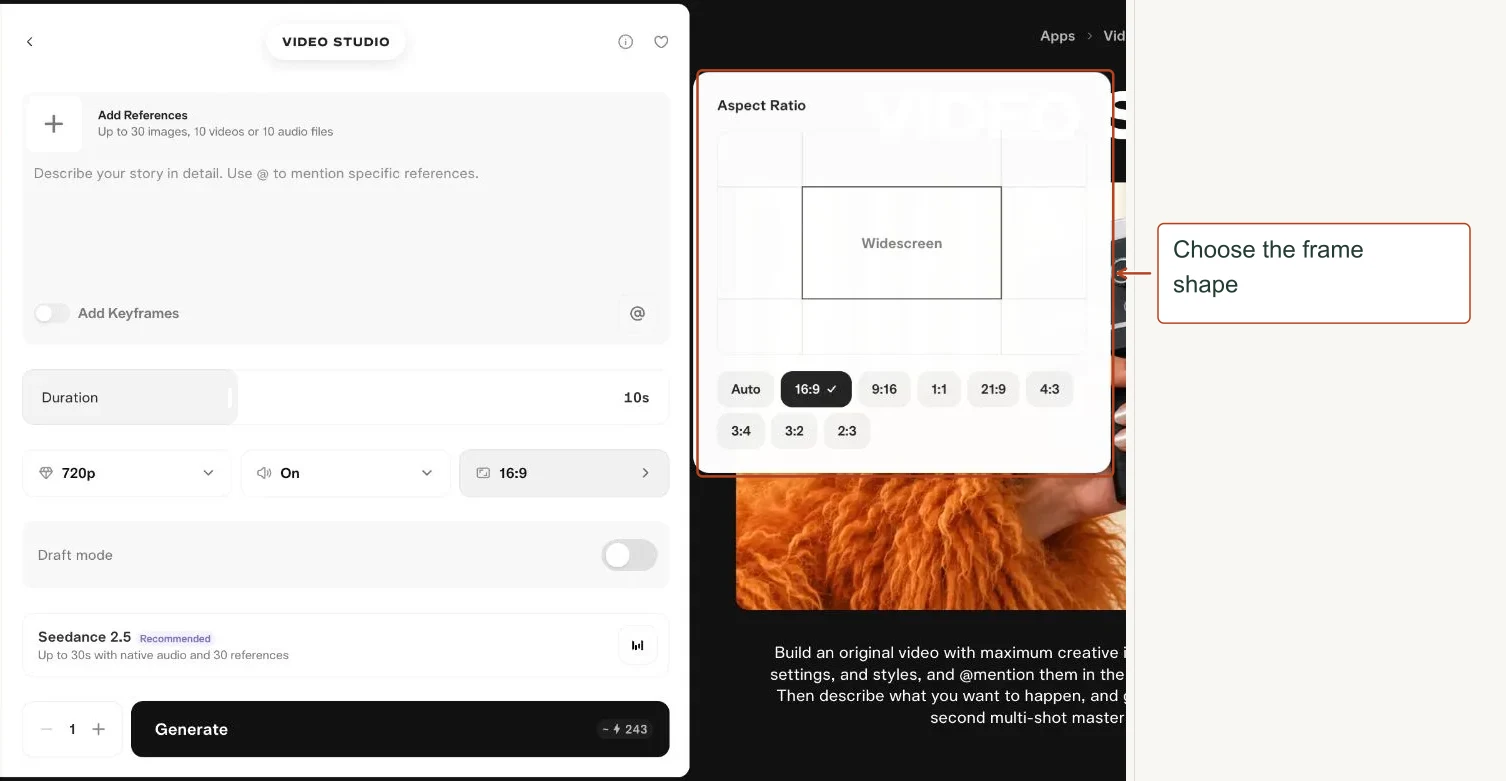
| Aspect ratio | Width relative to height. 16:9 is landscape; 9:16 vertical; 1:1 square; 21:9 very wide; 4:3 and 3:4 are moderate landscape/portrait; 3:2 and 2:3 are photographic landscape/portrait. |
| Resolution / Size | Output pixel dimensions. Larger images may retain more detail but cannot guarantee a better composition or correct anatomy. |
| Duration / Length | Requested time. A transition duration, extension length, track length and total film length are different settings. |
| Model / Version | The engine or variant doing the work. Switching it can change options, price and behavior. |
| Quality | A rendering tier. It can alter processing and cost independently of the output dimensions. |
| Audio | A request for generated or preserved sound, depending on the app. Read the label: native audio and keeping original sound are different. |
| Negative prompt | An explicit list of things to avoid when the app exposes this field. Do not assume all apps support it. |
| Generations | How many outputs or attempts to request. Start at one and watch the price when increasing it. |
| Generate / Upscale / Extend / Trim | Starts the task named on the button. A visible estimate is not necessarily a fixed final charge. |
| Disabled control | An option may require another input, model, compatible setting or completed loading step. Read the nearby message. |
| Preset | A starting style or configuration. Inspect its preview and output instead of assuming its name fully specifies the result. |
| Preview on the right | The app’s explanation or marketing example. It is not proof that your own prompt has already generated a result. |
Write prompts that are easy to follow
Use this pattern: subject + one action + setting + camera + lighting + sound + what must stay unchanged. Add details that change the result; remove repeated adjectives and conflicting directions.
| Prompt type | Example |
|---|---|
| Too vague | Make a beautiful cinematic mug video. |
| More useful | An ivory mug on an oak table. Steam rises gently. Slow camera push-in. Soft morning light from the left. Keep the handle and mug shape unchanged. No speech. |
| For image editing | Replace only the mug with the attached terracotta reference. Preserve the table, framing, lighting and hand position. |
| For a speaking avatar | Put the exact spoken words in Script. Put the setting in Scene. Select the voice separately. |
| For music | Describe genre, tempo, instruments, energy and structure. State “no vocals” when you want a background bed. |
| For SFX | Describe material, action, distance and room. Example: “Three dry wooden taps, close microphone, quiet room, no music.” |
Iterate one variable at a time. First fix subject and composition, then motion, then lighting, then output quality. Keep the same reference when comparing camera choices. A request to preserve something is useful direction, but the final image or video still needs inspection.
Understand credits and avoid waste
Estimates in screenshots belong to that exact state and may change with model, input, duration, audio, size and output count.
| Observed example | Displayed estimate |
|---|---|
| Video Studio initial state | About 243 credits |
| Pika 2.5 initial state | About 20 credits |
| Pikaffects initial state | About 5 credits |
| SFX Studio initial state | About 2 credits |
| Seedream 4 initial state | About 3 credits |
| Ideogram 4.5 initial state | About 6 credits |
| Product Ad Generate Looks | 13–16 estimated credits in the inspected project |
| Video upscale test state | A broad 1–768-credit range was shown |
These examples are not a price list. Read the live button before running a task. A broad range or missing estimate is a reason to inspect the configuration more closely.
- Start with one output and a short duration.
- Approve the source image before spending credits on animation.
- Avoid regenerating an entire project to fix one shot if a smaller edit will work.
- Choose final resolution and upscale after the concept is settled.
- Treat Generate Looks, Retry and Regenerate as possible paid actions, not harmless previews.
- Read your account’s subscription details for renewal, watermark, usage and refund terms.
Creation studios
The following chapters document the controls in this group. Screenshots show one configuration; choosing another mode or model can reveal different settings.
Video Studio
Create a video from a written idea, reference media, or start and end frames. This is the general video workspace; the selected model determines the final capabilities.
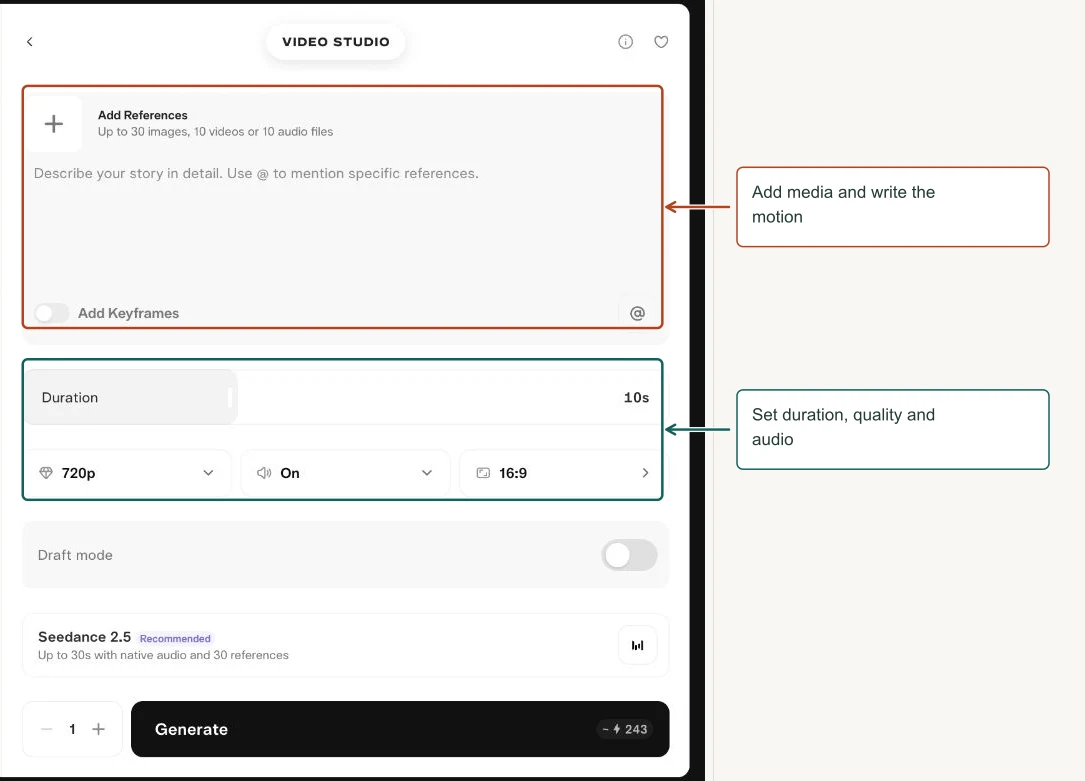
How to use it
- Open Create → All Apps → Video Studio.
- Attach references if needed, then write one clear scene. Use @ to identify the role of each attached reference.
- Choose a model, duration, resolution, sound, and aspect ratio. Keep Generations at 1 for your first attempt.
- Read the current credit estimate before Generate. Review the finished result in its project.
Controls explained
| Control | What it means |
|---|---|
| Add References | Supplies appearance, motion, setting, or audio guidance. The pictured panel allowed up to 30 images, 10 videos or 10 audio files; limits are model dependent. |
| Prompt and Mention | Describe the result; @ connects instructions to specific attachments. A reference does not explain its own intended role. |
| Add Keyframes | Switches to a required Start Frame and optional End Frame. Describe how the shot should move between them. |
| Duration | Requested clip length. Longer clips require more action planning and may cost more. |
| Resolution | Output dimensions, not a guarantee of better motion or identity consistency. |
| Audio | Requests sound when supported. Put dialogue and sound direction in the prompt. |
| Aspect Ratio | Sets the shape of the frame. Auto, 16:9, 9:16, 1:1, 21:9, 4:3, 3:4, 3:2 and 2:3 appeared in the picker. |
| Draft mode | An iteration option. Compare the displayed estimate and the selected model’s behavior before using it for a final shot. |
| Model | Selects the generation engine; the recommendation badge is Pika’s recommendation, not a quality test. |
| Generations and Generate | The counter requests multiple outputs. The button shows an estimate for the current configuration. |
Try this
A matte ivory coffee mug sits on an oak table. Steam rises gently. Slow camera push-in. Soft morning light from the left. One continuous shot. Keep the mug shape unchanged. No text or dialogue.
Review tip. The page description and form disagree about some reference limits. Follow the active form and validation messages. The menus are a settings reference, not a promise that every combination is supported.
More views of this workflow
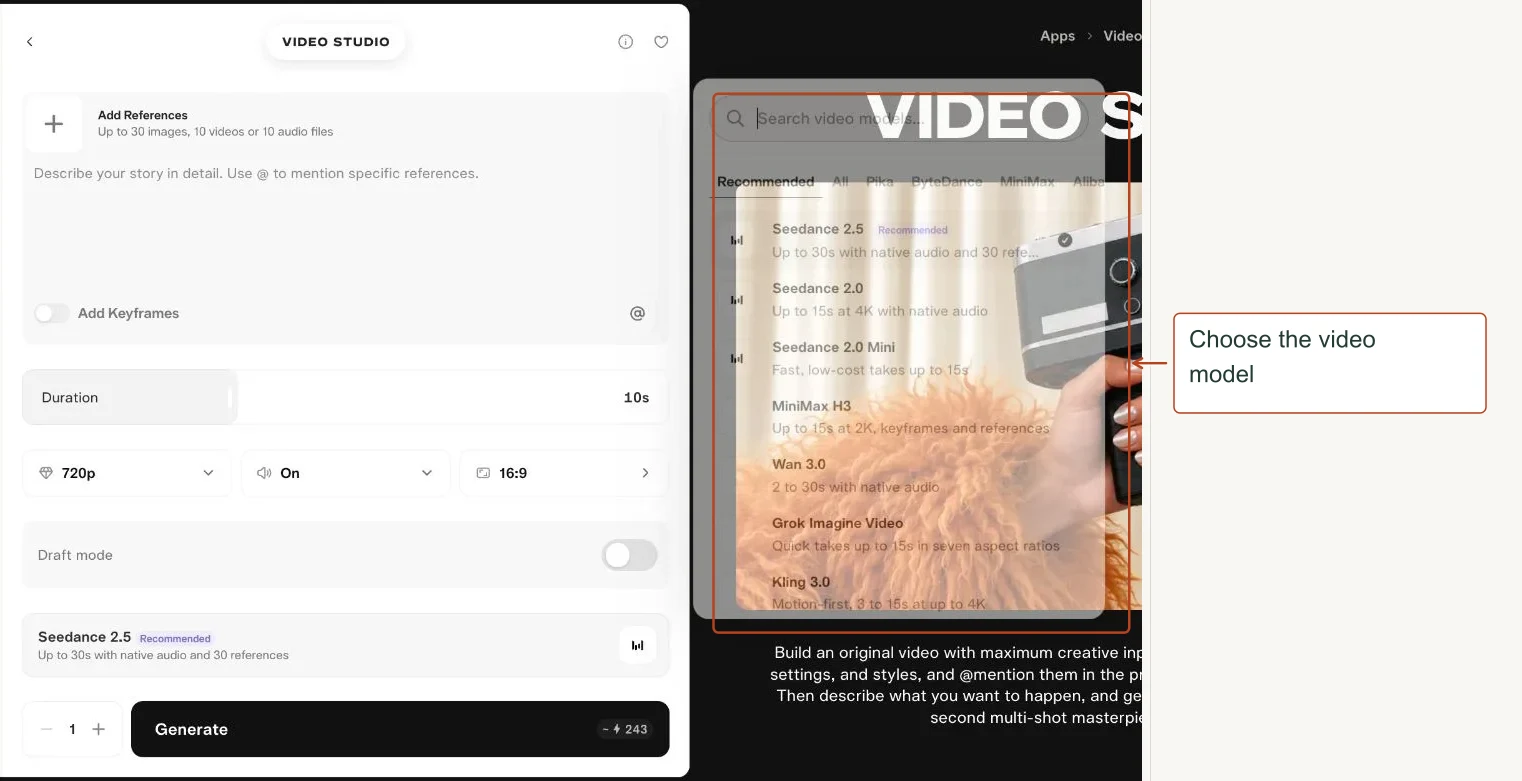
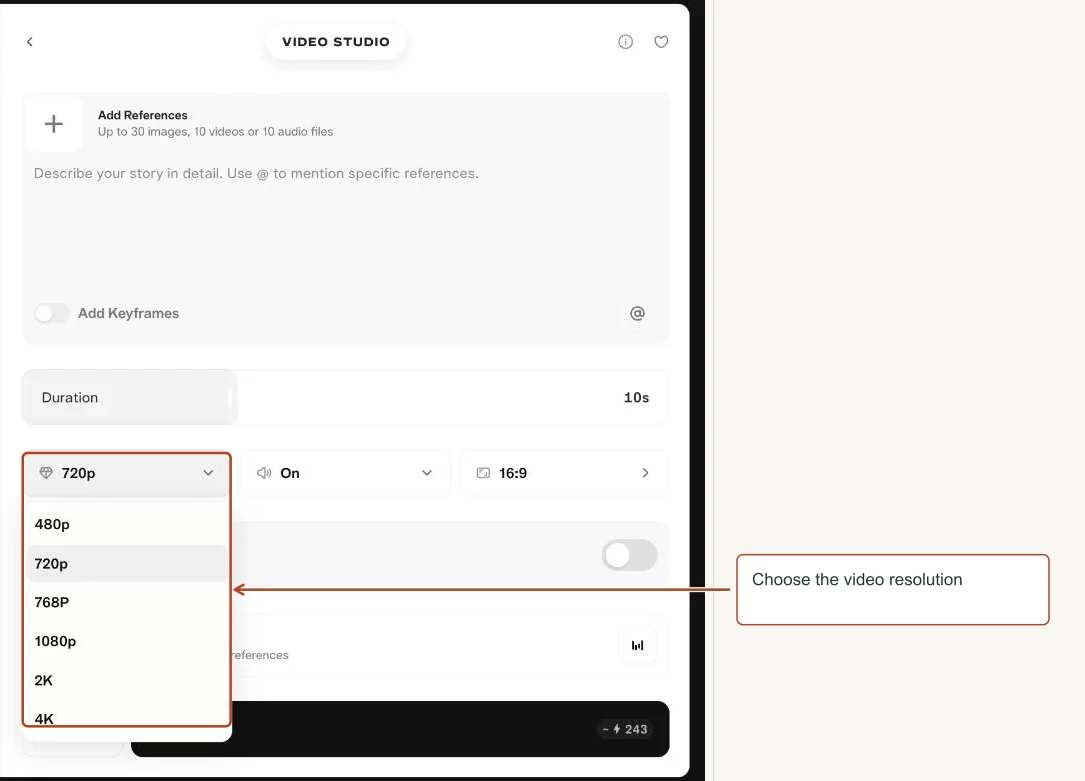
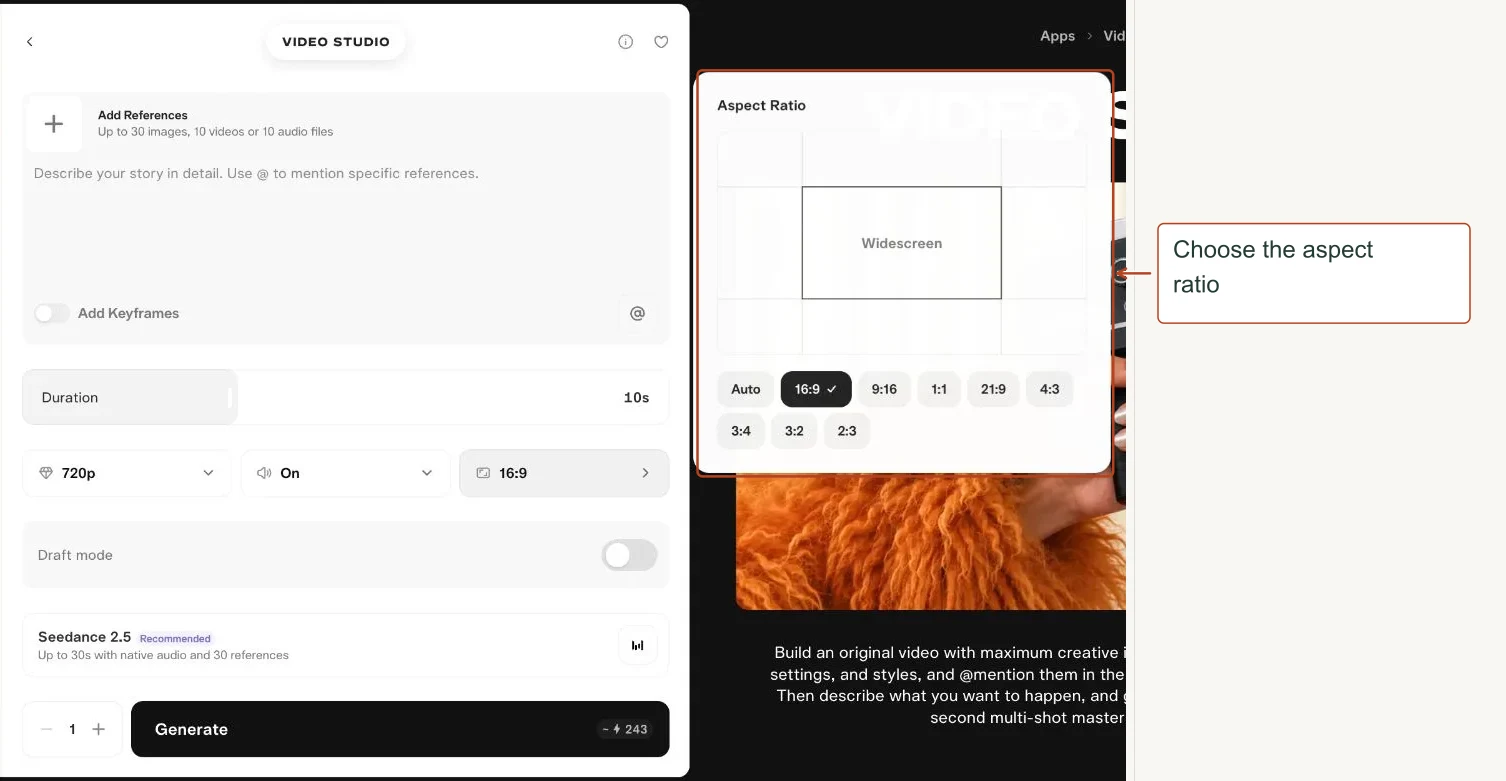
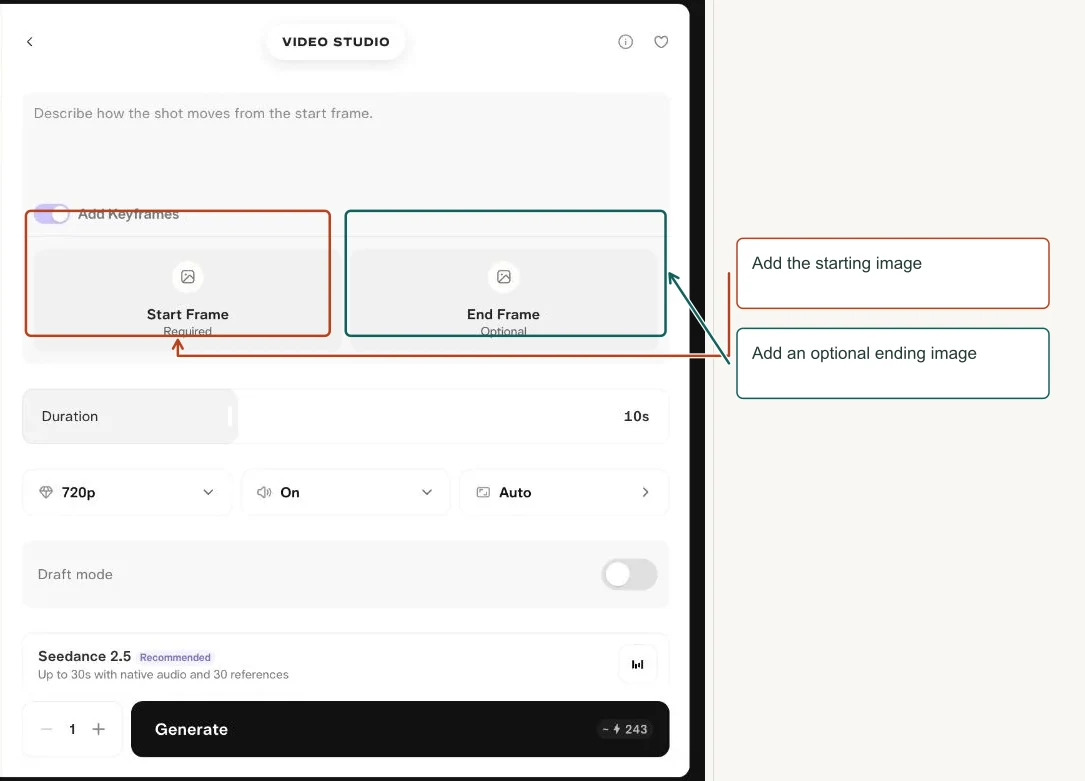
Image Studio
Create a still image from text, or guide it with reference images. Use this to make a clean source image before animating it.
How to use it
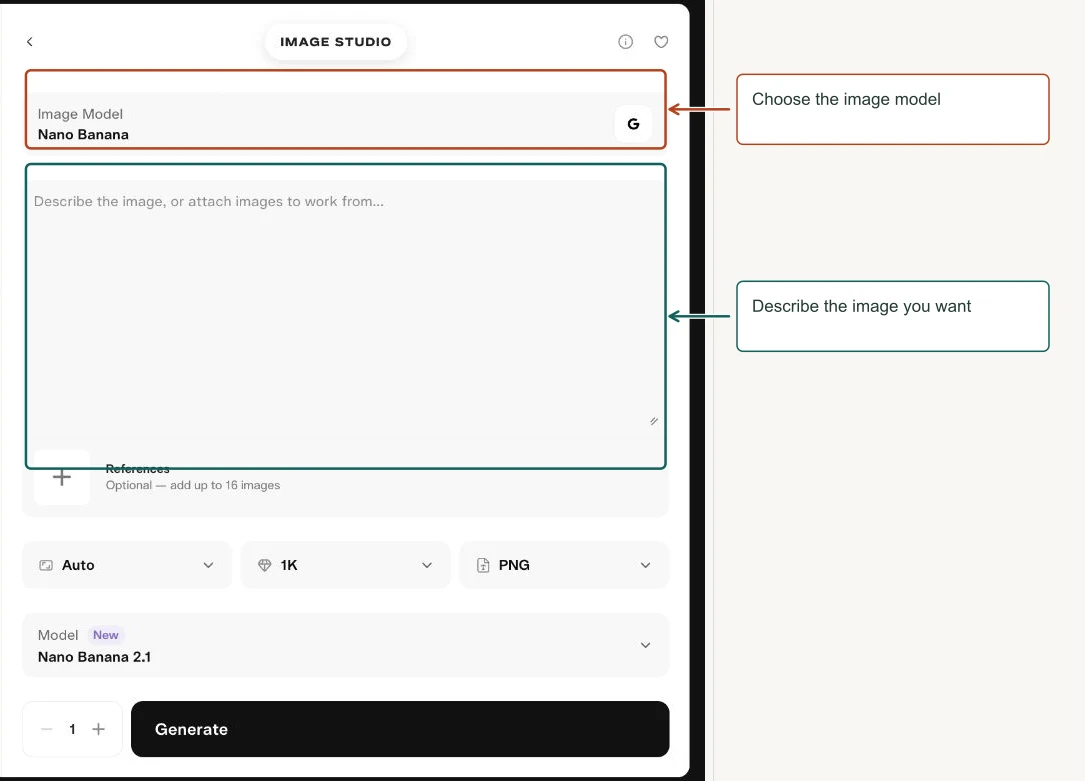
- Choose Image Model.
- Describe subject, composition, lighting and style; add references if useful.
- Set shape, resolution and format, then generate one version.
- Inspect small details before moving to video.
Controls explained
| Control | What it means |
|---|---|
| Image Model | Changes the engine and the controls below it. |
| Prompt | Specifies what the image should contain and how it should look. |
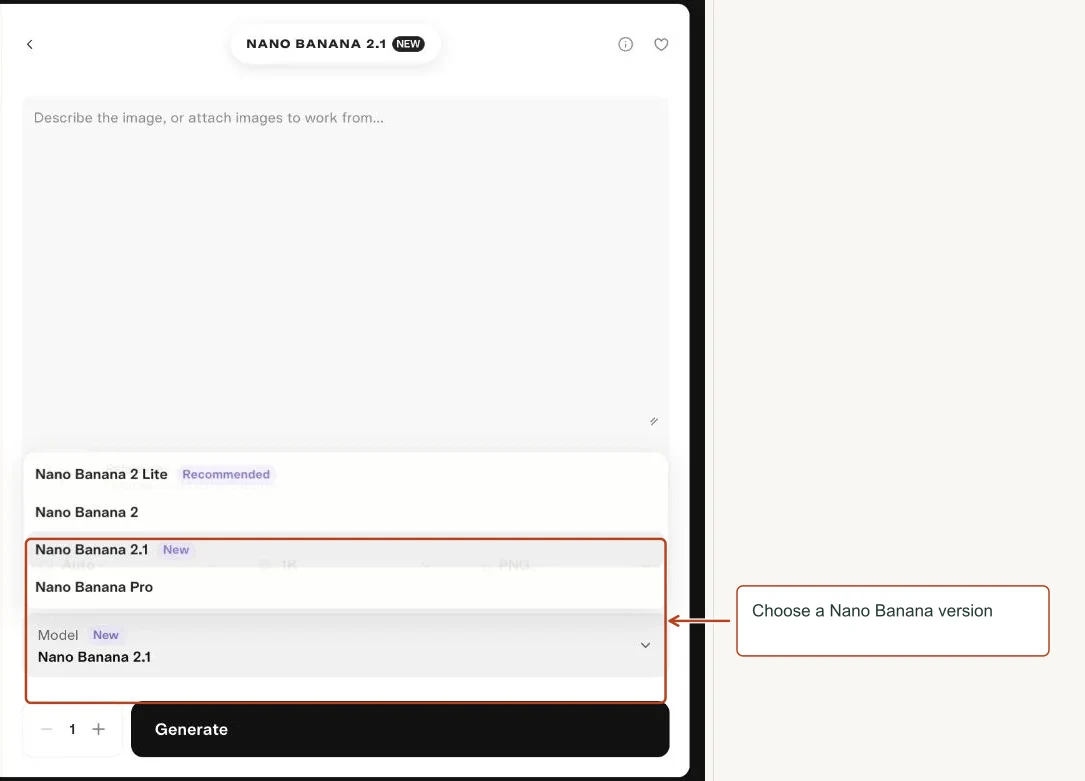
| References | The pictured Nano Banana panel accepted up to 16 images. Explain what each reference contributes. |
| Aspect Ratio | Choose the final framing before generation to avoid unnecessary cropping. |
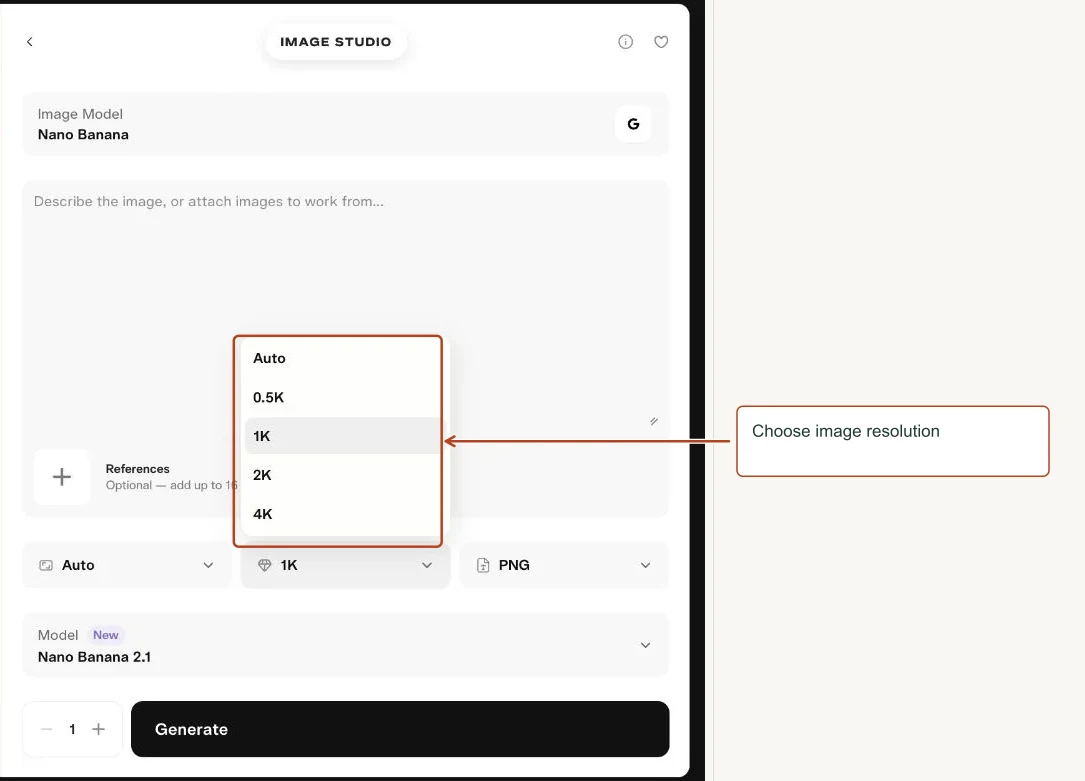
| Resolution | Auto, 0.5K, 1K, 2K and 4K appeared in this model’s menu. |
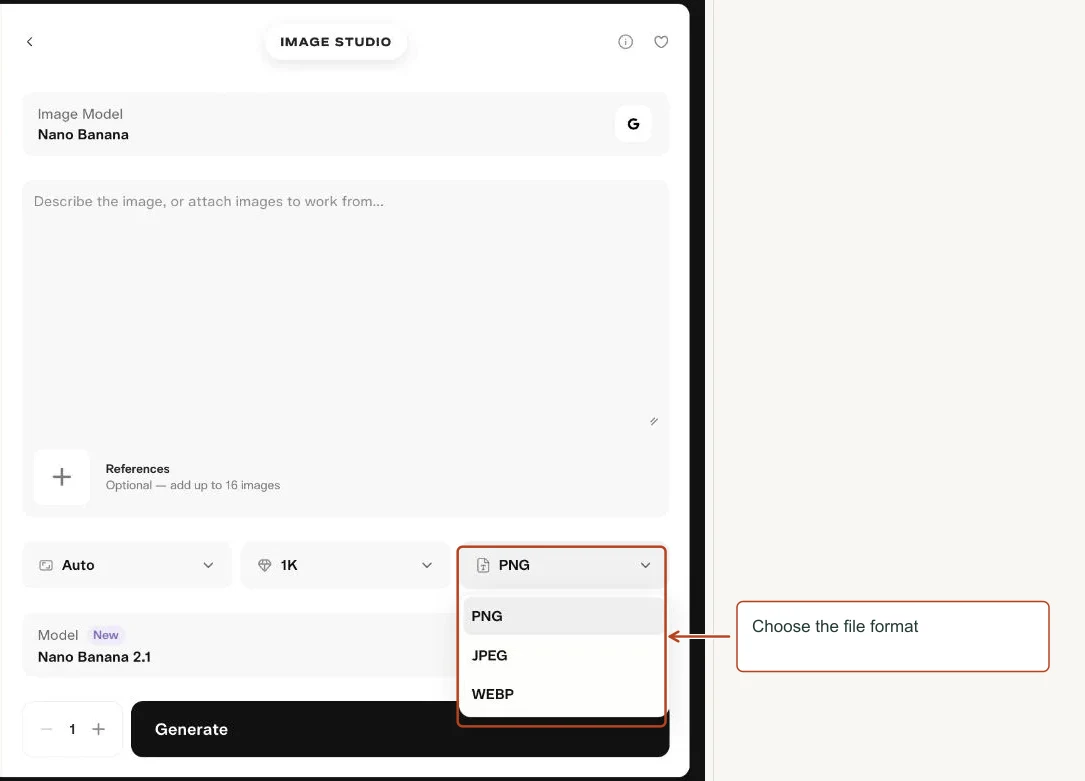
| Format | PNG is useful for clean graphics; JPEG suits smaller photographic files; WebP is useful for web delivery. |
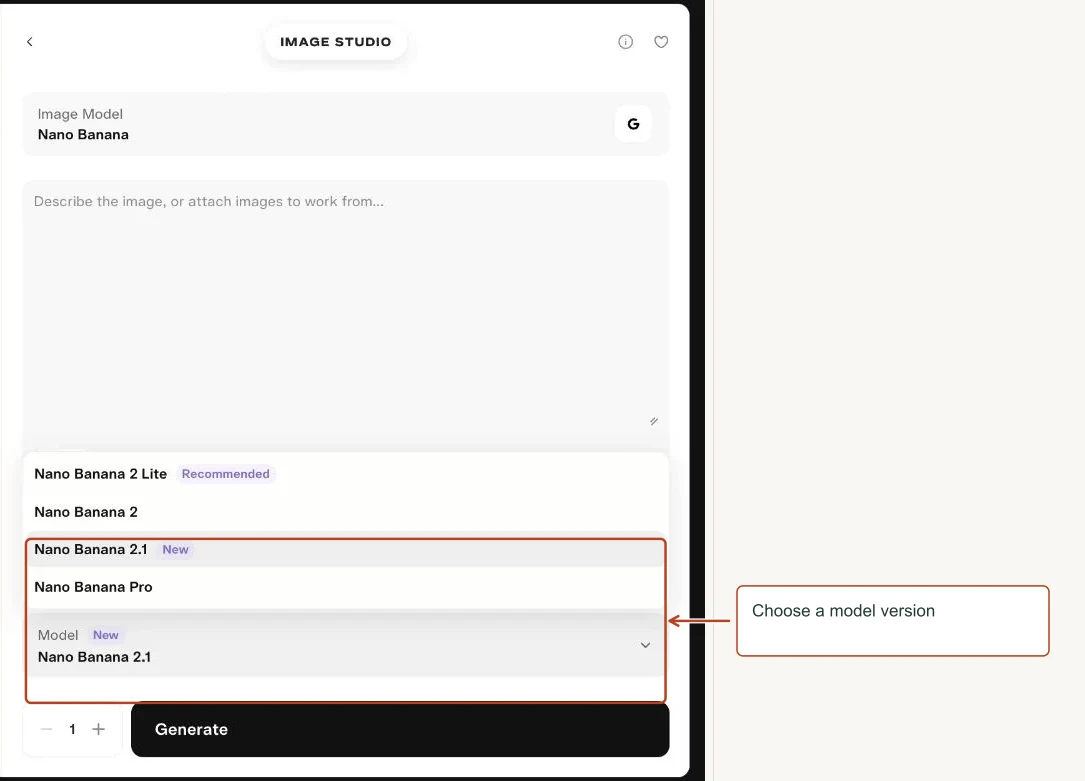
| Nano Banana model | Selects a specific variant within the family. Recheck price and available settings after changing it. |
Try this
Photorealistic ivory coffee mug on pale oak, handle on the right, soft window light, pale blue background, centered composition with space above for a headline, no lettering.
Review tip. Check logos, fingers, labels, and straight edges at full size. An attractive thumbnail can hide errors.
Menu choices
| Menu | Choices shown |
|---|---|
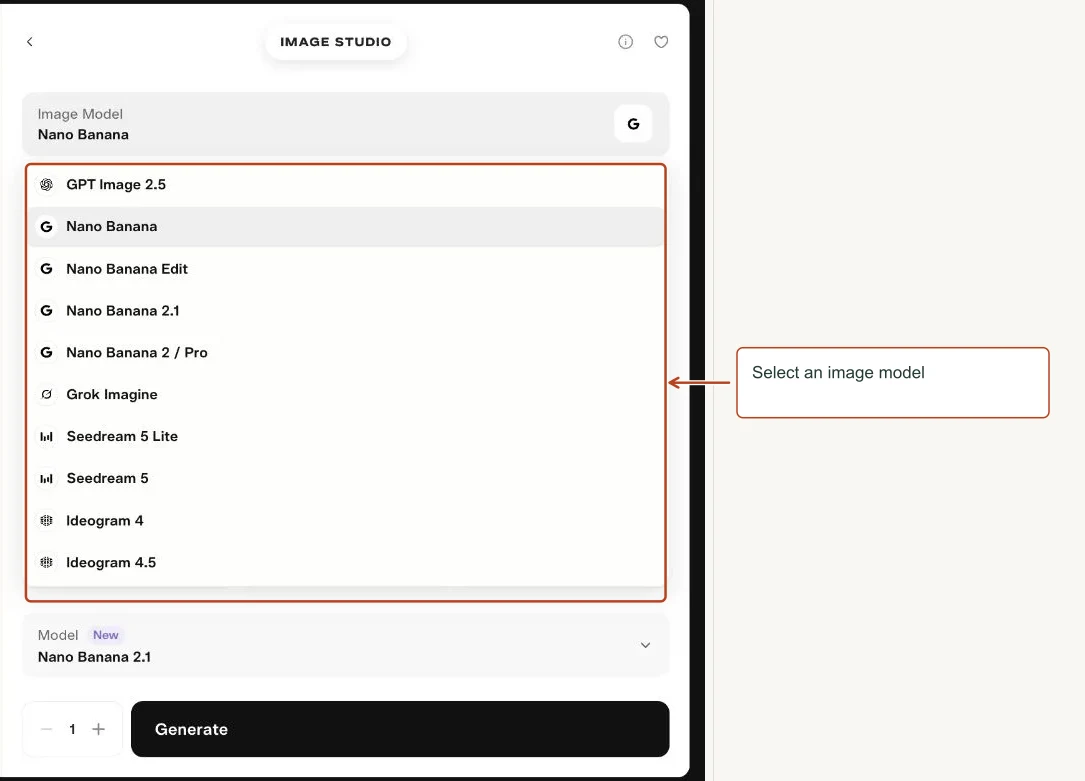
| Image Model | GPT Image 2.5, Nano Banana, Nano Banana Edit, Nano Banana 2.1, Nano Banana 2 / Pro, Grok Imagine, Seedream 5 Lite, Seedream 5, Ideogram 4, Ideogram 4.5 |
| Resolution | Auto, 0.5K, 1K, 2K, 4K |
| Format | PNG, JPEG, WEBP |
| Nano Banana model | Nano Banana 2 Lite Recommended, Nano Banana 2, Nano Banana 2.1 New, Nano Banana Pro |
View screenshots of these menus
Character Studio
Build a reusable character identity and character sheet for later images and videos.
How to use it
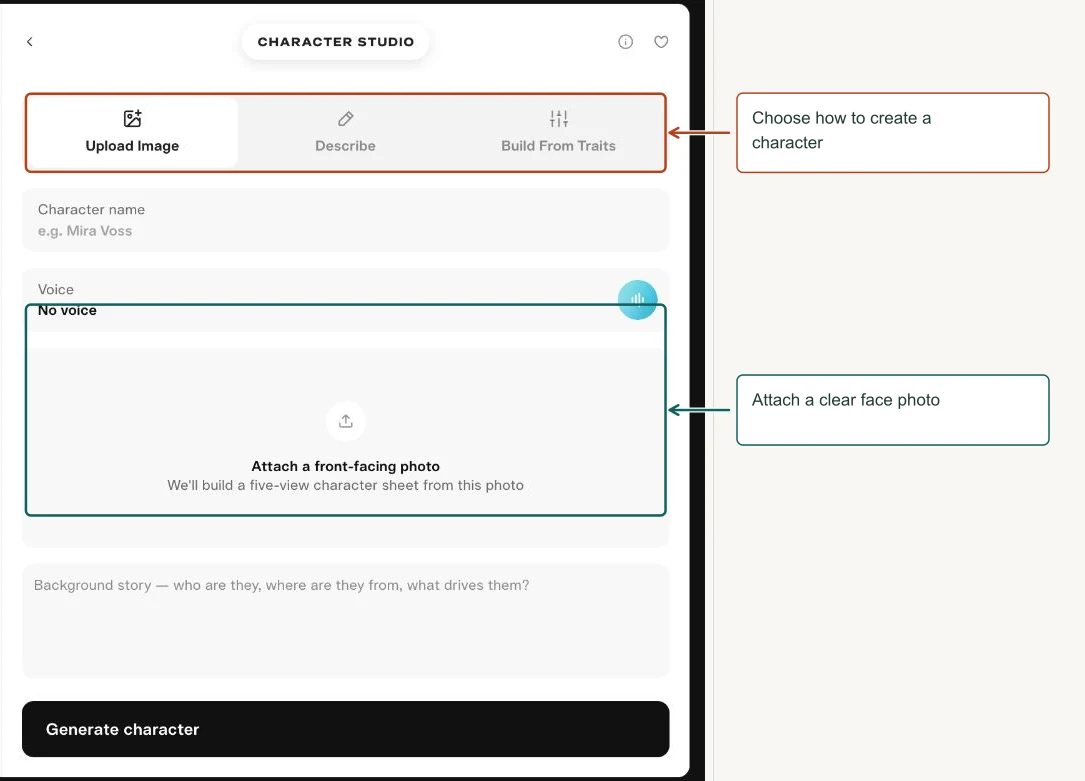
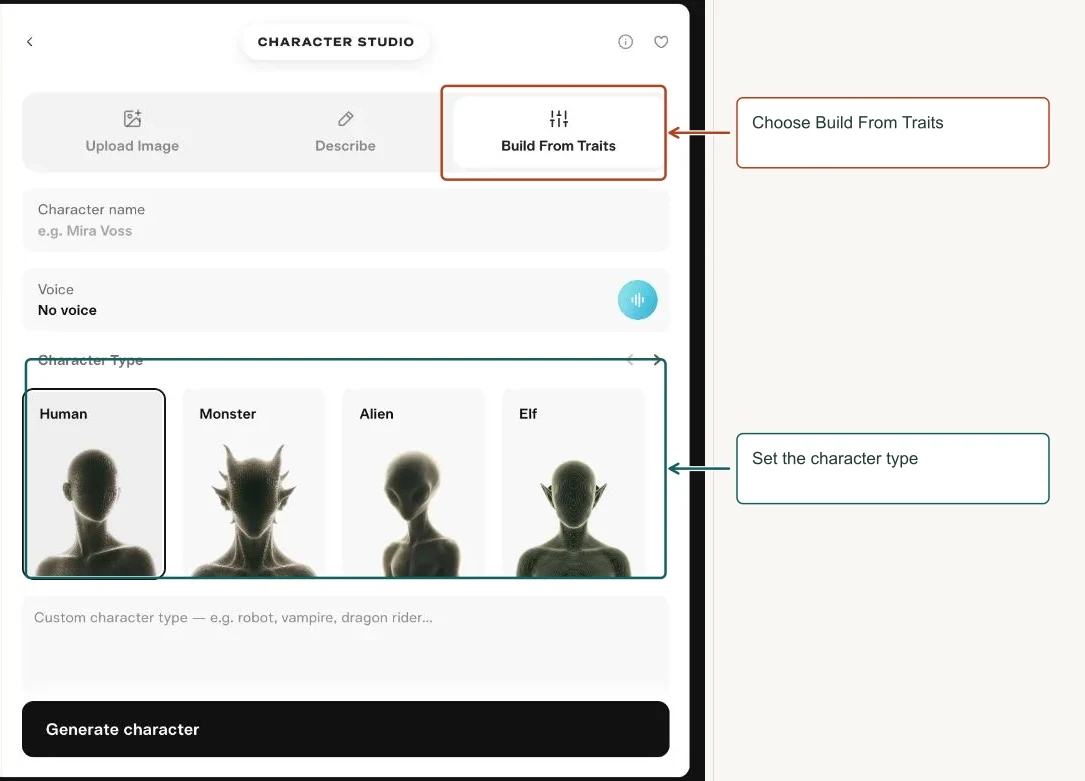
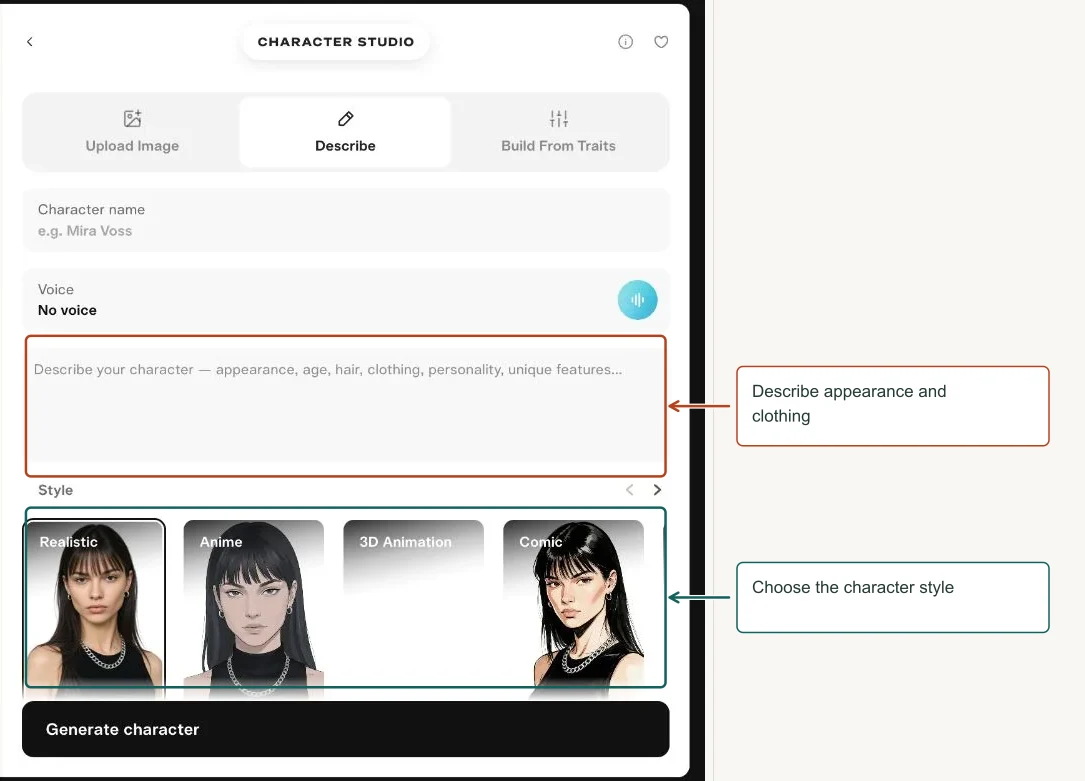
- Choose Upload Image, Describe, or Build From Traits.
- Give the character a memorable name and choose a voice if required.
- Provide the image, description, or traits. Choose the image model.
- Generate the character, inspect the sheet, then reuse it as a reference in other apps.
Controls explained
| Control | What it means |
|---|---|
| Upload Image | Starts from a front-facing photo. The interface describes a five-view character sheet. |
| Character name | Helps distinguish reusable identities. |
| Voice | Associates a voice choice; it does not itself create a talking video. |
| Background story | Adds identity and motivation context in the image-upload workflow. |
| Describe | Accepts appearance, clothing and personality in text. Styles shown include Realistic, Anime, 3D Animation, Comic, Cartoon, GTA, Low Poly 3D and Claymation. |
| Build From Traits | Exposes character type, custom type, gender, ethnicity/origin base, skin and eye color, age, fashion and custom fashion. |
| Image model | Chooses the engine for the sheet; the image-upload and text workflows can use different variants. |
Try this
Mira, an adult fictional bicycle courier with short curly black hair, round glasses, a teal jacket and grey trousers. Friendly expression. Keep the same facial features and clothing across the sheet.
Review tip. A character sheet improves consistency but does not guarantee perfect identity across every generation. Keep the same reference and repeat only the defining traits.
More views of this workflow
Music Studio
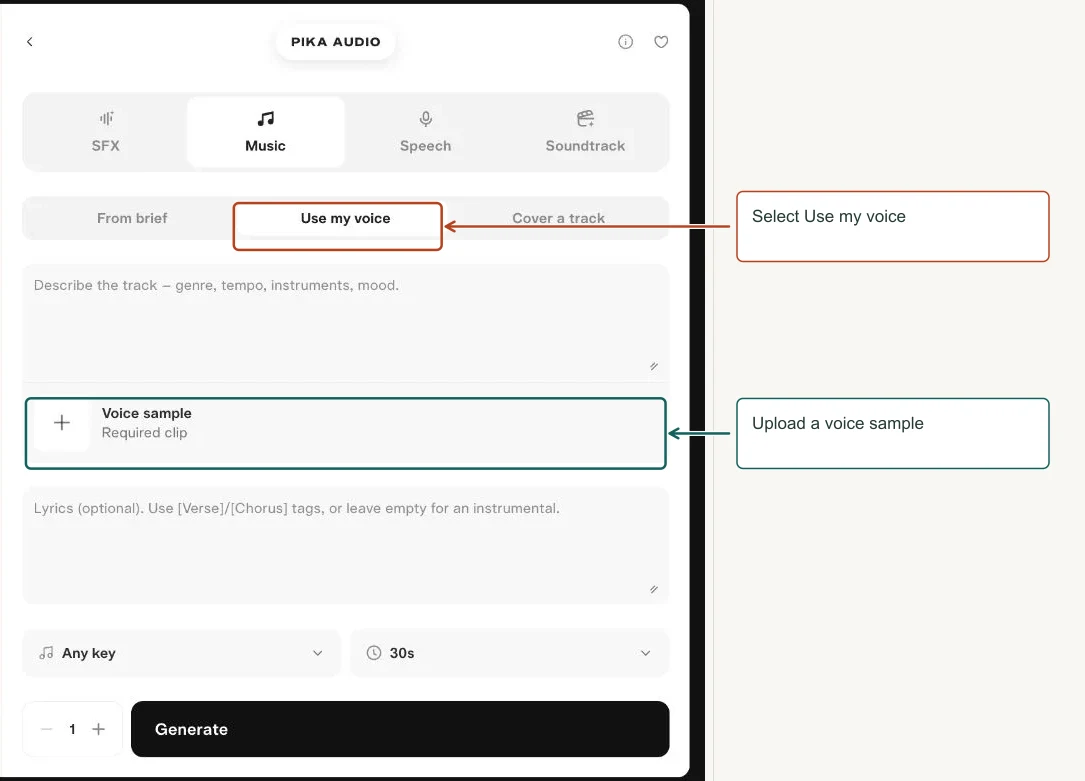
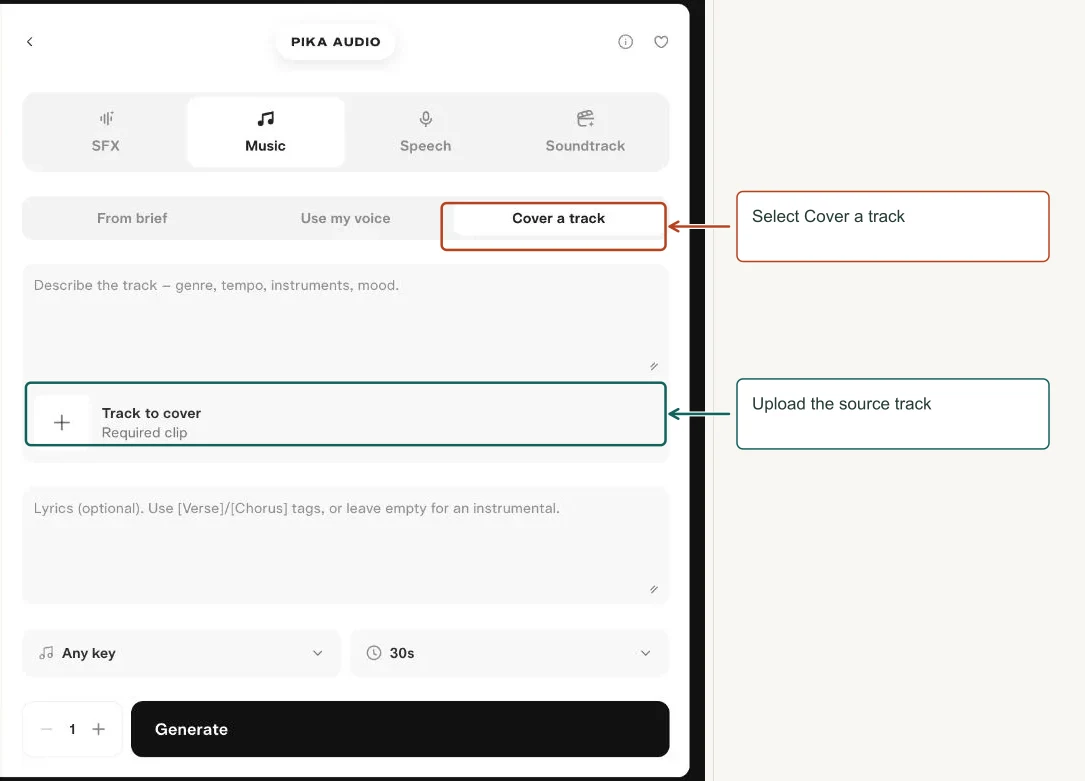
Create a music bed or song from a brief, optionally with lyrics, a musical reference, or a voice sample.
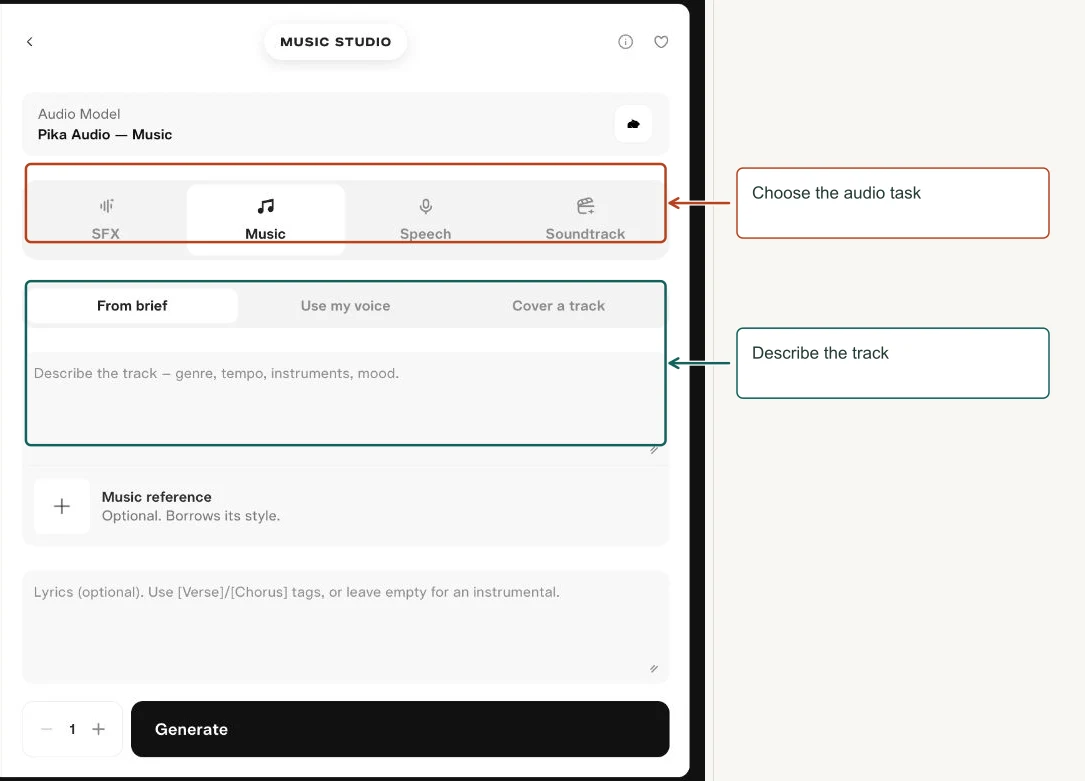
How to use it
- Choose the Audio Model and Music mode where shown.
- Choose From brief, Use my voice, or Cover a track.
- Describe genre, tempo, instruments, mood and structure; add lyrics only if vocals are wanted.
- Set key and length, generate a draft, then listen to the entire track.
Controls explained
| Control | What it means |
|---|---|
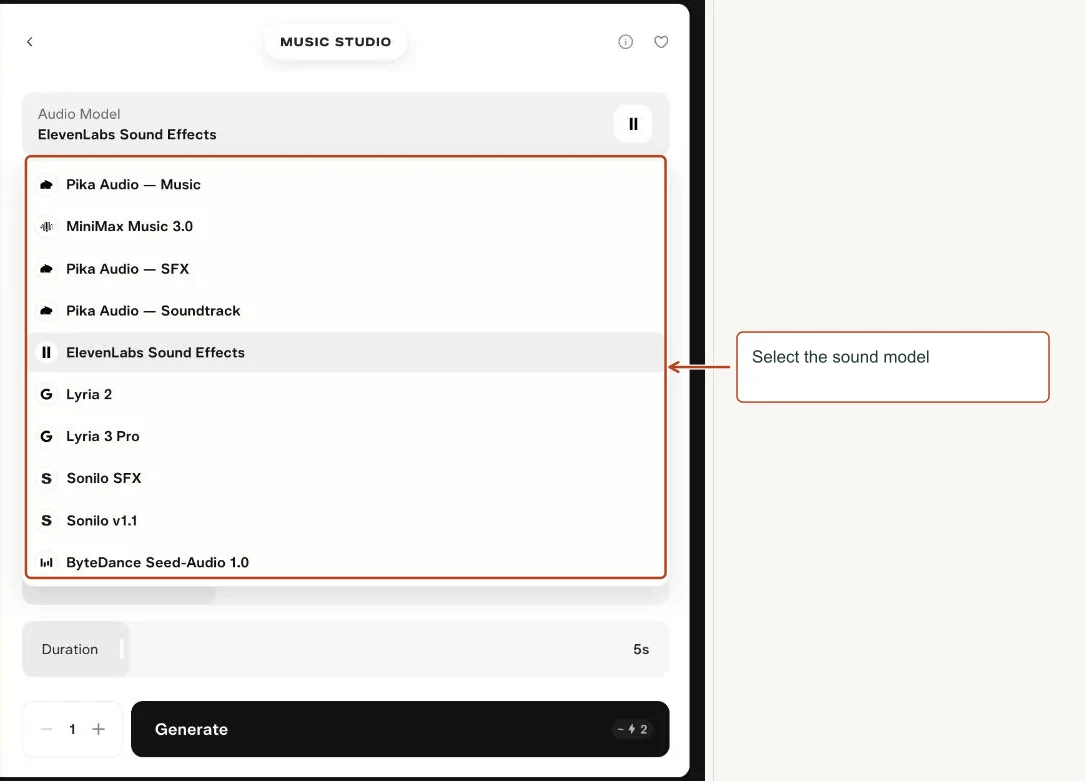
| Audio Model | Selects a music or audio engine; switching can replace the form. |
| Mode | Pika Audio groups SFX, Music, Speech and Soundtrack in one workspace. |
| From brief | Creates from text; an optional reference borrows style. |
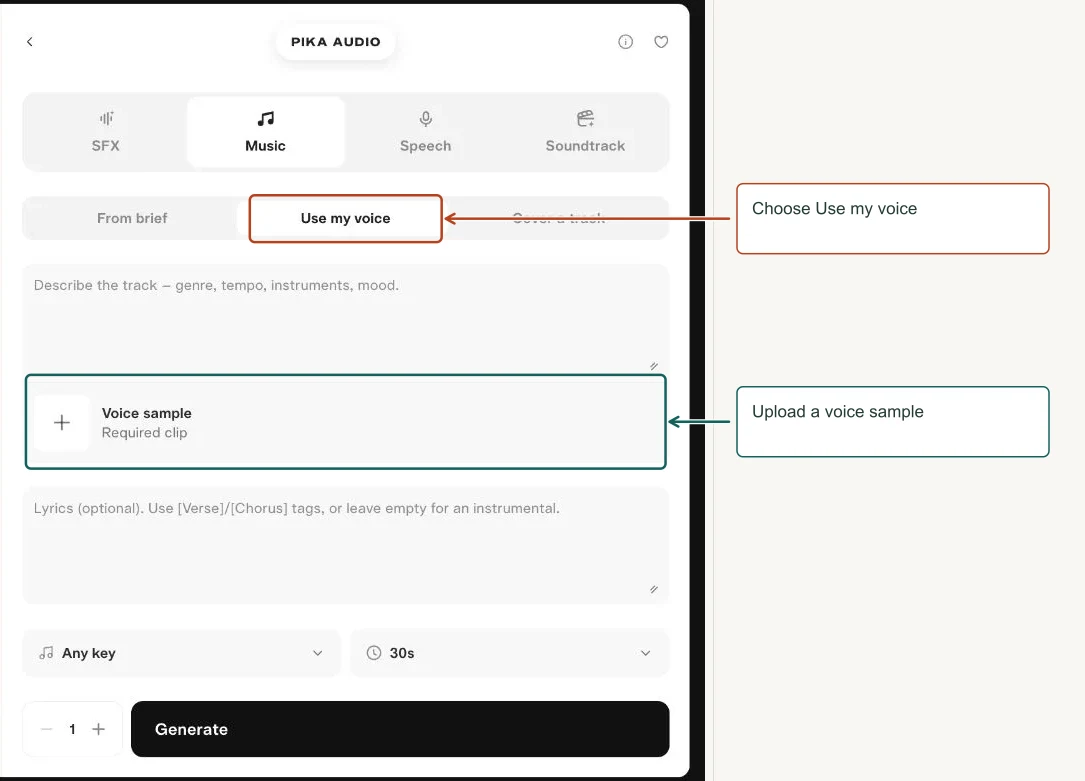
| Use my voice | Requires a voice sample to guide the vocal identity. |
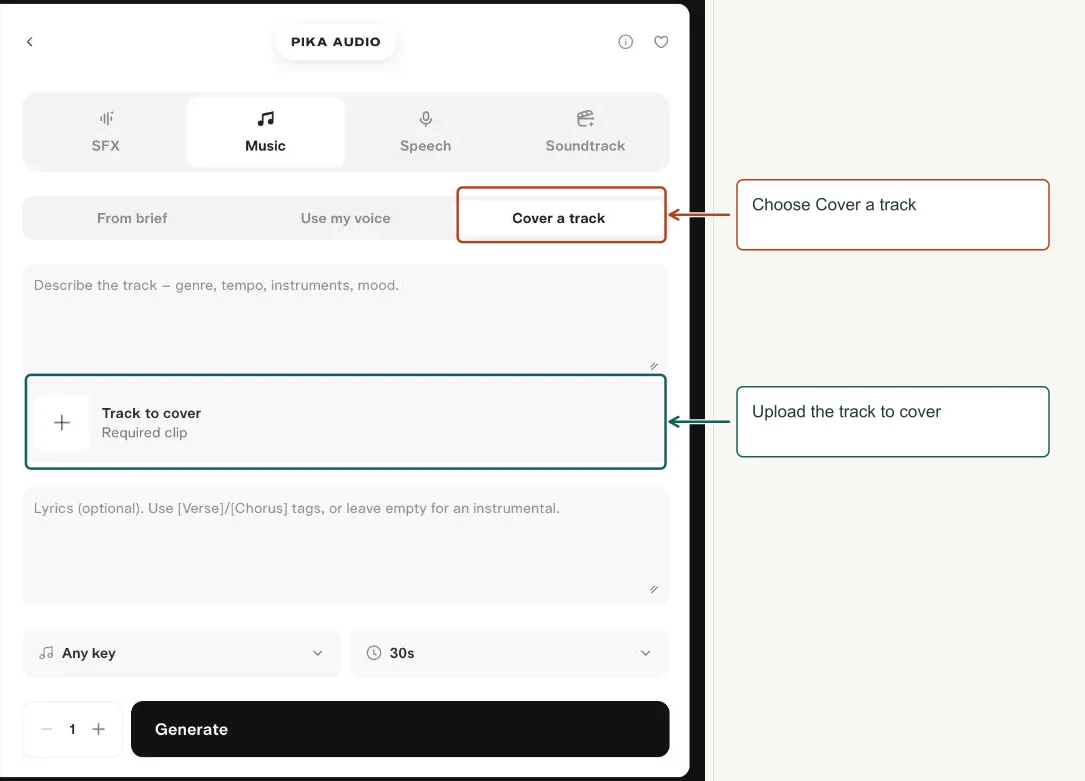
| Cover a track | Requires source audio to reinterpret. |
| Lyrics | Use verse and chorus tags where helpful. The placeholder says leaving it empty produces an instrumental. |
| Key | Musical key; Any key is a useful starting point if you are not matching another track. |
| Length | Requested track length; the pictured setting was 30 seconds. |
Try this
Warm instrumental café music, gentle acoustic guitar, soft brushed percussion, relaxed pace, no vocals, a quiet opening and a clean ending. Leave space for narration.
Review tip. Keep music below speech in the final mix. Use audio you have permission to reuse for voice and cover references.
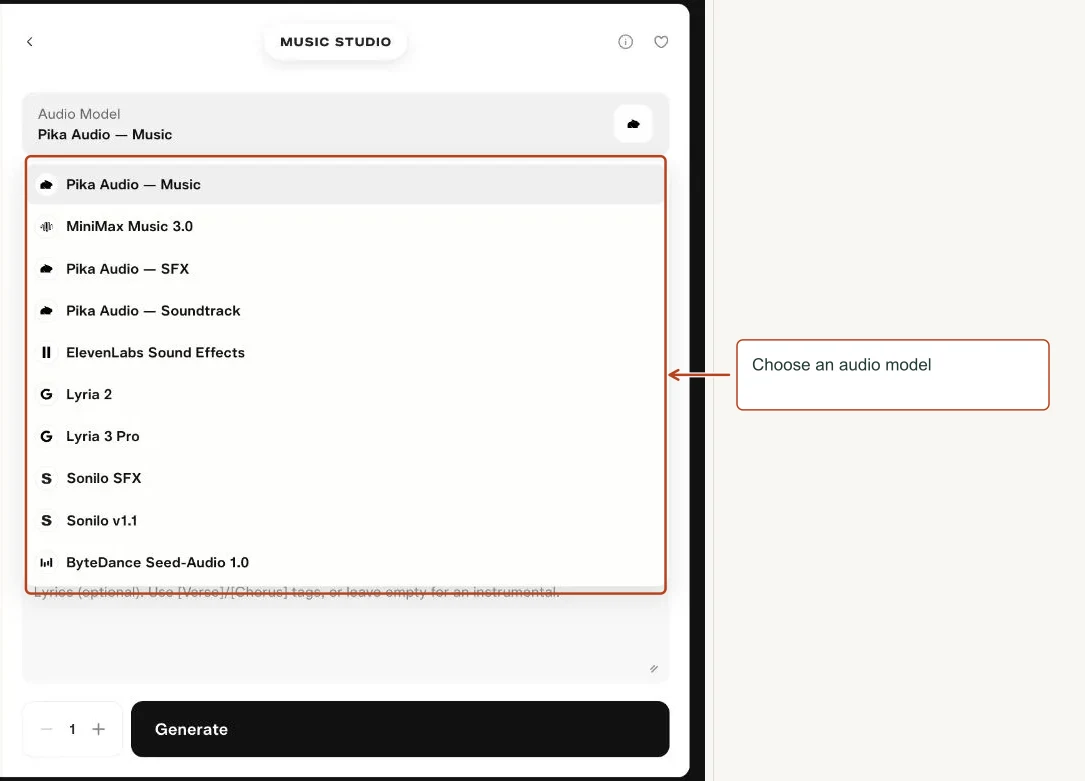
Menu choices
| Menu | Choices shown |
|---|---|
| Audio Model | Pika Audio — Music, MiniMax Music 3.0, Pika Audio — SFX, Pika Audio — Soundtrack, ElevenLabs Sound Effects, Lyria 2, Lyria 3 Pro, Sonilo SFX, Sonilo v1.1, ByteDance Seed-Audio 1.0 |
View screenshots of these menus
More views of this workflow
SFX Studio
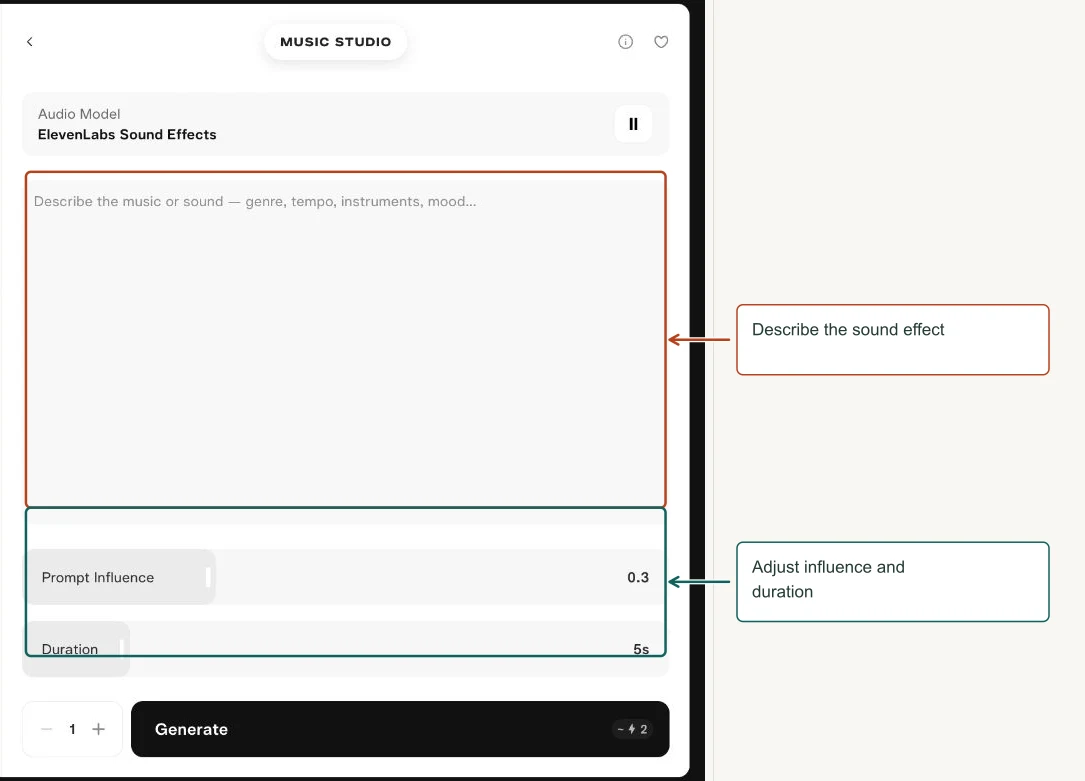
Generate an individual sound effect from a description. The SFX Studio workflow opened a shared page titled Music Studio with ElevenLabs Sound Effects selected.
How to use it
- Open SFX Studio and confirm the Audio Model.
- Describe the sound source, material, action and environment.
- Choose duration and prompt influence, then generate one sample.
- Listen for unwanted music, speech, tails or abrupt endings.
Controls explained
| Control | What it means |
|---|---|
| Audio Model | The pictured setting was ElevenLabs Sound Effects; the same selector includes other audio tools. |
| Prompt | Ask for a sound event rather than a scene alone. |
| Prompt Influence | Controls how strongly the description guides generation. Start near the default, 0.3, and compare results. |
| Duration | Requested length; the screenshot shows 5 seconds. |
| Generations | Number of separate takes requested. |
Try this
Three crisp mechanical button clicks, close microphone, dry quiet room, slight differences between clicks, no music and no speech.
Review tip. The workflow and page heading differ. Identify the selected model and controls, not just the large page title.
Menu choices
| Menu | Choices shown |
|---|---|
| Audio Model | Pika Audio — Music, MiniMax Music 3.0, Pika Audio — SFX, Pika Audio — Soundtrack, ElevenLabs Sound Effects, Lyria 2, Lyria 3 Pro, Sonilo SFX, Sonilo v1.1, ByteDance Seed-Audio 1.0 |
View screenshots of these menus
Speech Studio
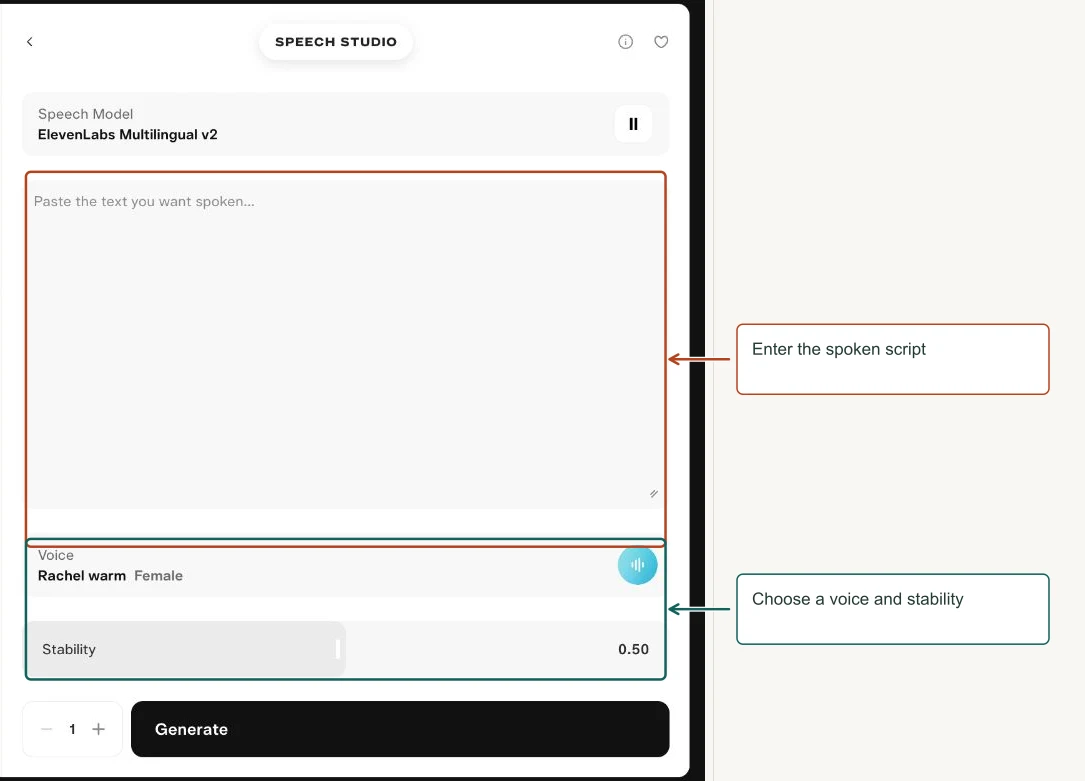
Turn a written script into narration. Speech Studio lets you switch speech engines in one place.
How to use it
- Choose Speech Model.
- Paste the words to be spoken in Script.
- Choose a voice and, when available, Stability.
- Generate a short test, check pronunciation, then produce the full narration.
Controls explained
| Control | What it means |
|---|---|
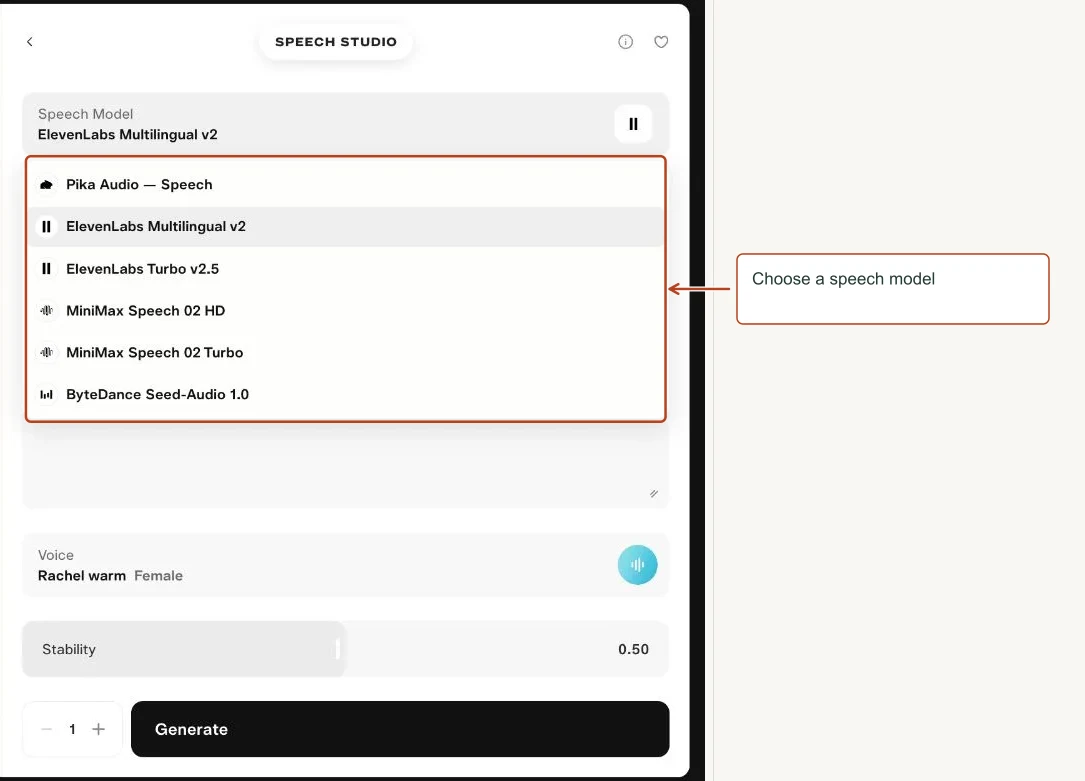
| Speech Model | The menu includes Pika Audio Speech, ElevenLabs Multilingual v2, ElevenLabs Turbo v2.5, MiniMax Speech 02 HD, MiniMax Speech 02 Turbo and ByteDance Seed-Audio 1.0. |
| Script | Contains the spoken words. Avoid mixing production notes into the script unless the engine explicitly supports them. |
| Voice | Chooses the speaker’s sound. The screenshot shows Rachel as the default for ElevenLabs. |
| Stability | Adjusts delivery consistency versus variation. The pictured setting was 0.50; use a short test before changing it widely. |
Try this
Take a breath. Your next idea can start with one image, one sentence, and one small experiment.
Review tip. Spell unusual names phonetically if needed and use punctuation to guide pauses. Listen rather than assuming the text was pronounced correctly.
Menu choices
| Menu | Choices shown |
|---|---|
| Speech Model | Pika Audio — Speech, ElevenLabs Multilingual v2, ElevenLabs Turbo v2.5, MiniMax Speech 02 HD, MiniMax Speech 02 Turbo, ByteDance Seed-Audio 1.0 |
View screenshots of these menus
Editing tools
The following chapters document the controls in this group. Screenshots show one configuration; choosing another mode or model can reveal different settings.
- Motion Transfer
- Relight Media
- Pika Soundtrack
- Upscale Image
- Upscale Video
- Extend Video
- Edit Image
- Color Grade
- Trim Video
- Camera Director
- Swap Anything
Motion Transfer
Animate a character using the movement in another video.
How to use it
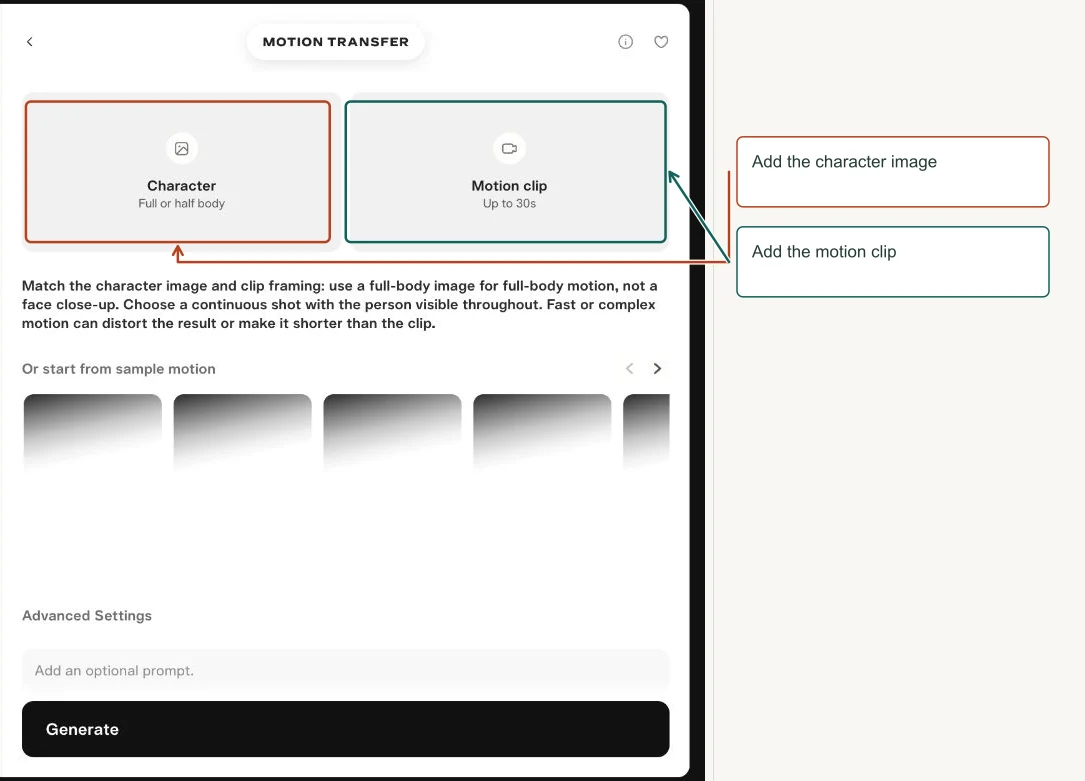
- Choose a character image and a motion clip, or select a sample motion.
- Match the framing of the image to the body shown in the video.
- Set Character Pose, sound and resolution; optionally add a prompt.
- Generate and inspect the body throughout the motion.
Controls explained
| Control | What it means |
|---|---|
| Character | Full- or half-body source image; match the reference clip’s framing. |
| Motion clip | Supplies movement. The panel labels a limit of up to 30 seconds. |
| Sample motions | Preset motion references for exploration. |
| Prompt | Optional extra direction. |
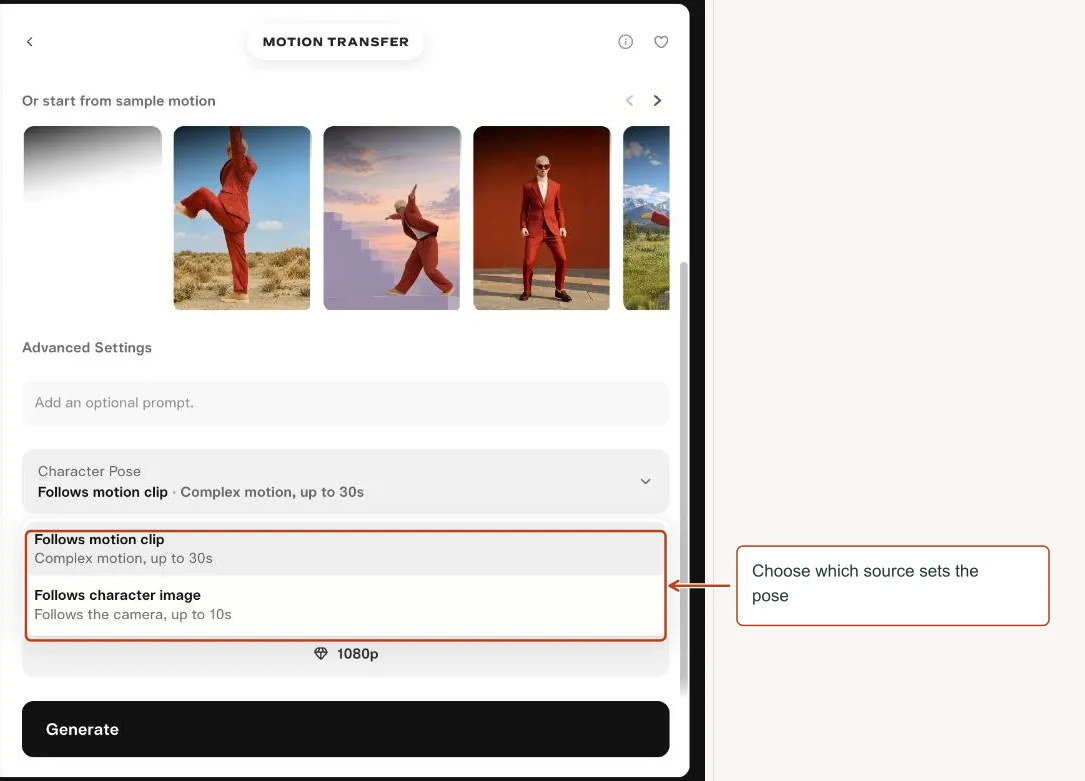
| Character Pose | Follows motion clip or Follows character image; choose which source anchors the pose/framing. |
| Sound | Keeps the original clip’s sound when enabled. |
| Resolution | Controls output size; 1080p was shown. |
Try this
Preserve the teal jacket and the character’s face. Follow the relaxed arm movements from the reference. Keep the background simple.
Review tip. Fast or complex motion may distort the result or shorten it. Start with one person, one continuous shot and a clearly visible body.
Menu choices
| Menu | Choices shown |
|---|---|
| Character Pose | Follows motion clip, Follows character image |
View screenshots of these menus
Relight Media
Change the lighting of a photo or video with presets, manual light controls, or a written direction.
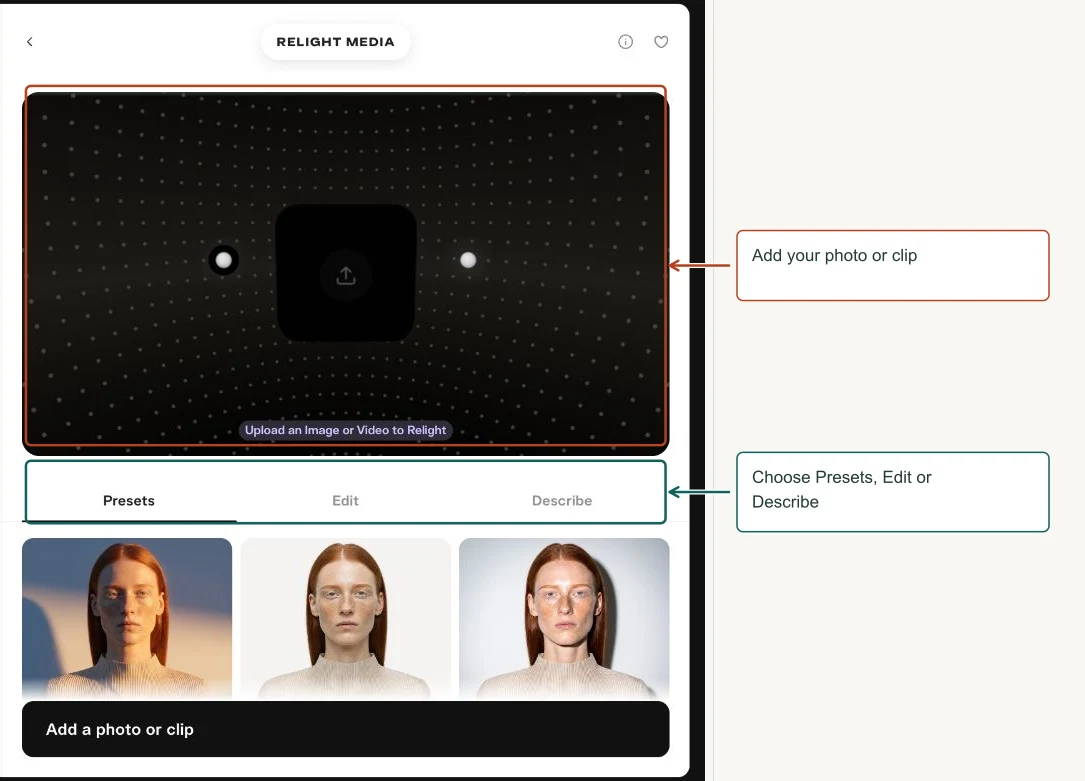
How to use it
- Add a photo or clip.
- Try a preset to establish the look.
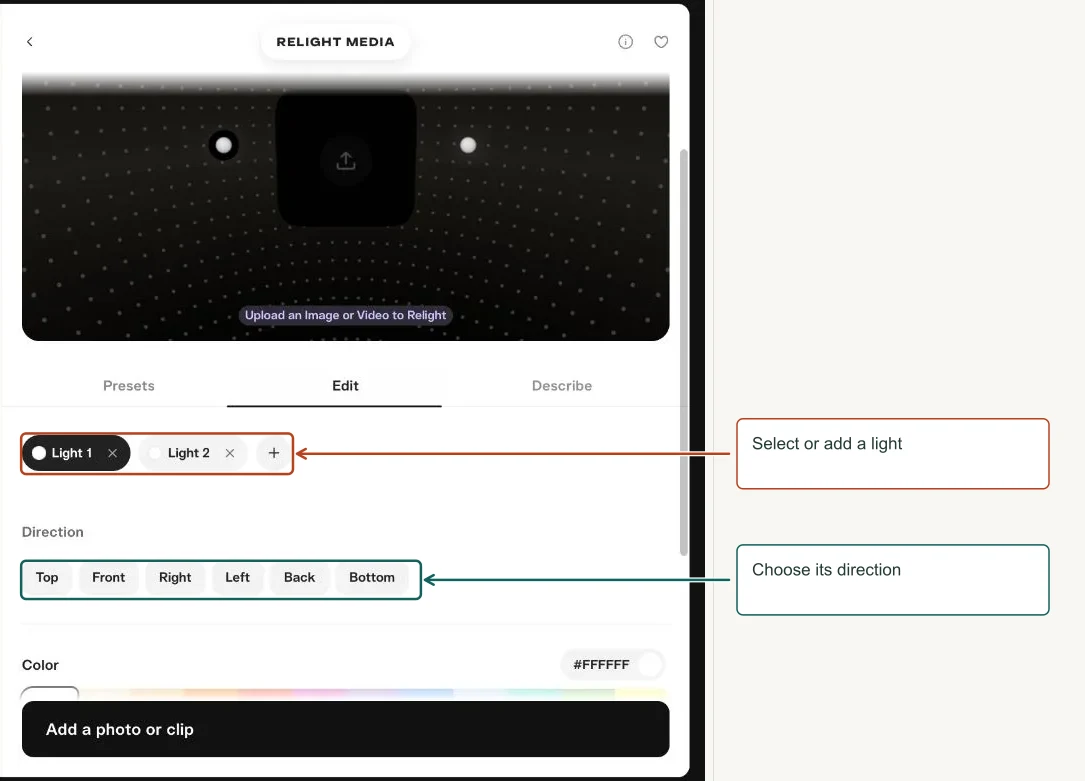
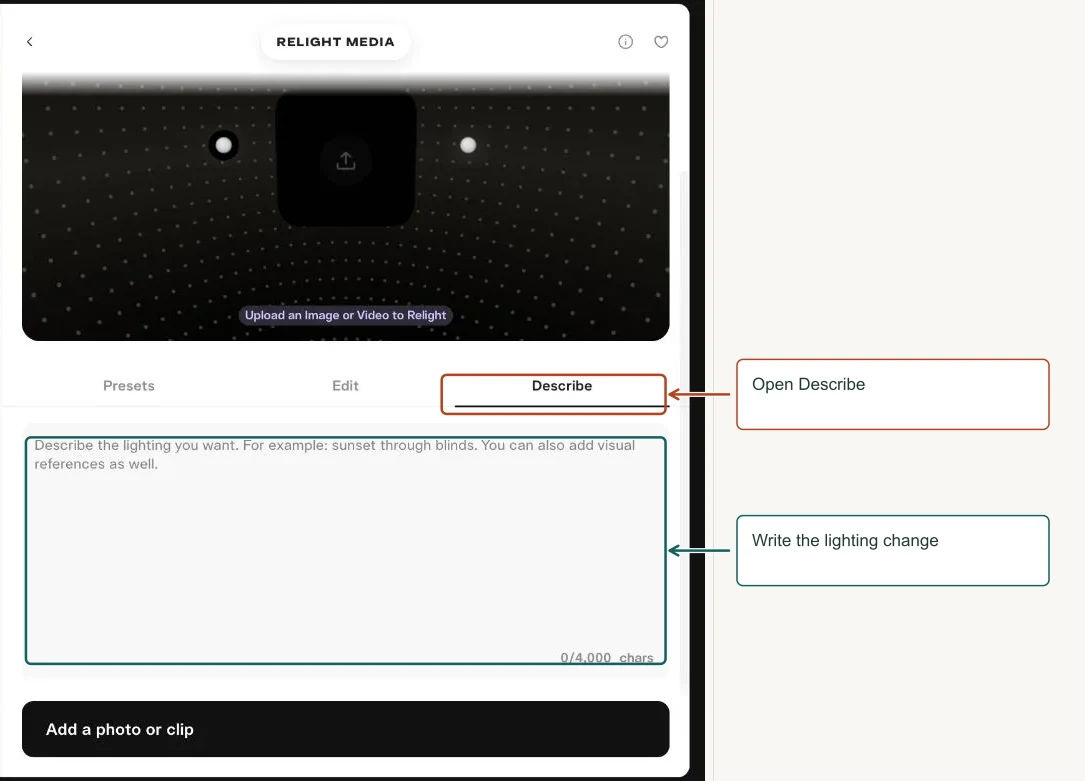
- Use Edit for direction, color and softness, or Describe for a text brief.
- Generate and compare the result with the source.
Controls explained
| Control | What it means |
|---|---|
| Presets | Golden Hour, Softbox, Hard Flash, Window, Neon Night, Moonlight, Back Light and Spotlight provide starting looks. |
| Edit | Select a light, add or remove lights, then adjust its properties. |
| Direction | Top, Front, Right, Left, Back and Bottom control where the light comes from. |
| Color | Preset swatches or a custom color tint the light. |
| Brightness | Controls the light’s intensity. |
| Diffuse | Controls softness and spread; start with moderate values for flattering light. |
| Describe | Use plain language to describe the desired lighting; the displayed limit was 4,000 characters. |
Try this
Warm window light from the left, a gentle cool fill from the right, soft shadows, preserve natural skin tones and the original background.
Review tip. Relighting changes the appearance of illumination. Color Grade is the more direct choice when you mainly want contrast, saturation or color balance.
More views of this workflow
Pika Soundtrack
Generate a soundtrack guided by an existing video, including mood and sound events.
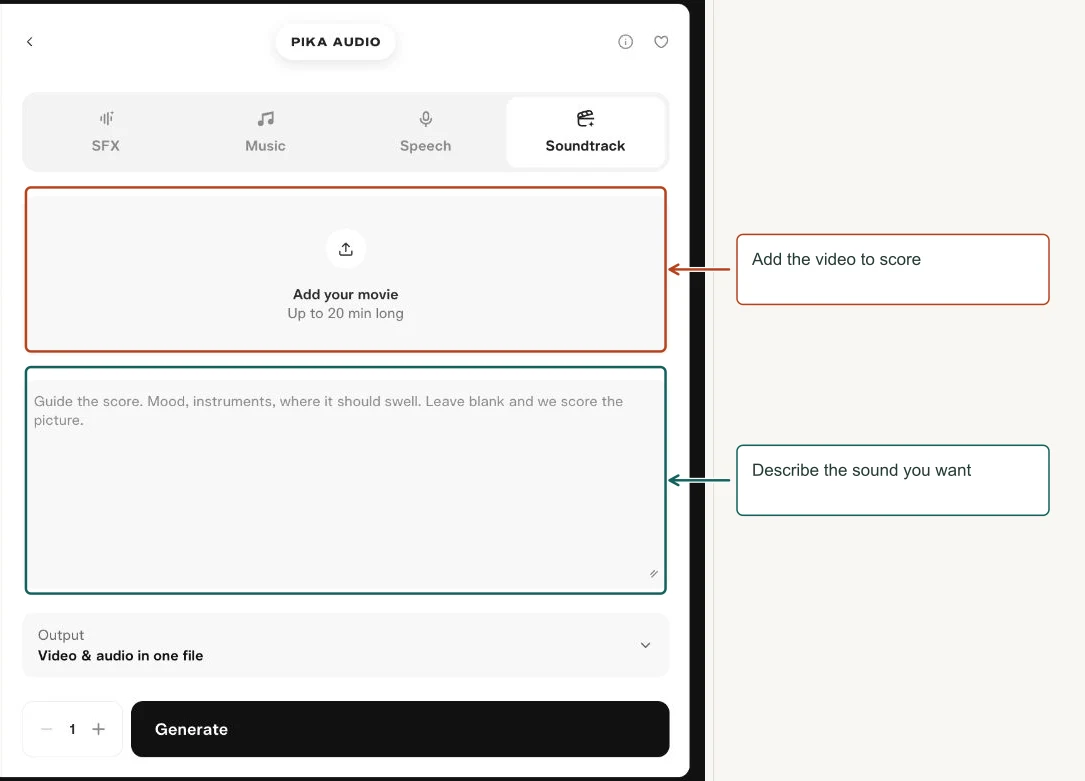
How to use it
- Choose the source video.
- Leave Instruction blank for automatic scoring, or describe the intended sound.
- Keep the supported output format selected.
- Generate and check if the sounds follow the visible action.
Controls explained
| Control | What it means |
|---|---|
| Mode | Soundtrack sits inside the shared Pika Audio workspace. |
| Source video | The form advertises clips up to 20 minutes; check active validation for your file. |
| Instruction | Guides mood, instruments and where the score should build. |
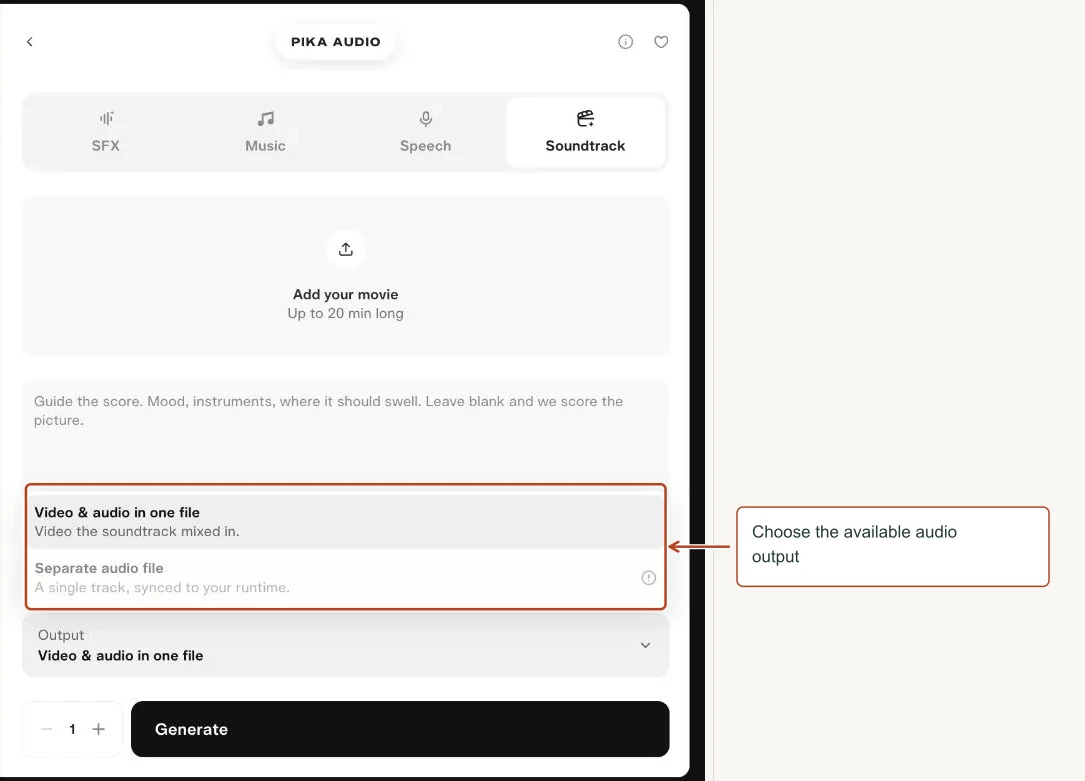
| Output | Video & audio in one file was available. Separate audio was explicitly marked as coming, not a usable option. |
Try this
Gentle café ambience, subtle cup and table sounds, warm sparse guitar. No spoken words. Keep the music quiet and let the pouring sound be clear.
Review tip. Treat the result as a new scored version. Compare original audio and timing before replacing anything in your edit.
Menu choices
| Menu | Choices shown |
|---|---|
| Output | Video & audio in one file, Separate audio file Pika Audio returns the scored clip; a separate track is coming. |
View screenshots of these menus
Upscale Image
Increase the pixel dimensions of an image and optionally restore detail.
How to use it
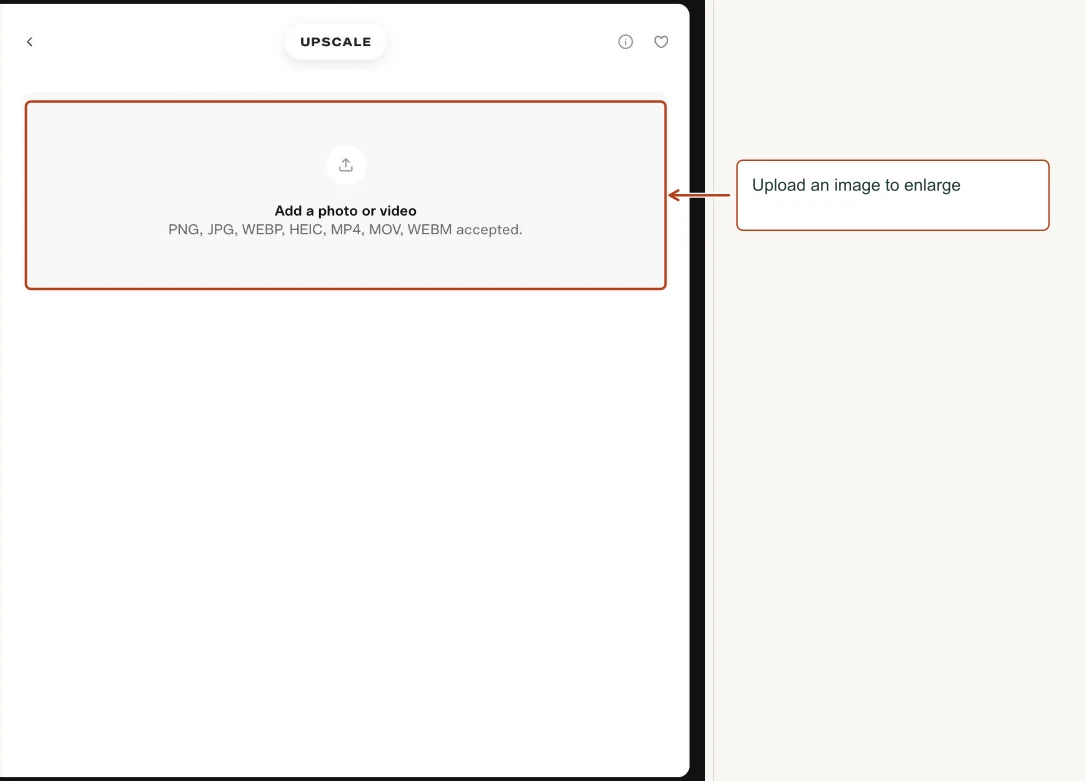
- Add an image from the picker.
- Choose an image model and output format.
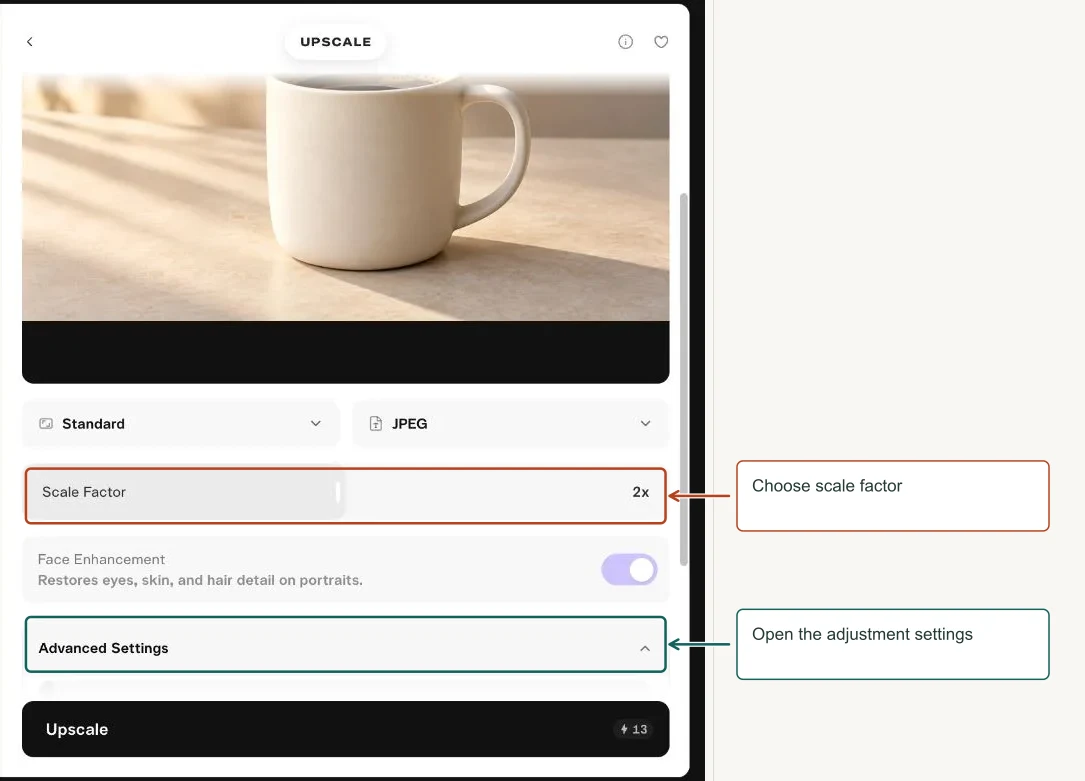
- Set Scale Factor and review Face Enhancement and Advanced Settings.
- Upscale only after approving the composition.
Controls explained
| Control | What it means |
|---|---|
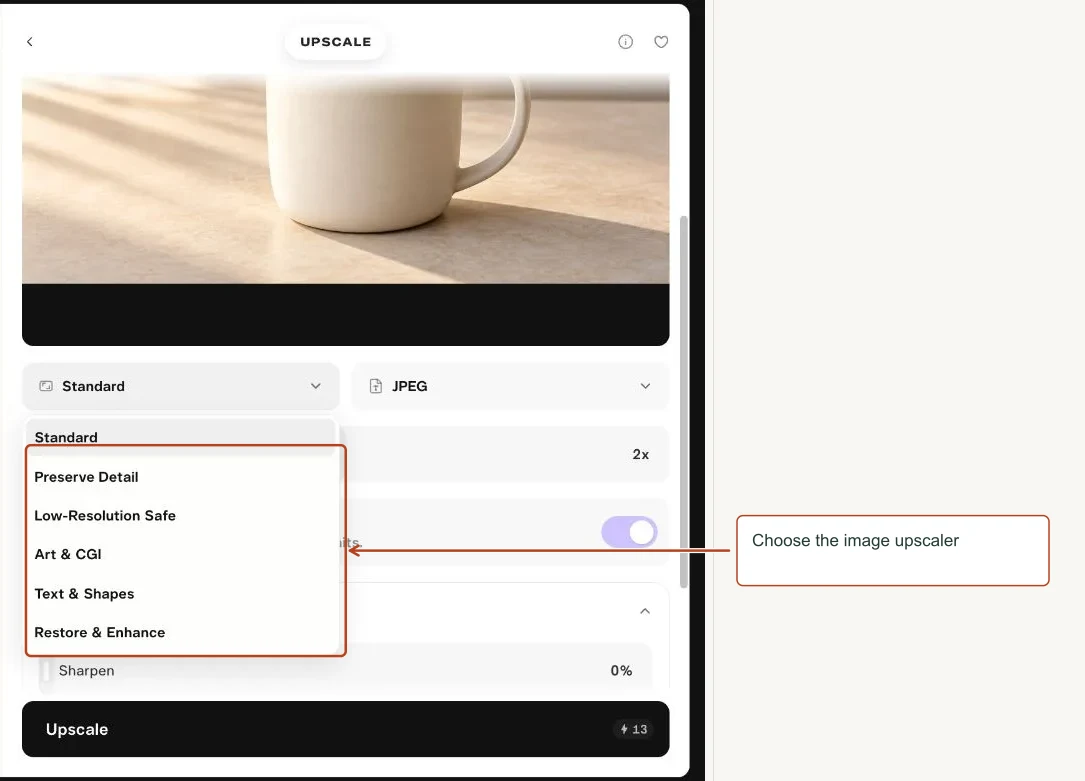
| Select Model | Standard, Preserve Detail, Low-Resolution Safe, Art & CGI, Text & Shapes and Restore & Enhance were shown. Match the category to your source. |
| Output format | Select a format appropriate for the destination; the pictured setting was JPEG. |
| Scale Factor | Sets enlargement, such as the pictured 2× setting. |
| Face Enhancement | Restores portrait details; inspect identity and texture carefully. |
| Sharpen | Increases edge definition. Too much can create halos. |
| Smooth | Reduces roughness; too much can erase texture. |
| Fix compression | Targets blocky or compressed-looking artifacts. |
Try this
Practice with a finished product image: 2× enlargement, a conservative model, and minimal sharpening. Compare the label edges before and after.
Review tip. Upscaling can invent plausible detail. It does not recover the true original information with certainty.
More views of this workflow
Upscale Video
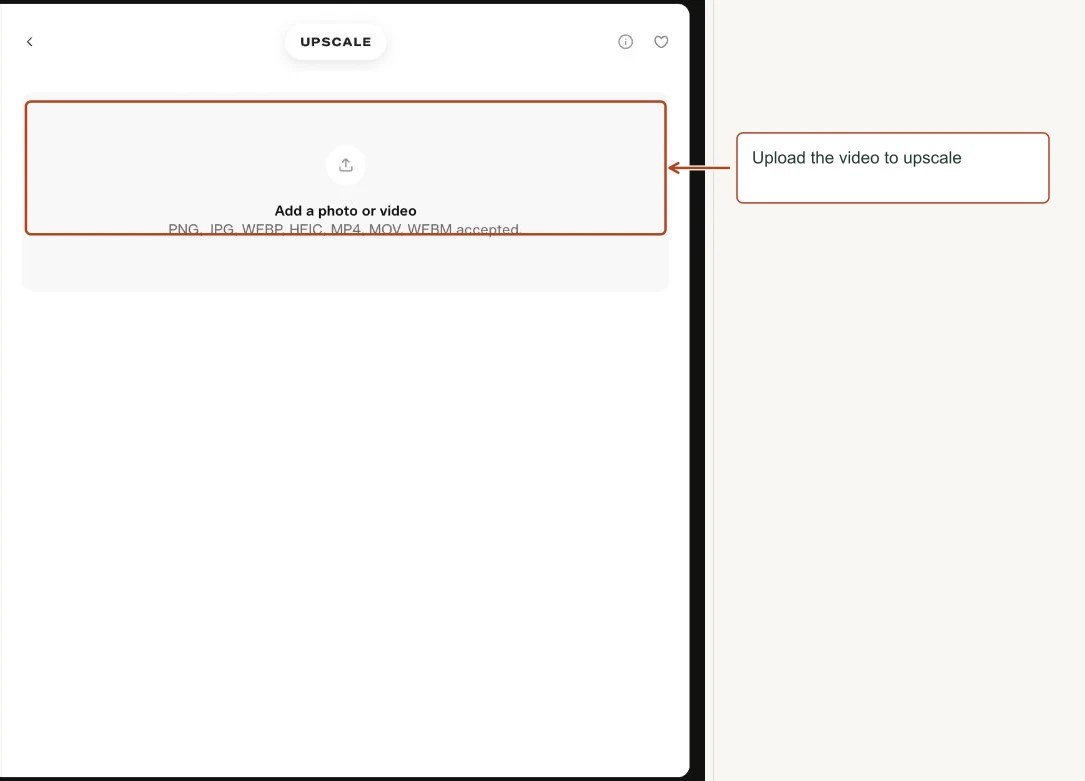
Increase video resolution with restoration models.
How to use it
- Add a clip.
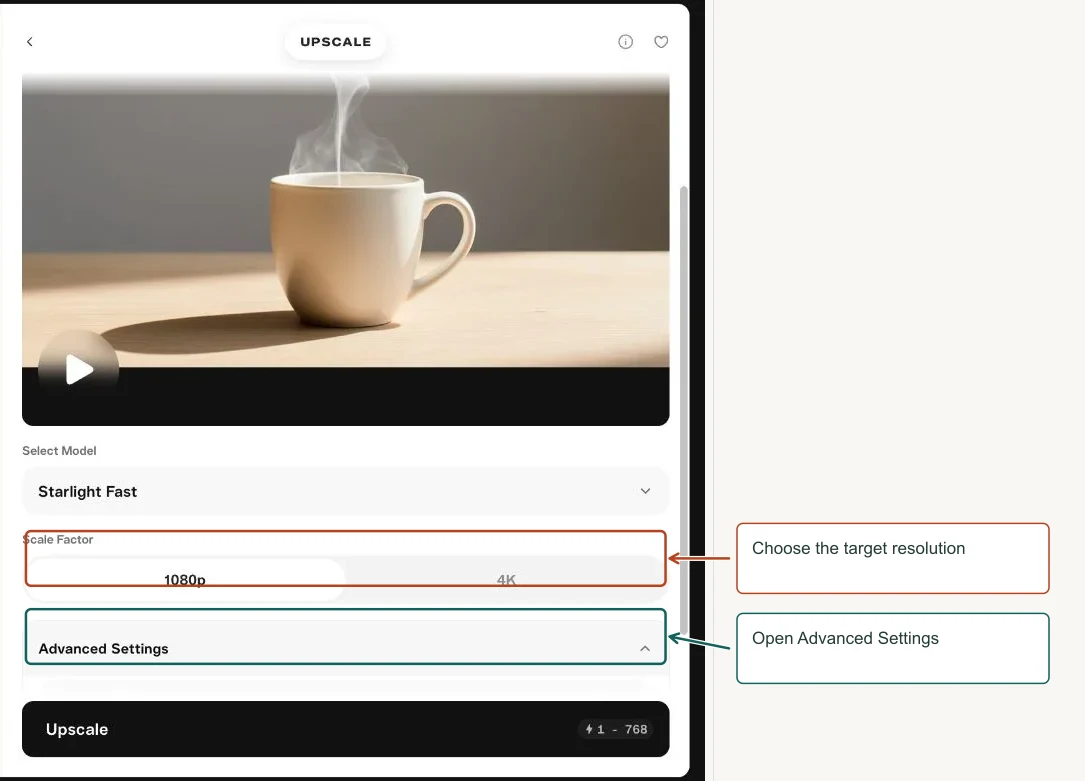
- Choose a model and 1080p or 4K output.
- Review advanced compatibility settings and the credit estimate.
- Upscale the selected final take, then inspect motion and fine details.
Controls explained
| Control | What it means |
|---|---|
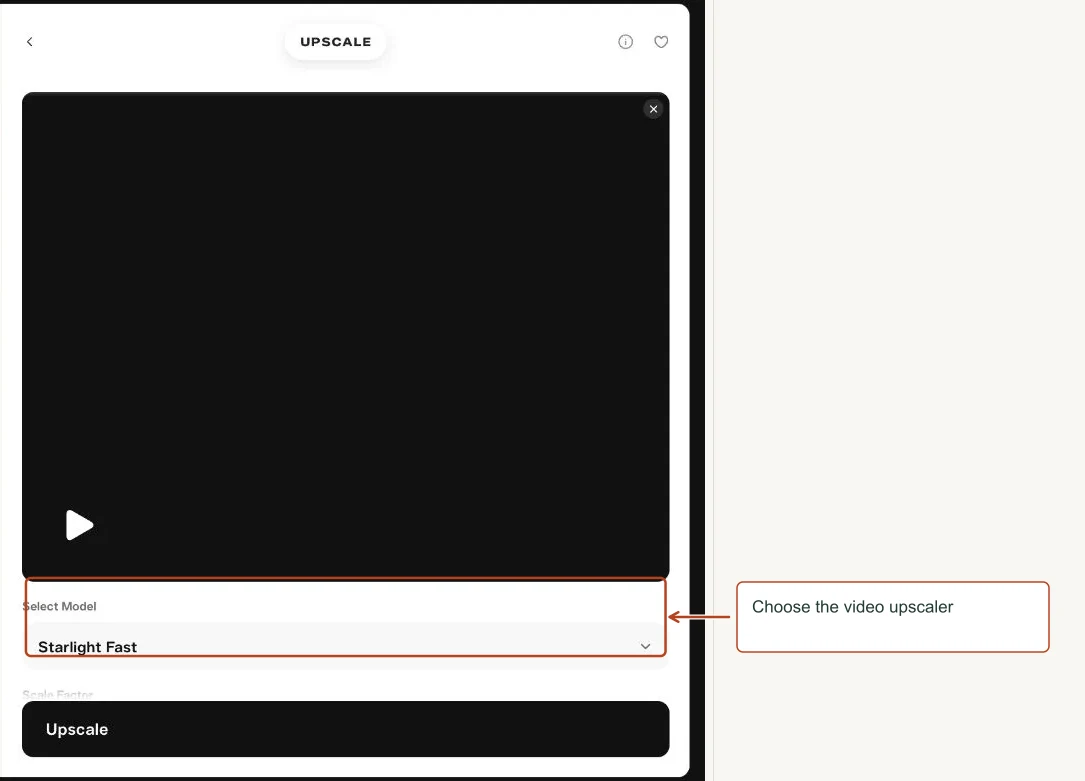
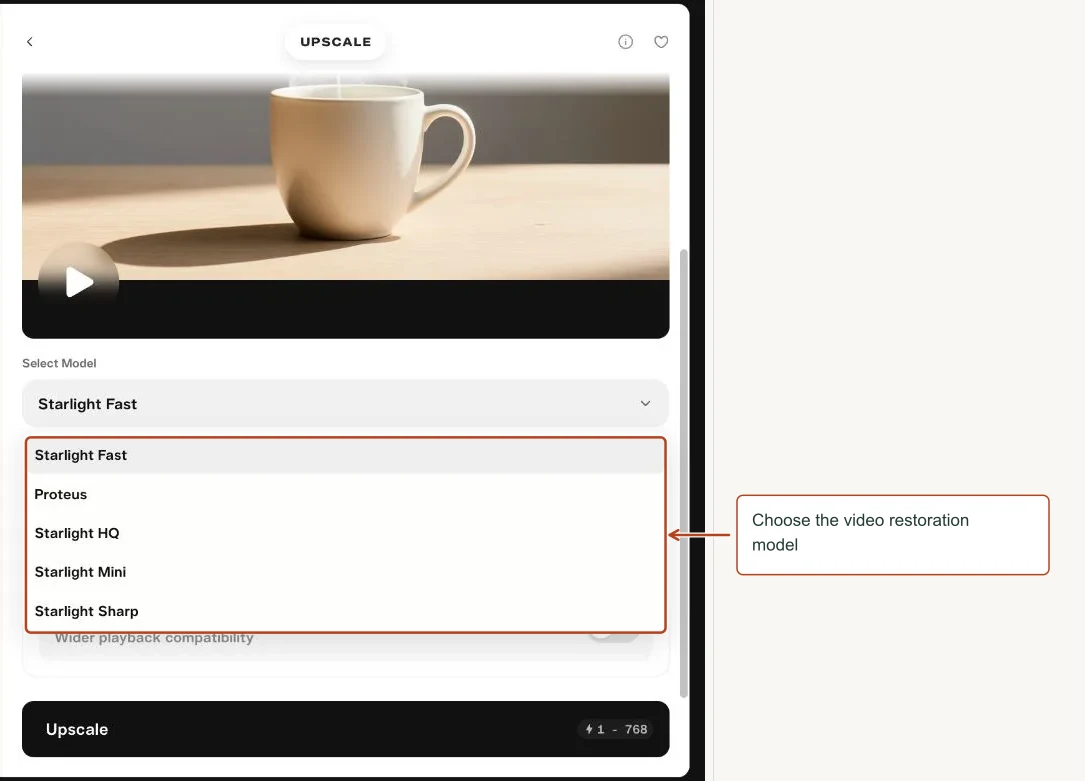
| Select Model | Starlight Fast, Proteus, Starlight HQ, Starlight Mini and Starlight Sharp appeared in the menu. |
| Scale factor | The video form expressed this as target resolution: 1080p or 4K. |
| Advanced Settings | Available controls depend on model. The pictured Starlight Fast panel exposed H.264 output. |
| H.264 output | The interface describes wider playback compatibility. |
| Upscale cost | The displayed estimate can be a wide range until the clip and settings are resolved. |
Try this
Use a short finished clip as a comparison test. Check text, faces, edges and moving objects at the destination resolution.
Review tip. Model names are choices, not a guarantee that the most expensive model is best for every clip. Choose a model to see its available adjustment controls.
More views of this workflow
Extend Video
Generate additional action beyond the end of an existing video.
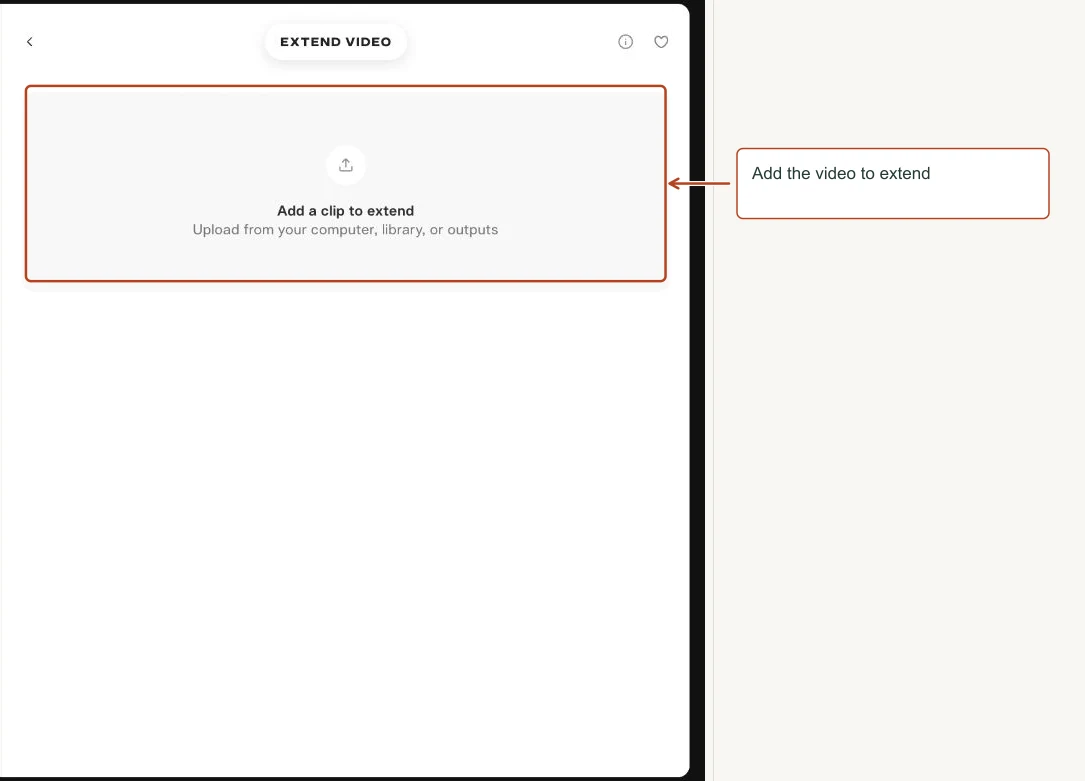
How to use it
- Choose a source clip.
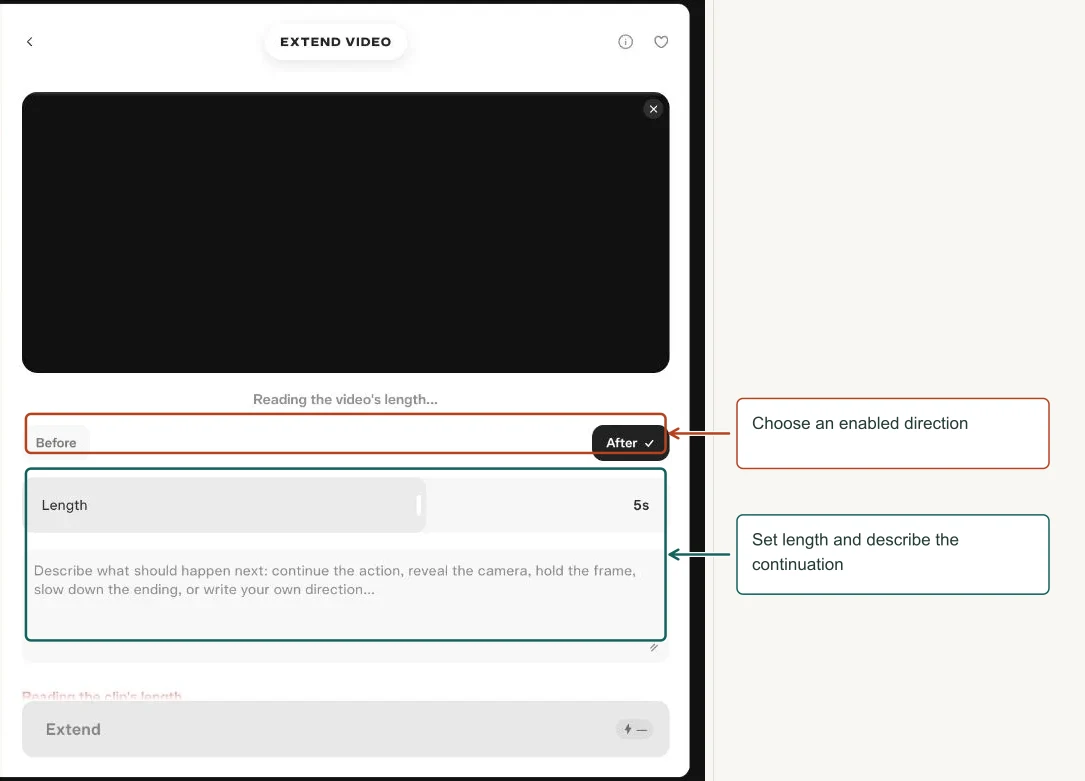
- Wait for its length to be read.
- Select a supported direction and extension length, then describe what happens next.
- Review the join between the original and generated footage.
Controls explained
| Control | What it means |
|---|---|
| Where | Before and After were shown; Before was disabled in the pictured state. |
| Length | Amount of additional footage requested, not the original clip length. |
| Prompt | Describes continuation, camera movement, a reveal or a held ending. |
| Extend | Starts a generation once the source and required metadata are ready. |
Try this
Continue the slow camera push-in. The mug remains fixed on the table while steam rises gently. End with a two-second still hold.
Review tip. Wait for the clip length to load, then choose an enabled direction and duration.
More views of this workflow
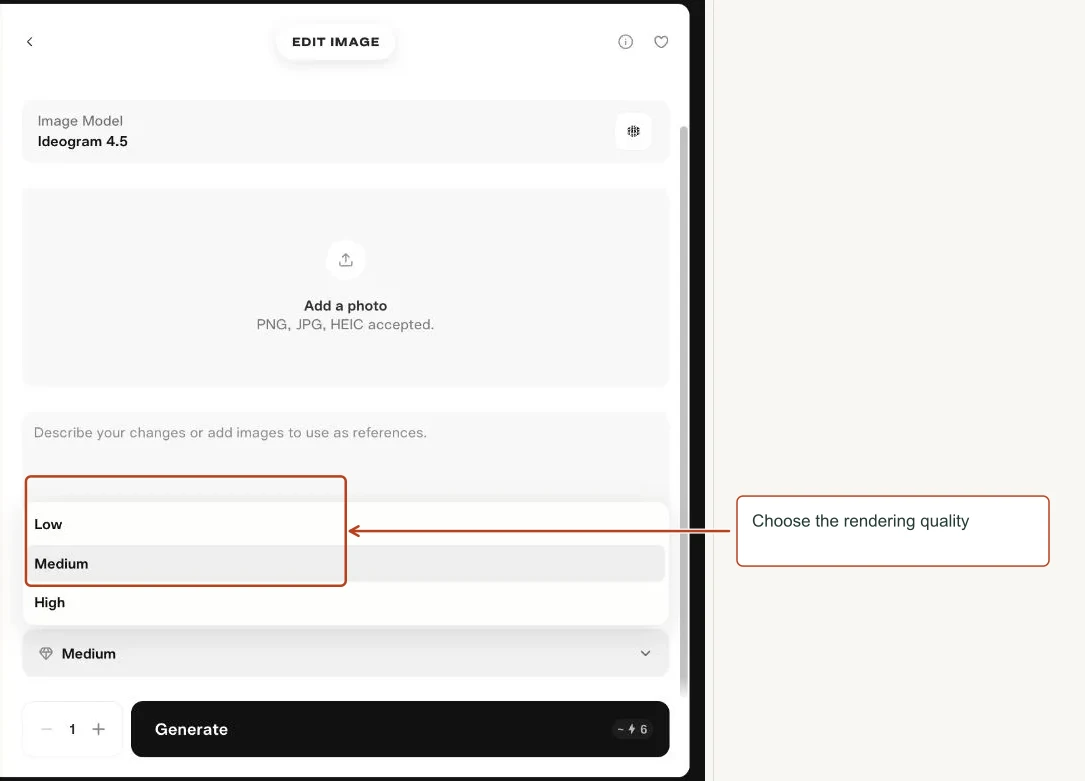
Edit Image
Modify an existing image, expand its canvas, or move to an upscale workflow.
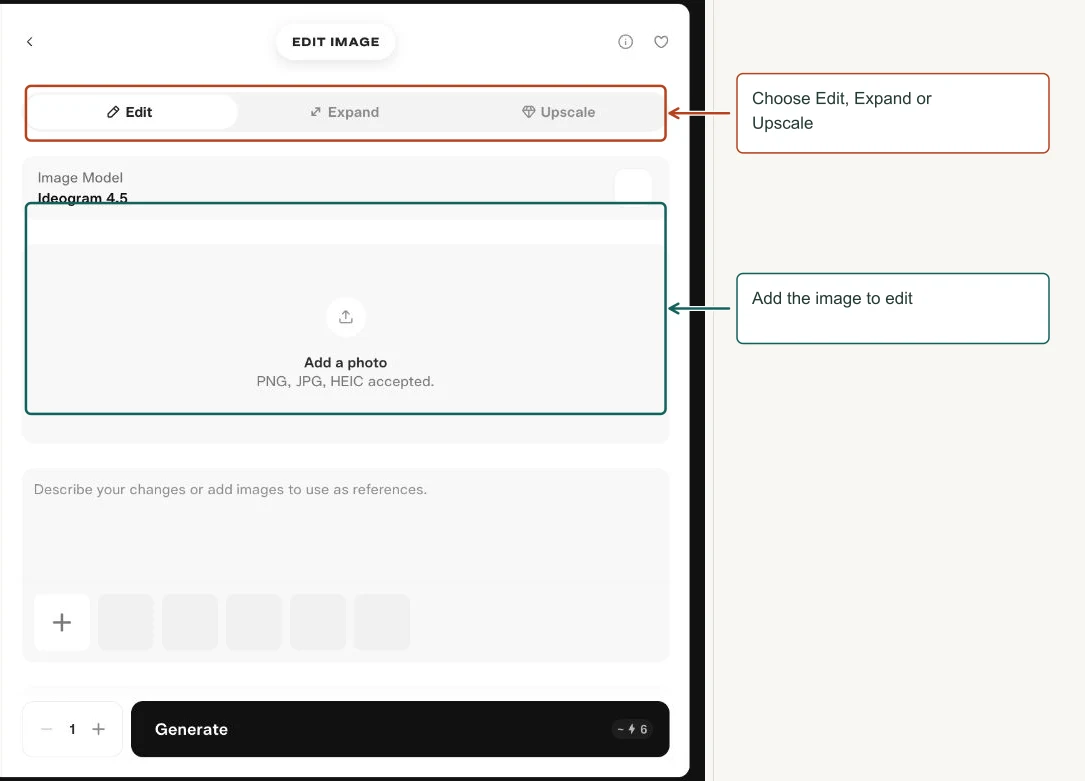
How to use it
- Choose Edit, Expand or Upscale.
- For Edit, select the image and add instructions; attach references if needed.
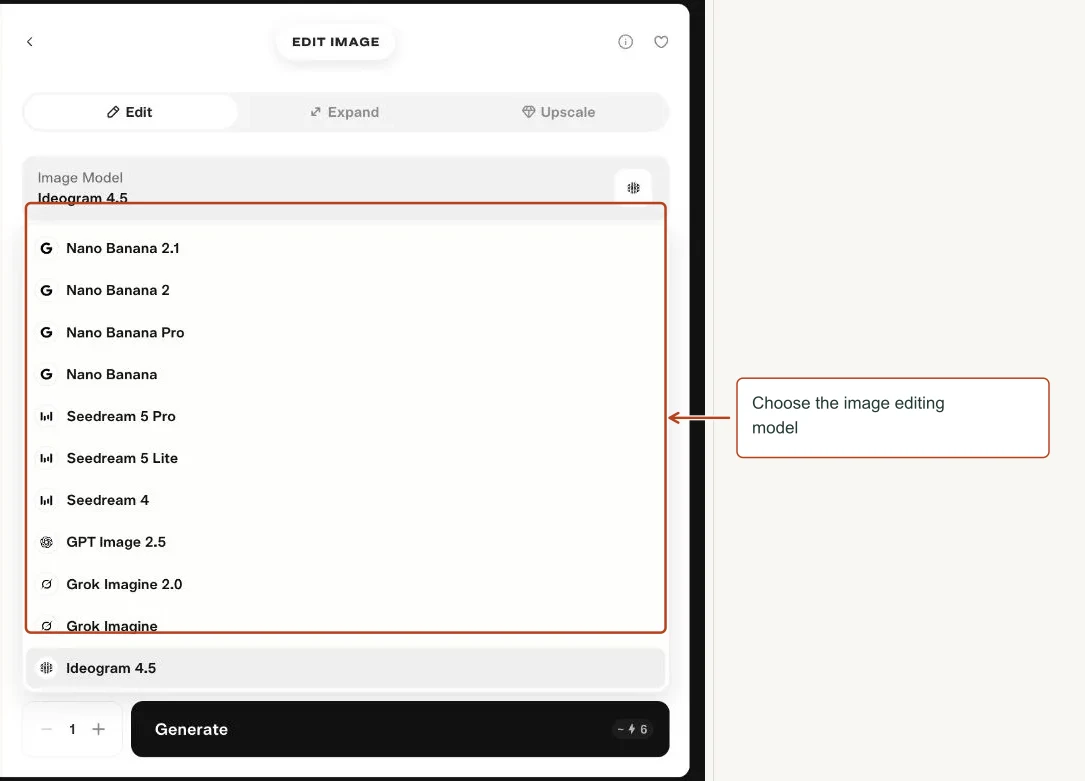
- Choose a model and quality.
- Generate, then compare both the requested change and the details you intended to preserve.
Controls explained
| Control | What it means |
|---|---|
| Edit | Changes the content or appearance inside an image. |
| Expand | Requests additional canvas beyond the original image. Upload an image to access the expansion settings. |
| Upscale | Improves output dimensions rather than adding a new composition. |
| Image Model | Chooses the editing engine. |
| Instructions | Say what changes and what stays fixed. |
| Reference images | Supply the desired object, look or context. |
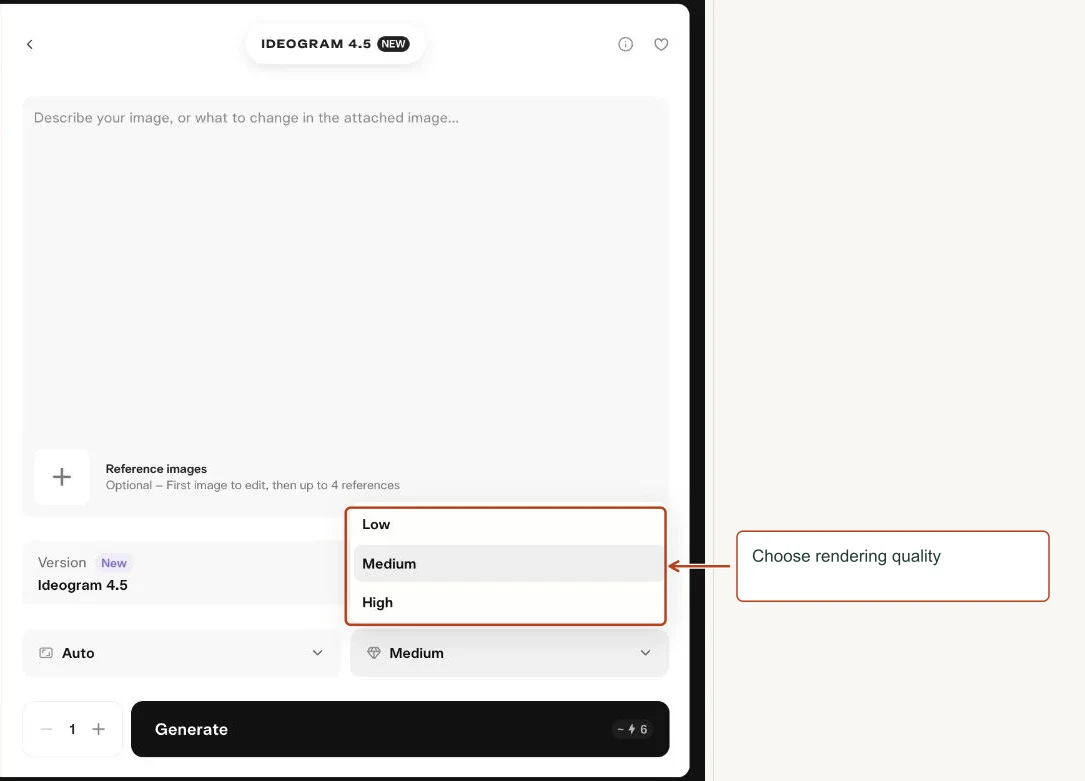
| Quality | Low, Medium or High appeared for the selected model; this can affect cost. |
Try this
Replace the ivory mug with a terracotta mug. Preserve the handle direction, camera angle, table, lighting and background. Do not add text.
Review tip. Change one major element at a time so you can tell which instruction caused a problem.
Menu choices
| Menu | Choices shown |
|---|---|
| Image Model | Nano Banana 2.1, Nano Banana 2, Nano Banana Pro, Nano Banana, Seedream 5 Pro, Seedream 5 Lite, Seedream 4, GPT Image 2.5, Grok Imagine 2.0, Grok Imagine, Ideogram 4.5 |
| Quality | Low, Medium, High |
View screenshots of these menus
Color Grade
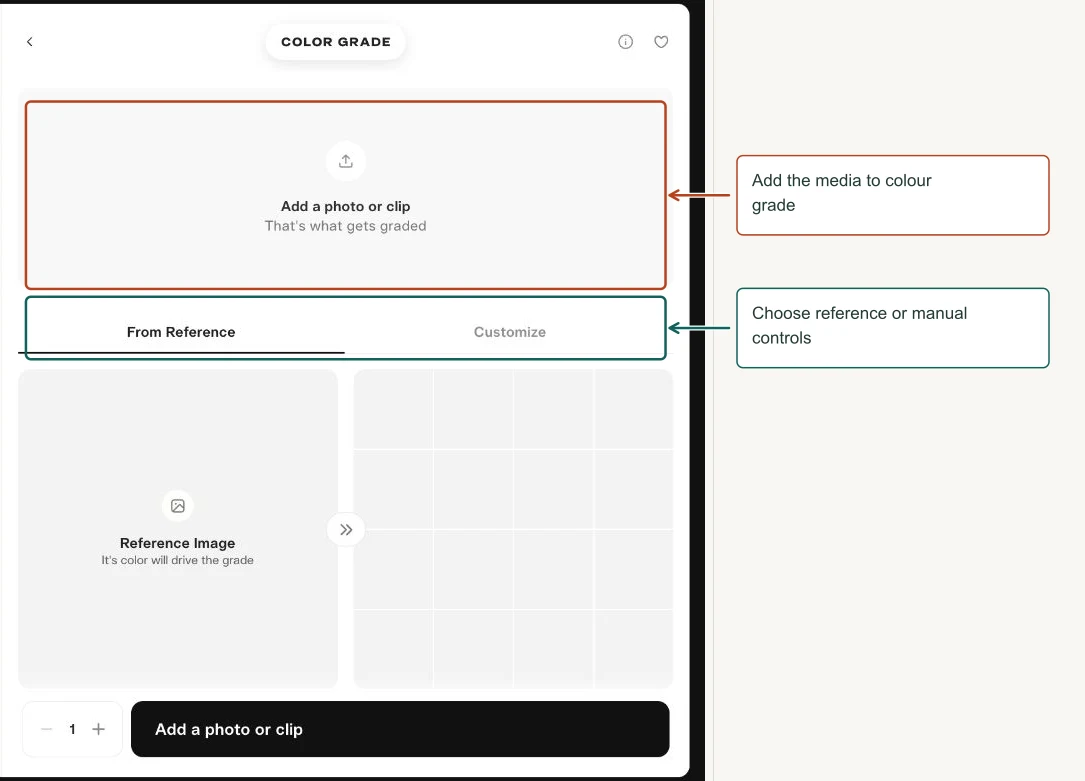
Adjust the overall color and tonal mood of a photo or clip.
How to use it
- Add the media to grade.
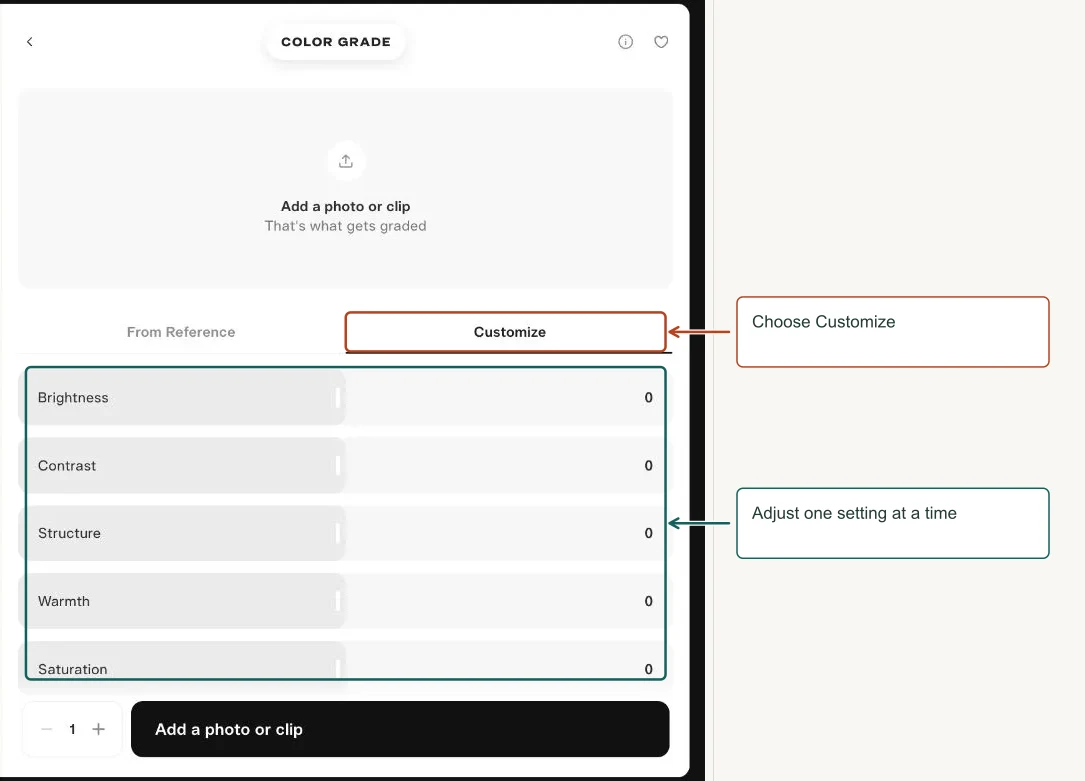
- Use From Reference to borrow a color look, or Customize to adjust controls.
- Add notes about important constraints.
- Compare skin tones, whites and shadows before accepting the result.
Controls explained
| Control | What it means |
|---|---|
| From Reference | Uses a reference image to guide the grade. |
| Brightness and Contrast | Change overall lightness and separation between light and dark. |
| Structure and Sharpen | Increase perceived local detail and edge definition; use sparingly. |
| Warmth | Moves the look toward warmer or cooler color. |
| Saturation | Changes color intensity. |
| Fade | Softens the tonal look, often useful for a lifted or muted finish. |
| Highlights and Shadows | Adjust bright and dark regions separately. |
| Vignette | Changes the appearance near the frame edges. |
| Color shadows and highlights | Adds separate tint choices for dark and bright areas. |
| Reset | Returns adjustments to their starting values. |
| Notes | Adds written constraints such as keeping skin tones natural. |
Try this
Warm, natural café grade. Keep the ivory mug neutral, soften harsh highlights, preserve table texture, and avoid orange shadows.
Review tip. Fix one category at a time: exposure, then contrast, then color. Large simultaneous changes make comparison difficult.
More views of this workflow
Trim Video
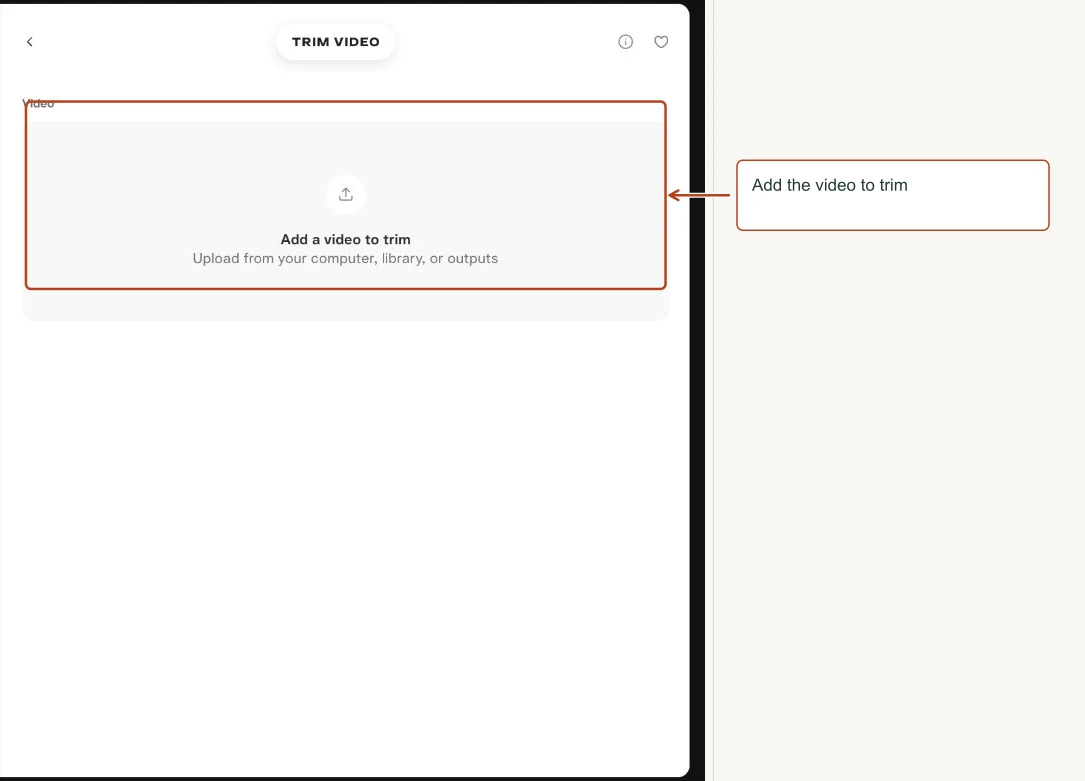
Shorten a clip by choosing the useful portion.
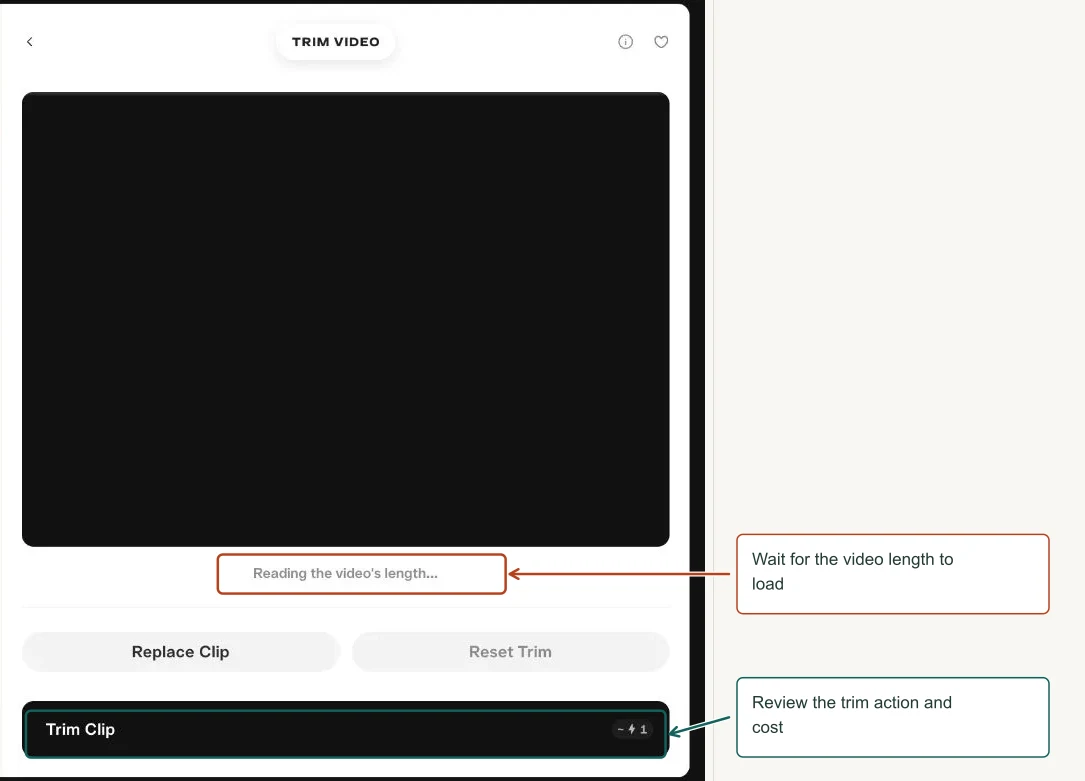
How to use it
- Add a source video.
- Wait for duration and trim controls to load.
- Choose the desired range and preview it.
- Use Trim Clip after reviewing the displayed cost.
Controls explained
| Control | What it means |
|---|---|
| Replace Clip | Changes the source. |
| Reset Trim | Restores the initial trim selection; it was disabled before a trim was set. |
| Trim Clip | Creates the trimmed result. The pictured estimate was about 1 credit, not a universal price. |
| Time range | Wait for the clip duration to load before choosing the time range. |
Try this
Keep the clean middle portion of a shot and remove the pause at the start and unstable final frames.
Review tip. Trim removes time. Extend Video generates new time. They solve different problems.
More views of this workflow
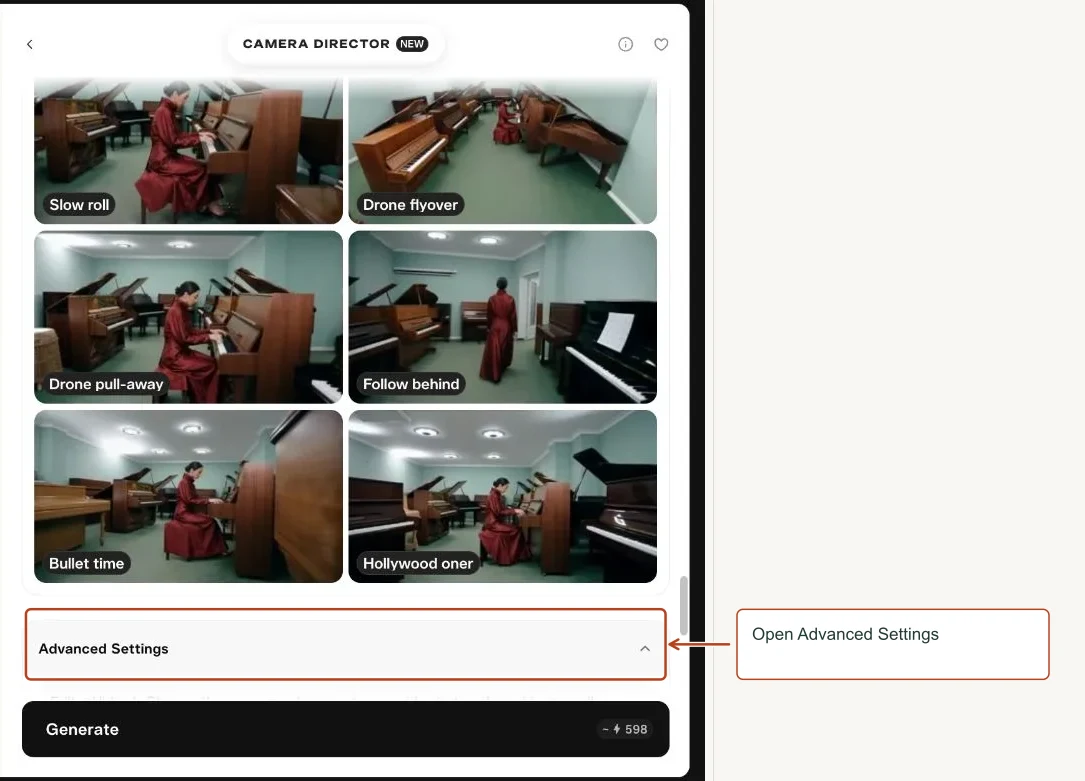
Camera Director
Reinterpret an existing video through a different framing, camera angle or camera movement.
How to use it
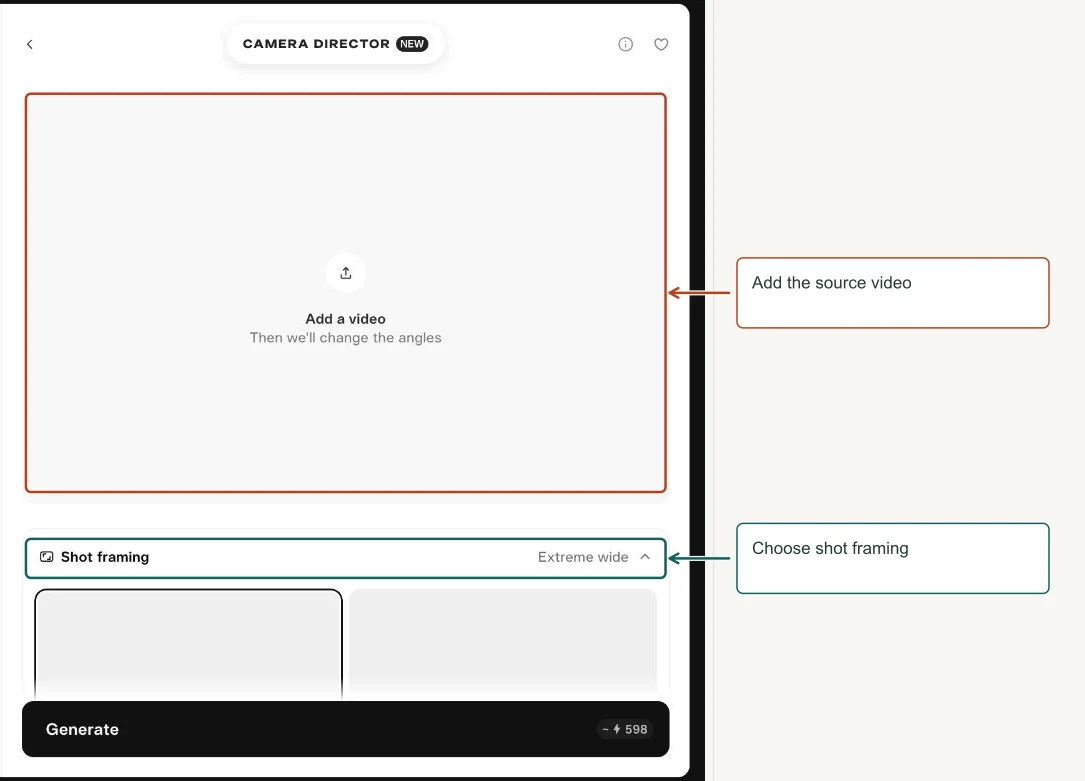
- Choose the source video.
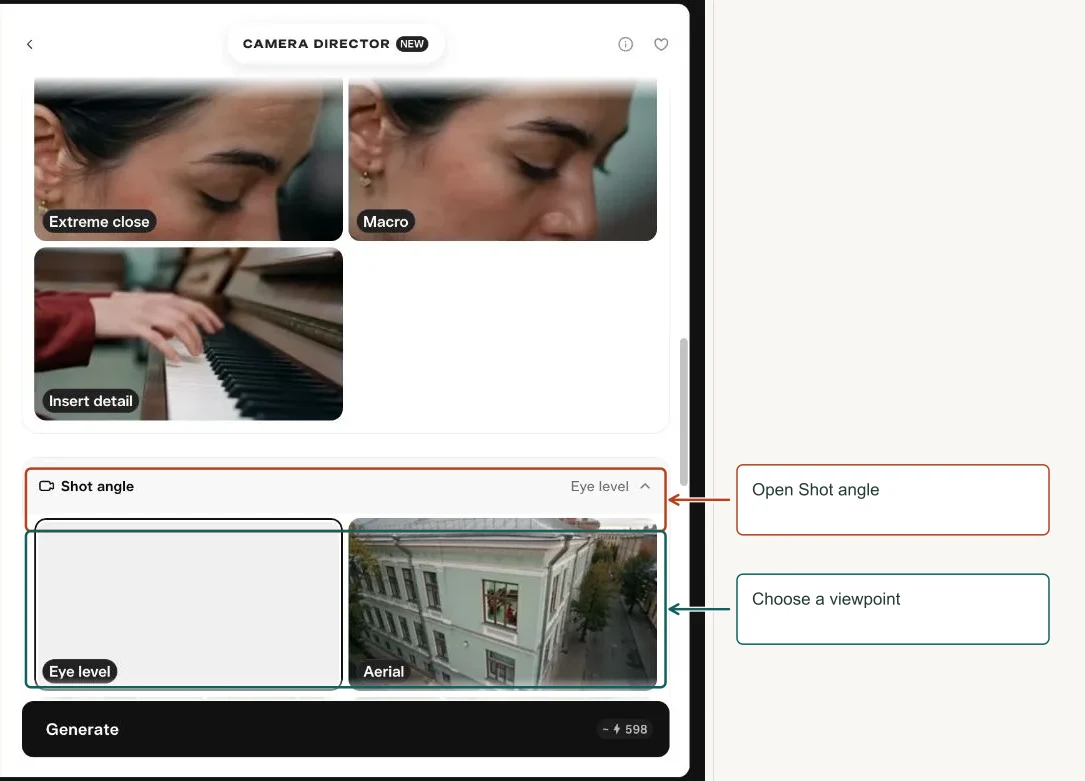
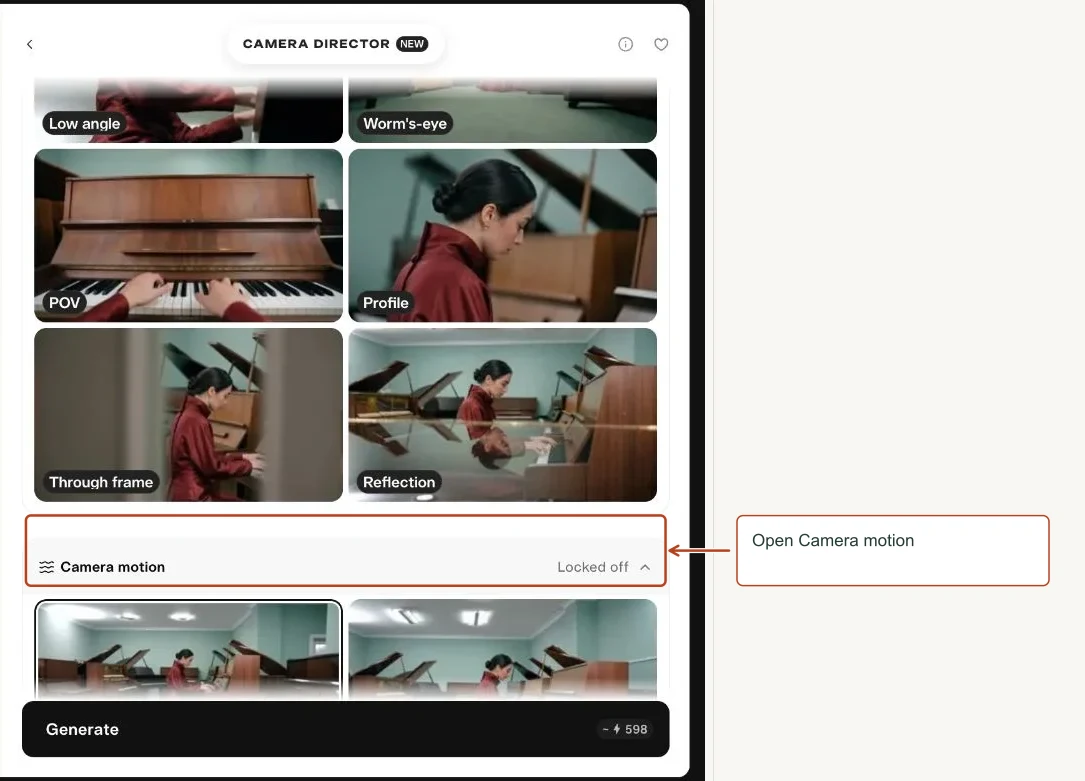
- Select Shot framing, Shot angle and Camera motion.
- Open Advanced Settings to read the composed prompt and adjust resolution or sound.
- Generate and compare if the action and identity remain consistent.
Controls explained
| Control | What it means |
|---|---|
| Shot framing | Controls how much of the subject and surroundings fills the frame. |
| Shot angle | Sets the viewpoint, such as eye level, overhead, low angle or POV. |
| Camera motion | Selects a movement pattern, from locked-off to orbit and tracking. |
| Advanced Prompt | Pika composes a direction from the presets; add scene-specific constraints. |
| Resolution | Output size; Match source was indicated in the pictured panel. |
| Sound | Preserves original audio when enabled. |
| Edit model | Chooses the editing engine; the screenshot showed Seedance 2.5. |
Try this
Medium shot, eye level, slow push-in. Keep the original performance, wardrobe, room and lighting. One consistent camera treatment.
Review tip. A camera edit asks the model to synthesize a new view. It is not the same as moving a real camera around a pictured 3D scene.
More views of this workflow
Swap Anything
Replace characters, clothes, locations or products in a video while trying to retain the performance.
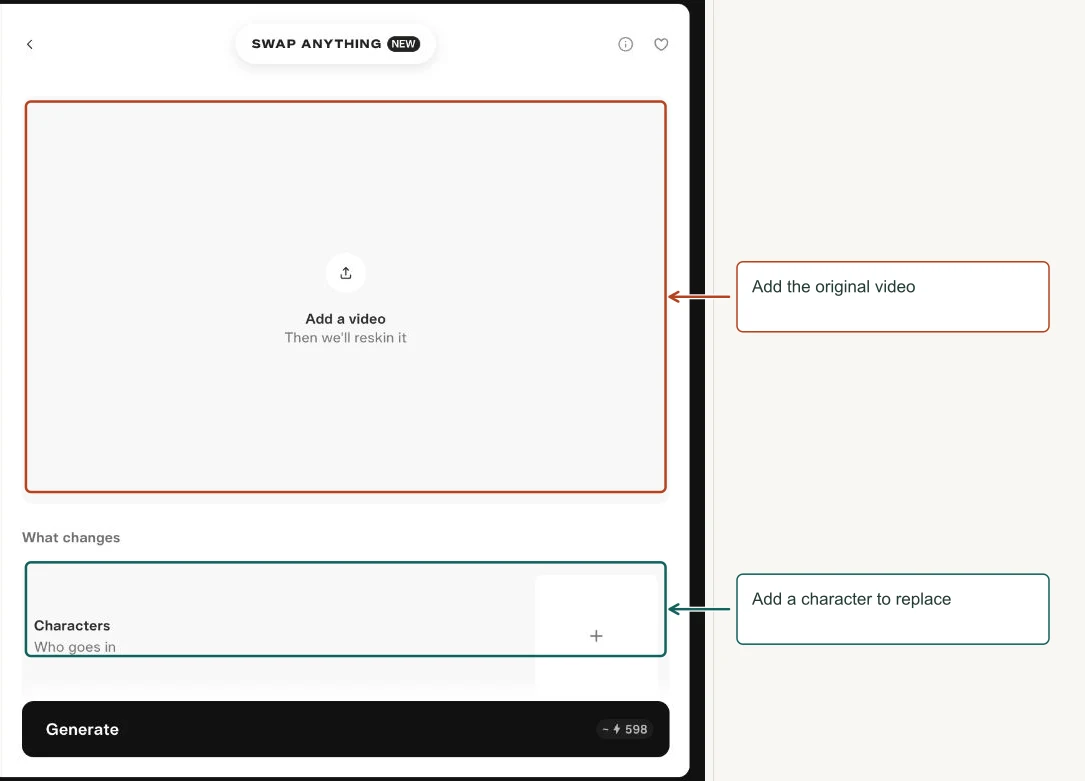
How to use it
- Add a source video.
- Fill only the reference slots that should change.
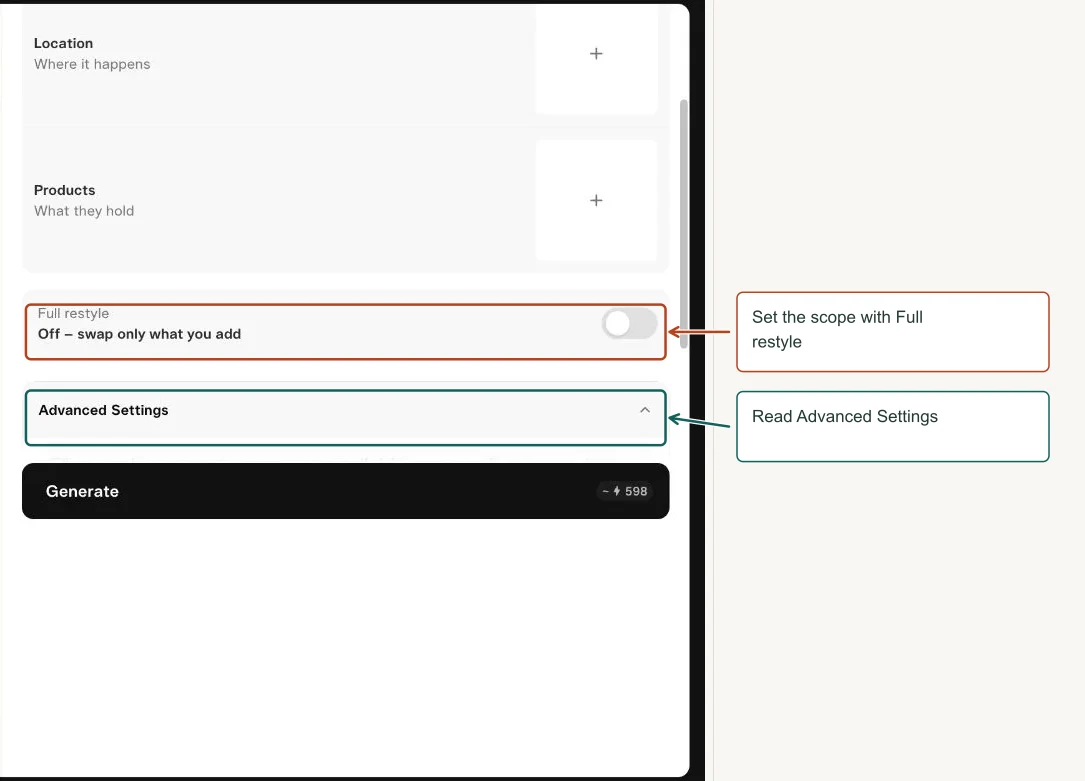
- Choose if Full restyle is needed.
- Read the generated prompt in Advanced Settings, then set resolution and sound.
Controls explained
| Control | What it means |
|---|---|
| Characters | Who appears in the clip. |
| Outfits | What the subject wears. |
| Location | Where the action happens. |
| Products | Objects the subject holds or features. |
| Full restyle | Off means swap only what you add; enabling it broadens the restyling. |
| Prompt | Refines the mapping between the references and source. |
| Resolution and Sound | Set output size and if original audio is kept. |
Try this
Replace only the mug with the terracotta reference. Keep the actor, timing, hand motion, camera and room unchanged.
Review tip. Use clear reference images with the intended item easy to distinguish. Hands and occlusions deserve close review.
More views of this workflow
Guided kits
The following chapters document the controls in this group. Screenshots show one configuration; choosing another mode or model can reveal different settings.
Talking Head Video
Create a speaking presenter from a face and either a script or an audio track.
Open Talking Head Video in Pika
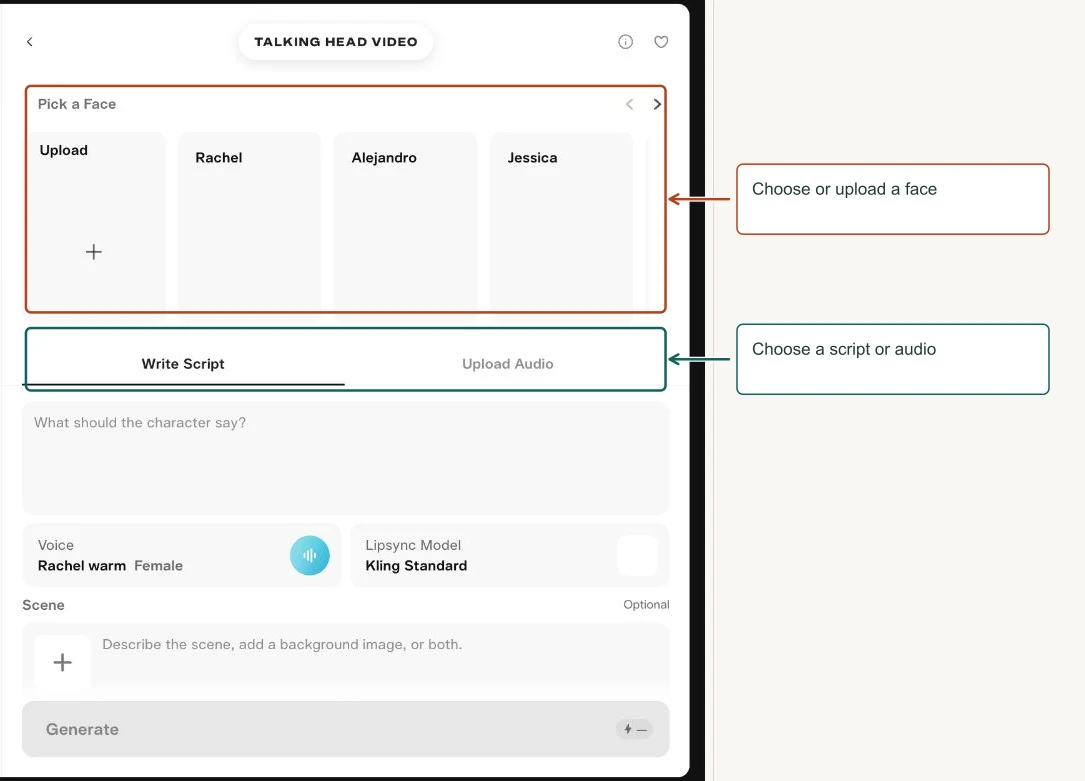
How to use it
- Choose a preset face or add one you can use.
- Select Write Script or Upload Audio.
- For text, choose the voice and lip-sync model.
- Optionally describe or supply the scene, then generate.
Controls explained
| Control | What it means |
|---|---|
| Pick a Face | Preset identities include Rachel, Alejandro, Jessica, Zach, Mareena and others; upload is also shown. |
| Write Script | Generates speech from your text. |
| Upload Audio | Uses an existing spoken track to drive the performance. |
| Voice | Controls how generated speech sounds. |
| Lipsync Model | Controls the face-animation engine; the pictured setting was Kling Standard. |
| Scene | Optional written setting and background image. |
Try this
Welcome to our studio. Today we’ll turn one product photo into a short video, then add a simple soundtrack.
Review tip. Use a clear face with an unobstructed mouth. Test a short sentence before a long presentation. Voice and lip-sync model are separate choices.
Product Ad
Build a multi-shot product advertisement through a guided sequence.
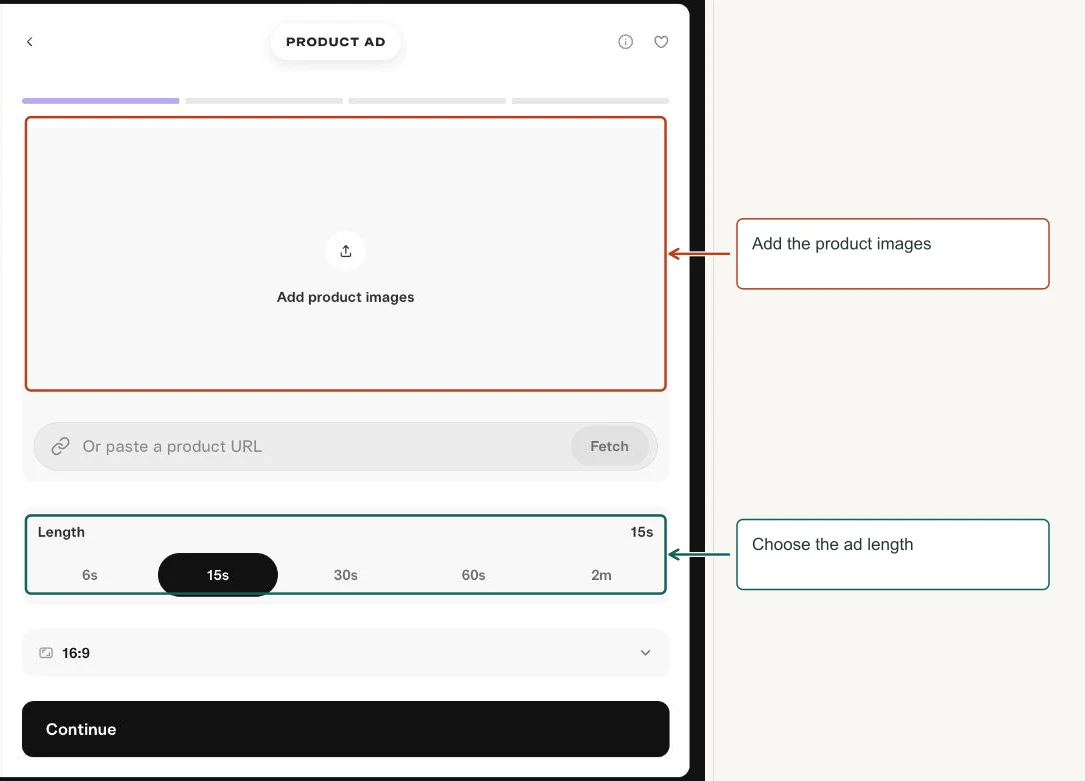
How to use it
- Product: add product photos or a product URL, choose length and frame shape.
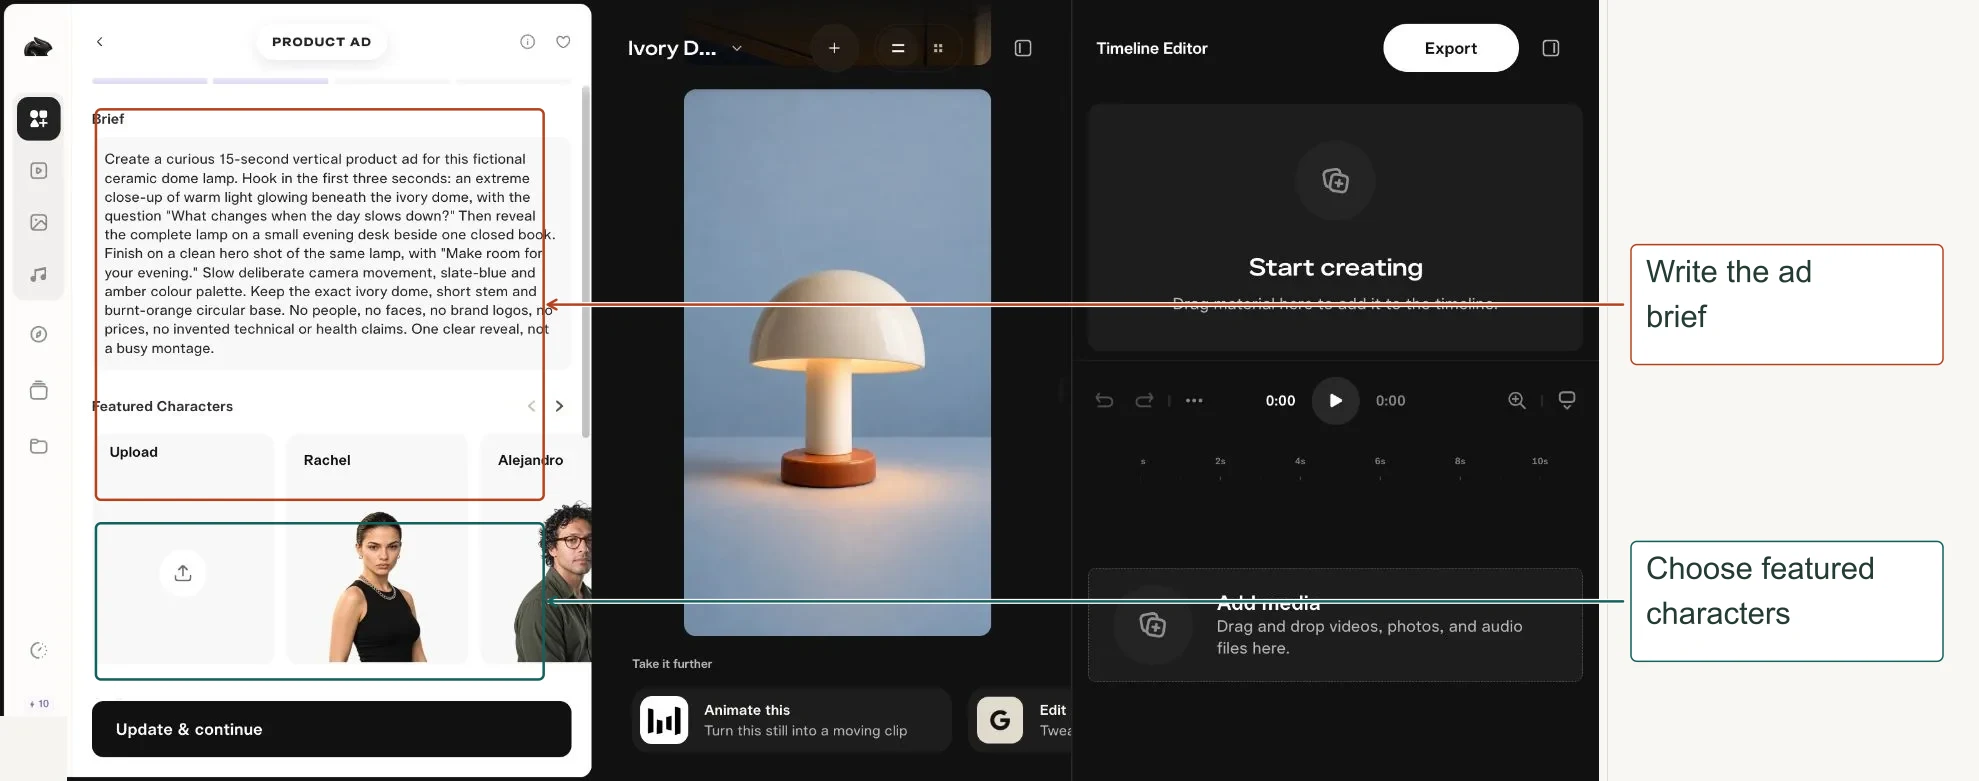
- Brief: describe the audience, message, image tone and audio requirements.
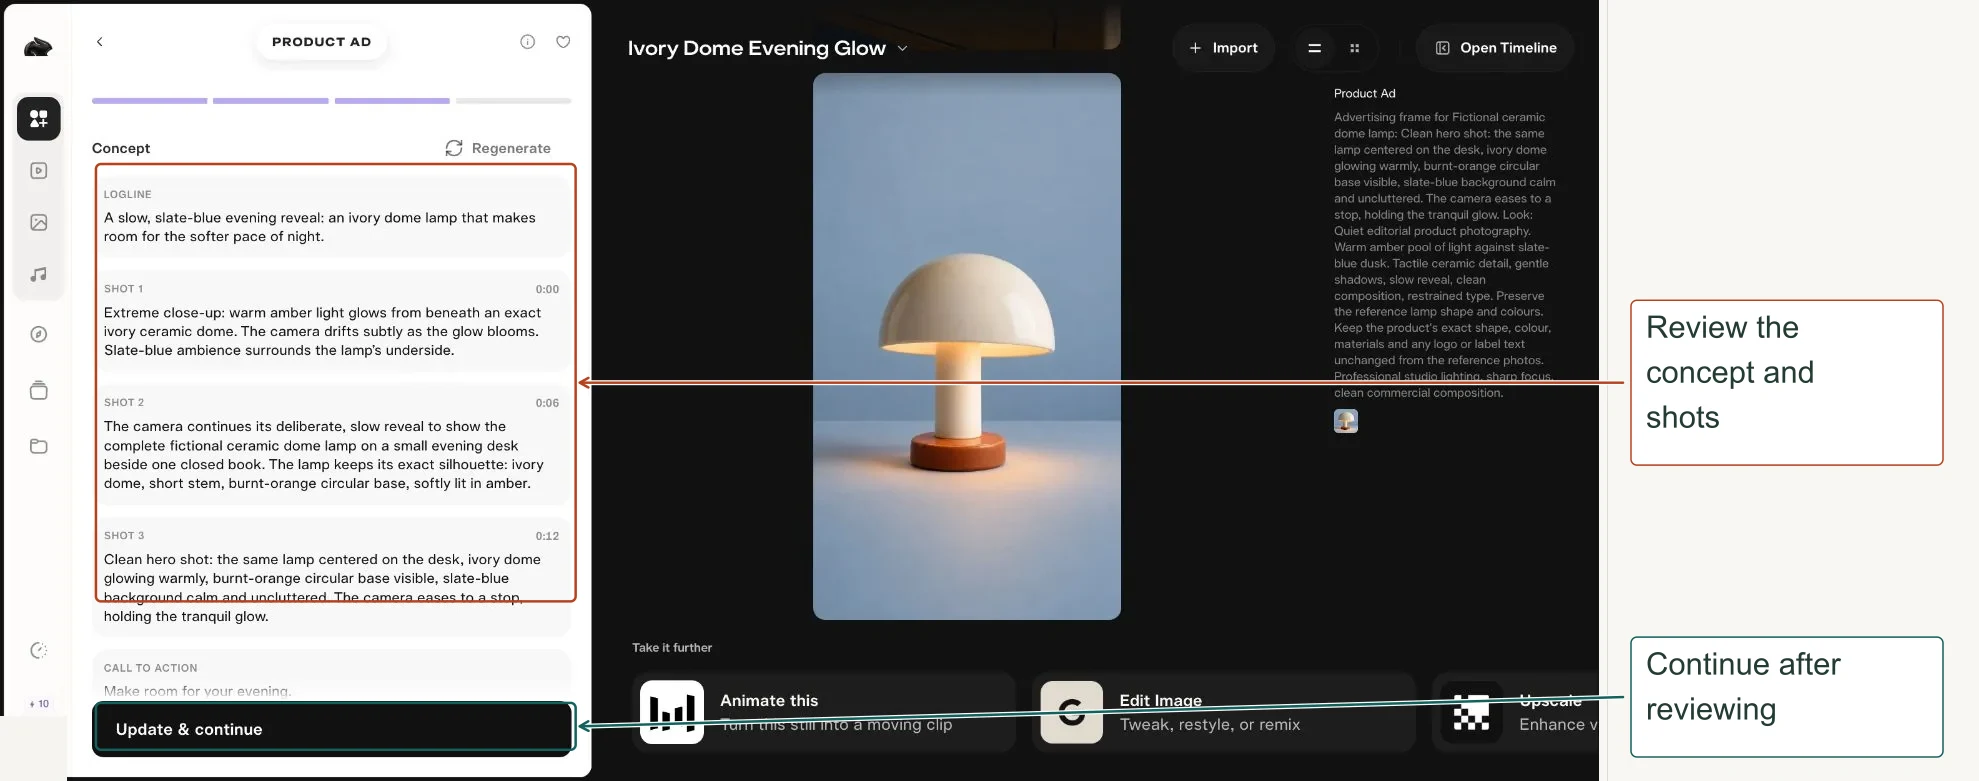
- Creative: review the logline, shot actions, timecodes, call to action and look.
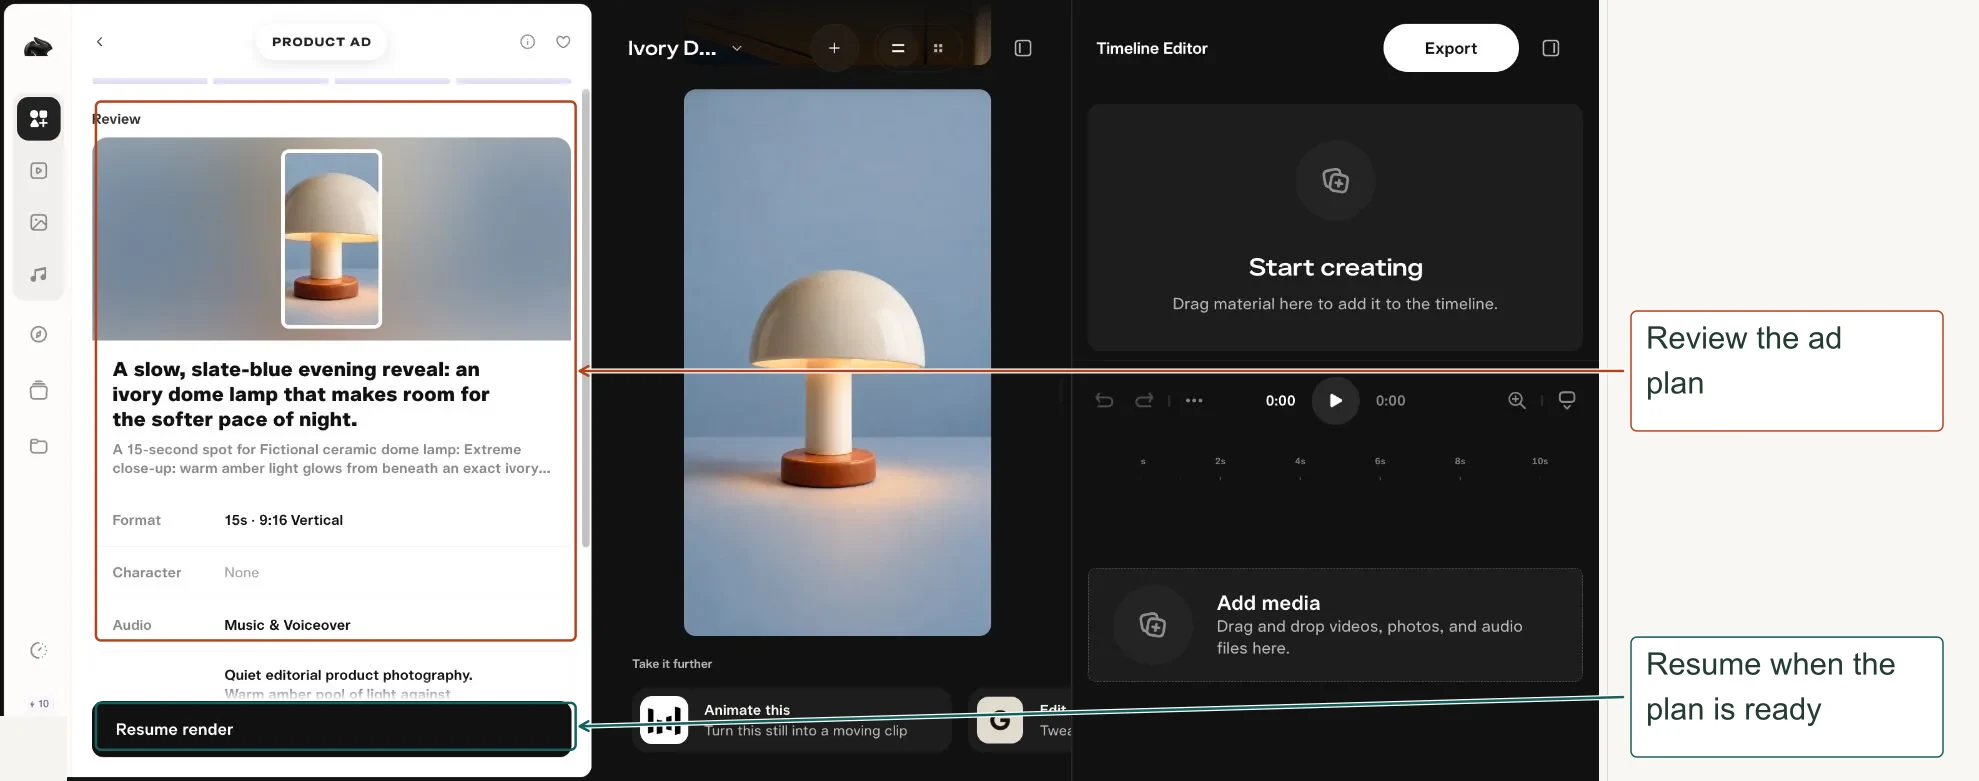
- Review: confirm format, character, audio, look and video model before rendering.
Controls explained
| Control | What it means |
|---|---|
| Product photos and URL | Identify what is advertised. Check fetched details rather than trusting them automatically. |
| Length | 6s, 15s, 30s, 60s and 2m were offered. |
| Brief | Explains the goal and the exact product details to preserve. |
| Featured Characters | Adds a presenter if the concept needs one. |
| Music bed | Turns background music on or off and accepts music notes. |
| Voiceover narration | Controls off-screen narration and its script. |
| Talking characters | Controls on-screen spoken dialogue. |
| Creative | Editable shot plan, logline, timecodes and closing call to action. |
| Generate Looks | A separate priced generation for image directions/previews. |
| Review and Video Model | Final configuration check; an existing project showed Resume render. |
Try this
Create a 15-second vertical ad for this ivory mug. Open on steam, reveal the handle and texture, then finish with a clean product hold. Warm morning light. Preserve the exact product. No invented claims.
Review tip. The later-step screenshots come from your existing lamp project; they show the workflow, not a new ad generated during this guide.
More views of this workflow
Short Film
Develop a short film through Idea, Script, Cast and Review.
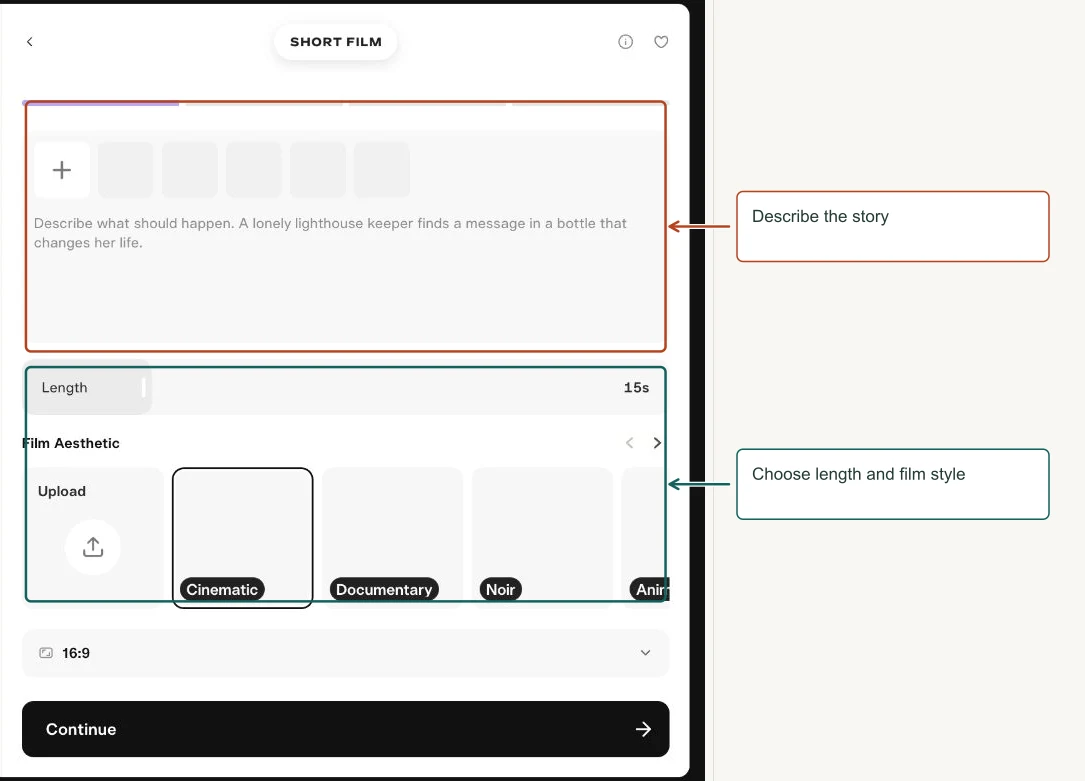
How to use it
- Write a concise premise and attach optional image references.
- Choose length, Film Aesthetic and aspect ratio.
- Continue through Script and Cast, reviewing the story before final rendering.
- Check continuity and sound in the finished shots.
Controls explained
| Control | What it means |
|---|---|
| Description | States what happens, who it happens to and what changes. |
| Reference attachments | Help establish the intended look. |
| Length | Requested story duration; the pictured starting value was 15 seconds. |
| Film Aesthetic | Cinematic, Documentary, Noir, Anime, Indie, Surreal and Sci-fi were shown, plus an upload option. |
| Script, Cast and Review | Complete each required step to continue to the next stage. |
Try this
A solitary robot finds a living seed on an abandoned rooftop. It shelters the seed from rain and watches the first leaf open. Three shots, quiet hopeful mood, no dialogue.
Review tip. Give a short film one clear change rather than a long plot. The detailed later-stage controls remain unverified in this capture.
Podcast Video
Create a video discussion using a topic or an exact script, hosts and a set.
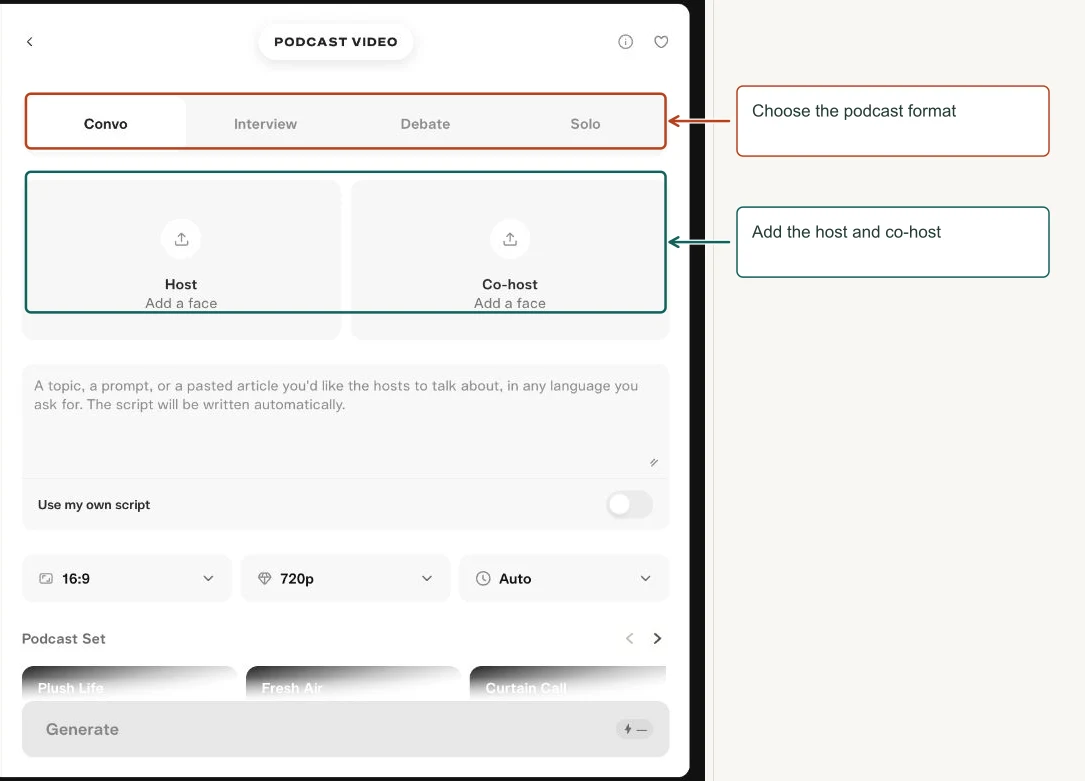
How to use it
- Choose Convo, Interview, Debate or Solo.
- Add host faces as needed.
- Describe the topic, or enable Use my own script.
- Set length, frame shape, resolution and the podcast set.
Controls explained
| Control | What it means |
|---|---|
| Format | Convo is a discussion, Interview uses question-and-answer roles, Debate presents opposing positions, and Solo uses one speaker. |
| Cast | Host and co-host images establish the on-screen speakers. |
| Podcast content | Accepts a topic, prompt or article; the form says the script can be written automatically. |
| Use my own script | Use when exact wording matters. |
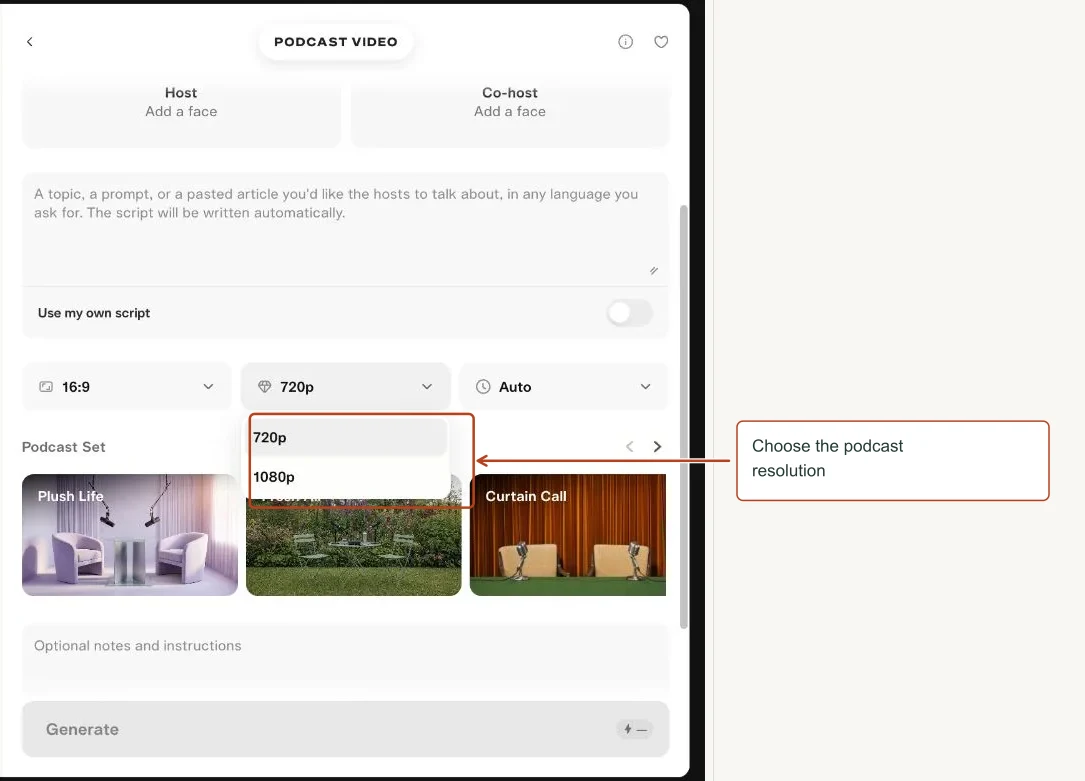
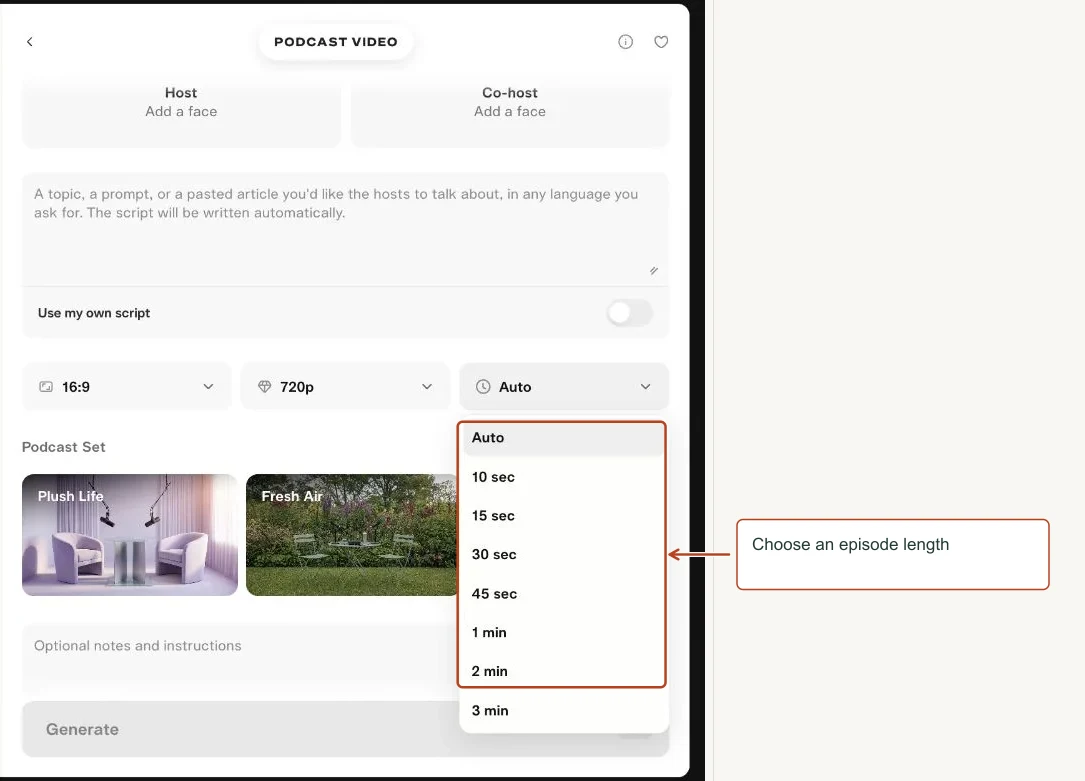
| Length | Auto through 3 minutes appeared in the menu. |
| Podcast Set | Chooses the background environment. Scene instructions and references refine it. |
| Resolution and Aspect Ratio | Set delivery size and framing. |
Try this
A friendly beginner discussion about making a first AI video. Explain references, prompts and why short tests help. Avoid technical jargon. End with one practical exercise.
Review tip. If facts matter, review the script before sharing the output. A generated conversation is not a reliable source by itself.
Menu choices
| Menu | Choices shown |
|---|---|
| Resolution | 720p, 1080p |
| Length | Auto, 10 sec, 15 sec, 30 sec, 45 sec, 1 min, 2 min, 3 min |
View screenshots of these menus
Pikaffects
Apply a named transformation to a photo to make a short effect video.
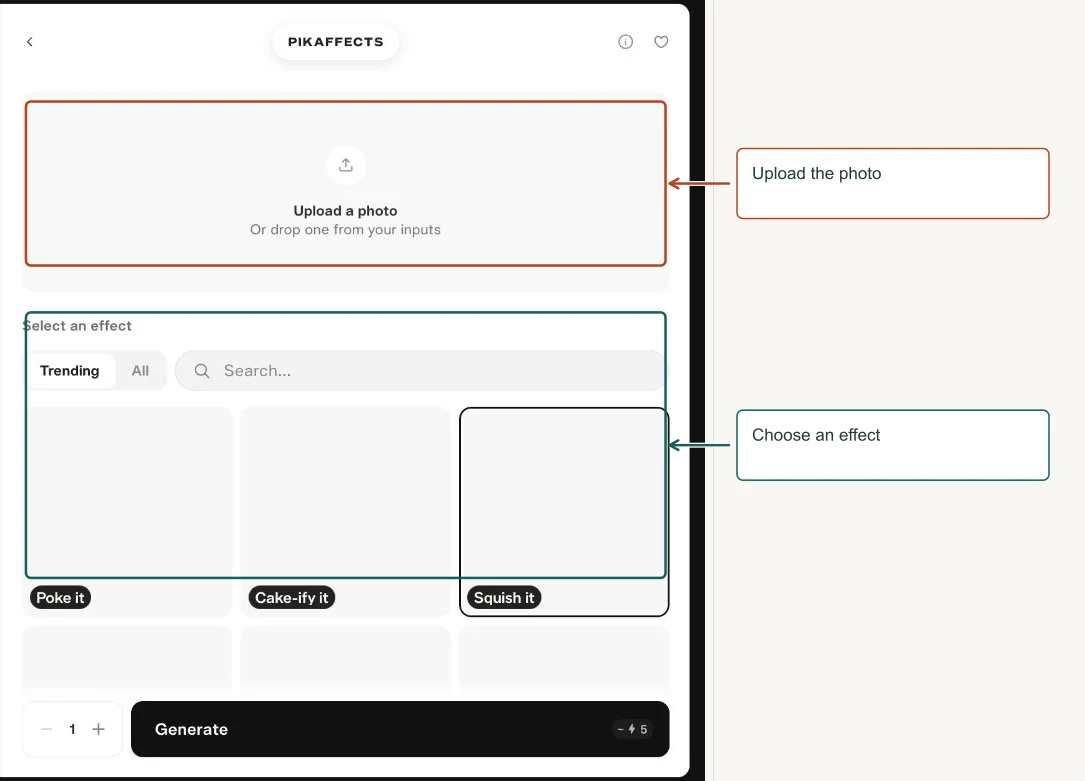
How to use it
- Add a photo.
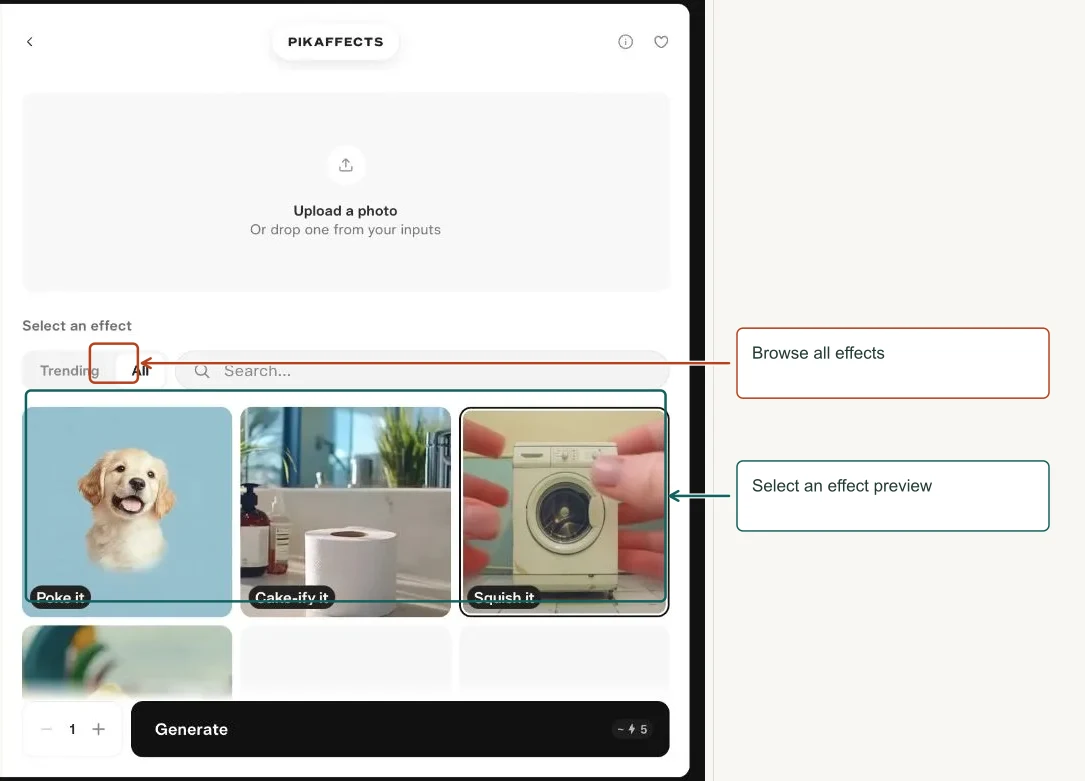
- Use Trending or All, then search for an effect.
- Select the effect and review any additional input requirements.
- Generate one take and check if the main subject remains recognizable.
Controls explained
| Control | What it means |
|---|---|
| Photo input | The source subject for the transformation. |
| Trending and All | Filter the effect catalog. |
| Search effects | Find a preset by name. |
| Effect | A preset transformation such as Squish it, Melt it, Cake-ify it or Inflate it. |
| Generations | Number of variations requested. |
Try this
Practice with a simple toy or mug against a plain background. Compare Squish it and Melt it while keeping the same input.
Review tip. Effect names and availability change. Preview an effect’s thumbnail and read its description before choosing it.
More views of this workflow
Headshots
Create a styled portrait from a source photo.
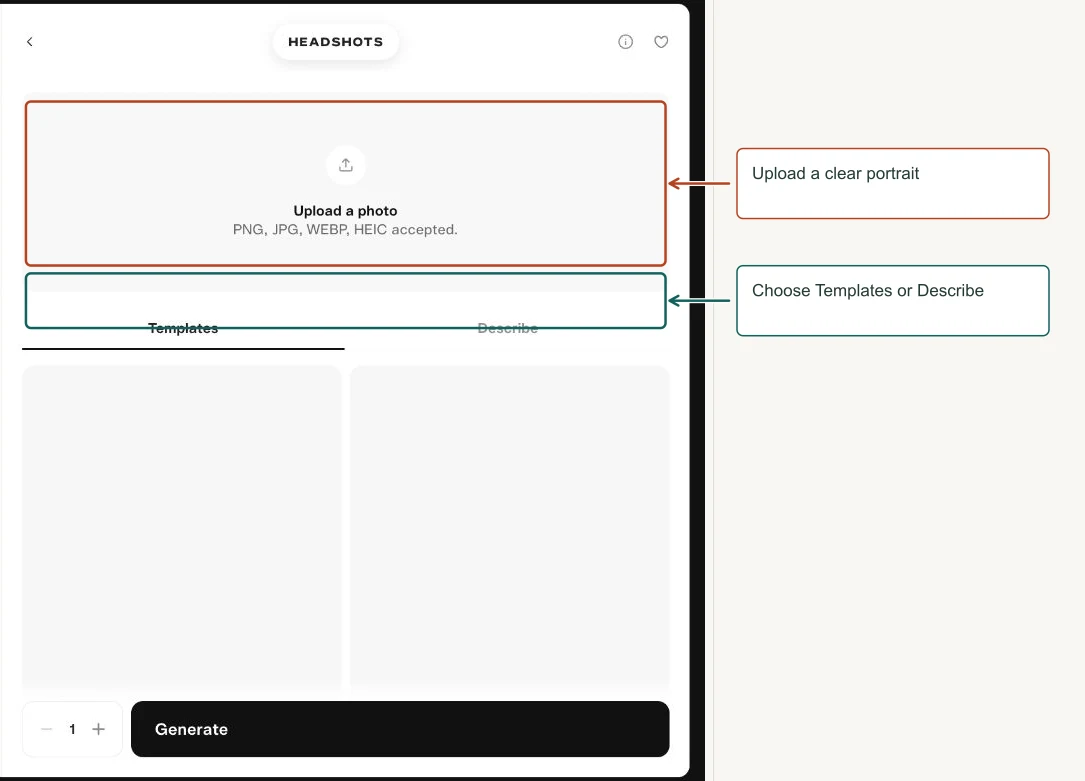
How to use it
- Add a clear portrait.
- Choose a template or Describe.
- Keep the intended expression, crop and clothing explicit when using text.
- Generate and compare identity, hair, eyes and clothing.
Controls explained
| Control | What it means |
|---|---|
| Upload a photo | The form lists PNG, JPG, WebP and HEIC. |
| Templates | A preset look; examples include Flash Forward, Silver Screen, Yearbook, Sun Kissed and Cream Matte. |
| Describe | The alternate mode for specifying your own setting and portrait direction. |
| Generations | Number of variations to request. |
Try this
Natural studio headshot, neutral pale grey background, soft window light, relaxed expression, preserve facial features and glasses, no heavy retouching.
Review tip. Treat the output as a generated portrait. Inspect identity and skin texture closely before using it professionally.
Product Shot
Place a product into a styled still-life or commercial photograph.
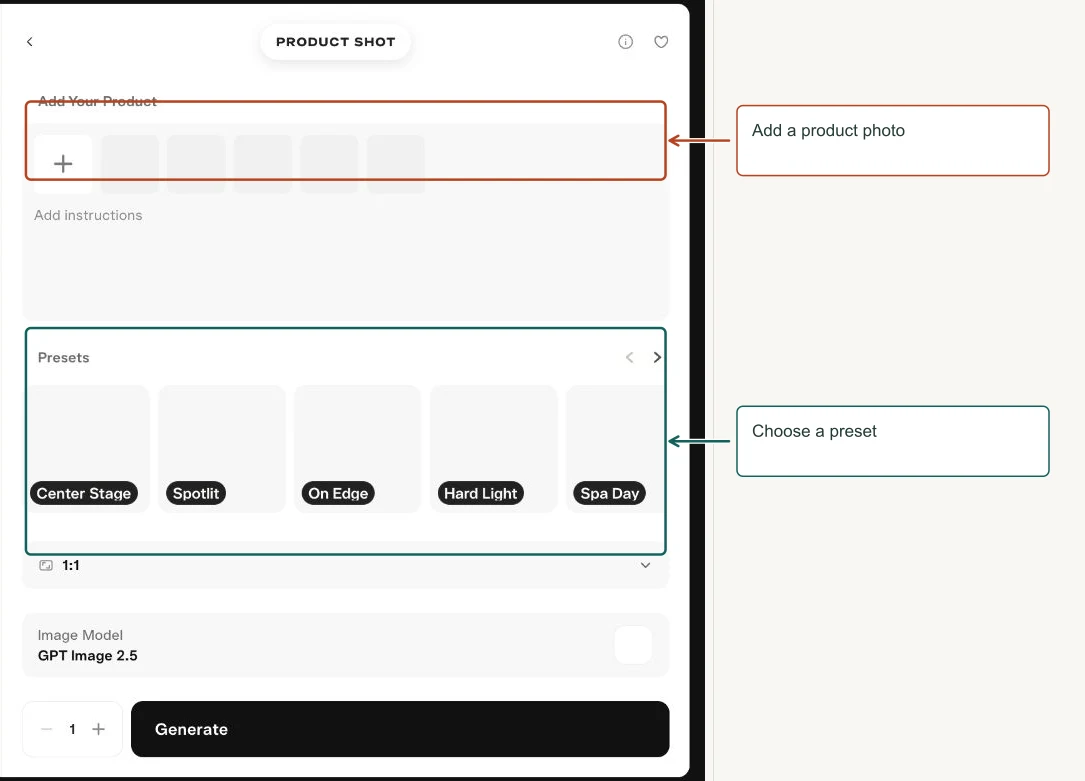
How to use it
- Add a product photo.
- Write any instructions about shape, colors, label and placement.
- Choose a preset, aspect ratio and image model.
- Generate a draft and compare the product to the reference.
Controls explained
| Control | What it means |
|---|---|
| Product photo | The object to preserve. |
| Add instructions | Specifies setting and what must stay unchanged. |
| Presets | Starting compositions and moods, such as Center Stage, Spotlit, Hard Light, Spa Day and Morning Fog. |
| Aspect Ratio | Frame shape; the pictured setting was 1:1. |
| Image Model | Engine choice; GPT Image 2.5 was selected in the capture. |
| Generations | Number of output variations. |
Try this
Place the amber bottle on a pale limestone block with a soft shadow. Preserve the exact bottle proportions and label. Warm natural light, uncluttered background.
Review tip. Product appearance can drift. Check labels and proportions before treating an image as an accurate product representation.
Model apps
The following chapters document the controls in this group. Screenshots show one configuration; choosing another mode or model can reveal different settings.
- Seedance 2.0
- Seedance 2.5
- MiniMax H3
- Wan 3.0
- Seedance 2.0 Mini
- Seedream 4
- GPT Image 2.5
- Eleven Multilingual v2
- Pika Speech
- Eleven Turbo v2.5
- MiniMax Music 3.0
- Pika Music
- Pika SFX
- Veo 3.1
- Nano Banana 2.1
- Pika 2.5
- Pikadditions
- Grok Imagine
- Grok Imagine 1.5
- Gemini Omni 1.1 Flash
- Seedream 5
- Ideogram 4.5
- Pikaframes
Seedance 2.0
Use the Seedance family workspace for video generation with mixed references and audio.
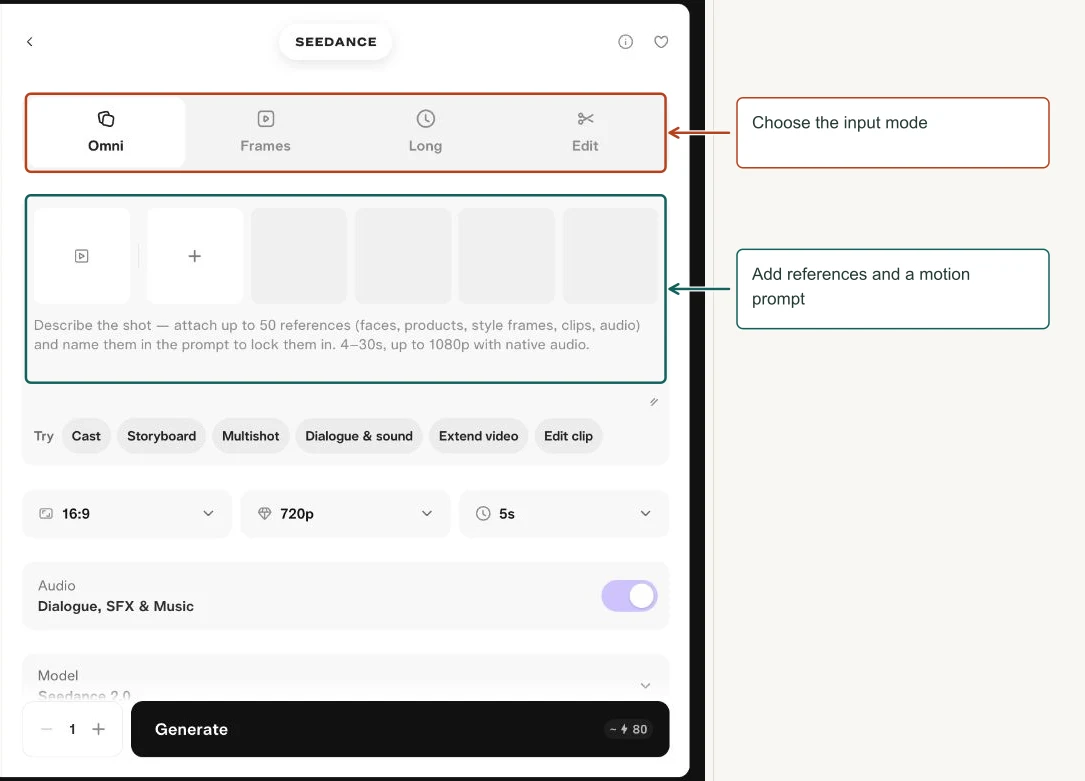
How to use it
- Confirm the Seedance model at the bottom of the form.
- Choose Omni, Frames, Long or Edit according to your input and goal.
- Describe the shot and reference roles.
- Review supported size, duration and sound before generating.
Controls explained
| Control | What it means |
|---|---|
| Omni | Combines different reference types with a written brief. |
| Frames | A frame-guided workflow; inspect the revealed required inputs. |
| Long | A longer sequence workflow. The duration picker included multi-clip choices. |
| Edit | Directs changes to existing footage. |
| Prompt suggestions | Cast, Storyboard, Multishot, Dialogue & sound, Extend video and Edit clip provide starting guidance. |
| Audio | Requests dialogue, effects and music. |
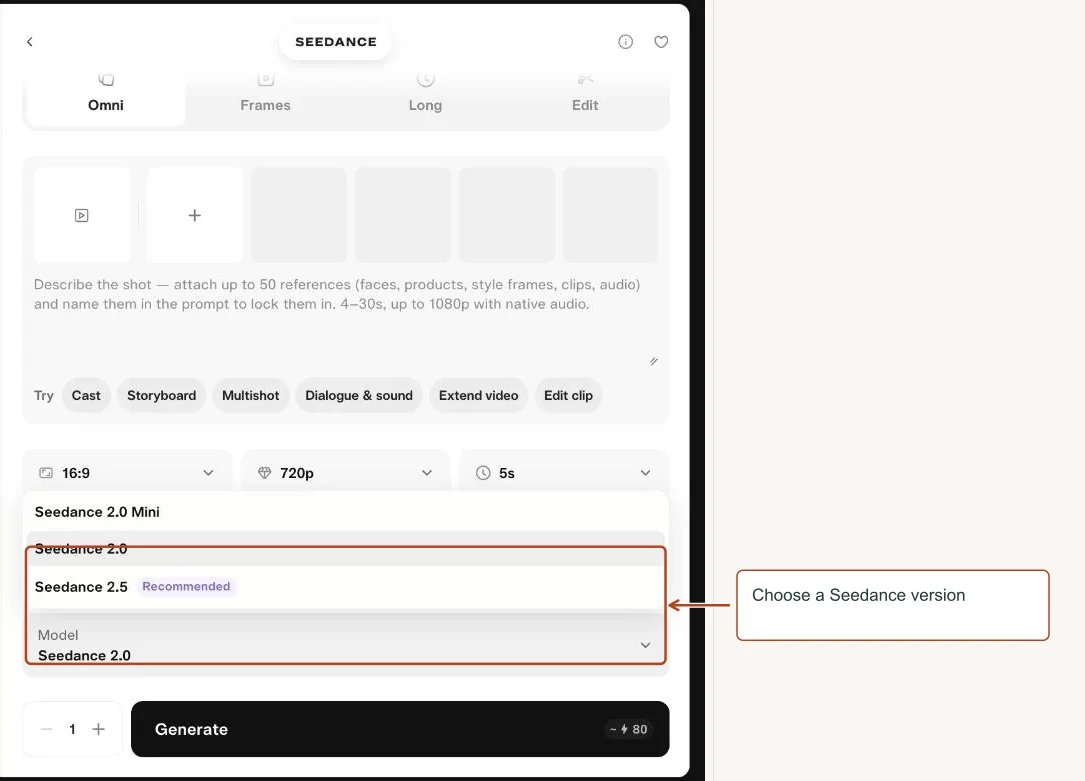
| Seedance model | Select 2.0 Mini, 2.0 or 2.5; menu limits must be rechecked for that variant. |
Try this
One shot: a cyclist stops outside a café and sets a helmet on a table. Eye-level medium framing, natural afternoon light, quiet street ambience, no dialogue.
Review tip. This shared form and its marketing copy report different reference/duration limits. Do not transfer one variant’s limits to another.
Menu choices
| Menu | Choices shown |
|---|---|
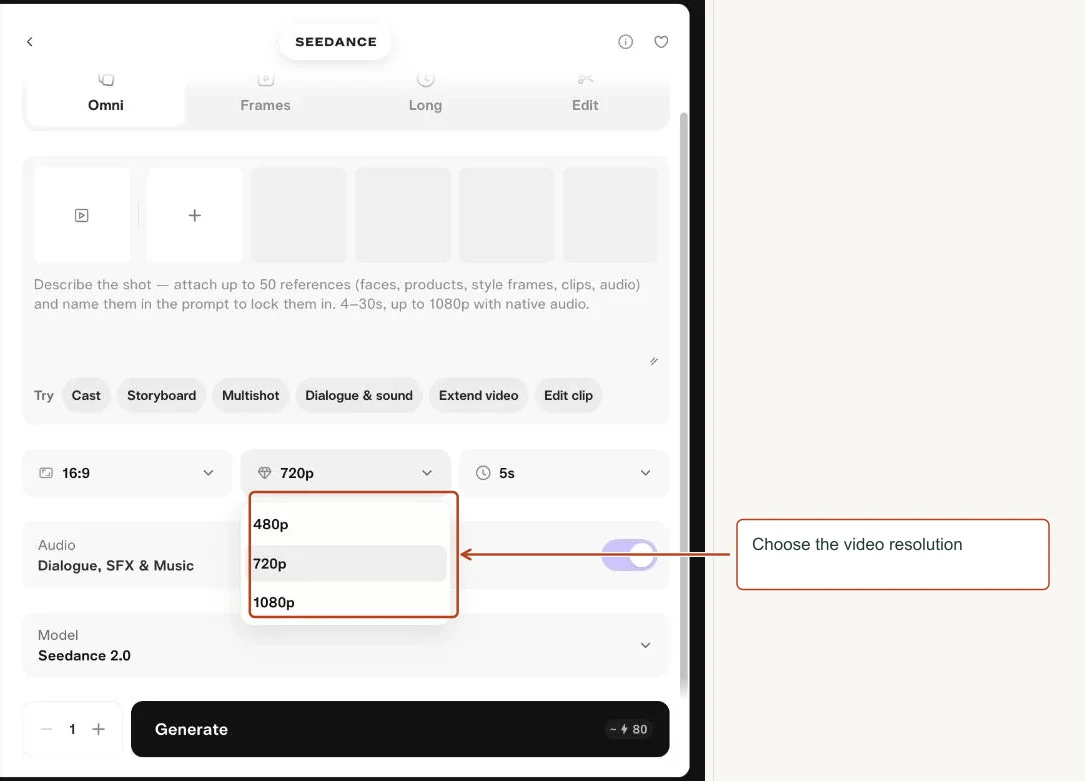
| Resolution | 480p, 720p, 1080p |
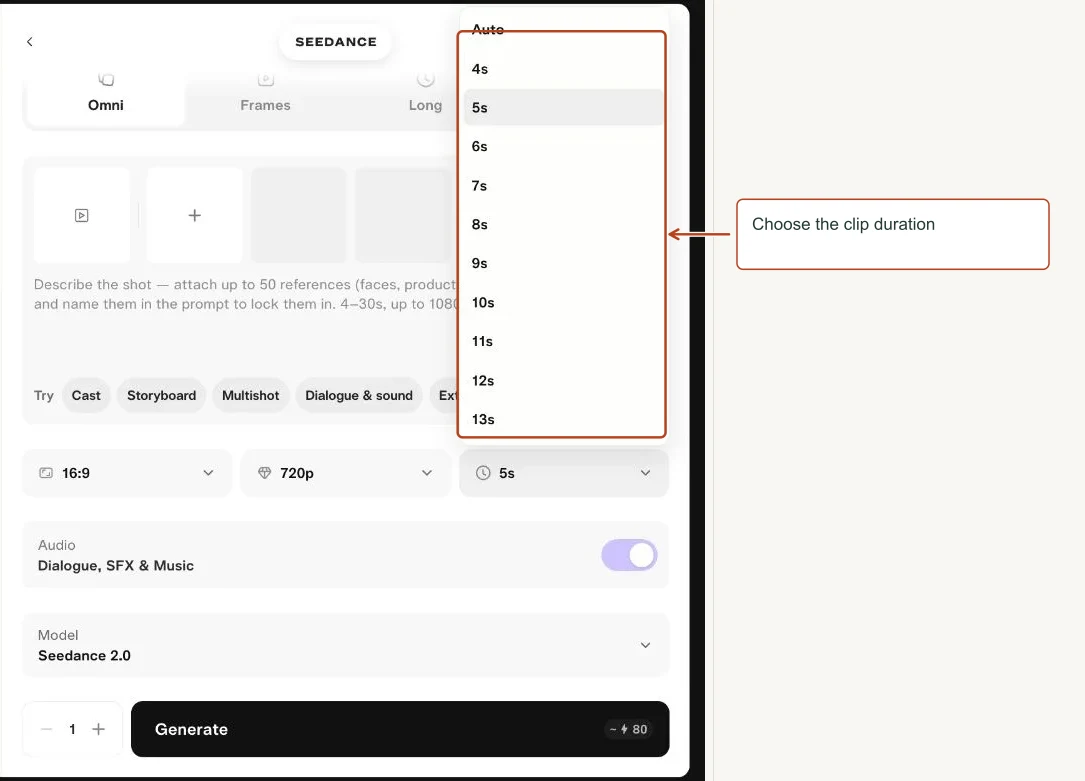
| Duration | Auto, 4s, 5s, 6s, 7s, 8s, 9s, 10s, 11s, 12s, 13s, 14s, 15s, 16s, 17s, 18s, 19s, 20s, 21s, 22s, 23s, 24s, 25s, 26s, 27s, 28s, 29s, 30s, 45s — 2 clips, 1 min — 2 clips, 1.5 min — 3 clips, 2 min — 4 clips, 3 min — 6 clips |
| Seedance model | Seedance 2.0 Mini, Seedance 2.0, Seedance 2.5 Recommended |
View screenshots of these menus
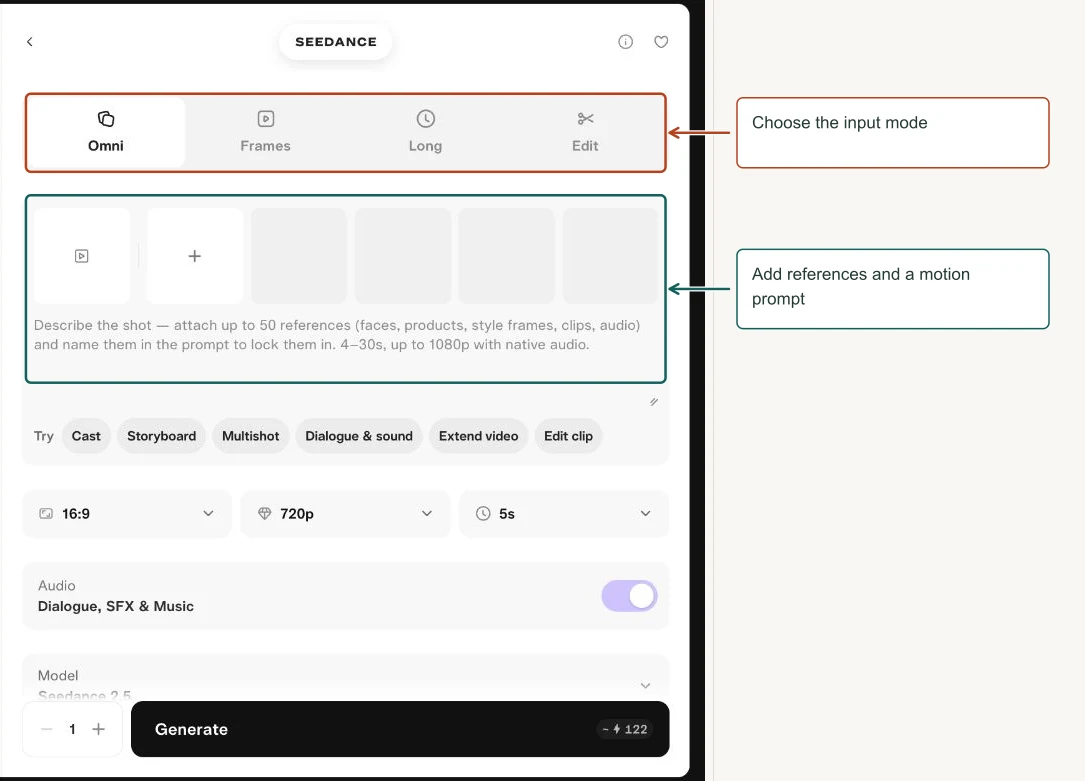
Seedance 2.5
Open the Seedance workspace with the 2.5 variant selected.
How to use it
- Confirm 2.5 in the model picker.
- Add the relevant references and choose an input mode.
- Describe shots, camera and audio clearly.
- Check the estimated cost before rendering.
Controls explained
| Control | What it means |
|---|---|
| Input modes | Omni, Frames, Long and Edit are visible in the shared form. |
| References and Prompt | Attach media, then name their roles in the prompt. |
| Resolution and Duration | Depend on the selected variant and mode. The shared menu included 480p, 720p and 1080p plus long multi-clip entries. |
| Audio | Requests synchronized sound. |
| Model | The 2.5 label is the version displayed by Pika in this workspace. |
Try this
Three short shots: steam above a mug, a slow side reveal, then a centered hero view. Keep the same mug and room. Gentle café ambience, no narration.
Review tip. Long multi-clip choices are not the same as one continuous native clip. Plan continuity and review transitions.
MiniMax H3
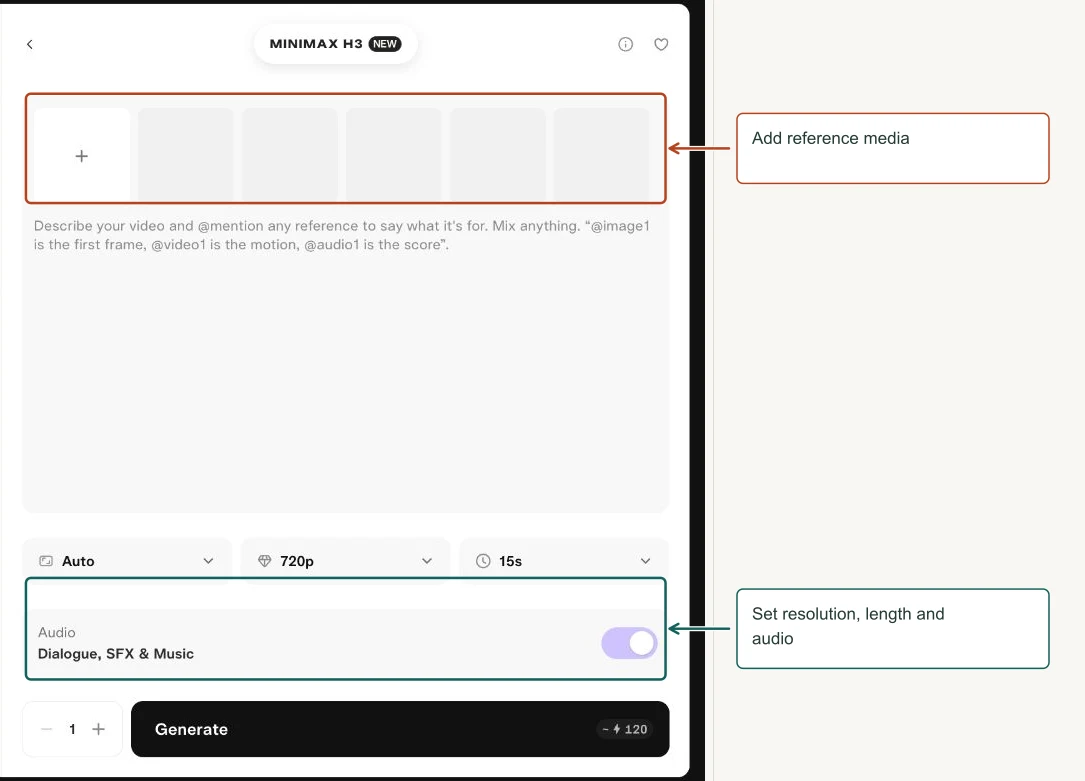
Generate video with mixed image, video and audio reference roles.
How to use it
- Attach the references you need.
- Use @ to specify first frame, motion or score roles.
- Choose duration, resolution, frame shape and audio.
- Generate one test and inspect how the references were used.
Controls explained
| Control | What it means |
|---|---|
| Reference attachments | Supports mixed guidance in the same prompt. |
| Prompt | The placeholder explicitly demonstrates @image1, @video1 and @audio1 roles. |
| Aspect Ratio | Auto or a chosen frame shape. |
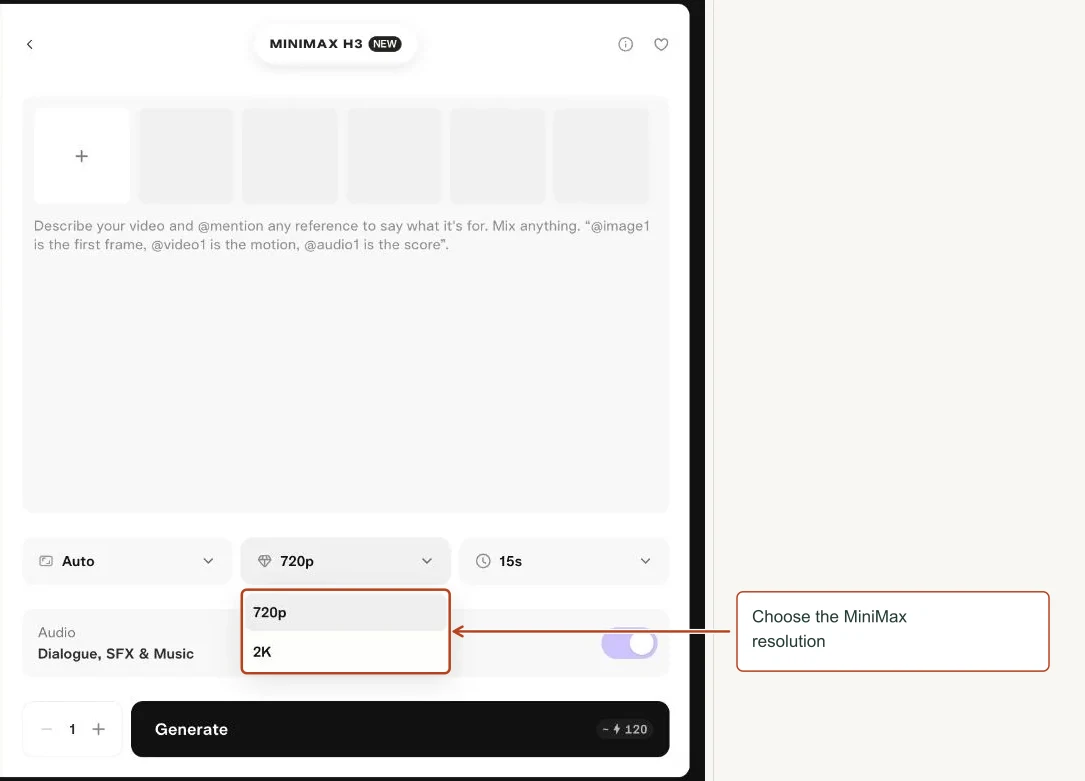
| Resolution | 720p and 2K appeared. |
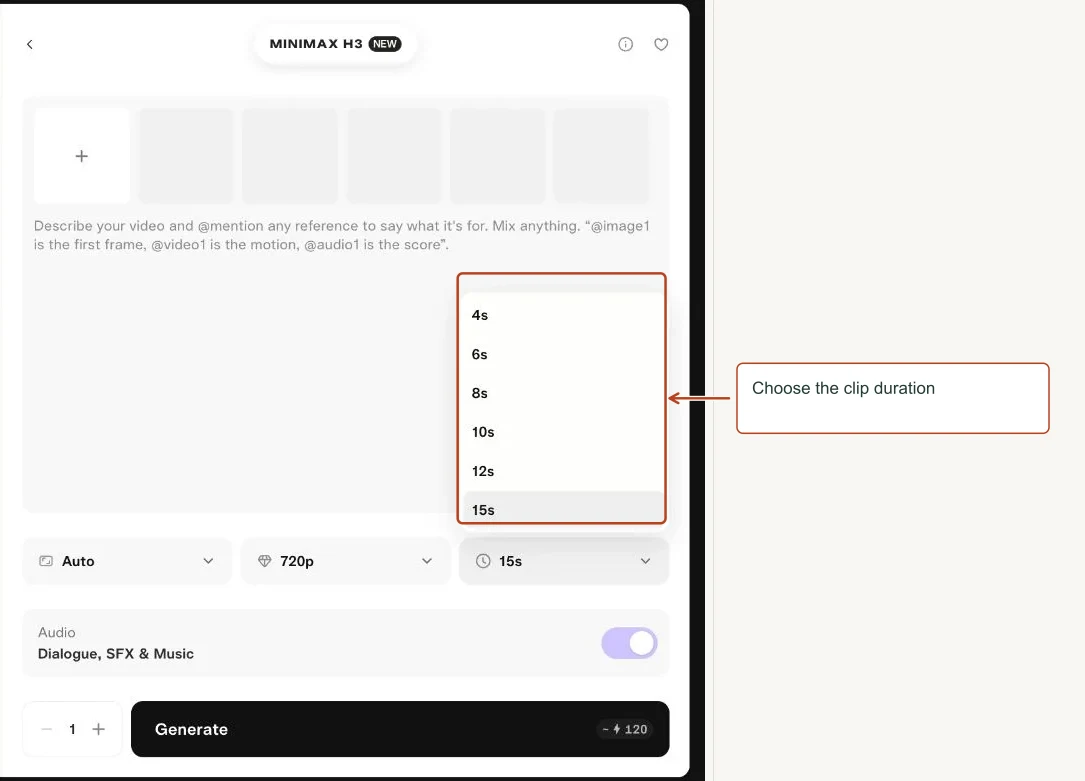
| Duration | 4, 6, 8, 10, 12 and 15 seconds appeared. |
| Audio | Requests dialogue, effects and music. |
Try this
@image1 defines the product. @video1 guides the gentle camera motion. Keep the product centered in soft daylight with subtle room tone.
Review tip. Add only references with a clear purpose. Conflicting examples can pull a result in different directions.
Menu choices
| Menu | Choices shown |
|---|---|
| Resolution | 720p, 2K |
| Duration | 4s, 6s, 8s, 10s, 12s, 15s |
View screenshots of these menus
Wan 3.0
Generate or edit video with multimodal references and optional audio in the Wan workspace.
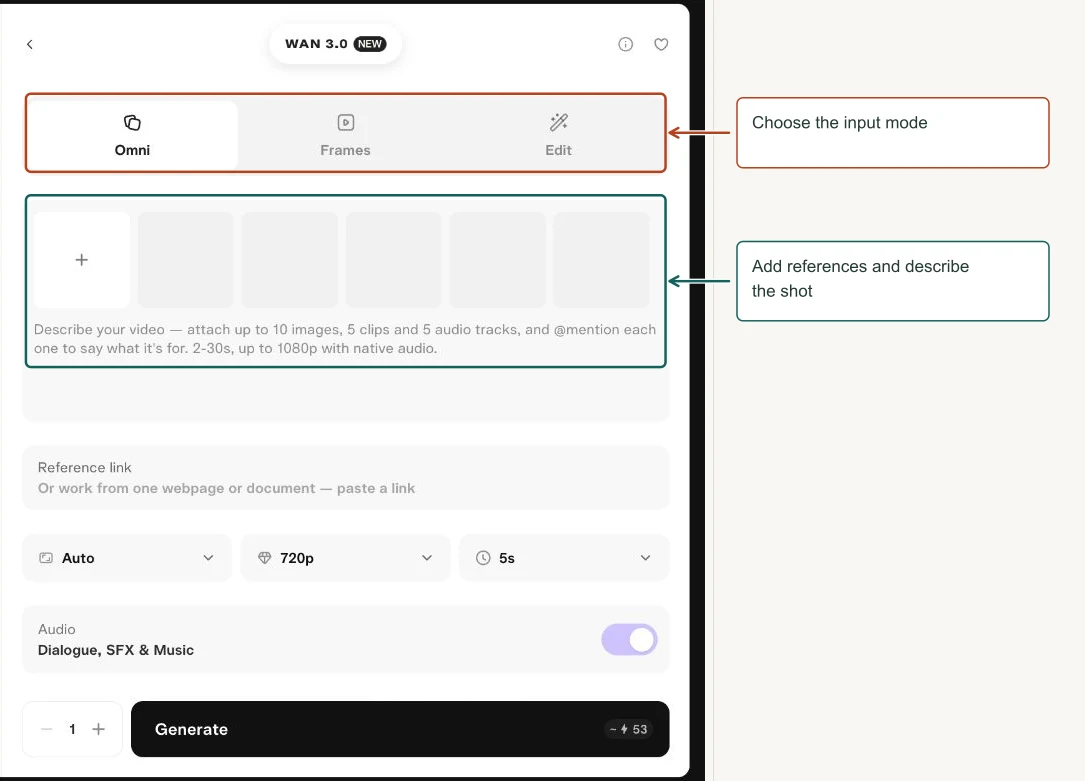
How to use it
- Choose Omni, Frames or Edit.
- Attach references and describe their roles.
- Optionally provide a reference link.
- Choose model, duration, resolution, aspect ratio and audio.
Controls explained
| Control | What it means |
|---|---|
| Omni, Frames and Edit | Different starting workflows for mixed references, frame guidance or existing video. |
| References | The prompt field listed up to 10 images, 5 clips and 5 audio tracks. |
| Reference link | A webpage or document link to work from; review its relevance before submitting. |
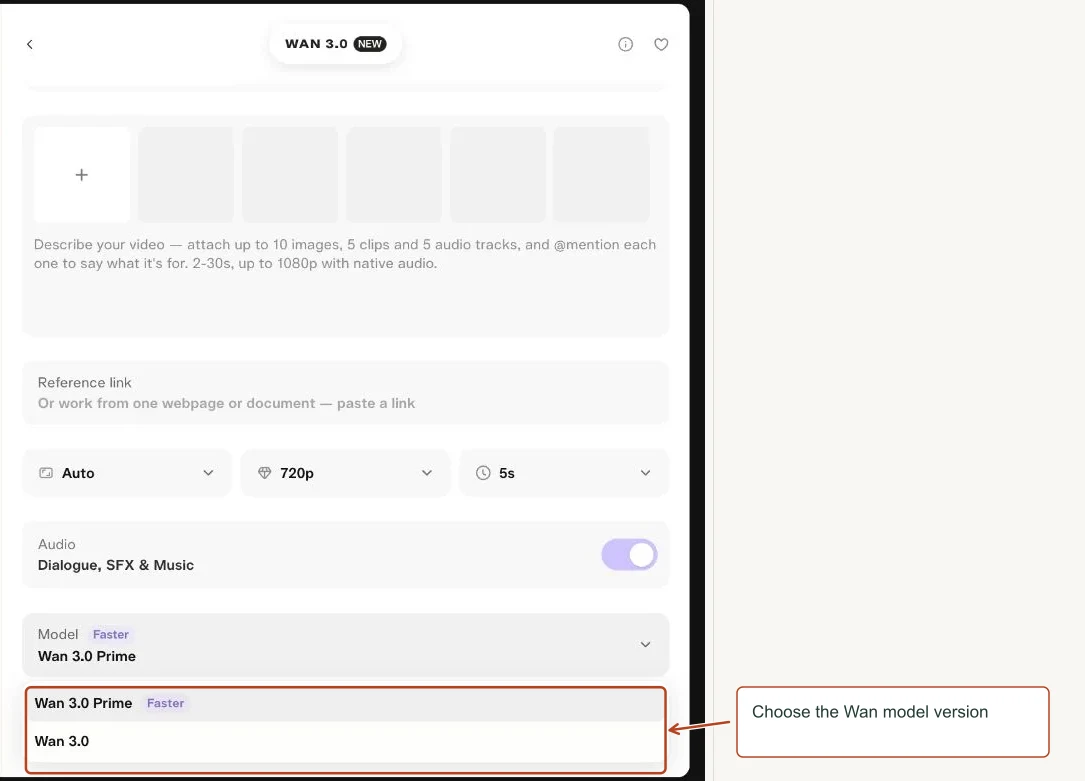
| Wan model | Wan 3.0 Prime was labeled Faster; Wan 3.0 was the other choice. |
| Audio | Requests dialogue, effects and music. |
Try this
Use the product reference in a calm kitchen scene. Camera tracks slowly right. Preserve the product color and label. Soft room ambience, no speech.
Review tip. The model label and all numerical options here are recorded from Pika’s UI, not independently benchmarked.
Menu choices
| Menu | Choices shown |
|---|---|
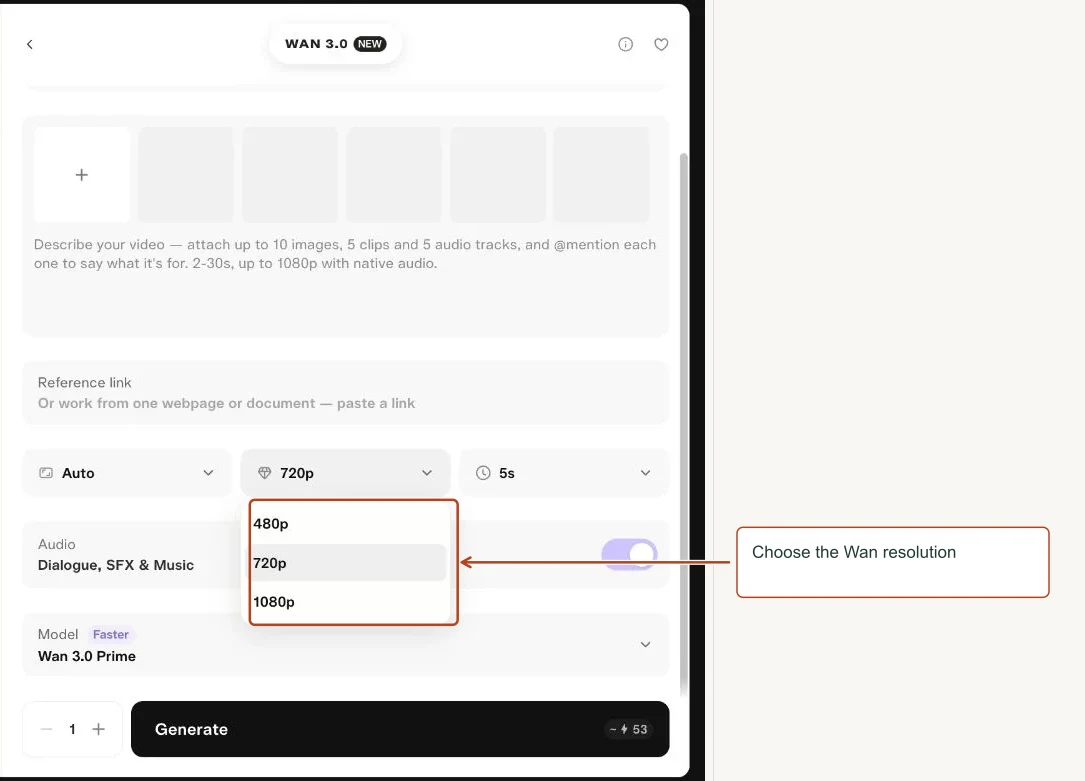
| Resolution | 480p, 720p, 1080p |
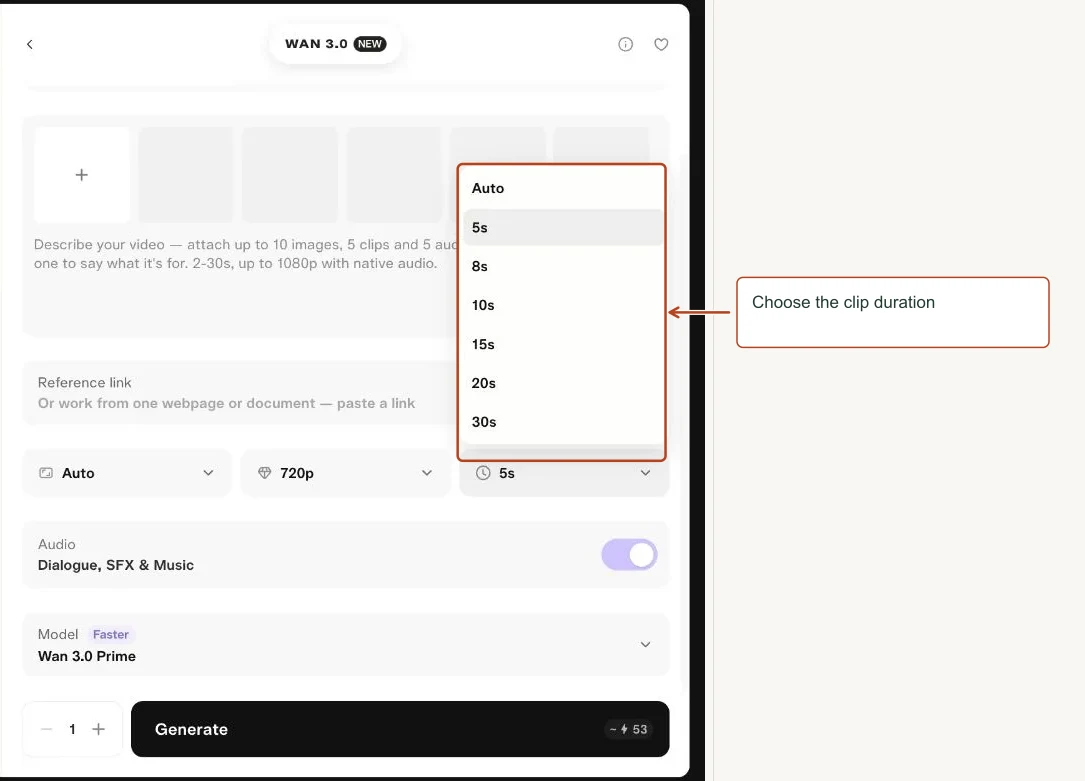
| Duration | Auto, 5s, 8s, 10s, 15s, 20s, 30s |
| Wan model | Wan 3.0 Prime Faster, Wan 3.0 |
View screenshots of these menus
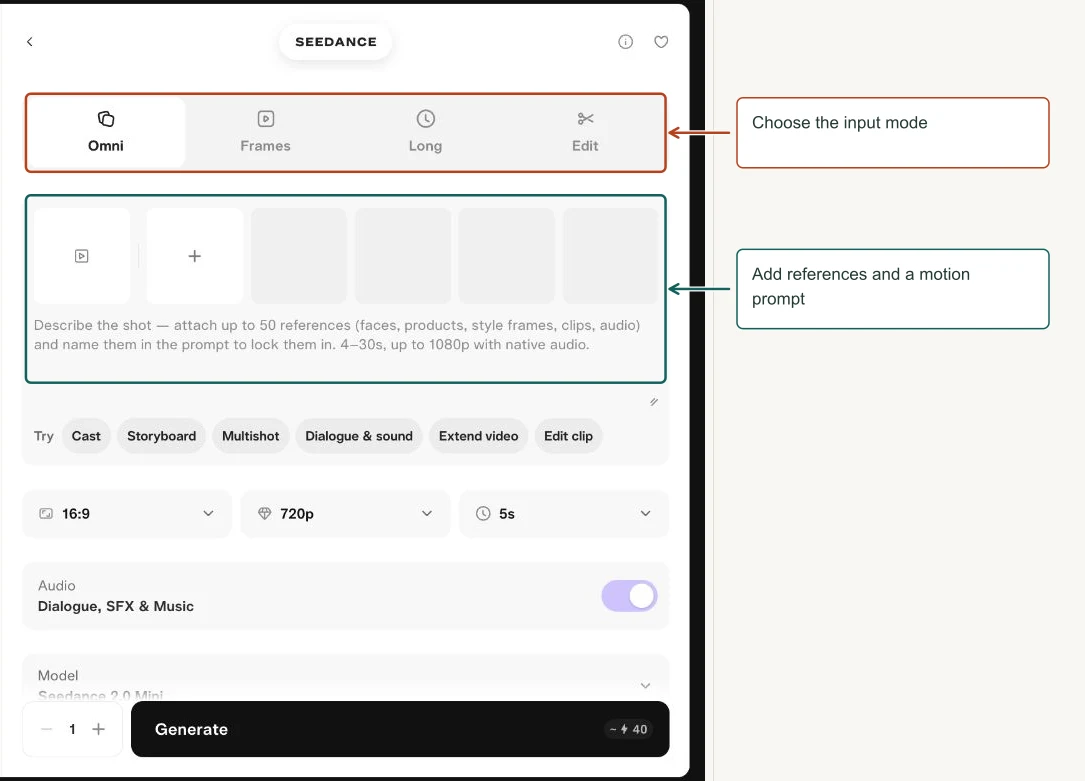
Seedance 2.0 Mini
Open the shared Seedance workspace with its Mini variant.
Open Seedance 2.0 Mini in Pika
How to use it
- Confirm Seedance 2.0 Mini in the model selector.
- Choose the input mode and add your prompt.
- Use a short, inexpensive test configuration available in the form.
- Review the output before increasing duration or quality.
Controls explained
| Control | What it means |
|---|---|
| Input modes | The shared panel shows Omni, Frames, Long and Edit; support can vary by variant. |
| Prompt suggestions | Help structure casting, storyboards, multi-shot and audio directions. |
| Model and output settings | Verify Mini remains selected and that the desired combination is enabled. |
| Generations | Keep one output while learning. |
Try this
A single leaf turns gently in the breeze against a plain sky. Static camera, soft daylight, one continuous shot.
Review tip. A simplified subject and short duration make model comparisons easier. Do not infer Mini’s exact limits from the shared picker alone.
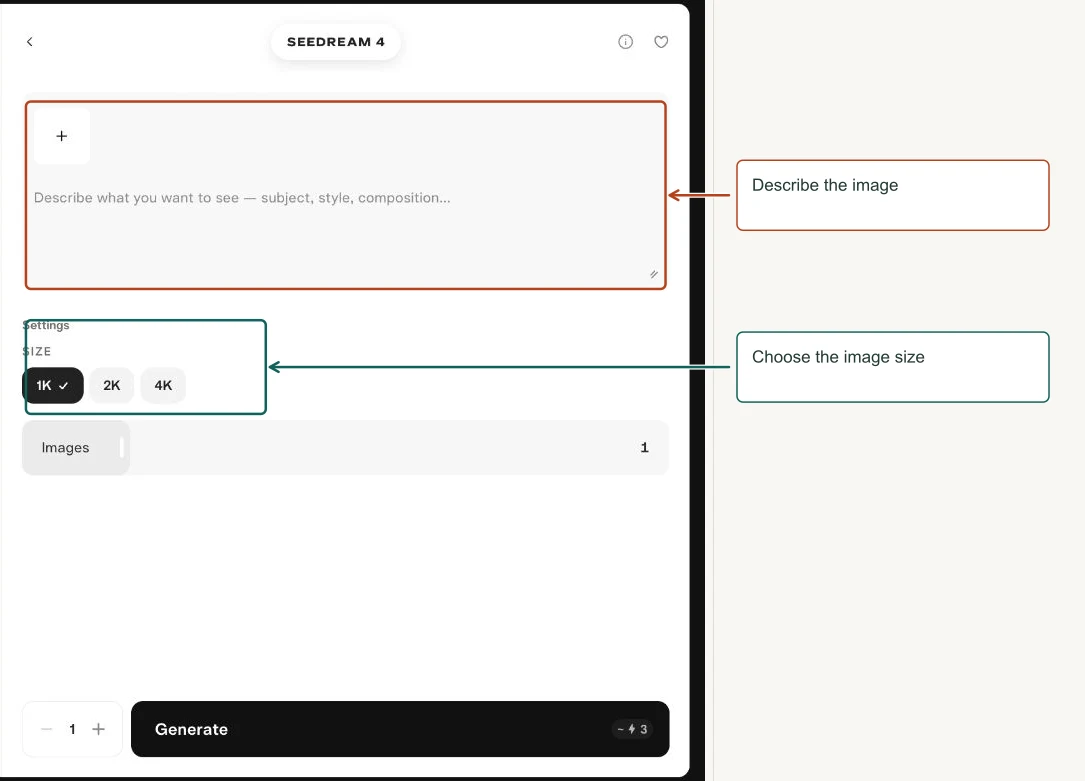
Seedream 4
Create or edit still images with a simple size and image-count workflow.
How to use it
- Write the frame you want; add references for editing or combining.
- Choose 1K, 2K or 4K.
- Set the Images slider and inspect the overall generation count.
- Generate and choose the best composition.
Controls explained
| Control | What it means |
|---|---|
| References | The app description states up to 10 image references. |
| Prompt | Defines subject, look and crop; this form has no dedicated aspect-ratio control. |
| Size | 1K, 2K and 4K are output size tiers. |
| Images | The app description states up to six images in one run. |
| Generations | A separate run-count control; check the resulting estimate to avoid multiplying outputs accidentally. |
Try this
Wide editorial landscape photograph of an ivory mug on an oak table, soft daylight from the left, clean blue background, no text.
Review tip. The prompt sets the crop in this form. Specify portrait, landscape or panorama explicitly.
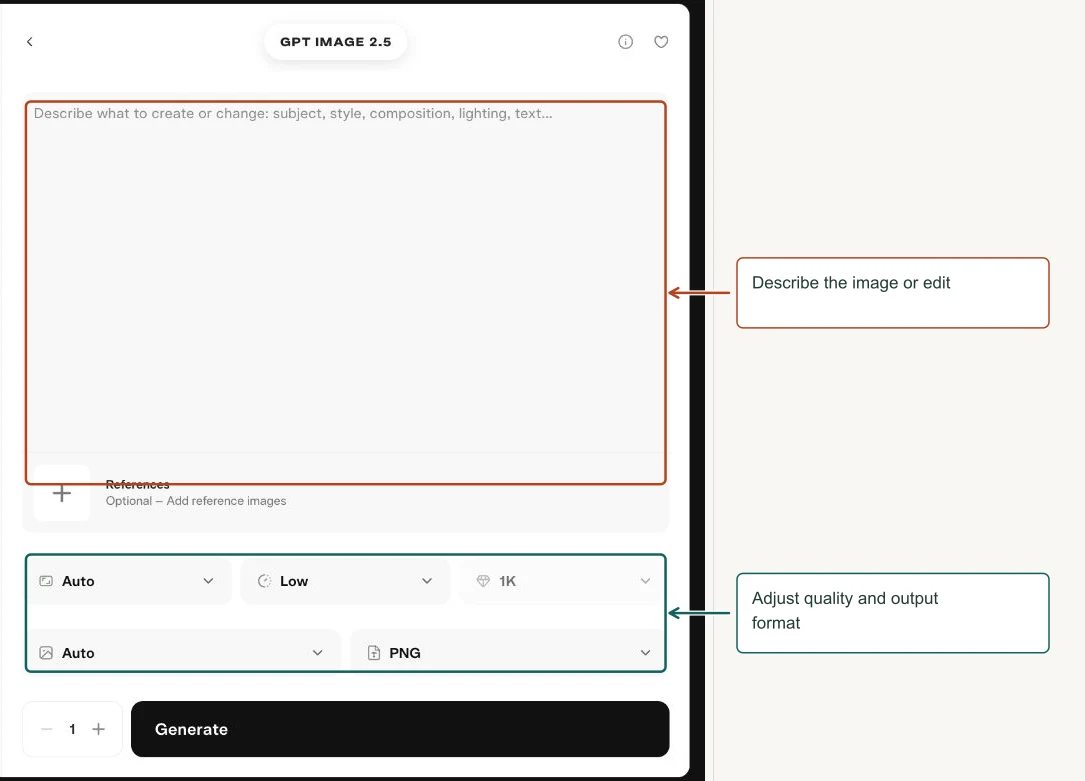
GPT Image 2.5
Create or edit images using the app labeled GPT Image 2.5 in the Pika workspace.
How to use it
- Write the image or editing instruction.
- Attach optional references.
- Choose quality, background, format and available resolution.
- Generate and review exact text and fine details.
Controls explained
| Control | What it means |
|---|---|
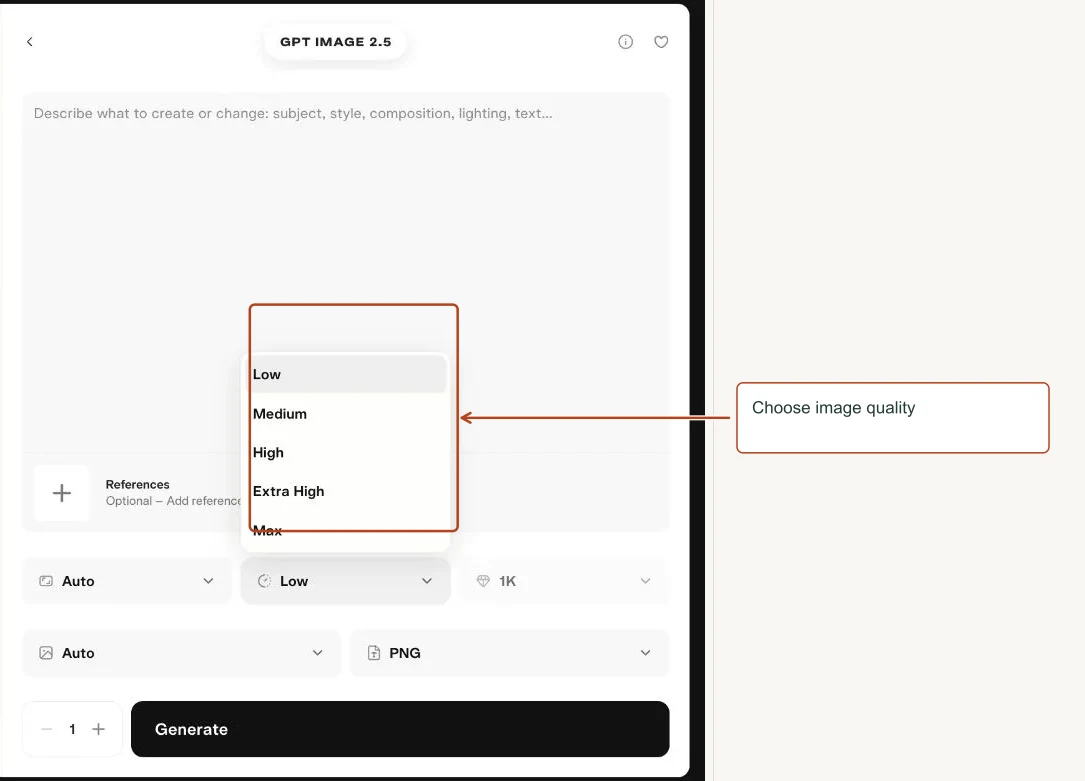
| Quality | Low, Medium, High, Extra High and Max appeared. Higher tiers may increase cost. |
| Resolution | The pictured setting was 1K and disabled at the current configuration. |
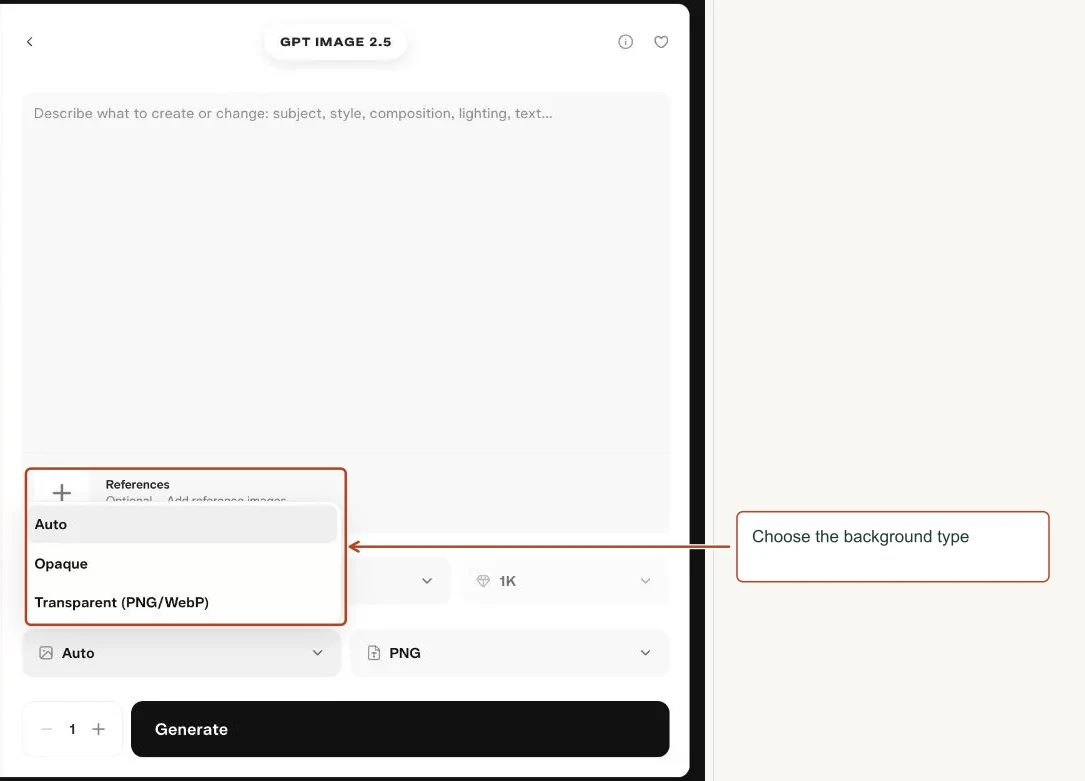
| Background | Auto, Opaque or Transparent; transparency was labeled PNG/WebP. |
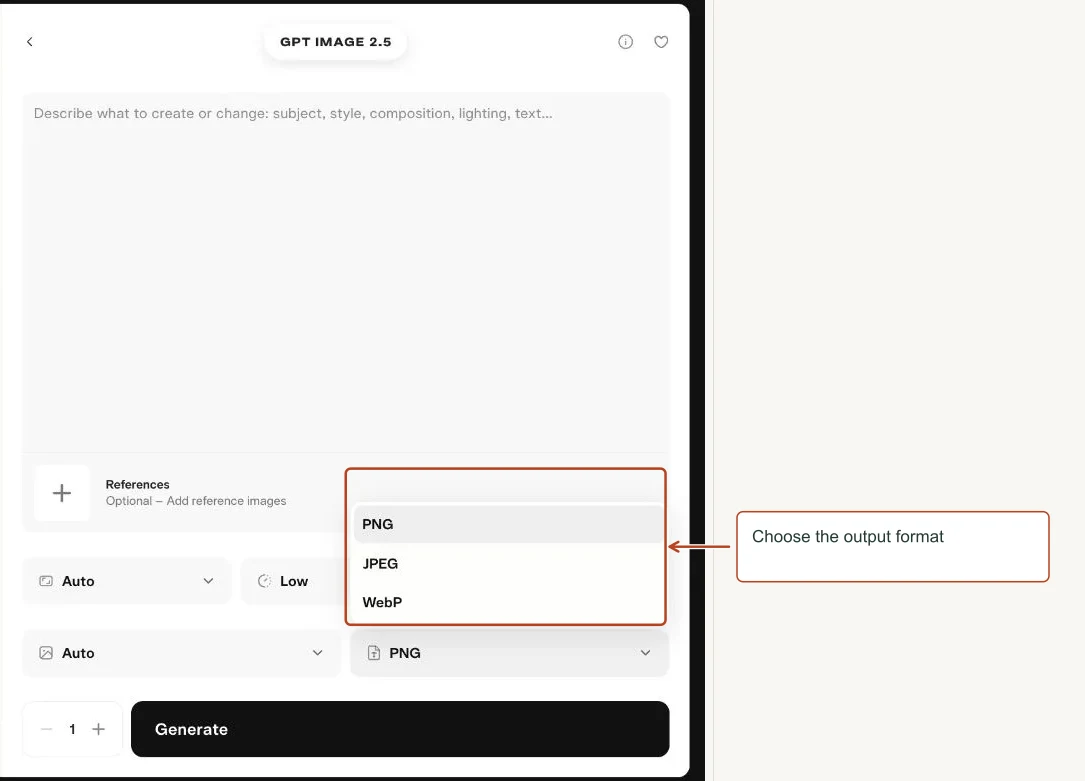
| Format | PNG, JPEG or WebP. |
| References | Optional images to guide creation or editing. |
Try this
A clean product cutout of a terracotta mug, three-quarter view, soft studio light, isolated with a transparent background, no text.
Review tip. Transparent output requires a supporting format. JPEG does not store an alpha transparency channel. Use the exact app labels when following screenshots.
Menu choices
| Menu | Choices shown |
|---|---|
| Quality | Low, Medium, High, Extra High, Max |
| Background | Auto, Opaque, Transparent (PNG/WebP) |
| Format | PNG, JPEG, WebP |
View screenshots of these menus
Eleven Multilingual v2
Create narration with the Eleven Multilingual v2 option.
Open Eleven Multilingual v2 in Pika
How to use it
- Paste a short script.
- Select a voice.
- Adjust Stability only if needed.
- Check pronunciation and pacing before creating the full version.
Controls explained
| Control | What it means |
|---|---|
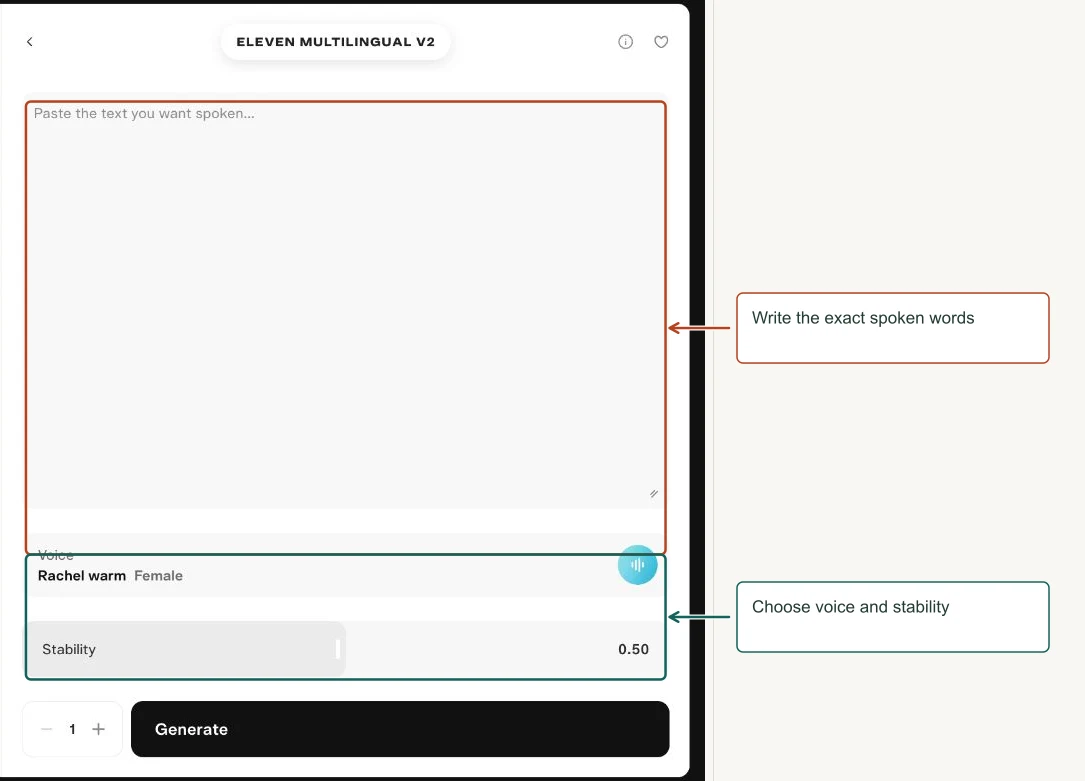
| Script | The words to be spoken. |
| Voice | Speaker selection; the pictured setting was Rachel. |
| Stability | Delivery consistency control, initially 0.50. |
| Generations | Separate output attempts. |
Try this
Welcome. This short lesson will help you turn a simple idea into your first creative project.
Review tip. The Pika app description advertises 29 languages. Test the intended language and voice rather than assuming equal performance.
Pika Speech
Create narration with Pika’s own speech workspace and voice presets.
How to use it
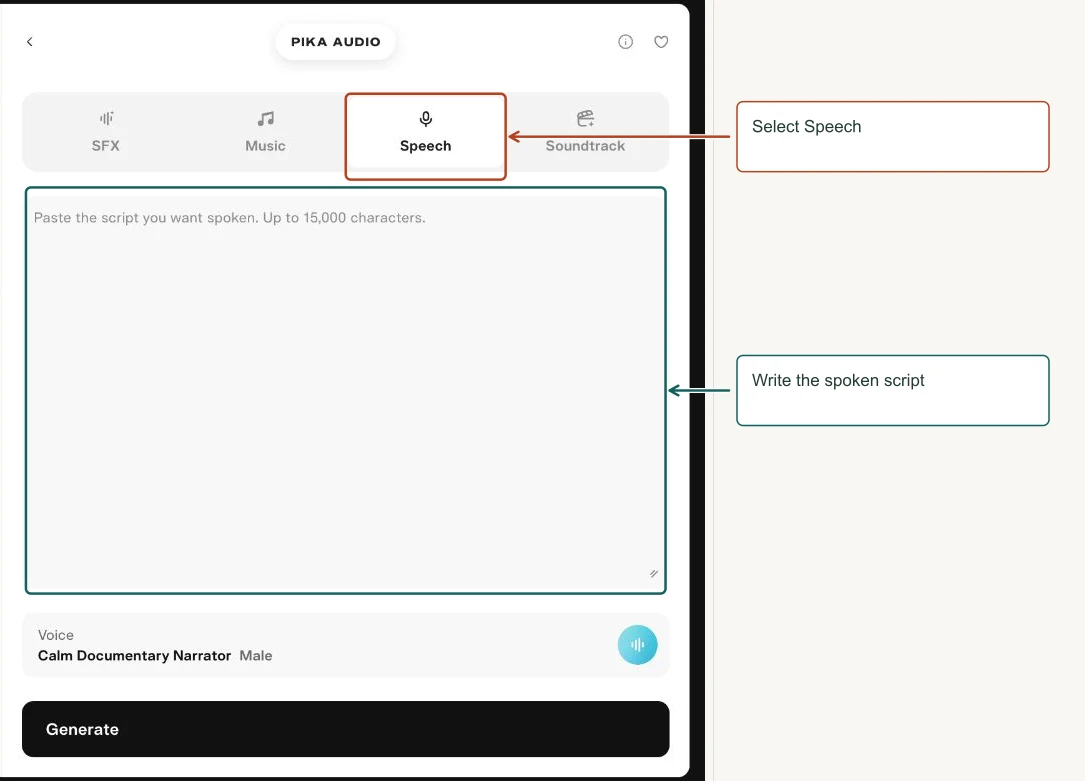
- Choose Speech mode.
- Enter your script.
- Select a preset voice appropriate to the audience.
- Generate a short pronunciation test.
Controls explained
| Control | What it means |
|---|---|
| Script | The form advertises up to 15,000 characters. |
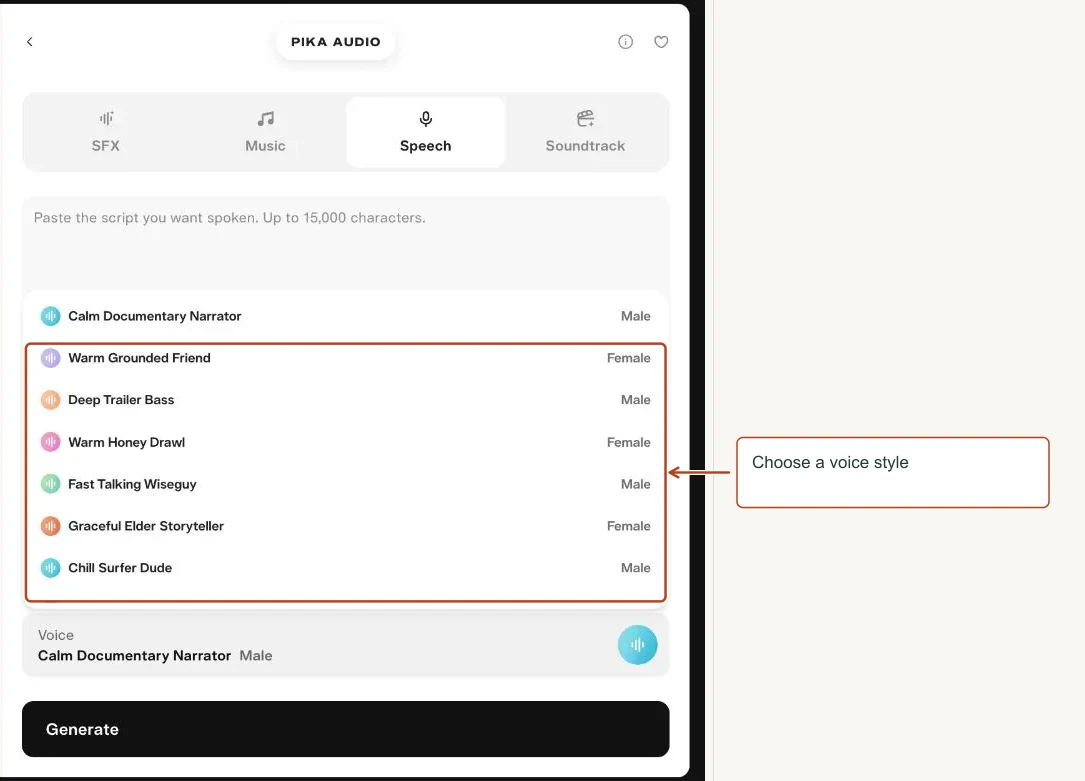
| Voice | A large preset menu describes delivery styles, such as Calm Documentary Narrator, Warm Grounded Friend and Polished News Anchor. |
| Mode | Switches between Pika Audio’s SFX, Music, Speech and Soundtrack tools. |
| Generate | Creates spoken audio; this does not create a talking face. |
Try this
One clear idea is enough to begin. Make a short test, listen carefully, and improve one detail at a time.
Review tip. Choose a voice by listening to the output, not just its name. The voice catalog is included as a reference.
More views of this workflow
Eleven Turbo v2.5
Create spoken audio with the Eleven Turbo v2.5 option.
Open Eleven Turbo v2.5 in Pika
How to use it
- Enter the script.
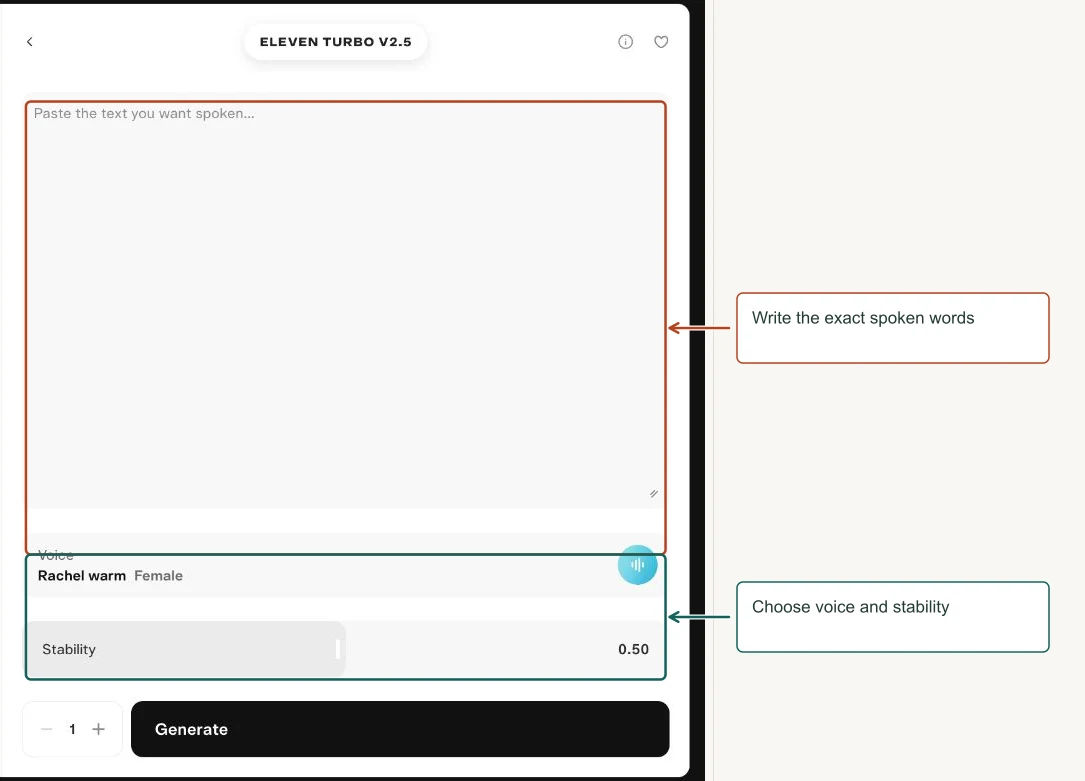
- Choose a voice and Stability.
- Generate a short sample.
- Check speed, emotion and pronunciation.
Controls explained
| Control | What it means |
|---|---|
| Script | Exact spoken wording. |
| Voice | Speaker identity and style choice. |
| Stability | Controls delivery consistency versus variation. |
| Generations | Number of takes. |
Try this
Your order is ready. Thank you for visiting, and have a wonderful day.
Review tip. The app is presented as a high-speed speech option. No timing benchmark was performed for this guide.
MiniMax Music 3.0
Generate a music track with the MiniMax Music 3.0 app.
Open MiniMax Music 3.0 in Pika
How to use it
- Describe genre, mood, instruments and song structure.
- State if vocals or an instrumental are wanted.
- Review the estimate and request one generation.
- Listen through the full track before using it.
Controls explained
| Control | What it means |
|---|---|
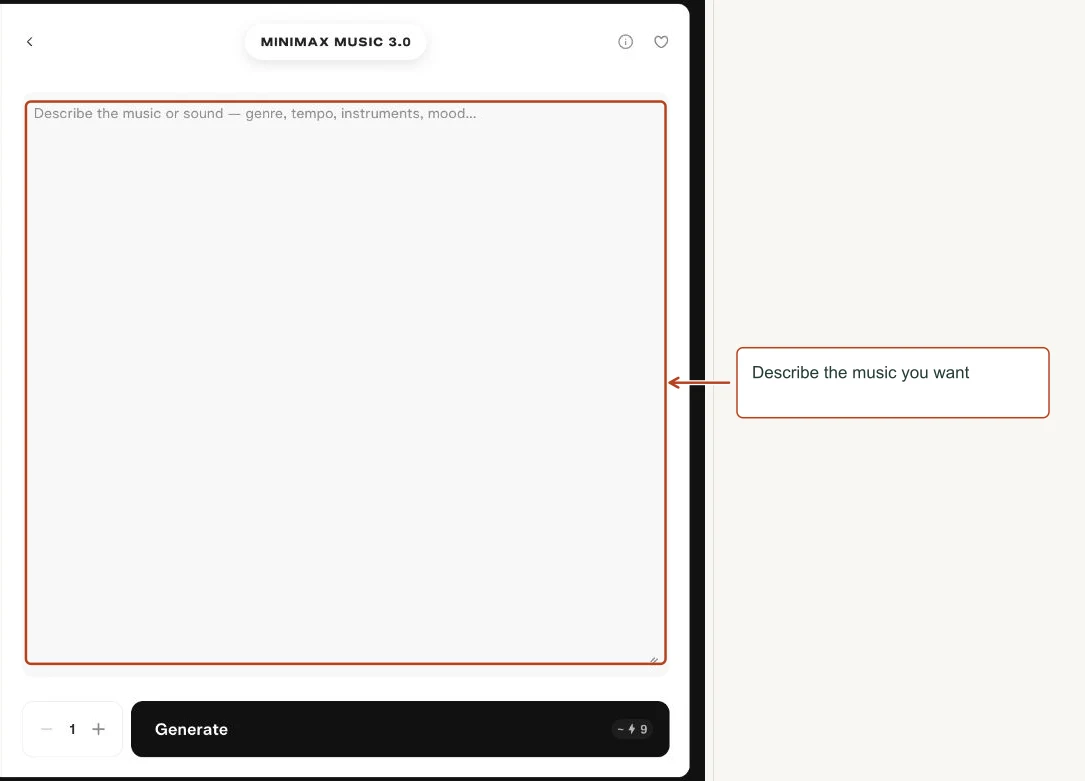
| Prompt | The central control in the pictured form; describe the musical result in detail. |
| Generations | Number of separate versions. |
| Generate estimate | The screenshot showed about 9 credits for its initial state; it is not a fixed universal rate. |
Try this
Gentle instrumental acoustic theme, warm guitar, brushed drums, no singing, a quiet introduction, modest build and clean final chord.
Review tip. The app description advertises songs up to five minutes, but the pictured form did not expose a dedicated duration selector.
Pika Music
Use Pika’s music engine directly for instrumental or vocal tracks.
How to use it
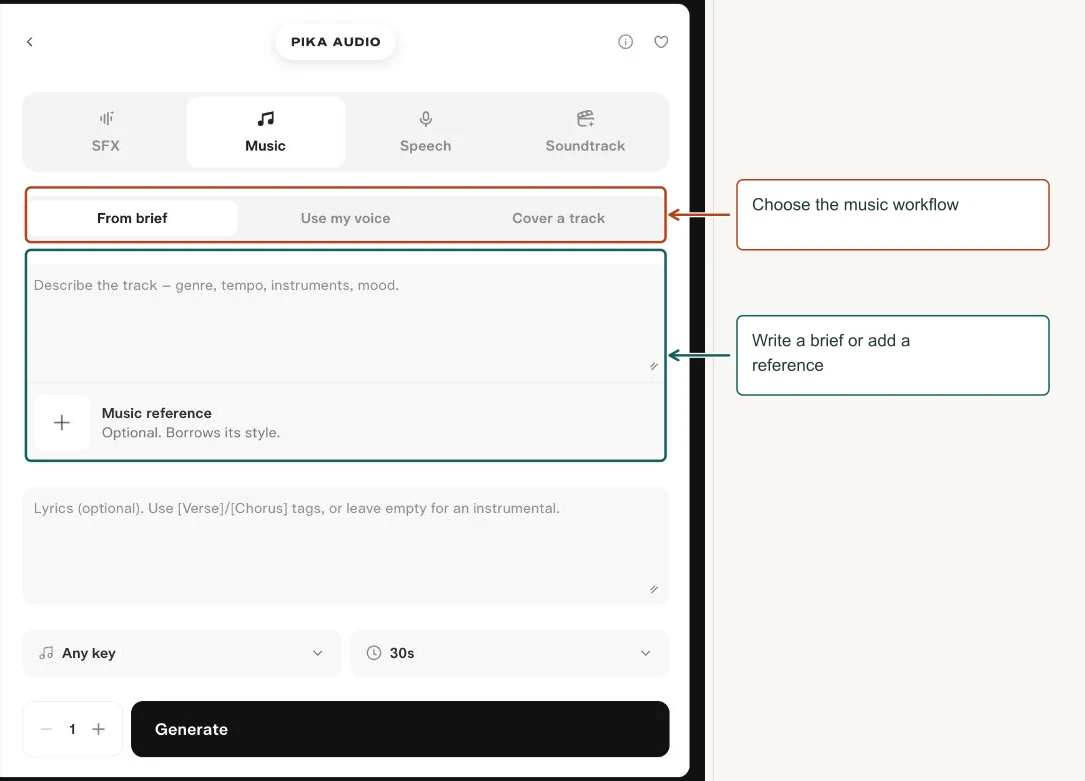
- Choose From brief, Use my voice or Cover a track.
- Write the musical direction and supply the required reference if applicable.
- Add optional lyrics, key and length.
- Generate and review the musical structure.
Controls explained
| Control | What it means |
|---|---|
| From brief | Text-led music with optional style reference. |
| Use my voice | Requires a voice sample. |
| Cover a track | Requires source audio. |
| Lyrics | Optional structured text using verse/chorus tags. |
| Key and Length | Set tonality and duration; the pictured settings were Any key and 30 seconds. |
Try this
Light upbeat instrumental, plucked strings and soft percussion, optimistic but unobtrusive, no vocals, clean ending.
Review tip. This is the Pika engine also available through Music Studio. The studio is a wrapper that lets you choose other engines.
More views of this workflow
Pika SFX
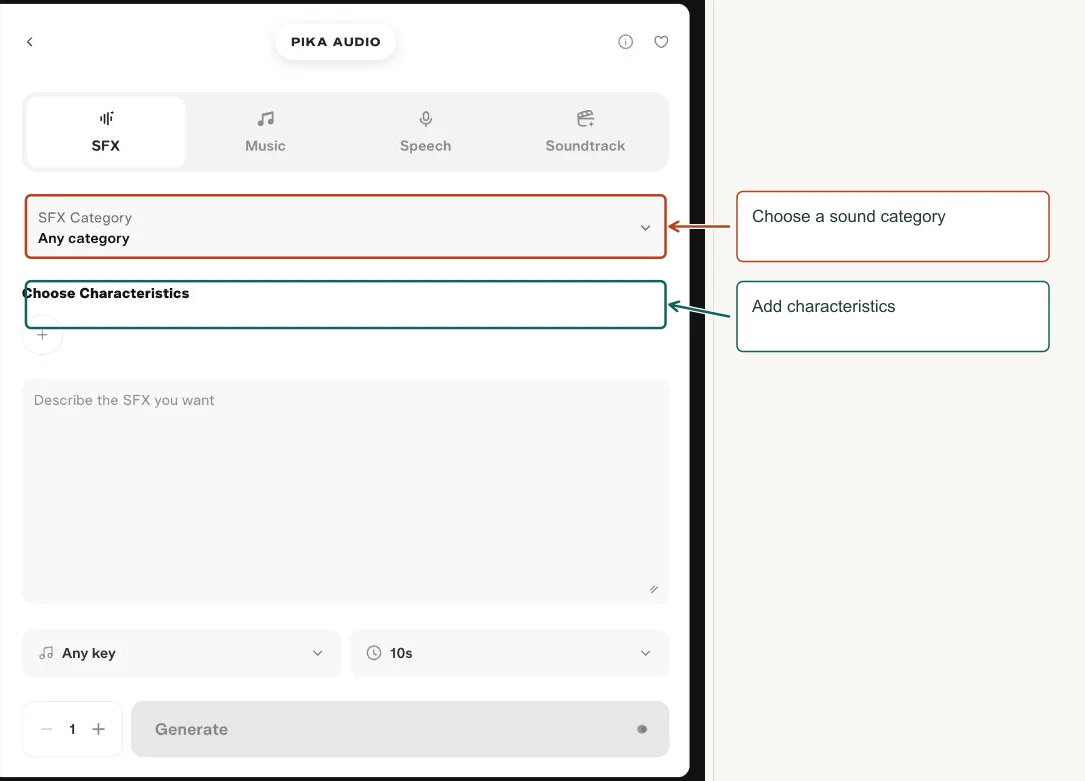
Create focused sound effects with categories, descriptive characteristics, key and duration.
How to use it
- Choose a category or keep Any category.
- Add characteristics where useful and describe the sound.
- Choose key for tonal effects and set duration.
- Generate, then trim or mix the useful portion.
Controls explained
| Control | What it means |
|---|---|
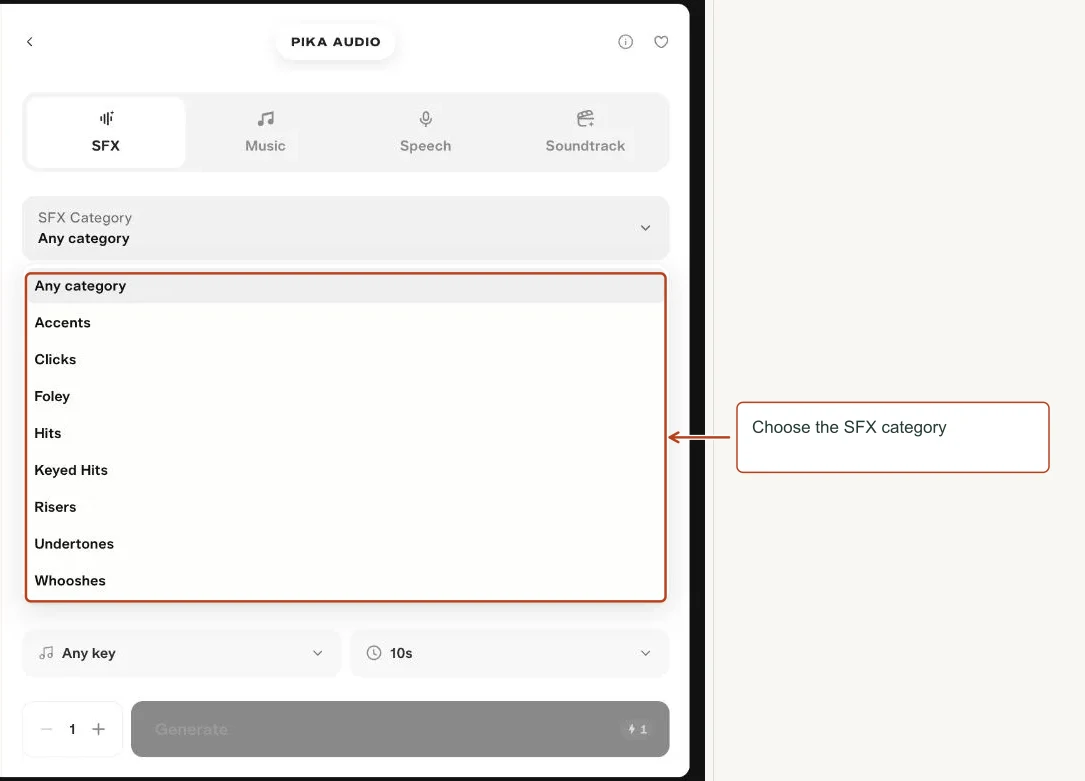
| SFX Category | Any category, Accents, Clicks, Foley, Hits, Keyed Hits, Risers, Undertones and Whooshes were shown. |
| Characteristics | Additional descriptors. Add characteristics that describe the sound you want. |
| Prompt | Specify material, action, room and perspective. |
| Key | Matches tonal effects to music; Any key avoids a specific key request. |
| Duration | The app description states 1–20 seconds. The pictured setting was 10 seconds. |
Try this
A soft airy whoosh passing from left to right, clean studio sound, quick rise and gentle tail, no music, no speech.
Review tip. Foley means action sounds such as footsteps or handling objects. A riser builds tension; an undertone is a sustained background layer.
Menu choices
| Menu | Choices shown |
|---|---|
| SFX Category | Any category, Accents, Clicks, Foley, Hits, Keyed Hits, Risers, Undertones, Whooshes |
View screenshots of these menus
Veo 3.1
Generate cinematic clips, animate a still or access clip-extension workflows through Veo.
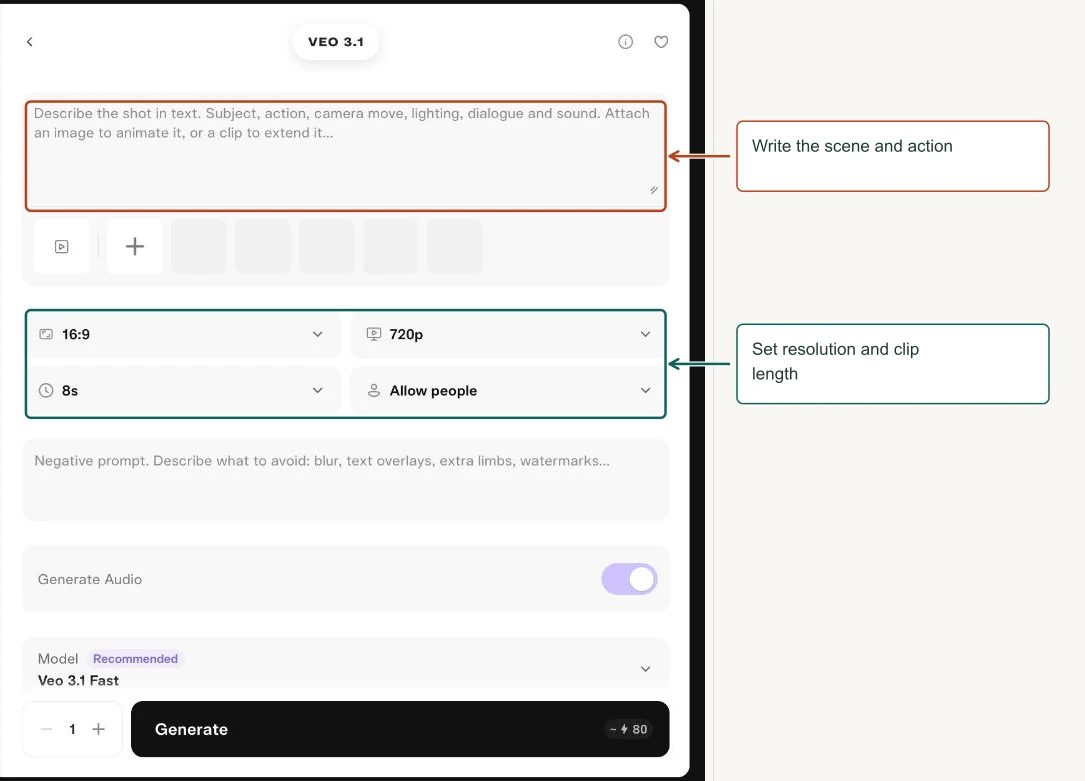
How to use it
- Write the image action, camera, lighting and sound.
- Attach a relevant reference if needed.
- Choose model tier, size, duration, people setting and audio.
- Use Negative prompt for specific exclusions.
Controls explained
| Control | What it means |
|---|---|
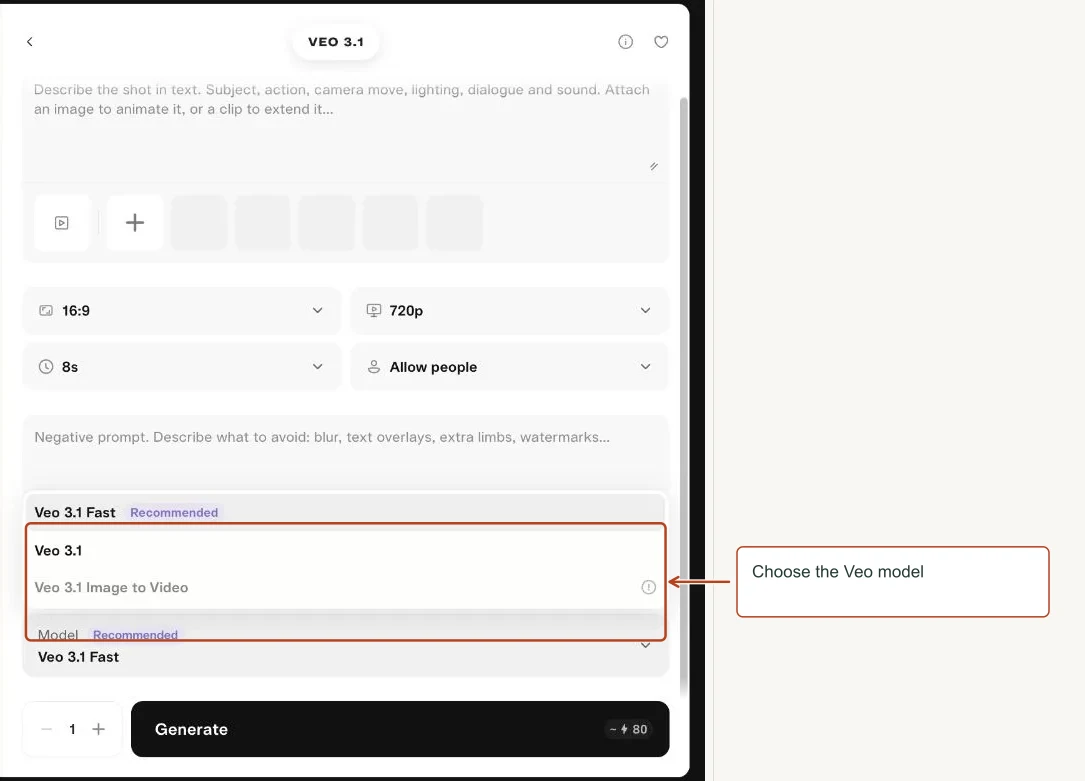
| Model | Fast, Veo 3.1 and Image to Video appeared; the latter required an image. |
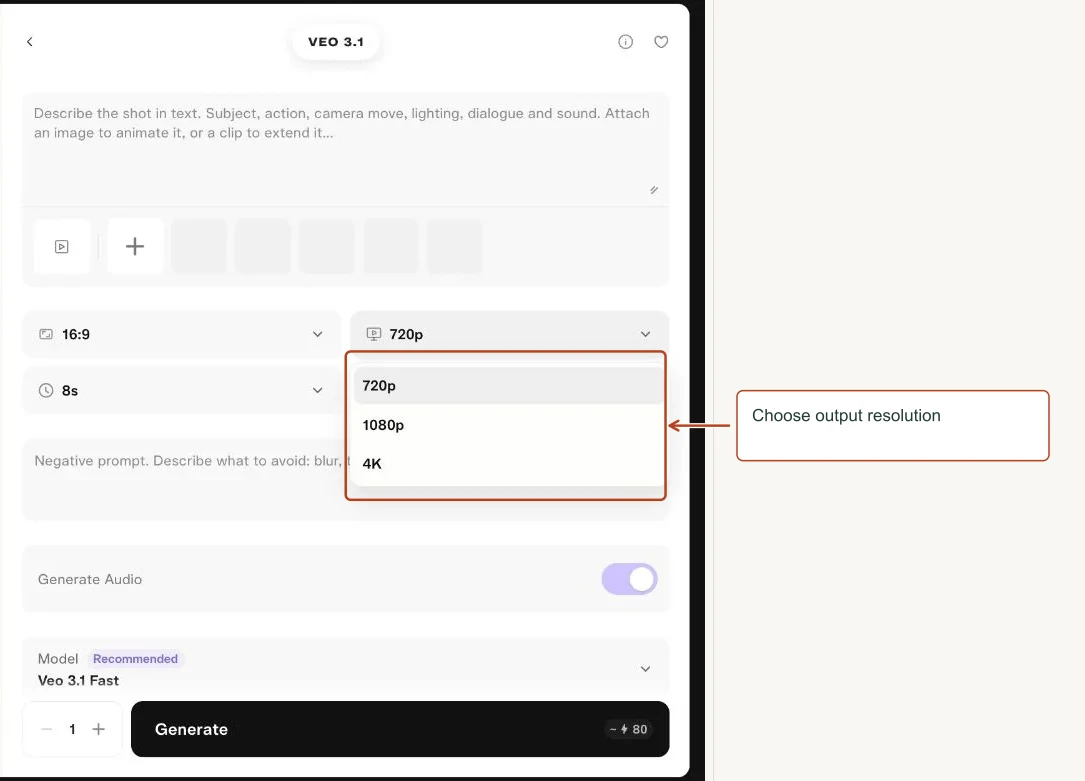
| Size | 720p, 1080p and 4K appeared, subject to model/input compatibility. |
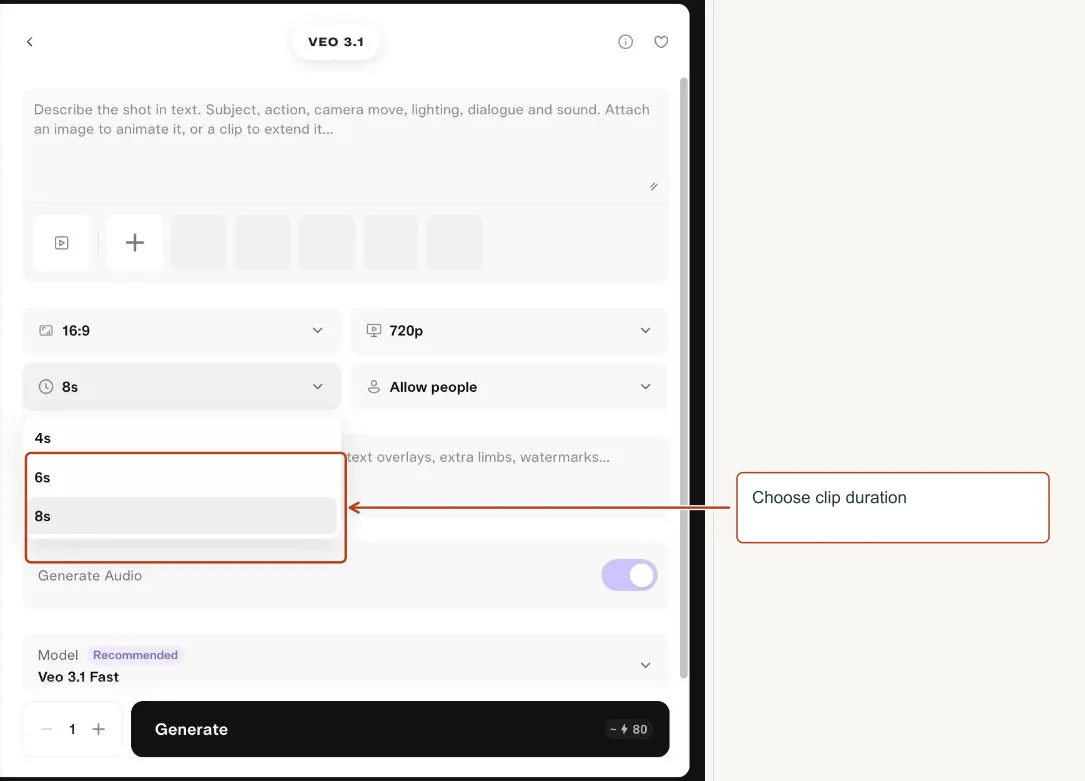
| Duration | 4, 6 and 8 seconds appeared in the pictured form. |
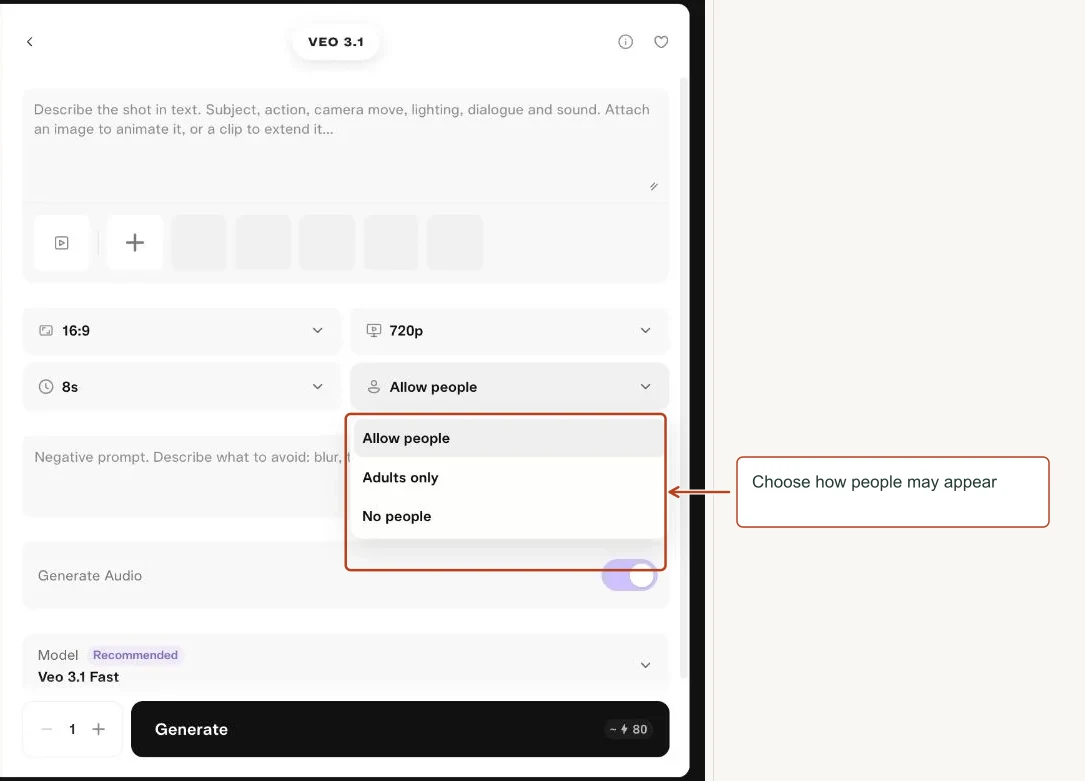
| People | Allow people, Adults only or No people. |
| Negative prompt | Describes what to avoid, such as text overlays or blur. |
| Generate Audio | Requests sound; the app description says turning it off gives a silent, cheaper render. |
| References | Images can guide or be animated; clips can lead to an extension workflow. |
Try this
A locked-off close-up of rain on a café window. Soft golden lights blur in the distance. Gentle rain audio. No speech, no music, no on-screen text.
Review tip. A disabled model can remain visible with a reason. Read the reason rather than trying to force an incompatible combination.
Menu choices
| Menu | Choices shown |
|---|---|
| Size | 720p, 1080p, 4K |
| Duration | 4s, 6s, 8s |
| People | Allow people, Adults only, No people |
| Veo 3.1 model | Veo 3.1 Fast Recommended, Veo 3.1, Veo 3.1 Image to Video Needs an image to animate |
View screenshots of these menus
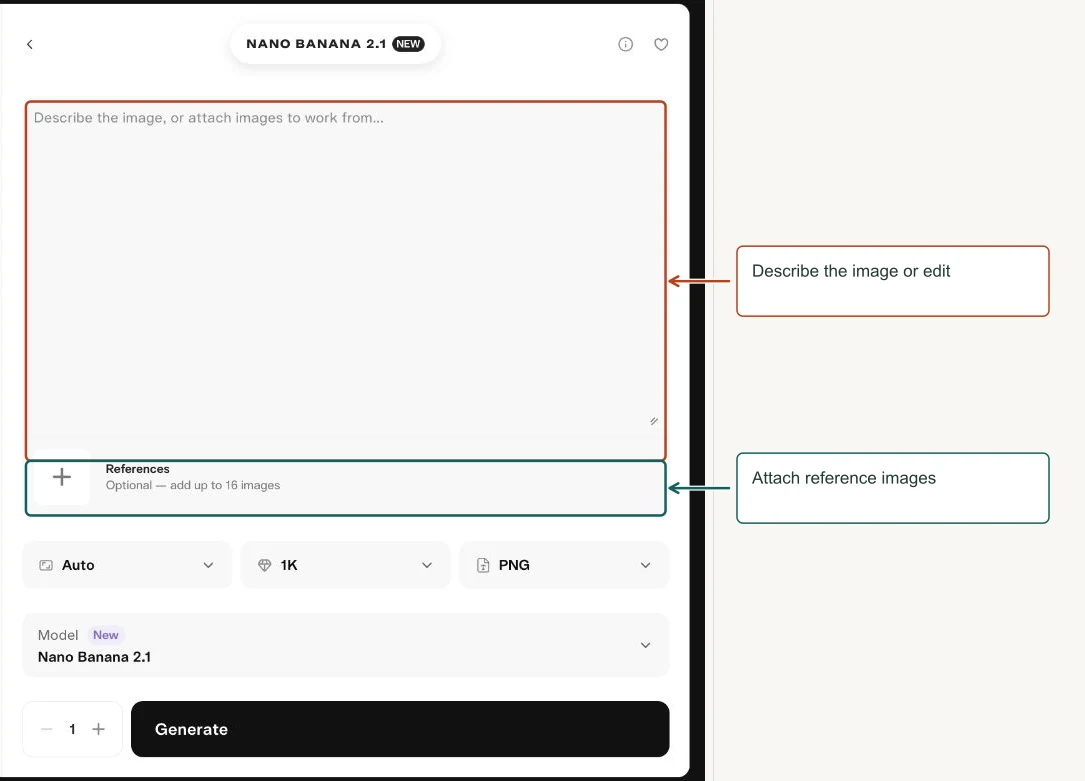
Nano Banana 2.1
Create and edit images in the Nano Banana family workspace.
How to use it
- Write a creation or editing instruction.
- Attach references and explain their roles.
- Select model variant, resolution, format and aspect ratio.
- Generate and review small details.
Controls explained
| Control | What it means |
|---|---|
| References | Up to 16 images was shown in the form. |
| Model | Nano Banana 2 Lite, 2, 2.1 and Pro appeared. |
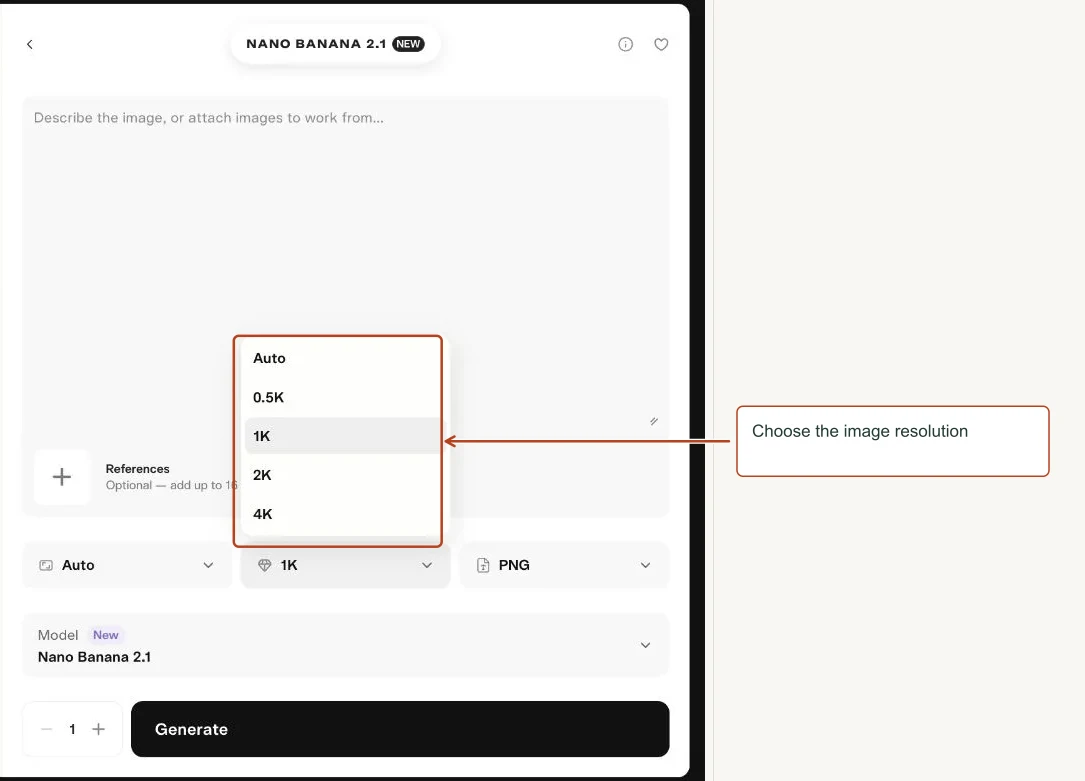
| Resolution | Auto, 0.5K, 1K, 2K and 4K appeared. |
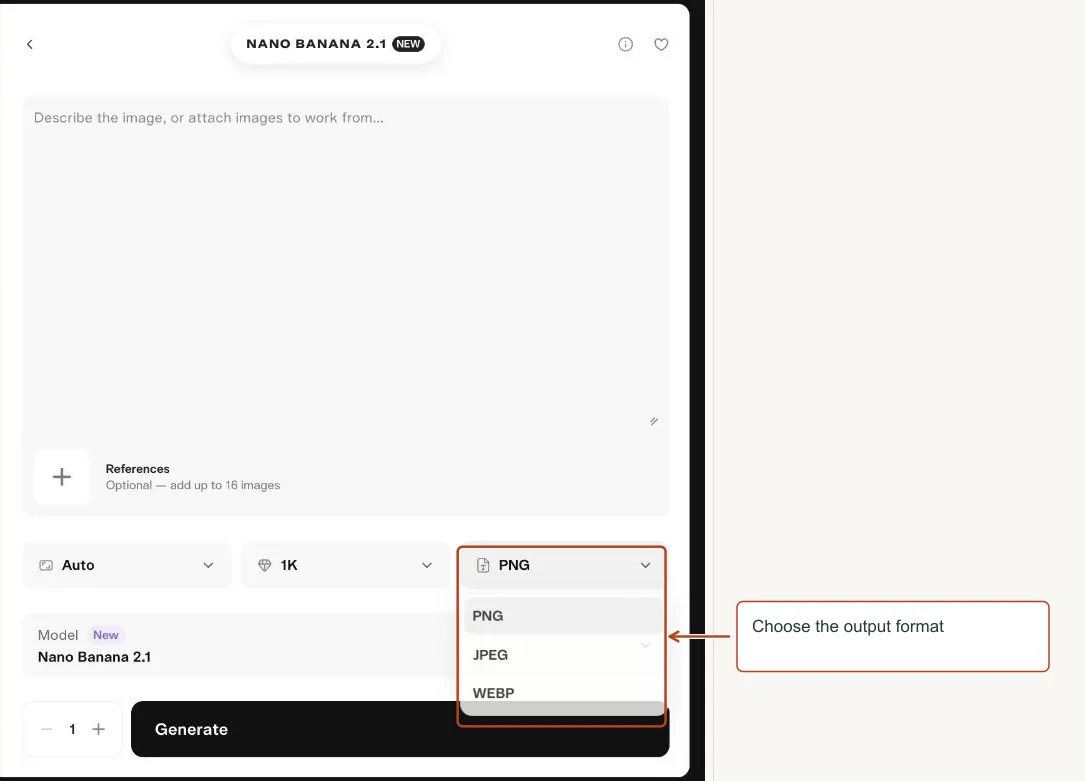
| Format | PNG, JPEG or WebP. |
| Aspect Ratio | Sets the frame shape. |
Try this
Using the attached mug, create a bright kitchen product image. Preserve its shape and handle. Add soft morning shadows and ample empty space on the right.
Review tip. Use the same reference for a sequence of related images. Model changes can also change the interpretation of a prompt.
Menu choices
| Menu | Choices shown |
|---|---|
| Resolution | Auto, 0.5K, 1K, 2K, 4K |
| Format | PNG, JPEG, WEBP |
| Nano Banana model | Nano Banana 2 Lite Recommended, Nano Banana 2, Nano Banana 2.1 New, Nano Banana Pro |
View screenshots of these menus
Pika 2.5
Generate a short Pika video from text, optionally animating a source image.
How to use it
- Write a simple motion prompt.
- Attach an image if you want to animate an existing composition.
- Choose resolution and available duration.
- Generate one take, then inspect motion and stability.
Controls explained
| Control | What it means |
|---|---|
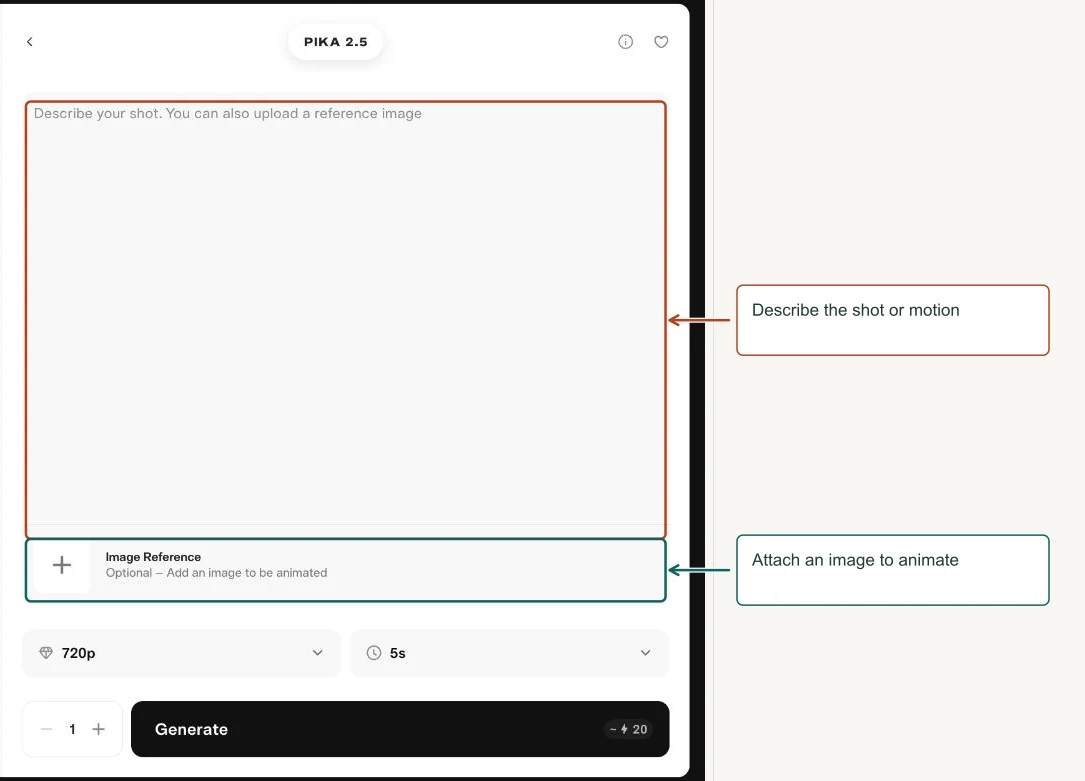
| Prompt | Defines the shot or the movement of the reference. |
| Image Reference | Optional source still to animate. |
| Resolution | 720p and 1080p appeared. |
| Duration | Only 5s appeared in the pictured text-to-video state; do not assume 10s is available in every mode. |
| Generations | Number of attempts. |
Try this
Gentle steam rises from the mug. Keep the camera fixed and the cup perfectly still. Natural morning light. One continuous shot.
Review tip. Pikaframes is the dedicated choice when you need transitions across multiple still images.
Menu choices
| Menu | Choices shown |
|---|---|
| Resolution | 720p, 1080p |
| Duration | 5s |
View screenshots of these menus
Pikadditions
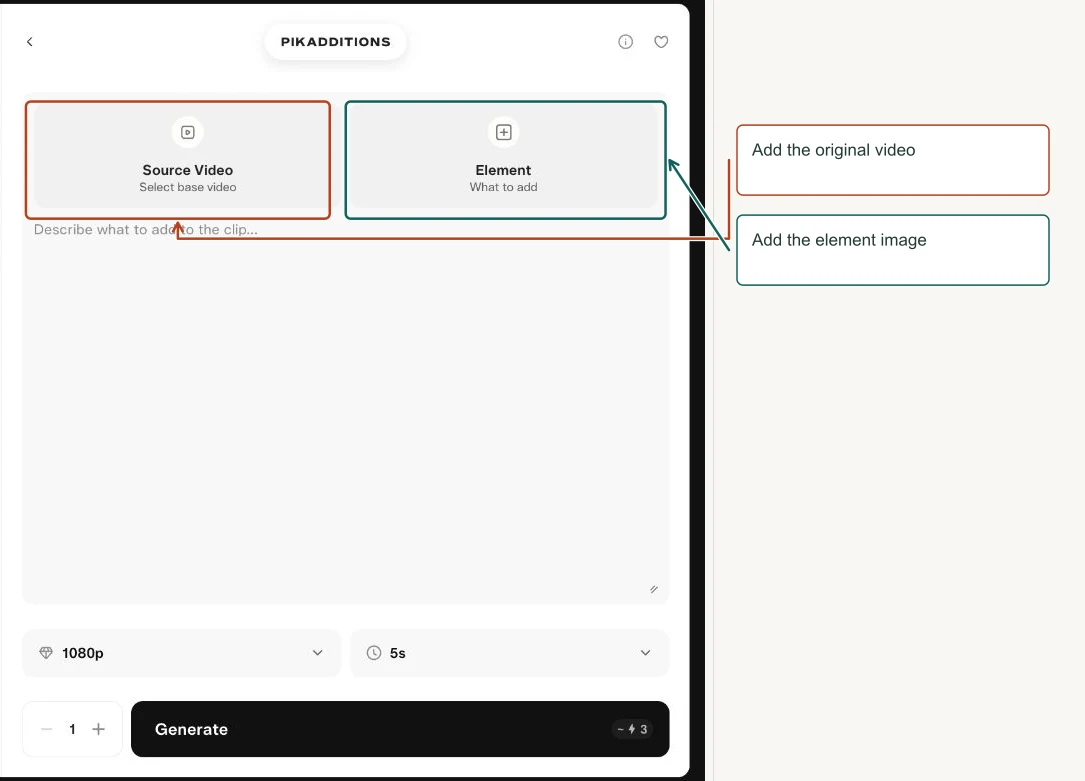
Add an element to an existing video using a separate reference.
How to use it
- Choose the source video.
- Choose an image of the element to add.
- Explain its placement, scale and behavior.
- Set duration and resolution, then review interaction and occlusion.
Controls explained
| Control | What it means |
|---|---|
| Source Video | The base footage. |
| Element | The object or subject to insert. |
| Prompt | Explains what to add and how it belongs in the scene. |
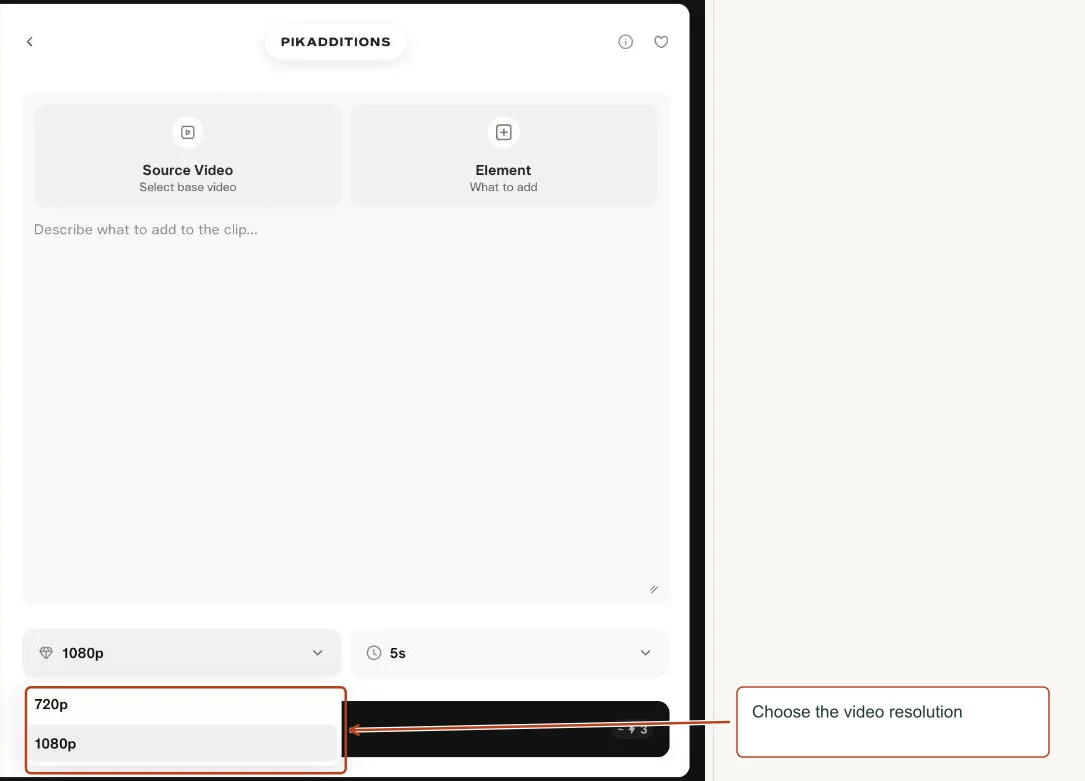
| Resolution | 720p or 1080p appeared. |
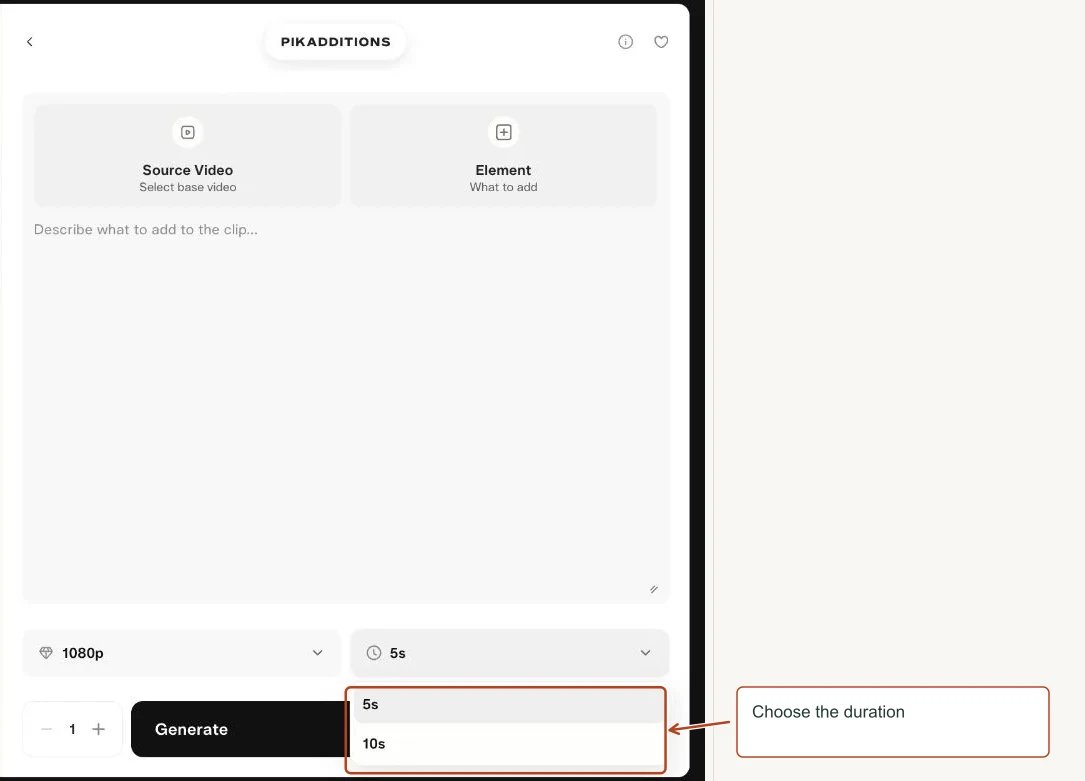
| Duration | 5 or 10 seconds appeared. |
Try this
Add the small plant from the reference to the far right of the desk. Keep the person, camera and room unchanged. Match the existing light.
Review tip. Adding an object is different from swapping an existing object. Check shadows and if foreground objects overlap correctly.
Menu choices
| Menu | Choices shown |
|---|---|
| Resolution | 720p, 1080p |
| Duration | 5s, 10s |
View screenshots of these menus
Grok Imagine
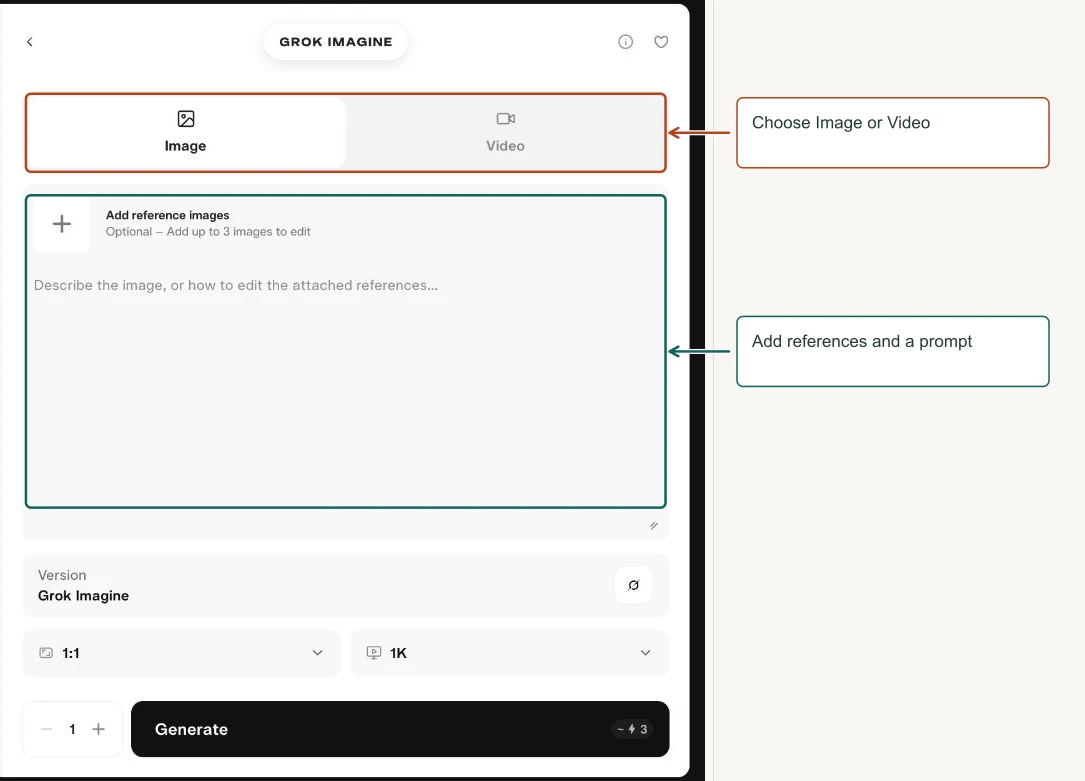
Create images or switch into the related video workflow in the Grok Imagine app.
How to use it
- Choose Image output.
- Write the prompt and attach up to three editing references if needed.
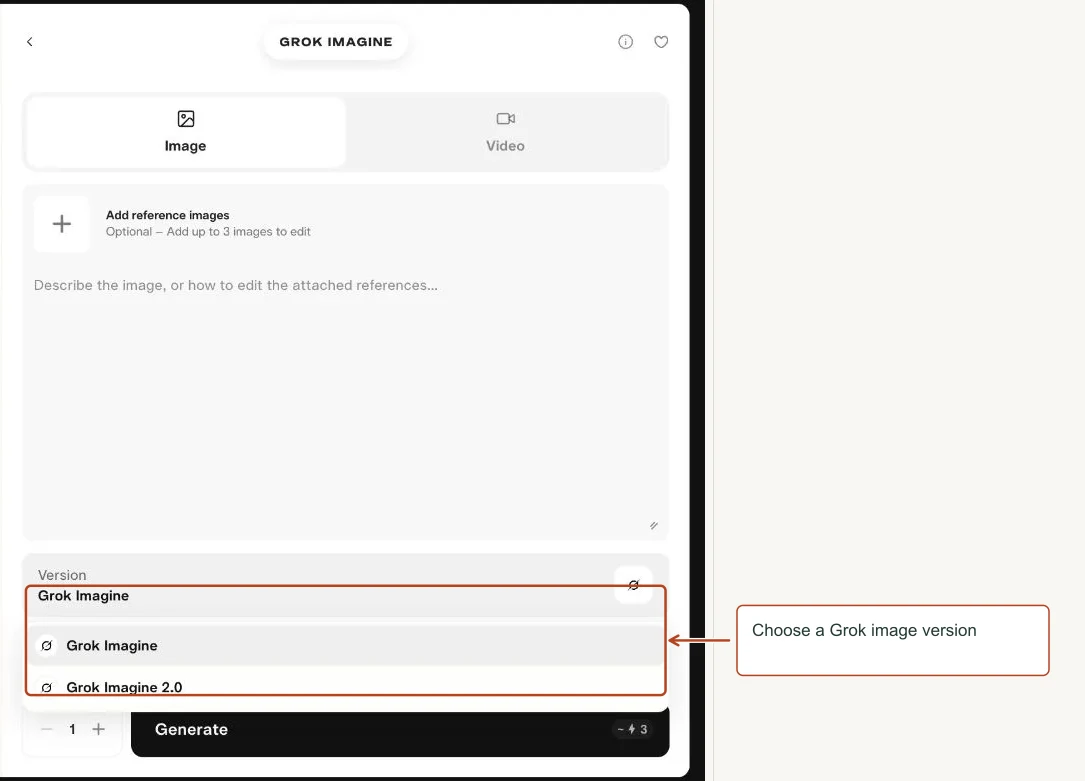
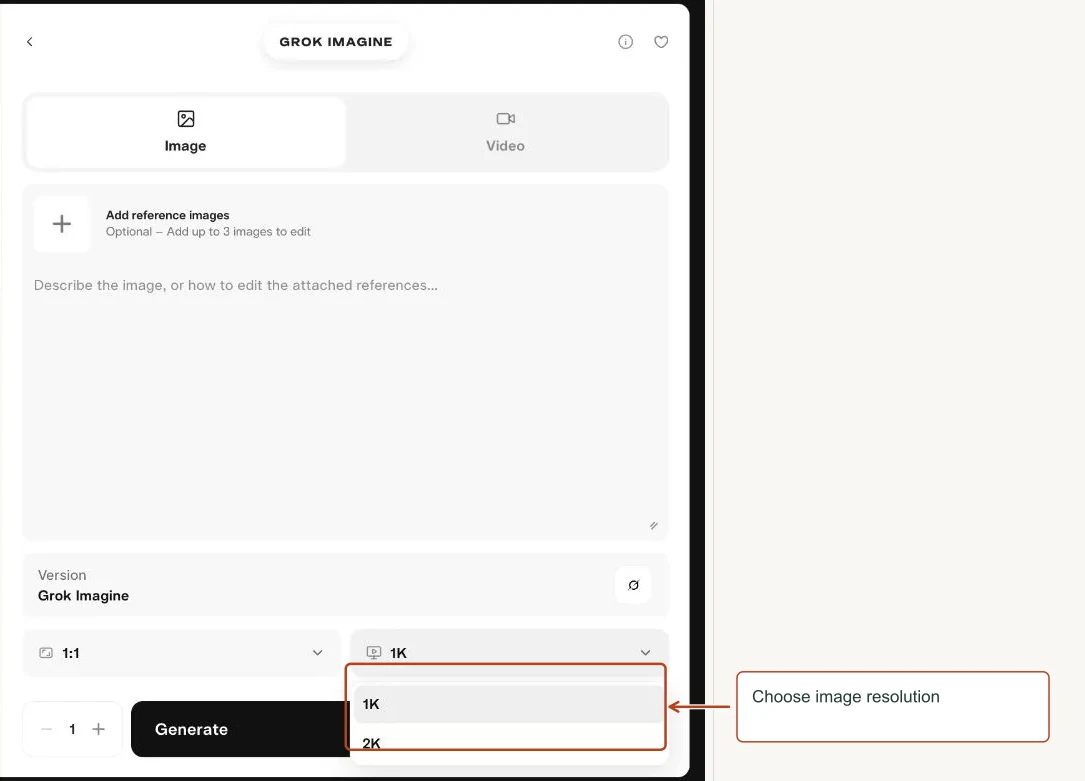
- Choose Version, resolution and aspect ratio.
- Generate and review.
Controls explained
| Control | What it means |
|---|---|
| Output type | Switches between Image and Video forms. |
| References | The image form allowed up to three references for editing. |
| Version | Grok Imagine or Grok Imagine 2.0 appeared. |
| Resolution | 1K and 2K appeared. |
| Aspect Ratio | Chooses framing; the pictured setting was 1:1. |
Try this
A square studio photograph of an ivory mug, soft shadow, pale blue backdrop, realistic ceramic texture, no text.
Review tip. The video form has different controls. See the Grok Imagine 1.5 entry for the video configuration.
Menu choices
| Menu | Choices shown |
|---|---|
| Version | Grok Imagine, Grok Imagine 2.0 |
| Resolution | 1K, 2K |
View screenshots of these menus
Grok Imagine 1.5
Generate video in the Grok Imagine video form, with optional image references.
How to use it
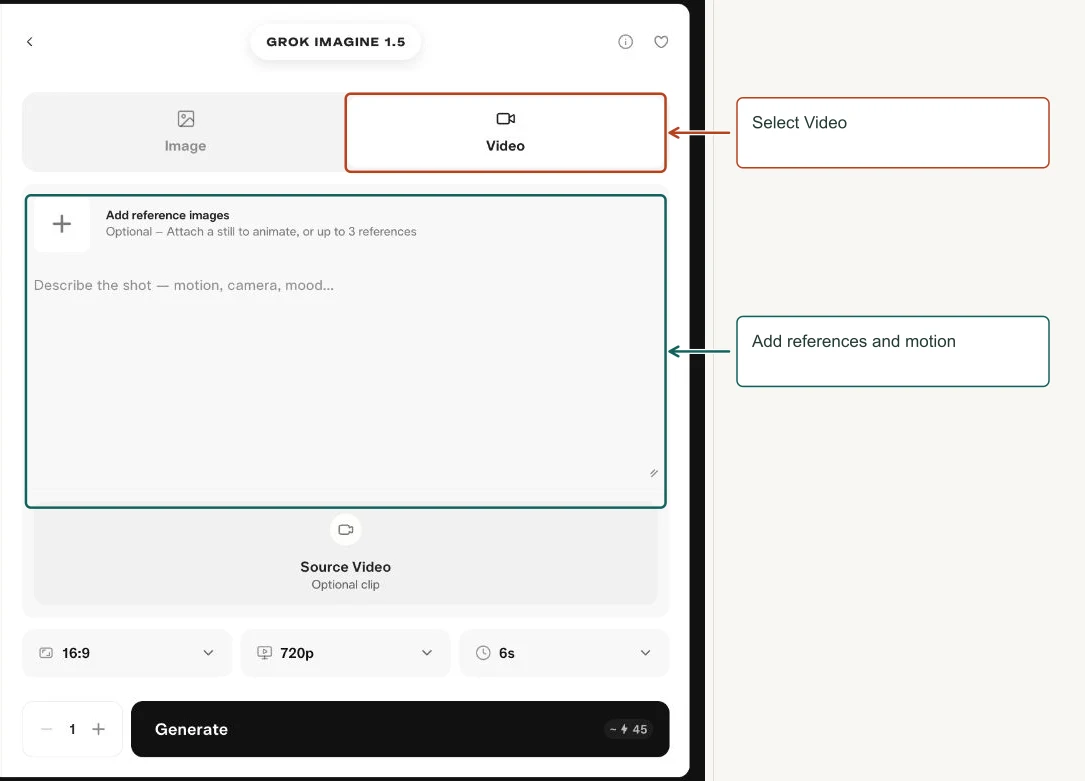
- Choose Video output.
- Attach a still to animate or reference images.
- Write motion, camera and mood.
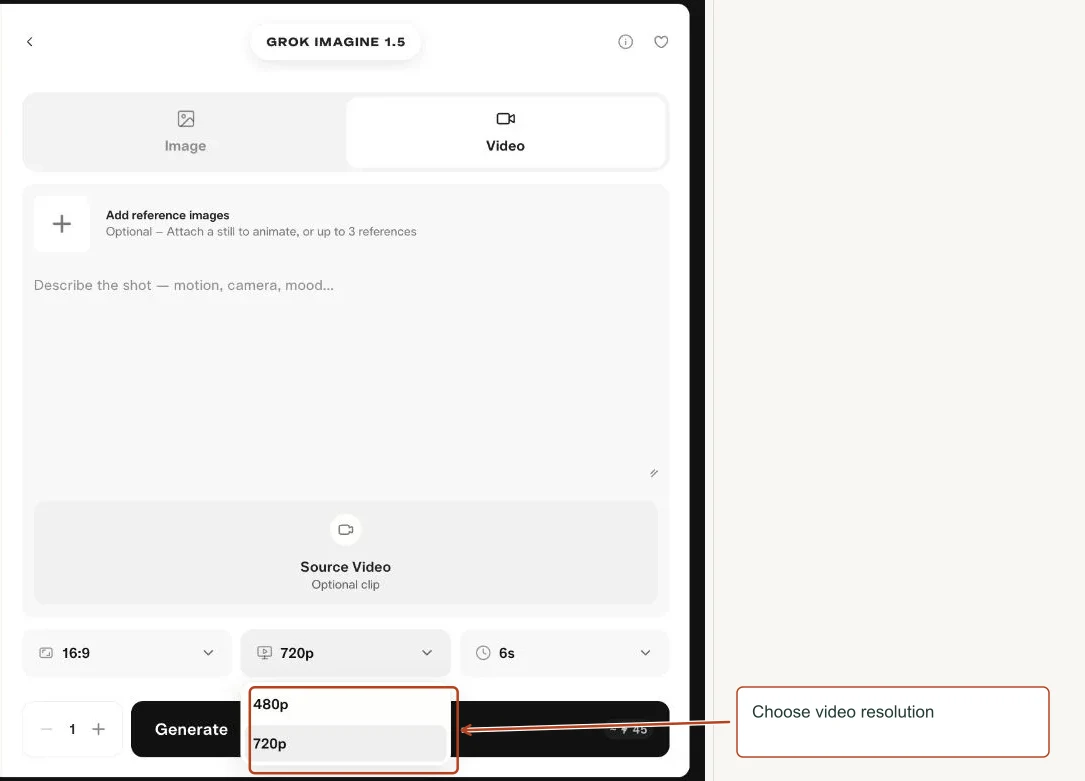
- Choose resolution, duration and frame shape.
Controls explained
| Control | What it means |
|---|---|
| Output type | Video is selected in this entry. |
| References | The form describes a still to animate or up to three references. |
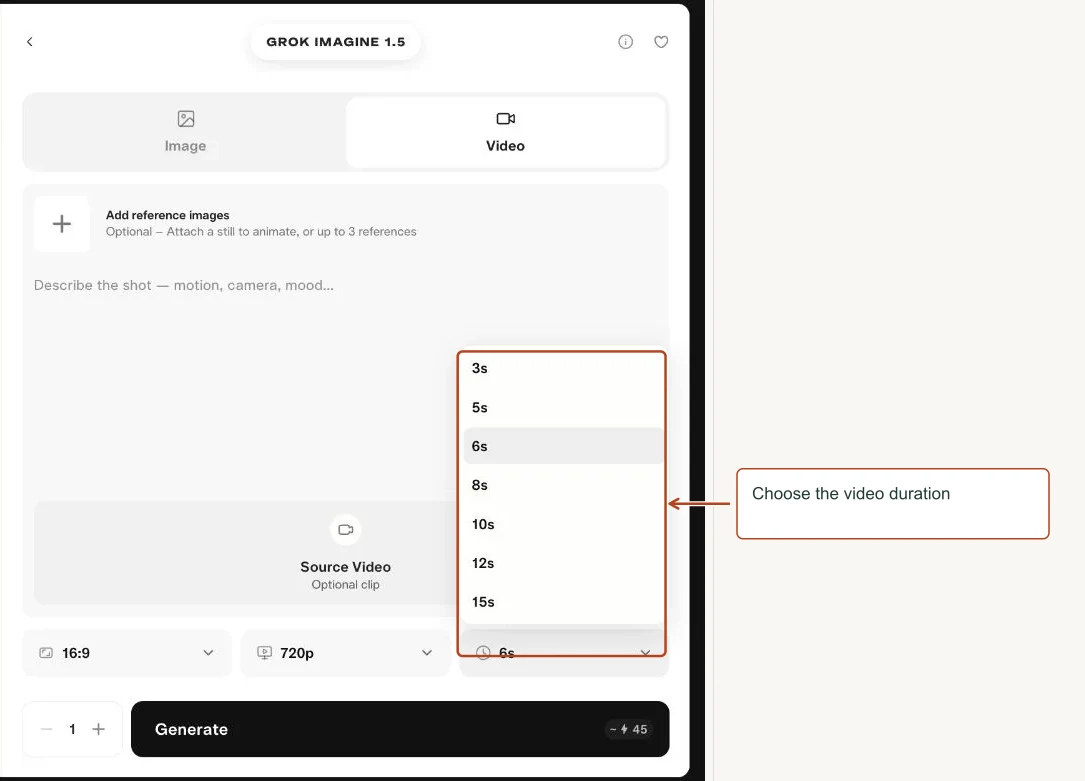
| Resolution | 480p and 720p appeared. |
| Duration | 3, 5, 6, 8, 10, 12 and 15 seconds appeared. |
| Aspect Ratio | Sets the composition shape. |
Try this
A slow camera pull-back from the coffee mug, revealing a quiet wooden table. Preserve the mug and keep the movement smooth.
Review tip. Start with gentle motion. Large camera moves can reveal imagined details that were not present in the still.
Menu choices
| Menu | Choices shown |
|---|---|
| Resolution | 480p, 720p |
| Duration | 3s, 5s, 6s, 8s, 10s, 12s, 15s |
View screenshots of these menus
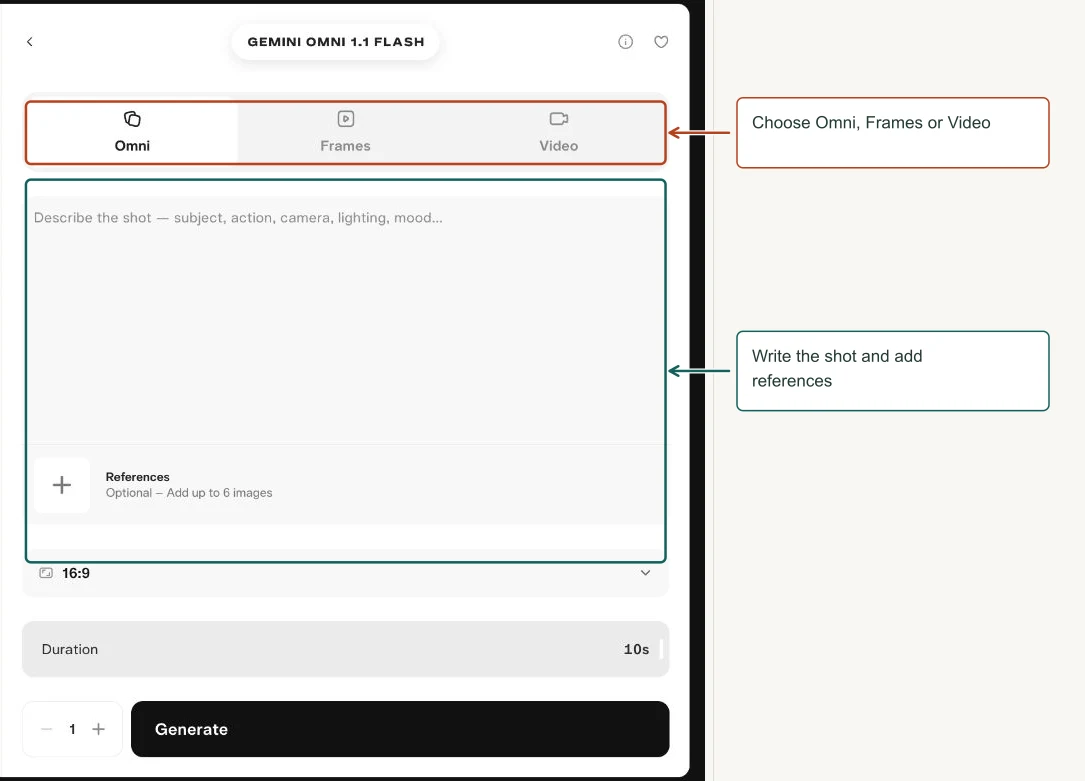
Gemini Omni 1.1 Flash
Create video from text and image guidance or choose frame/video input workflows.
Open Gemini Omni 1.1 Flash in Pika
How to use it
- Choose Omni, Frames or Video mode.
- Describe the shot and attach the required references.
- Set aspect ratio and duration.
- Review one generation before increasing complexity.
Controls explained
| Control | What it means |
|---|---|
| Omni | Text with optional image references; the pictured form allowed up to six images. |
| Frames | A mode for guiding the video with frame images. |
| Video | A mode for working with an existing video. |
| Prompt | Describes subject, action, camera, lighting and mood. |
| Duration | The pictured setting was 10 seconds. Choose an enabled length for the selected mode. |
Try this
A small paper boat drifts slowly across a puddle, low camera angle, overcast light, gentle ripples, one continuous shot.
Review tip. The app label was Gemini Omni 1.1 Flash, while the Video Studio menu used Google Omni Flash. Keep those labels distinct when following the screenshots.
Seedream 5
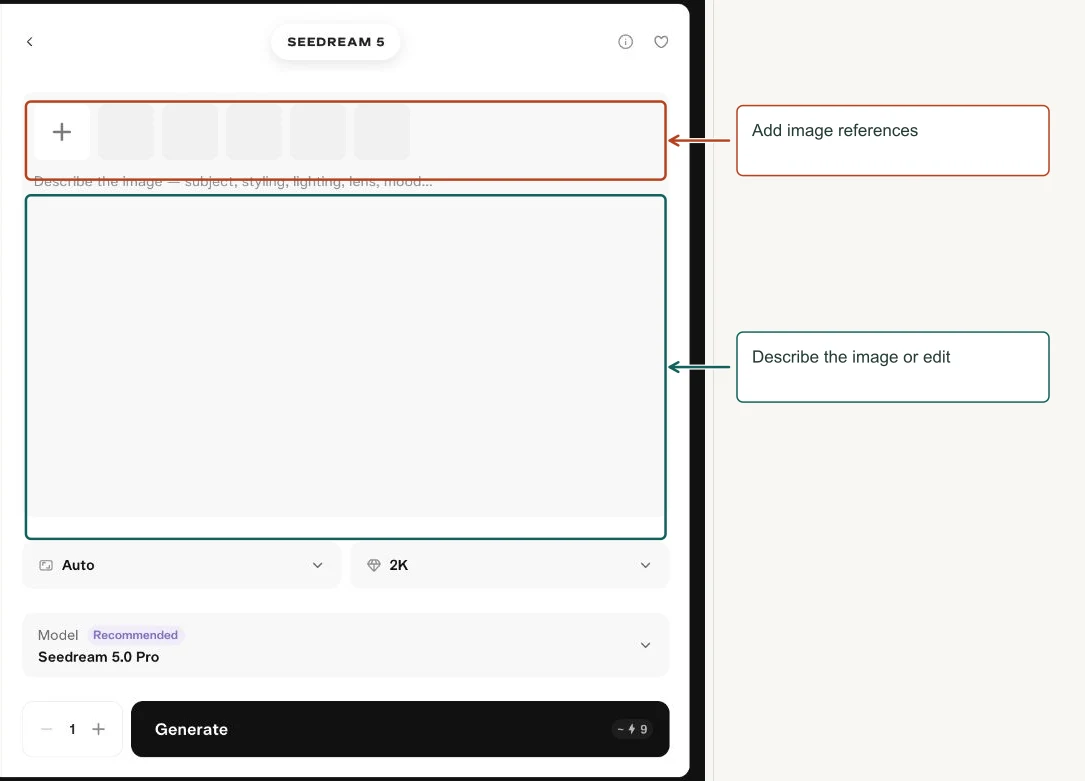
Create high-resolution stills or prompt-based edits in the Seedream 5 workspace.
How to use it
- Attach reference images if needed.
- Write the image or change request.
- Choose model tier, resolution and frame shape.
- Generate and inspect.
Controls explained
| Control | What it means |
|---|---|
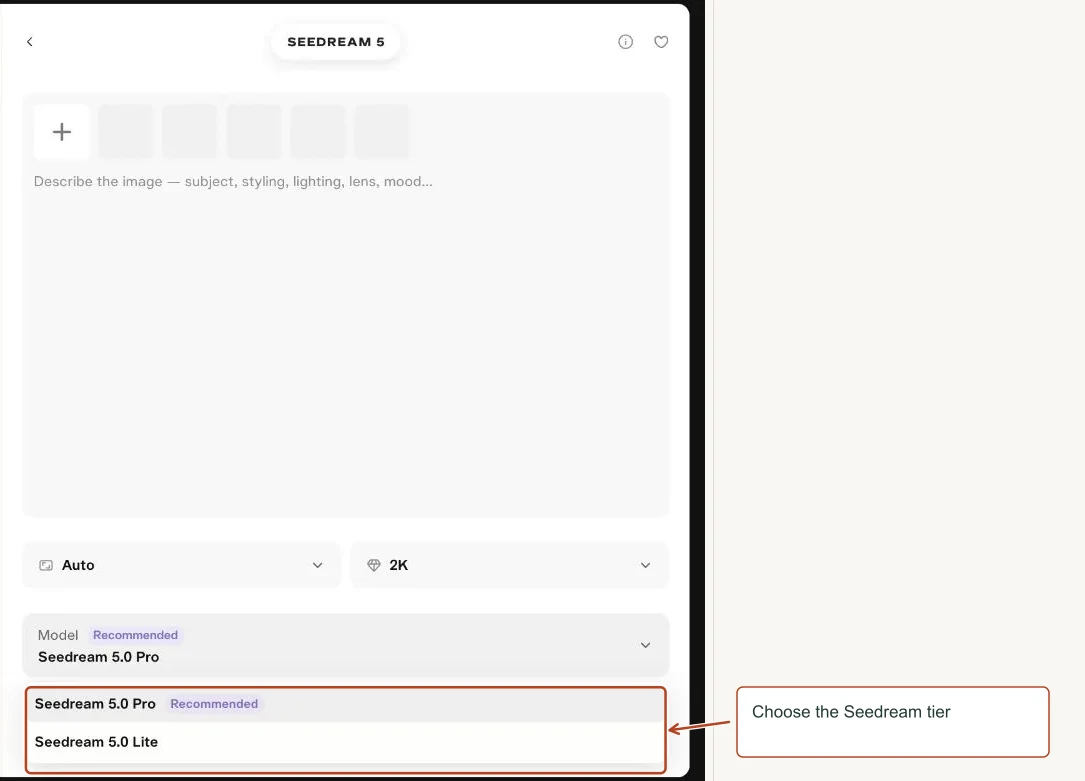
| Model | Seedream 5.0 Pro and Lite appeared; Pro was marked Recommended. |
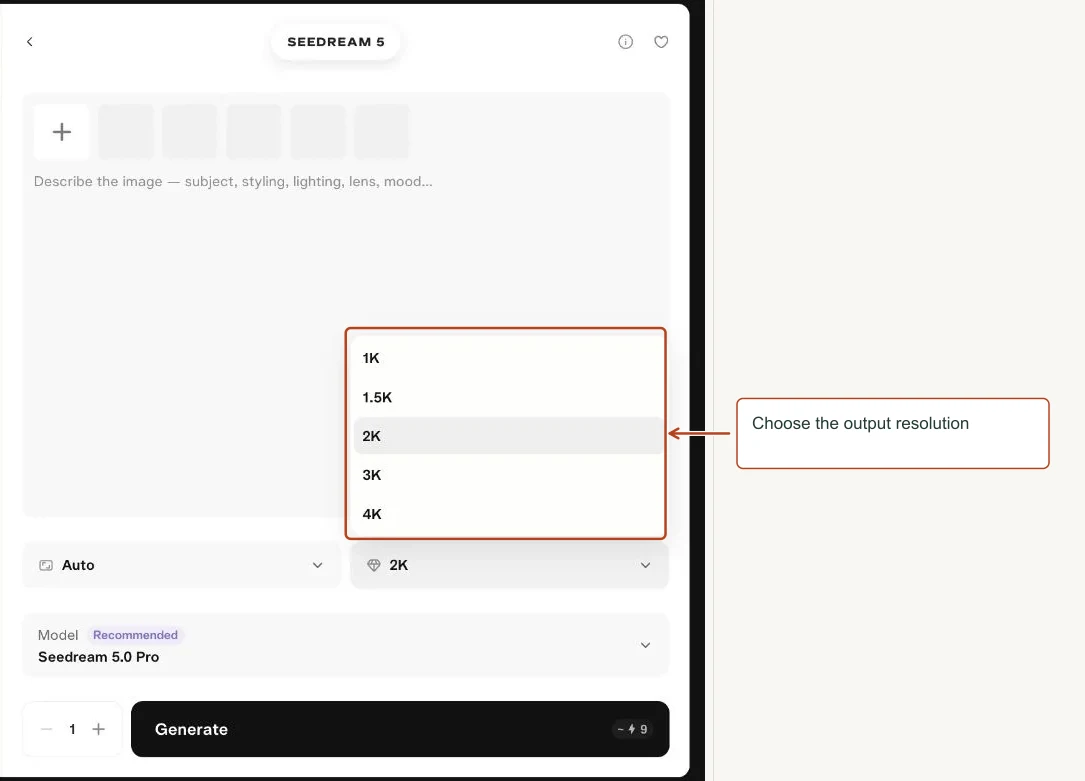
| Resolution | 1K, 1.5K, 2K, 3K and 4K appeared. |
| References | Guide identity, objects or editing. |
| Aspect Ratio | Sets shape or uses Auto. |
Try this
A clean editorial product photo of a mug on limestone, soft warm light, subtle shadows, preserve the exact reference proportions.
Review tip. Render large only after approving the composition. More pixels do not automatically fix a poor prompt.
Menu choices
| Menu | Choices shown |
|---|---|
| Resolution | 1K, 1.5K, 2K, 3K, 4K |
| Model | Seedream 5.0 Pro Recommended, Seedream 5.0 Lite |
View screenshots of these menus
Ideogram 4.5
Create images or edit an image with reference guidance in the Ideogram workspace.
How to use it
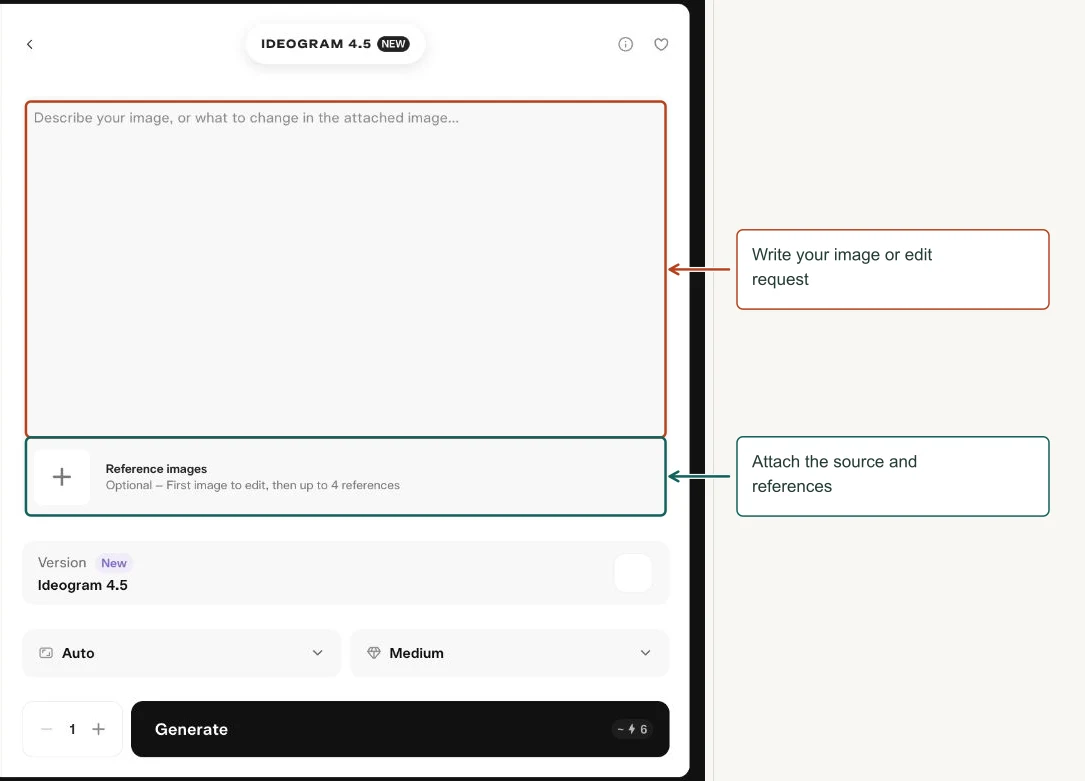
- Write a prompt or an edit instruction.
- Attach the image to edit first, then supporting references.
- Choose version, size and quality.
- Generate and check text, layout and object consistency.
Controls explained
| Control | What it means |
|---|---|
| Order of references | The panel says the first image is edited, followed by up to four references. |
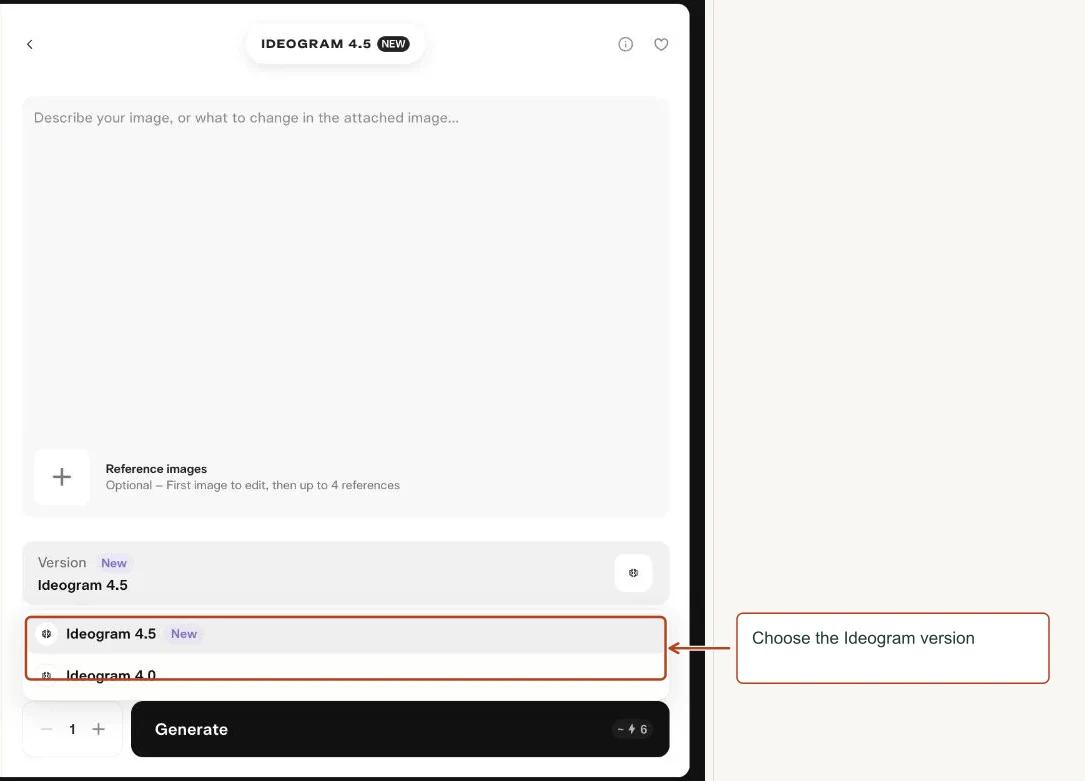
| Version | Ideogram 4.5 or 4.0 appeared. |
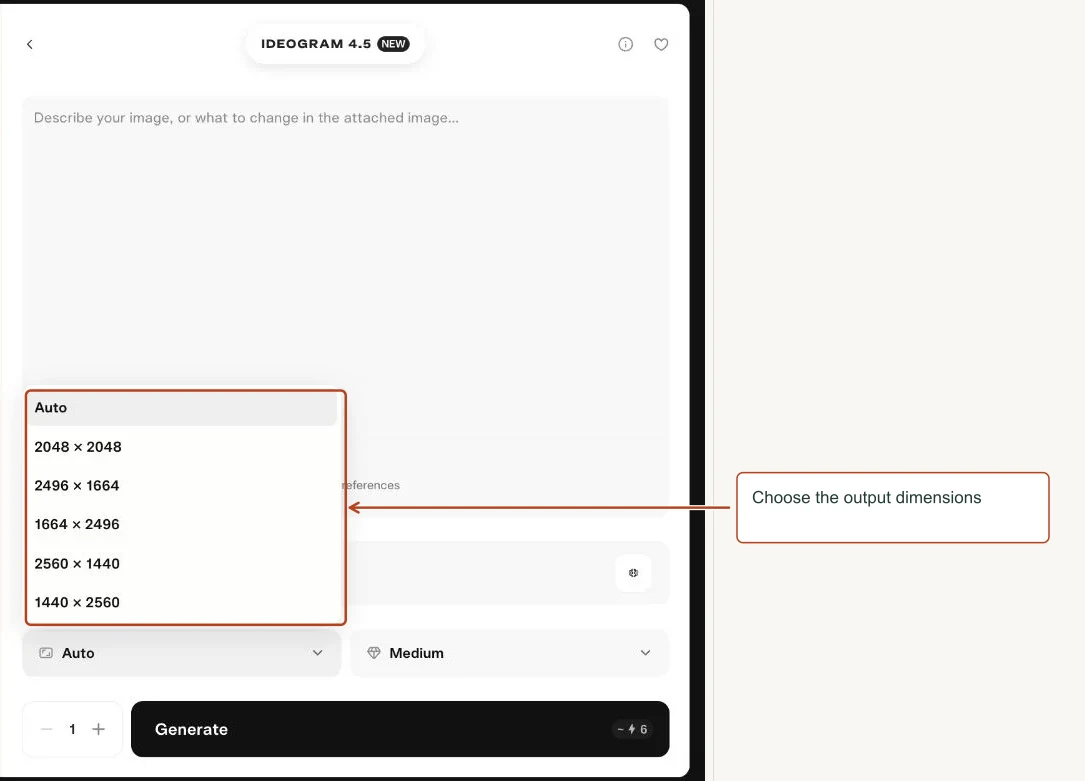
| Size | Auto, square, landscape and portrait pixel dimensions were listed. |
| Quality | Low, Medium or High. |
| Generations | Number of separate attempts. |
Try this
Create a clean square café poster with the exact headline “A quiet moment”. One ivory mug at the bottom, generous empty space, restrained typography.
Review tip. Always proofread generated text. Naming a text-focused workflow does not eliminate spelling or layout errors.
Menu choices
| Menu | Choices shown |
|---|---|
| Version | Ideogram 4.5 New, Ideogram 4.0 |
| Size | Auto, 2048 × 2048, 2496 × 1664, 1664 × 2496, 2560 × 1440, 1440 × 2560 |
| Quality | Low, Medium, High |
View screenshots of these menus
Pikaframes
Animate transitions between an ordered sequence of still images with Pika.
How to use it
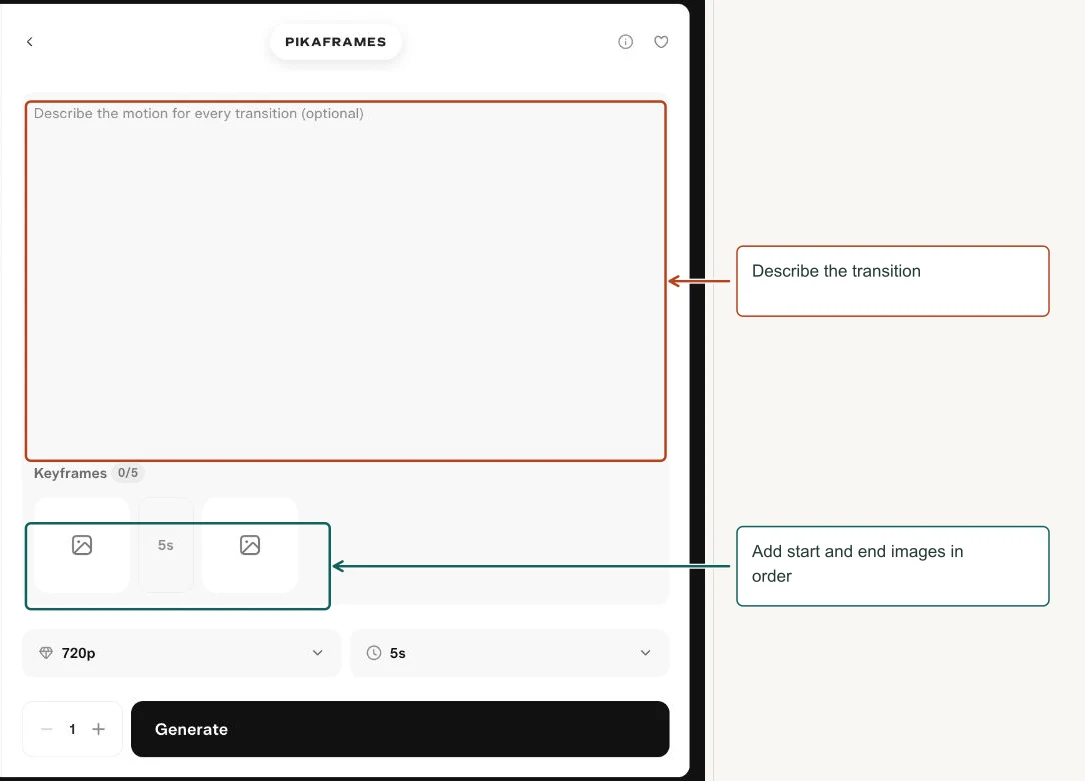
- Add at least the start and end images and arrange their order.
- Add more keyframes if useful, up to the displayed five-slot limit.
- Describe motion and choose transition duration and resolution.
- Check each transition for unwanted morphing.
Controls explained
| Control | What it means |
|---|---|
| Keyframes | Up to five stills; they anchor the sequence. |
| Prompt | Optional motion instruction for transitions. |
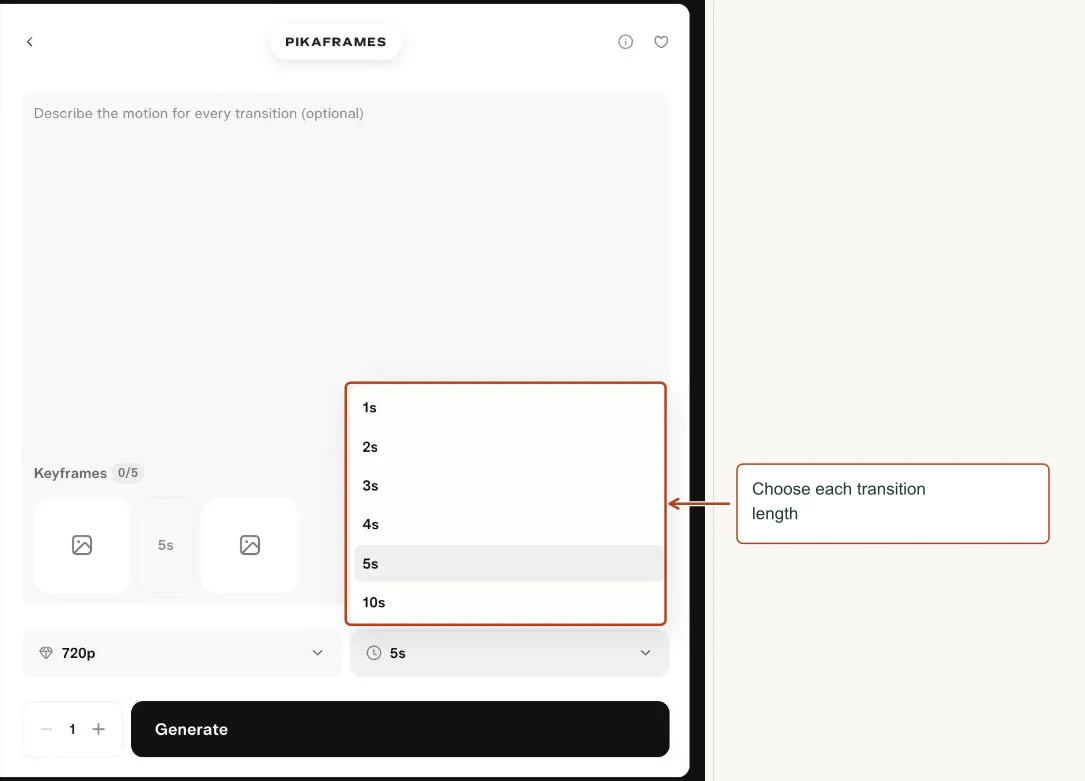
| Transition duration | 1, 2, 3, 4, 5 and 10 seconds appeared. This is a transition setting, not necessarily the whole sequence length. |
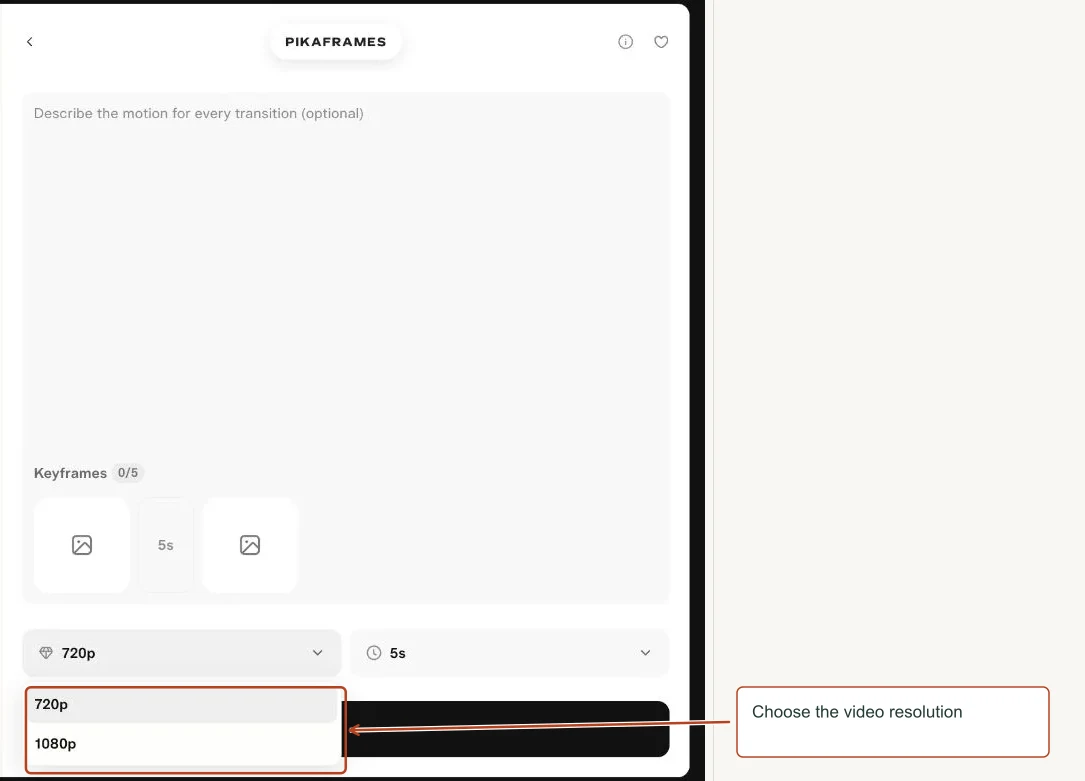
| Resolution | 720p or 1080p. |
| Generations | Number of attempts. |
Try this
Slowly move from the close-up mug to the wider table view. Preserve the mug geometry and lighting. Smooth continuous camera pull-back.
Review tip. Use compatible compositions and matching subjects. Very different frames can cause large morphs instead of a natural camera transition.
Menu choices
| Menu | Choices shown |
|---|---|
| Resolution | 720p, 1080p |
| Transition duration | 1s, 2s, 3s, 4s, 5s, 10s |
View screenshots of these menus
Camera language reference
These are plain-language explanations of the Camera Director choices shown in the menus below. They describe intended screen effects, not guaranteed physical camera reconstruction.
| Choice | Intended effect |
|---|---|
| Extreme wide / Wide master | Emphasize location and the overall action. Extreme wide makes the subject relatively small. |
| Full shot / Cowboy shot / Medium | Show the full body, roughly thigh-up, or a closer upper-body view. |
| Close-up / Extreme close / Macro / Insert detail | Emphasize a face, a very small region, tiny detail or a specific object. |
| Eye level / High angle / Low angle | View from normal eye height, above the subject or below it. |
| Aerial / Overhead / Worm’s-eye | A high sweeping view, a straight-down view, or a very low upward view. |
| POV / Profile / Through frame / Reflection | Show a character’s viewpoint, the side, an intervening frame such as a doorway, or a reflected view. |
| Locked off / Subtle breathe | A fixed camera or barely noticeable drift. |
| Handheld / Run-and-gun | Human-operated looseness or a more energetic observational feel. |
| Steadicam float / Gimbal glide | Smooth movement through the space. |
| Slow push-in / Slow pull-back | Move toward or away from the subject. |
| Crash zoom / Creeping zoom / Snap zoom out | Rapid magnification, gradual magnification or a rapid wider view. |
| Dolly zoom | A combined perspective-and-magnification effect that changes the background relationship. |
| Track left / Track right | Move sideways while following or reframing the action. |
| Half orbit / Full 360 orbit | Travel around the subject for part or all of a circle. |
| Crane up reveal / Crane down / Jib sweep / Pedestal rise | Raise, lower or sweep the viewpoint; pedestal rise is a vertical lift. |
| Whip pan / Slow pan / Tilt up reveal / Tilt down | Rotate the camera quickly or slowly sideways, or rotate it vertically. |
| Rack focus / Soft focus drift | Shift the sharp plane of focus deliberately or gently drift focus. |
| Slow roll | Rotate the frame around the viewing axis. |
| Drone flyover / Drone pull-away | An elevated movement over a scene or away from a subject. |
| Follow behind | Track a moving subject from behind. |
| Bullet time | A stylized slowed or frozen-action viewpoint effect. |
| Hollywood oner | A continuous moving-shot style rather than a series of obvious cuts. |
Preset and voice catalogs
Use the preset names to find the matching control. Preview the thumbnail, read the description and try a short sample before applying a preset to a larger project.
Pikaffects in All
Poke it · Cake-ify it · Squish it · Crush it · Action Me · Tear it · Arcade Winner · Baby Me · Peel it · Crumble it · Balloonify · Explode it · Melt it · Captain Me · Choco Me · Clown Fit · Crazy in Love · Cupid Strike · Decapitate it · Deflate it · Dissolve it · Doom Stroll · Epic Me · Everything's Bonsai · Eye-pop it · Eyes Zoom in · Fairytale Me · Goth Dream · Hazmat Fit · Hearts Bouquet · Hero Me · Human Pet · Inflate it · Jungle Me · Labubu Style · Leprechaun Me · Levitate it · Lo-Fi Me · Looong Hair · Love Bomb · Magic Polaroid · Make it Real · Mona Me · Mrs. Me · Museum Me · Princess Me · Proposal · Puppy Me · Rose · Royal Me · Ta-da it · Tarot Transform · VIP Me · Warrior Me · Yarn Charm · Zen Me
Headshot templates
Flash Forward · Over the Shoulder · Silver Screen · Renaissance · Darkroom · Yearbook · Sun Kissed · Cream Matte · Head in the Clouds · Newsprint · Pinned Up · Portrait Sitting · Photobooth · Outtakes
Product Shot presets
Center Stage · Spotlit · On Edge · Hard Light · Spa Day · High Noon · Waiting Room · Iced Out · Dew Point · Free Falling · Pit Stop · Shotgun · Morning Fog · Vanity Fair · Glove Story · Room Serviced · In Season · Hang Tight · Match Point · Net Worth · Balancing Act · Fresh Pick · In Focus · Color Cast
Pika Speech voices
Each choice selects a preset voice identity and delivery style. Choose a neutral narrator for instruction, a more expressive style for characters, and test the pronunciation with your own script.
Calm Documentary Narrator Male · Warm Grounded Friend Female · Deep Trailer Bass Male · Warm Honey Drawl Female · Fast Talking Wiseguy Male · Graceful Elder Storyteller Female · Chill Surfer Dude Male · Bubbly It Girl Female · Roaring Locker Room Coach Male · Velvet Radio Alto Female · Gruff Slow Drawl Male · Brassy Sharp Wit Female · Vintage Radio Showman Male · Gentle Hushed Librarian Female · Rapid Sports Caller Male · Warm Playful Spark Female · Folksy Porch Storyteller Male · Crisp Founder Pitch Female · Smoky Noir Monotone Male · Sunny Morning Host Female · Cozy Grandpa Storyteller Male · Plummy Posh Gentleman Male · Cheeky Bright Charmer Female · Rapid Market Banter Male · Stern Clipped Headmistress Female · Hearty Fireside Rumble Male · Soft Thoughtful Lilt Female · Musical Poetic Lilt Male · Melodic Quick Storyteller Female · Gravelly Deadpan Male · Imperious Grande Dame Female · Dry Cheerful Joker Male · Polished News Anchor Female · Commanding Safari Guide Male · Rhythmic Radio Charmer Male · Mellow Wise Elder Male · Lilting Warm Hostess Female · Articulate Tech Lead Female · Booming Epic Showman Male · Cool Minimal Designer Female · Precise Stern Engineer Male · Breathy Chic Charm Female · Slow Heavy Brooder Male · Fiery Passionate Cook Female · Loving Loud Grandma Female · Gentle Careful Sweetness Female · Velvet Worldly Narrator Male · Deep Night Storyteller Male · Bright Peppy Vlogger Female · Poised Documentary Calm Female · Grumpy Soft Heart Male · Zany Kid Inventor Male · Hammy Pirate Captain Male · Theatrical Scheming Villain Male · Slow Goofy Giant Male · Wheezy Batty Wizard Male · Raspy Scrappy Kid Female · Chatty Beauty Bestie Female · Hyped Gym Motivator Male · Soft Cozy Aesthetic Female · Smooth Hype Unboxer Male · Bored Chic Trendsetter Female · Joyful Food Fanatic Male · Deadpan Ironic Fry Female · Mellow Road Tripper Male · Breathy Luxe Diva Female · Fast Nerdy Reviewer Male · Unhinged Arena Hype Male · Abyssal Doom Growl Male · Airhorn Club MC Male · Barking Drill Fury Male · Smoky Mystic Drama Female · Booming Ring Announcer Male · Feather Whisper ASMR Female · Seismic Boss God Male · Thunderous Revival Preacher Male
Reuse assets and review outputs
The media picker combines uploaded assets with reusable Characters, Products, Scenes and Brand Styles. A Camera tab was also visible. Selecting an existing asset supplies it to the current form; it is separate from running a generation.
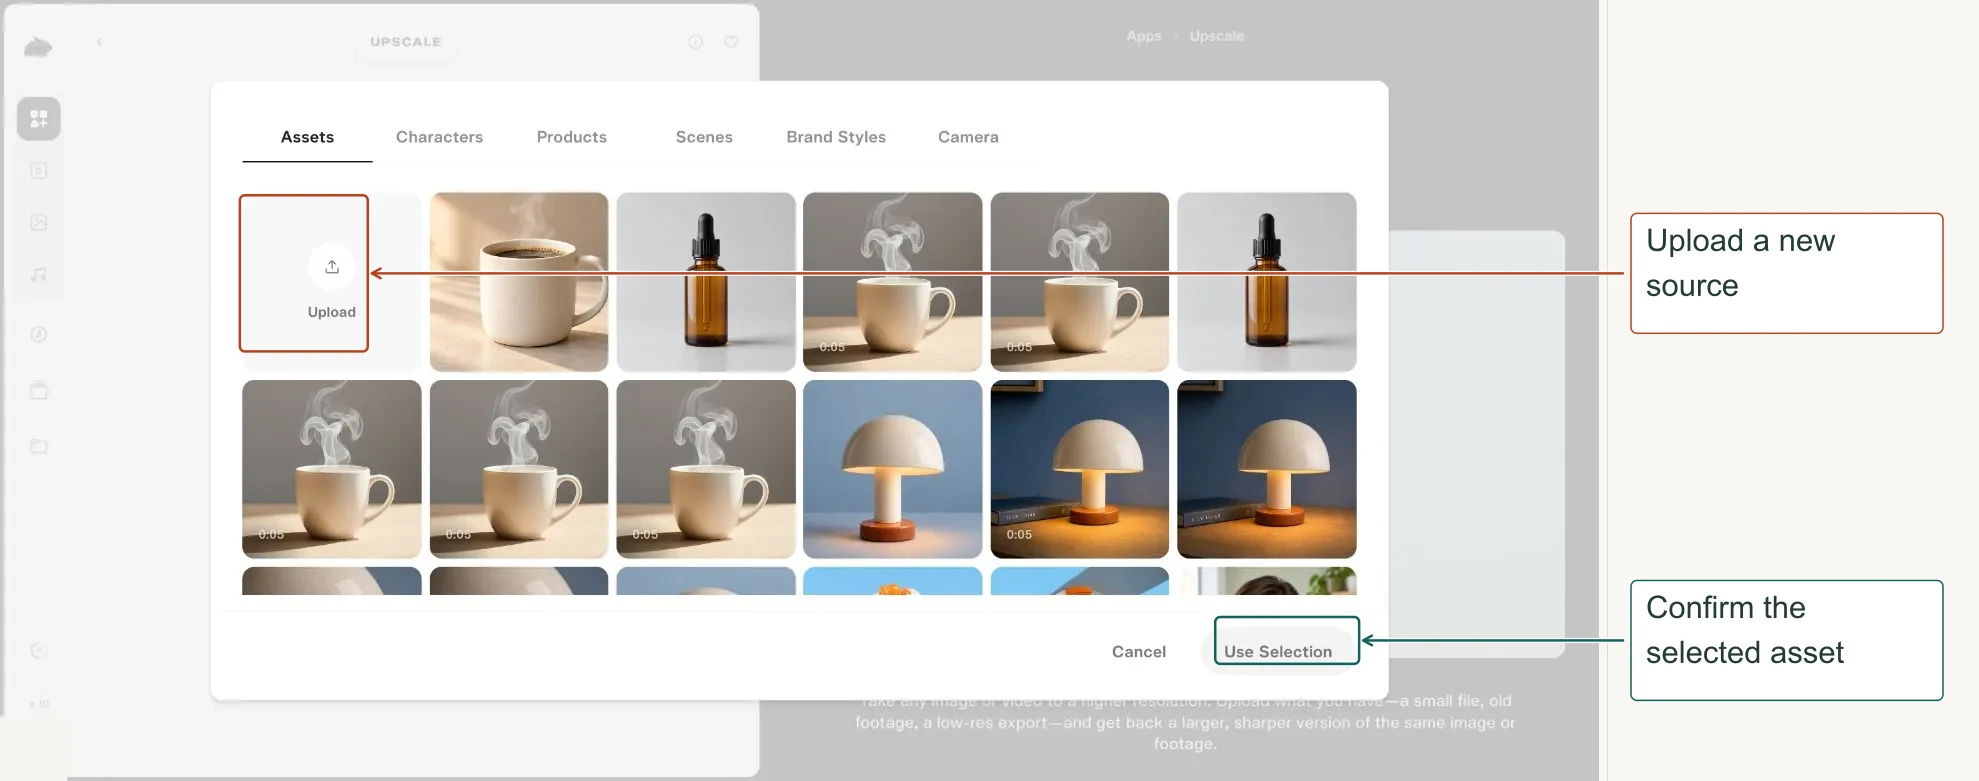
In Library, filter by media type or References to find a source. Characters and Elements are separate top-level tabs. Use descriptive names so the same reference can be found again. Projects keep related outputs together; a project’s feed shows its prompt and inputs alongside results.
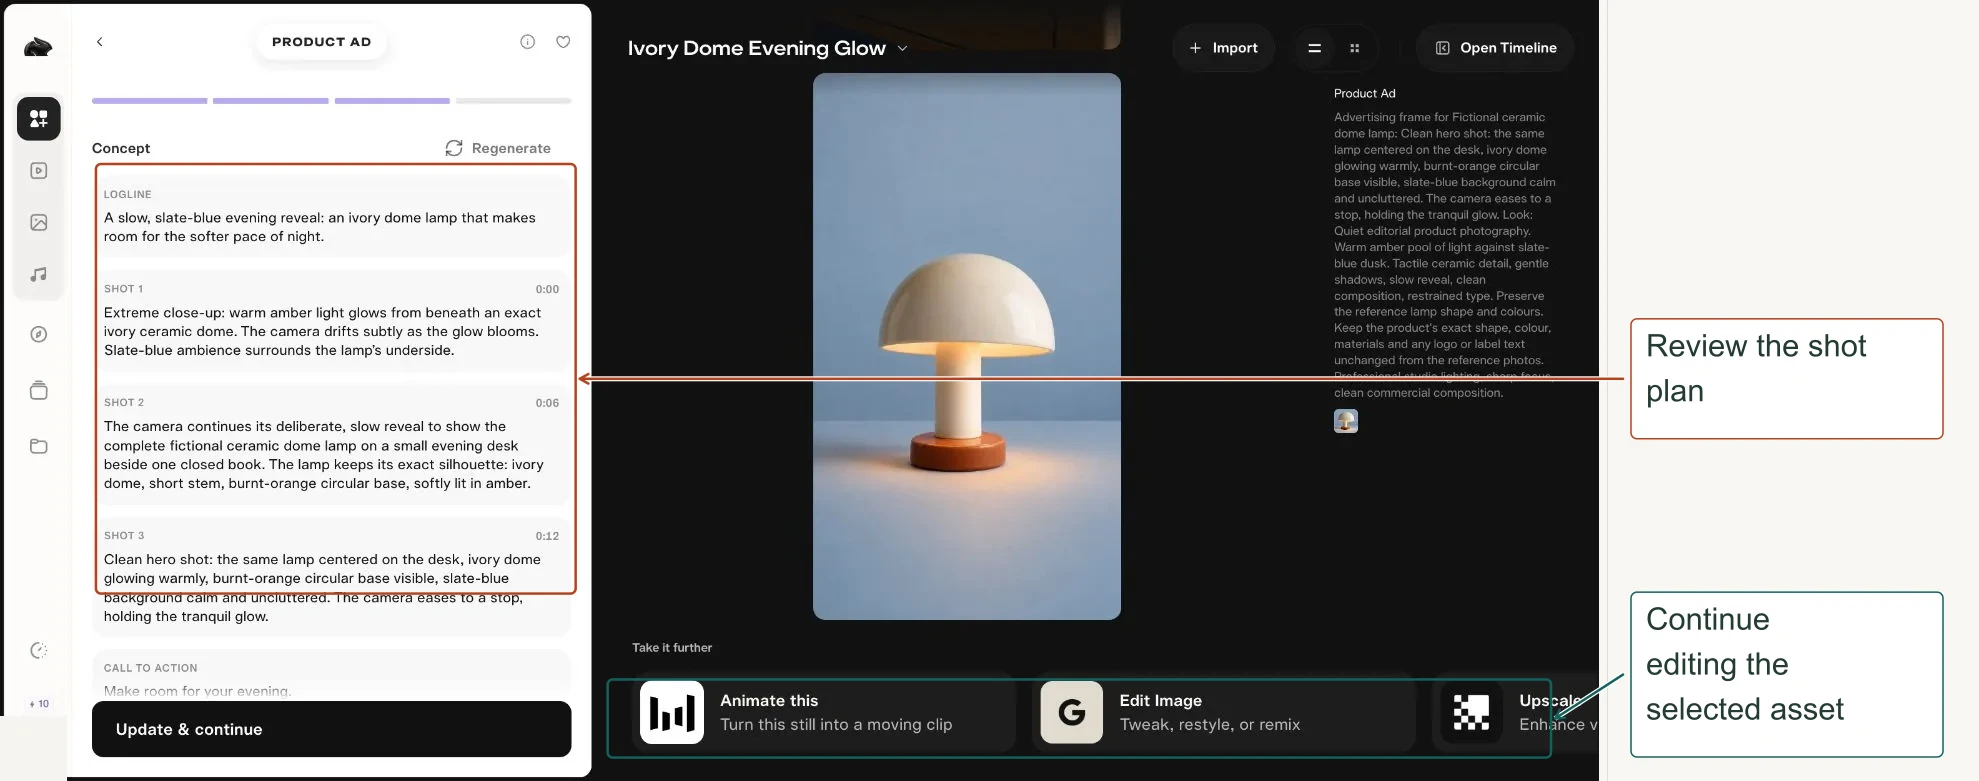
| Control | What it means |
|---|---|
| Feed view / Grid view | Switch between a detailed stream and a thumbnail grid. |
| Import | Bring library material into the project. |
| Copy prompt | Reuse the recorded instruction. |
| Preview input | Inspect the source used for that output. |
| Retry | Request another attempt; the button can show a credit cost. |
| Reprompt | Return to the instruction workflow to make a deliberate revision. |
| Edit / Animate / More | Choose an app to continue working with the output. |
| Upscale / Expand / Extend | Continue with the transformation relevant to the media type. |
| Favorite | Mark a useful output for easier retrieval. |
| Delete | Removes an asset. Keep a downloaded copy of anything you want to retain. |
| Output actions menu | Open an asset detail view for Download, Favorite, Use in an app and Edit with an app. Its More actions menu showed Rename and Delete. |
Before sharing a result, play or inspect it at full size. Keep a copy of the successful prompt, model, settings and references. Do not assume that changing the model will reproduce the same output.
Assemble a project in the timeline
Open a project and choose Open Timeline. Add videos, photos and audio to arrange a sequence. Use Play to review it, Undo and Redo to adjust edits, Zoom to inspect timing, and Export when you are ready to save.
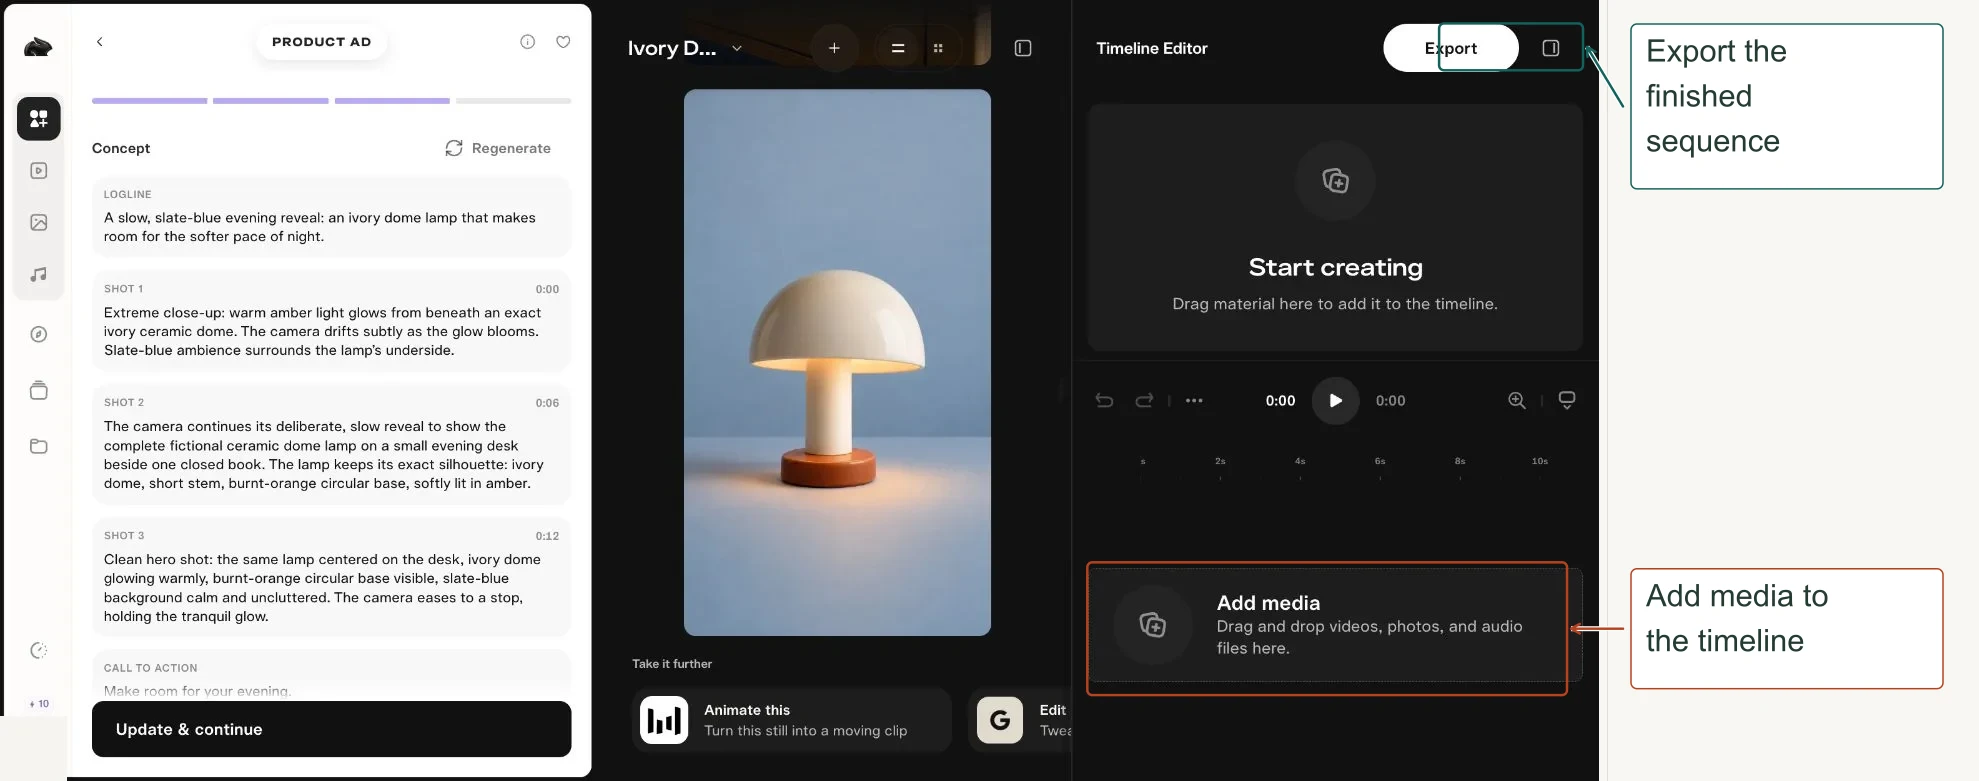
- Choose the best shots in the project or import them from Library.
- Add the selected material to the timeline. Use the live interface to confirm clip order and duration.
- Preview the sequence. Remove repeated starts and abrupt endings, and listen for music overpowering speech.
- Check frame shape and any letterboxing or cropping.
- Open Export and review the options and any cost shown before submitting. Choose the available export options that match your destination.
A practical beginner structure is opening shot → main action → final hold. Keep the sequence short enough that every shot adds something.
Three complete practice workflows
A simple product promo
- Create or select a clean product reference.
- Use Product Shot for a polished still; compare shape, color and label to the original.
- Animate the selected image with Pika 2.5 or Video Studio using one camera movement.
- Use Color Grade or Relight only if the shot needs correction.
- Add Pika Soundtrack or separate music and effects.
- Trim the selected clip and assemble the final sequence in a project timeline.
- Upscale only the chosen final version if the delivery needs it.
A recurring fictional presenter
- Build a character in Character Studio and check the sheet.
- Write a short, exact script.
- Use Talking Head Video with the approved face and an appropriate voice.
- Specify a simple scene or background reference.
- Check lip-sync, pronunciation, eyes and mouth movement.
- Reuse the same face and voice for the next segment.
A short image story
- Write one premise with a clear beginning, change and ending.
- Create consistent character and scene references.
- Use Short Film for a guided process, or build individual Video Studio shots with the same references.
- Keep camera and lighting directions compatible between shots.
- Review the script and shot plan before expensive renders.
- Choose the best takes, add sound, assemble them in order and inspect the final sequence.
Fix common beginner problems
| Problem | Next useful check |
|---|---|
| Generate is disabled | Check required images/audio, script, prompt, model compatibility and loading messages. A credit check alone does not explain every disabled button. |
| No price or a very broad range | Wait for input metadata to load and inspect the chosen configuration. Read the live estimate before submitting. |
| The clip remains at Reading length | Try a valid supported file and allow metadata loading to finish. Choose the trim range only after the duration is available. |
| The result ignores my reference | Use fewer references and state each one’s role. Add an @ mention where the app supports it. |
| The person or product changes | Use the same clear reference, simplify the action, and avoid changing several major elements at once. |
| Motion is distorted | Reduce speed and complexity. For Motion Transfer, match body framing and use one continuous, clearly visible performance. |
| Camera movement is wrong | Ask for one movement. Do not combine locked-off, orbit and push-in in the same short shot. |
| The beginning is good but the end fails | Trim the useful portion or generate a shorter shot. Extend only from an ending that is stable. |
| Speech sounds wrong | Test short passages. Correct punctuation and names; try another voice or stability value where available. |
| Audio has unwanted elements | State what should be present and absent. Separate music, SFX and speech tasks when you need greater control. |
| Text or labels are incorrect | Proofread at full size. Make a targeted image edit or add exact typography in a finishing editor. |
| Too many credits used | Check duration, quality, resolution, multiple-output counters and separate actions such as Retry and Generate Looks. |
| An online tutorial looks different | Check if it uses old.pika.art. This guide records the new create.pika.art workspace. |
| A model’s description conflicts with its form | Follow enabled inputs, settings and validation in the current selected mode. Marketing text may describe another variant or a broader capability. |
A zero to hero learning path
| Stage | What to practice |
|---|---|
| Lesson 1 — Find your way | Locate Create, Library, Projects and the credit display. Open one app and identify inputs versus promotional preview. |
| Lesson 2 — Make one image | Generate one simple still and inspect it at full size. Save the prompt and reference. |
| Lesson 3 — Add restrained motion | Animate the still with one motion instruction. Compare a static camera with a slow push-in. |
| Lesson 4 — Control continuity | Make a character sheet or use matching keyframes. Check that identity and objects remain consistent. |
| Lesson 5 — Edit with intention | Choose one editing tool to solve one problem: trim timing, relight illumination or grade color. |
| Lesson 6 — Design sound | Create a short speech, music or SFX element. Listen for how it supports the picture. |
| Lesson 7 — Finish a sequence | Combine a few approved shots, review sound and timing, then verify the live export settings. |
You are ready for more complex projects when you can explain why you chose a tool, reproduce your input setup, identify a specific flaw in an output, and change one setting or instruction to address it.
Find jobs and download finished media
Jobs separates In Progress work from Complete and Failed results. Use it to inspect a submitted generation before sending another request. Discover offers Featured, Video, Image and Favorites filters, plus search and community remix entry points.
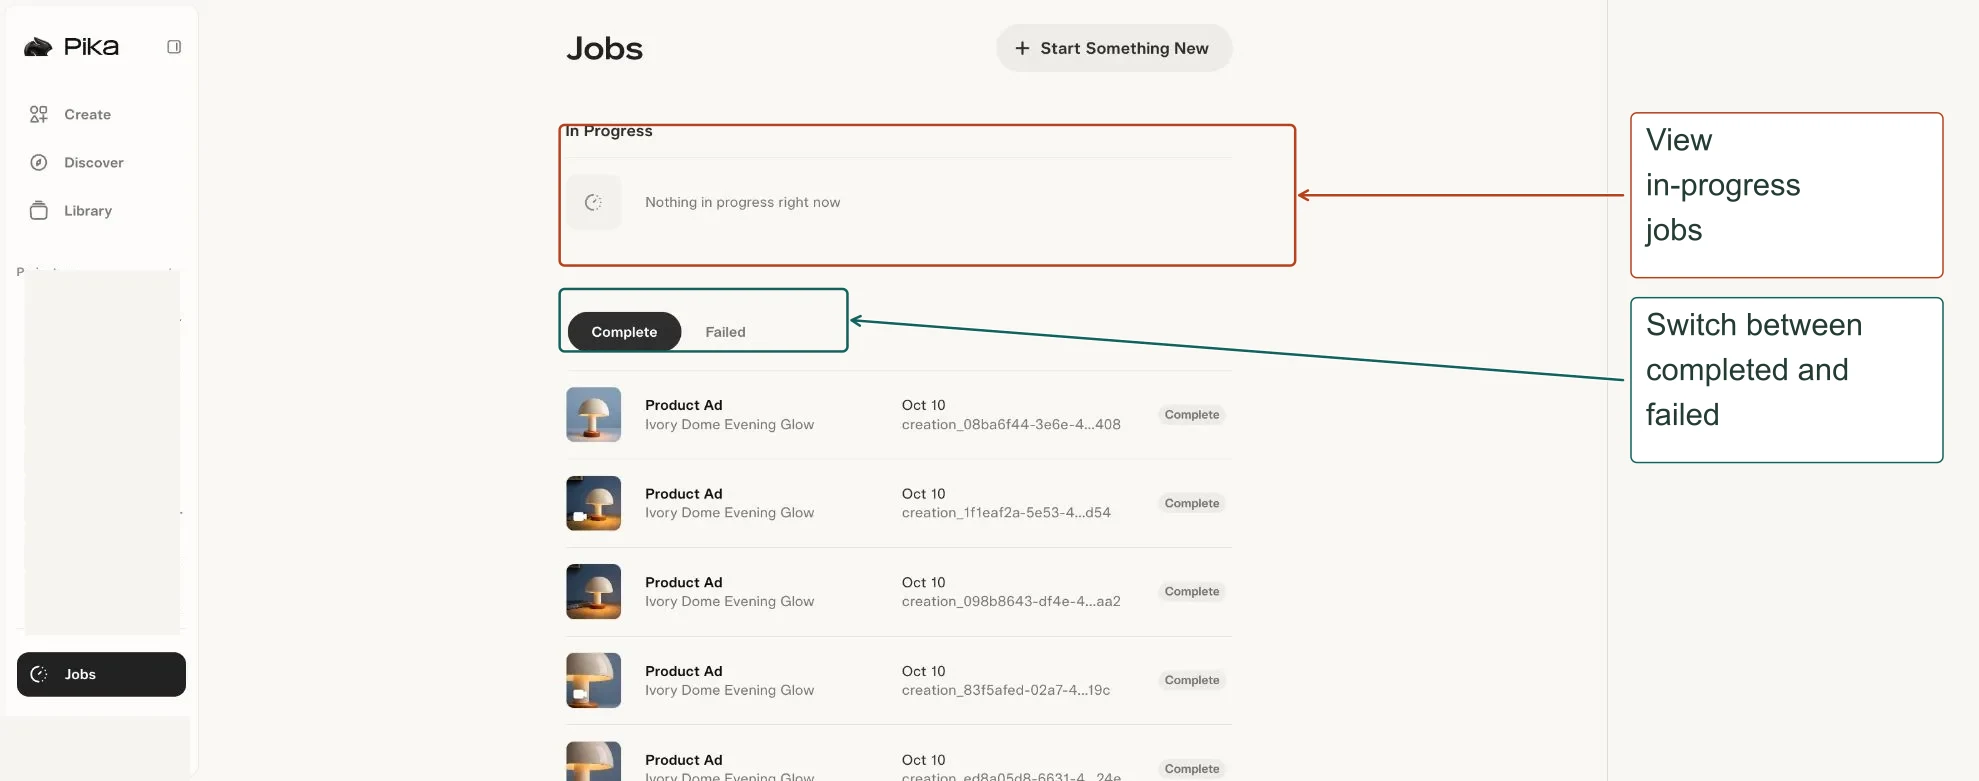
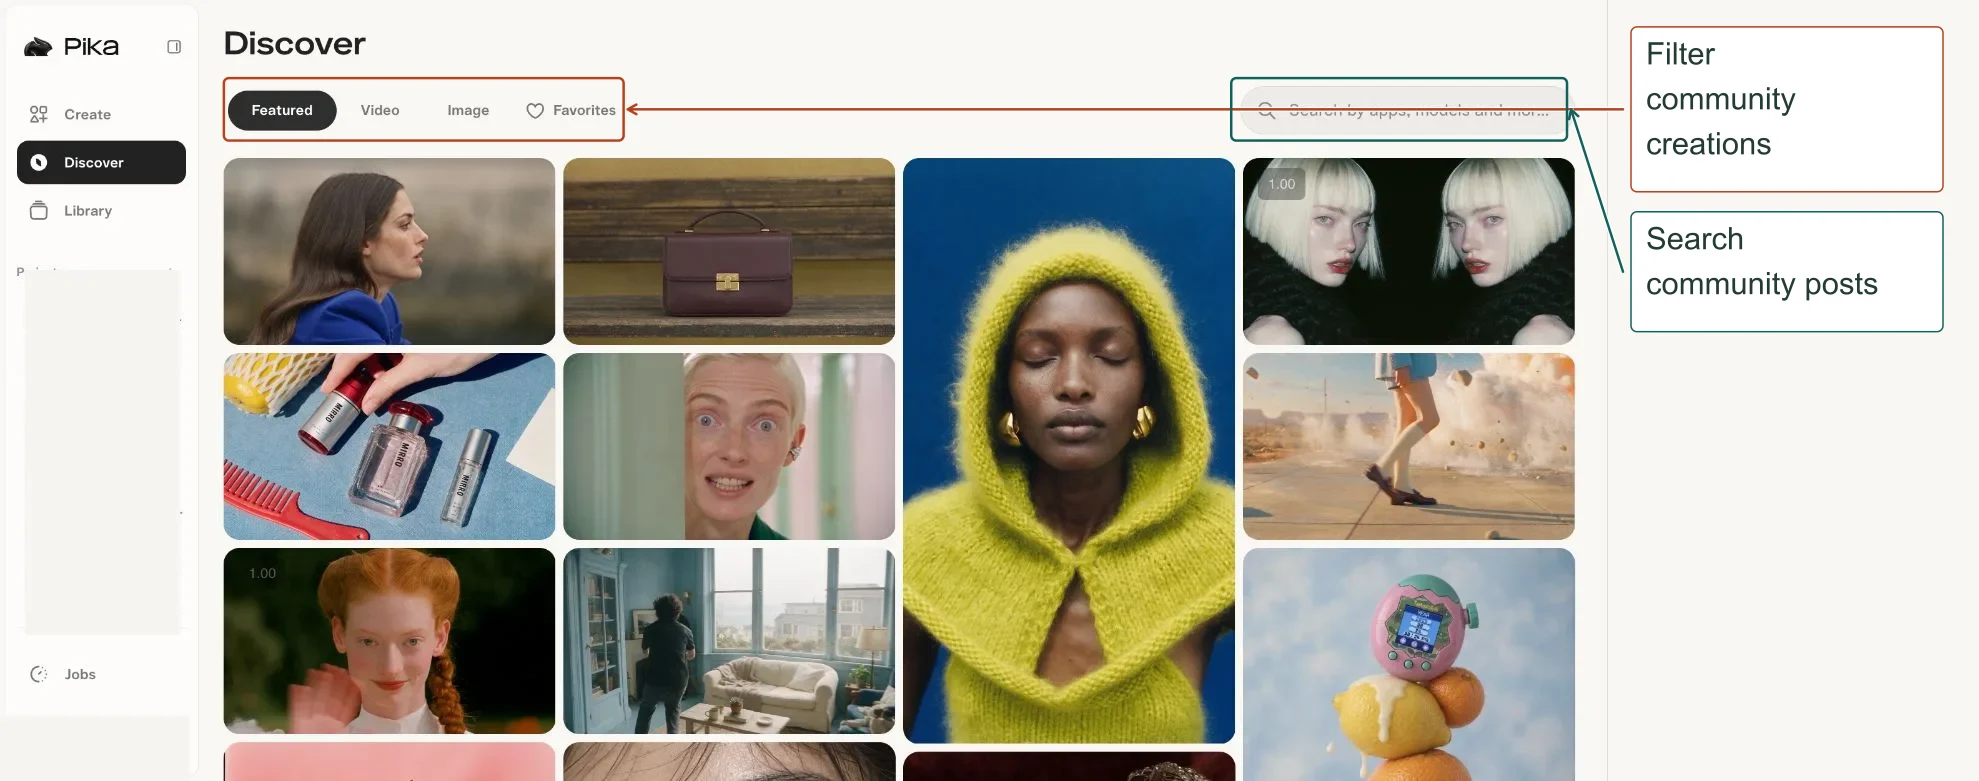
To download an individual asset, open Library and select the item. The detail view shows a Download button along with Use in an app, Edit with an app, Make Element, Favorite and More actions. The side panel records file type, dimensions, aspect ratio and creation information. More actions showed Rename and Delete. Use Download to save the selected asset.
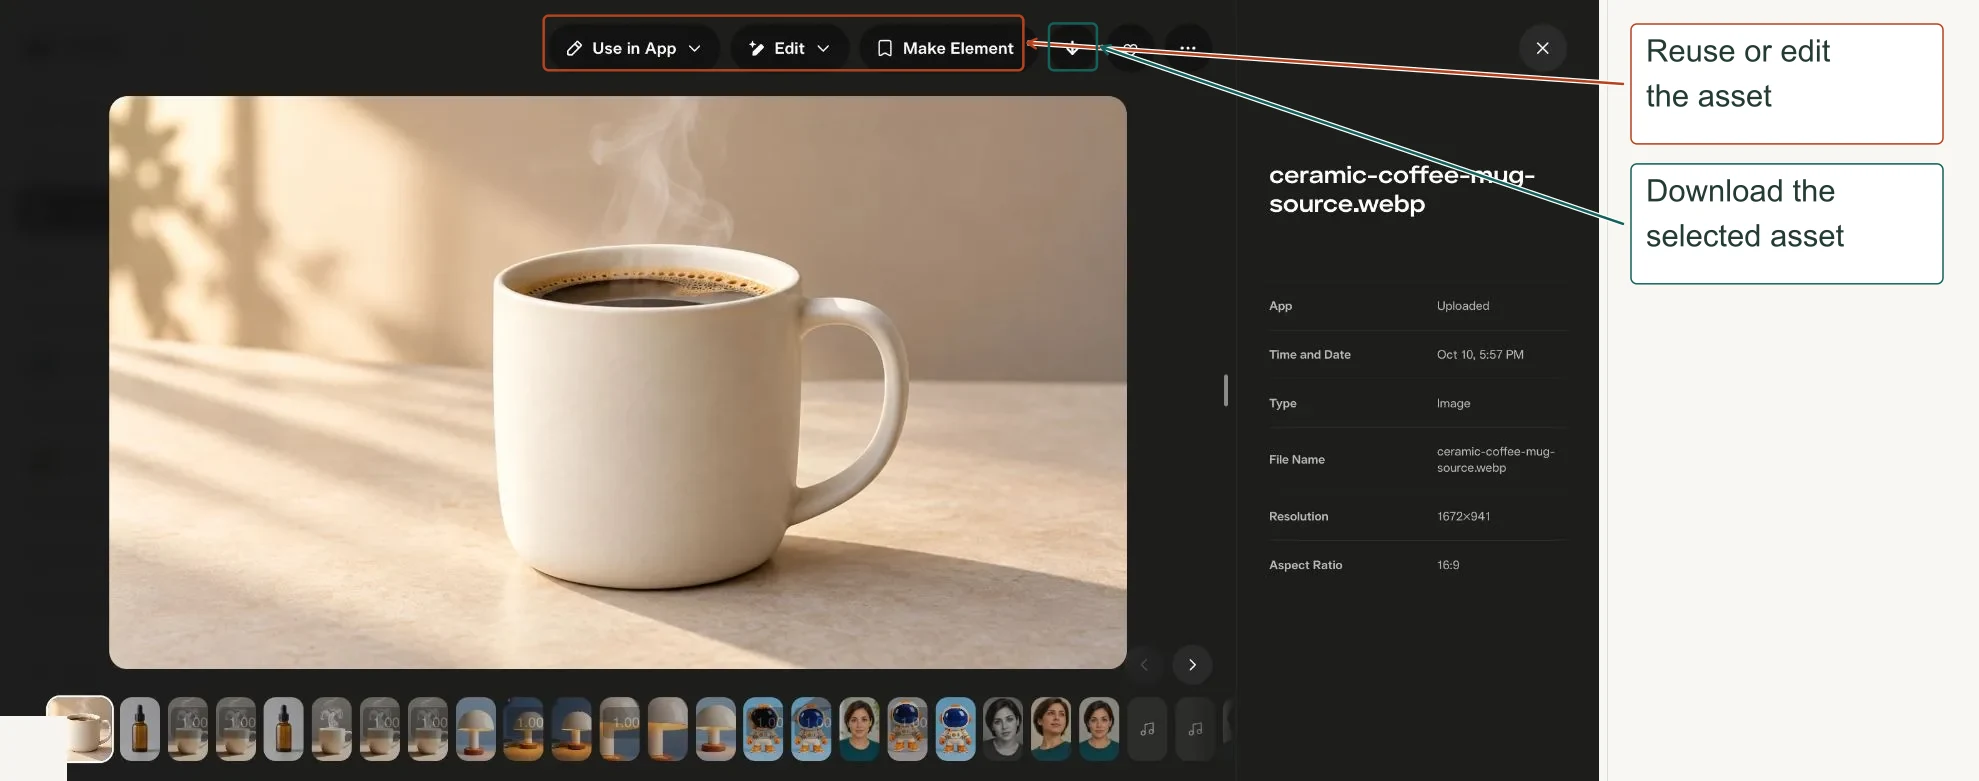
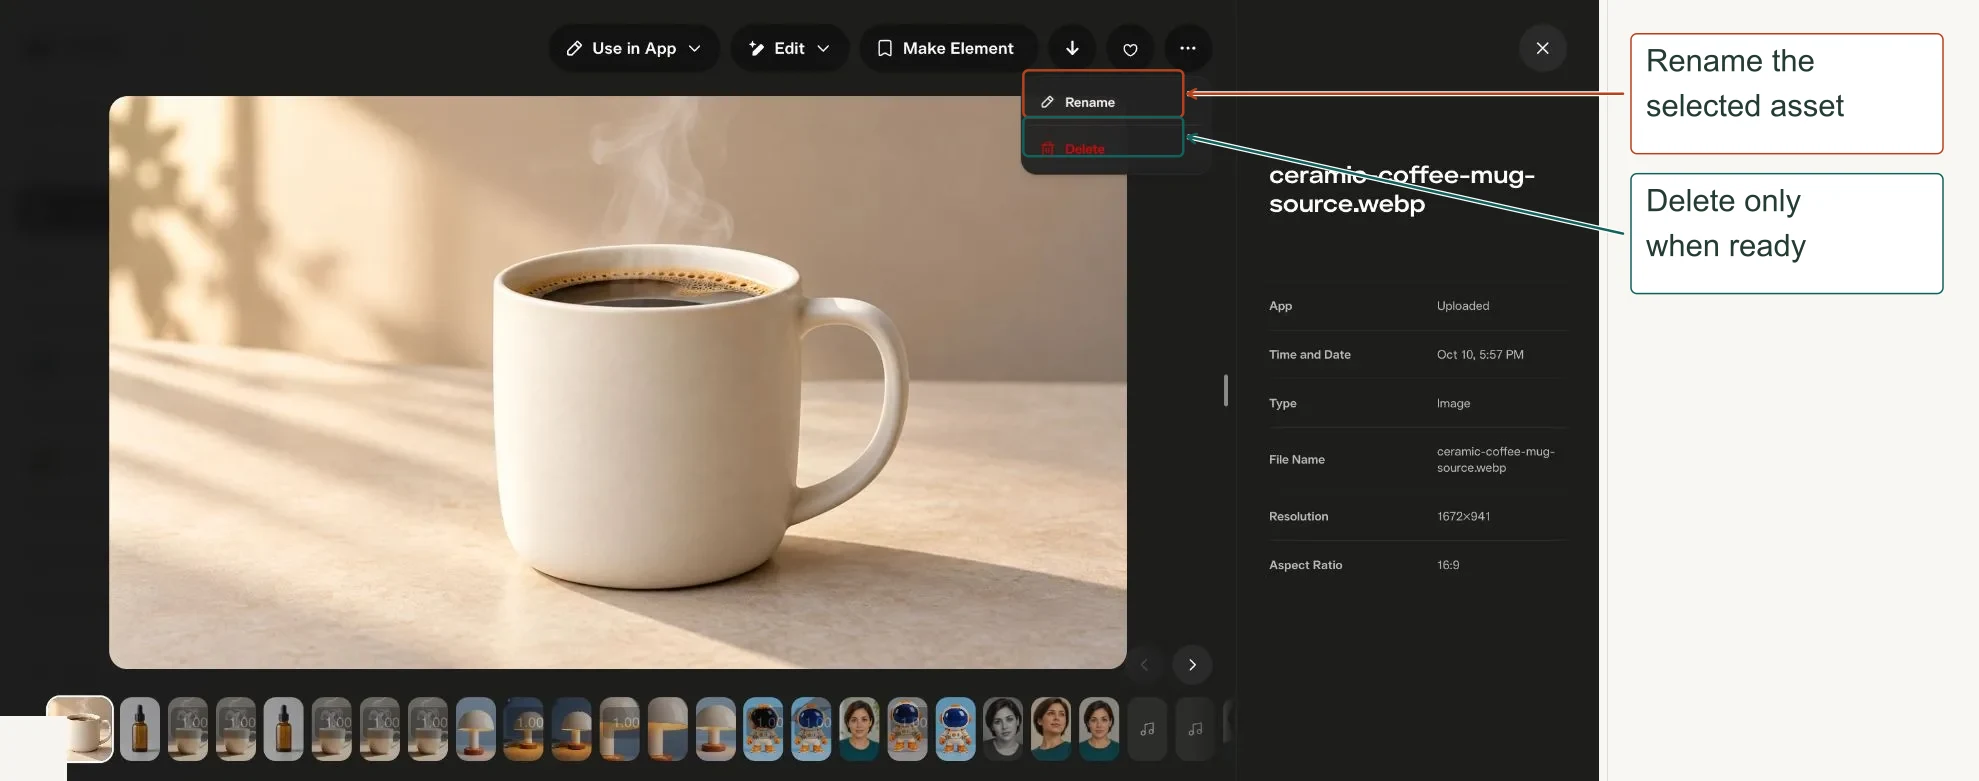
Questions before you start
Which Pika tool should I try first?
Start with Pika 2.5 for a short clip from a photo or prompt. Choose Video Studio when you want to compare the settings available across models. Keep your first attempt to one generation.
Does every model support the same settings?
No. Duration, resolution, audio, references and frame shapes depend on the selected model and input mode. Recheck the form after changing either.
Can I add music after making a video?
Yes. Pika Soundtrack uses a video as its starting point. Pika Music and Pika SFX let you create separate audio that you can add to a project.
Where do I find my finished work?
Use Jobs to follow processing, then open the asset in Library or its project. The asset detail view includes Download and options to continue editing.