
I use Motion Transfer when the movement is already in a clip and I want a character photo to perform it. The image supplies the person and outfit; the motion clip supplies the movement. Start with a clear full-body image and one continuous reference shot.
We made two fictional adult creator images, then tested the same female image with Sample motion 3 and Sample motion 5 on 8 October 2026. Both attempts use 1080p, Follows motion clip and sound off, with the same optional prompt. Watch the actual results first, then follow the inputs, screenshots and costs below.
Watch the two real results
These are downloaded results, served as smaller MP4 copies with the original frame dimensions and timing. Neither starts automatically. Use the download links to inspect the clips in your editor.
The female image is the matched test input in both players. The male image below is an alternate input we prepared; we did not run a male motion test. Keep that distinction when judging what we tested.
What is Pika Motion Transfer?
Motion Transfer takes a character image and a movement clip to make a new video of that character following the reference. You can upload your own clip or select a sample inside the app.
The Motion Transfer page offered Character, Motion clip, seven sample motions, an optional prompt, Character Pose, Sound and Resolution. We did not see a model selector in this form. The second completed asset identifies kling/kling-3.0/motion-control in its details, so these are Motion Transfer app tests, not Pika 2.5 tests.
The app warns that fast or complex movement can distort a result or make it shorter than the source clip. Our chosen samples include demanding movement; treat them as examples to inspect, not a promise that every frame is ready to publish.
When is it worth using?
| Your goal | My starting choice | What to check |
|---|---|---|
| A fictional creator doing a particular dance | Motion Transfer with a clear reference | Face, hands, feet and outfit through the move |
| A short outfit or character movement test | One full-body image and one simple clip | Body framing and clothing consistency |
| An animation with an existing performance | Match character and performer framing | Turns, occlusion and body proportions |
| A gentle wave or small camera move | Ordinary image-to-video may be enough | A motion reference may add unnecessary work |
| A transition between two planned pictures | Read our keyframe guide | You need image order, not a borrowed performance |
Creators, character designers and editors can use it to test movement before committing to a longer edit. I would start with a simple gesture when the goal is a clean introduction. A flip can reveal the tool’s limits, but it is rarely the cheapest first test for a brand clip.
For a movement described in words, read our image-to-video guide. For two planned image states, read Pikaframes versus ordinary image-to-video.
Our full-body character inputs
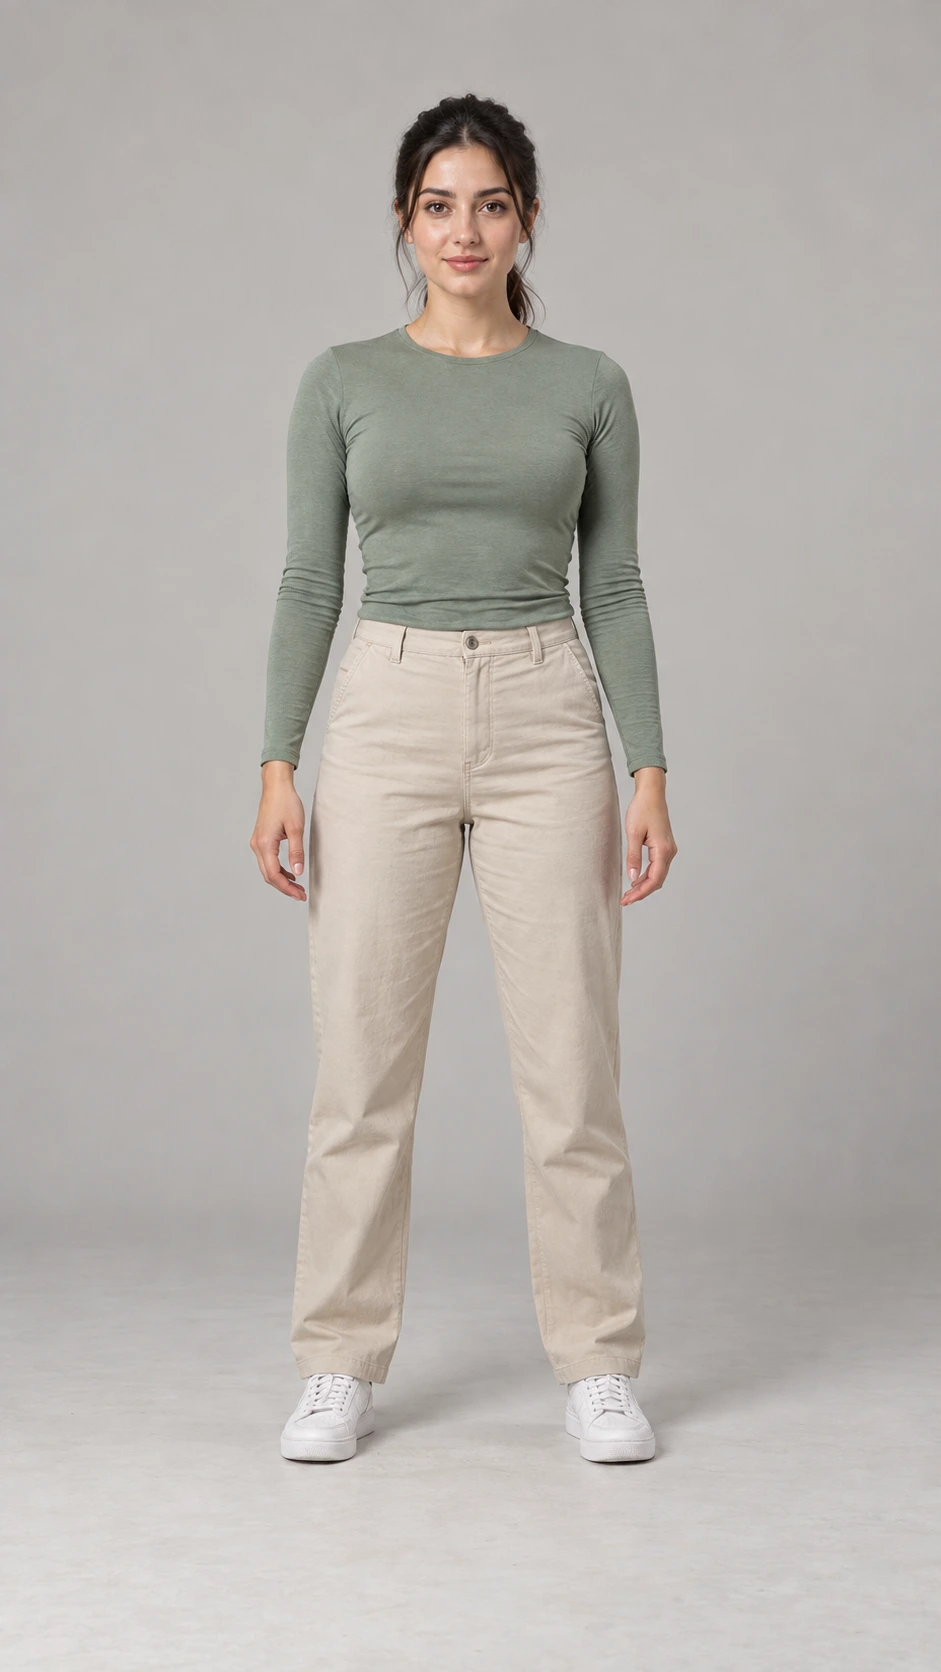
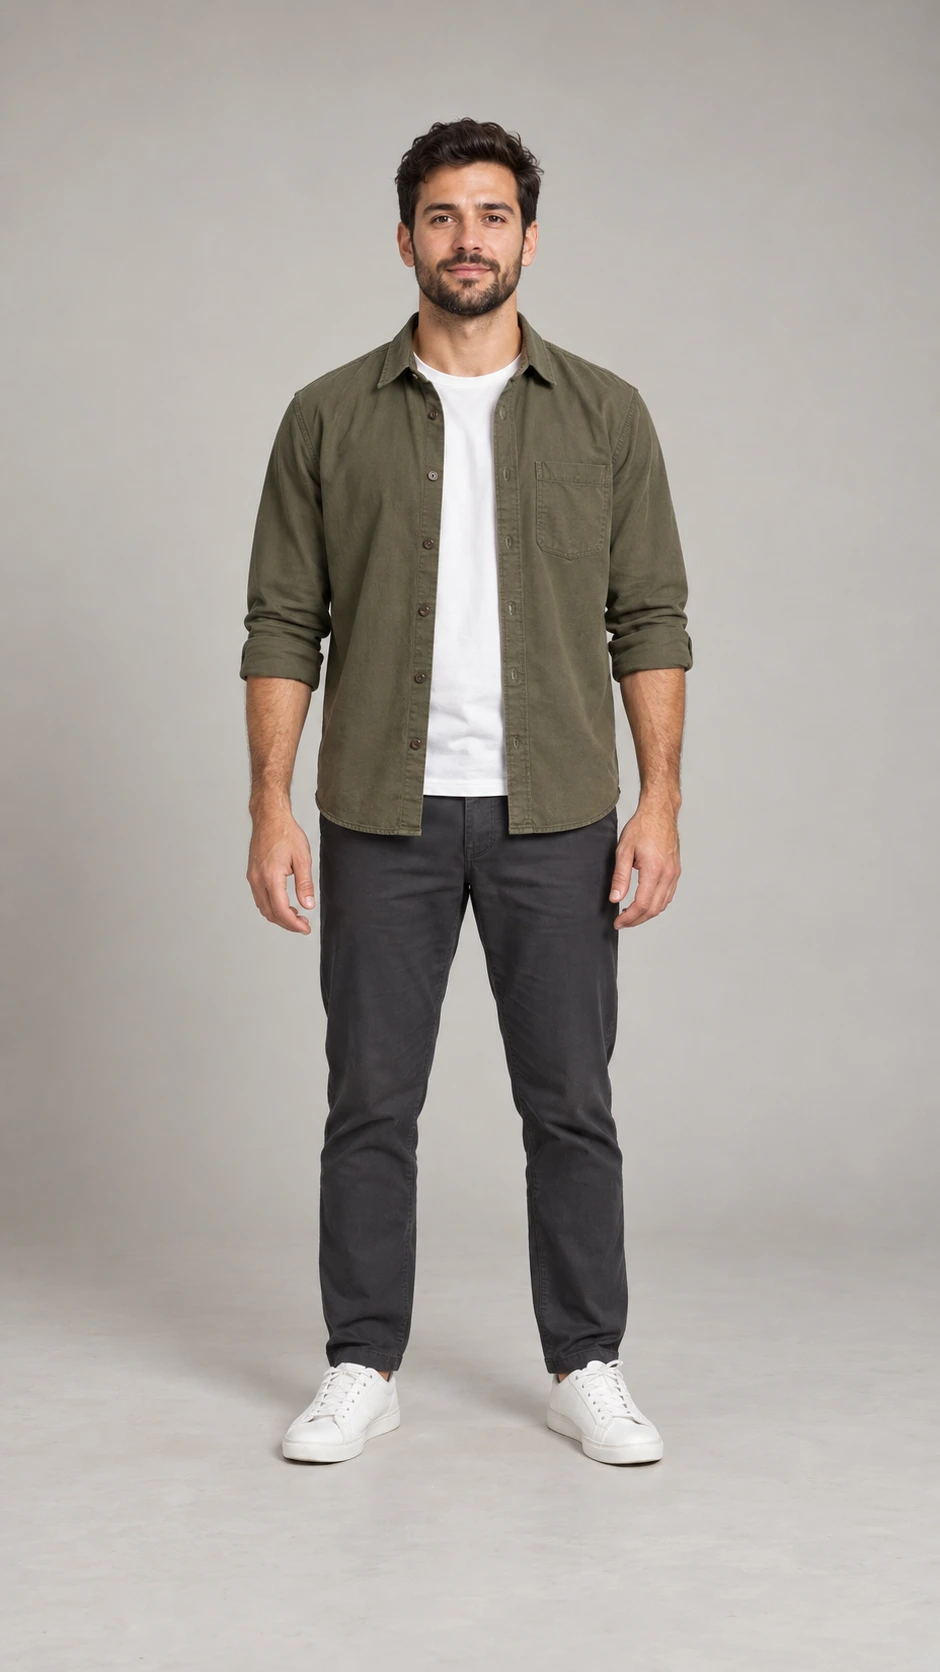
We created two fictional adults in neutral standing poses, with hands and shoes visible and room around their bodies. Plain backgrounds and clear outfit edges make the input easier to inspect.
Copy the image brief for your own character
One fictional adult lifestyle creator, full body, facing the camera. Arms relaxed and slightly away from the torso, hands visible, feet apart. Keep the whole head and shoes in frame with space above and below. Plain light-gray studio background and floor, soft even light, natural skin texture. No objects, text or logos.
For our female input, we added sage long-sleeve top, straight beige trousers, white sneakers and tied-back dark hair. For the male input, we added olive overshirt, white T-shirt, charcoal trousers, white sneakers, short dark hair and a trimmed beard.
A reference still should show one person clearly. Avoid crossed arms, a phone covering the face, tight crops or furniture covering the legs. You can also prepare a character through Character Studio; choose a suitable single image for this app rather than uploading a multi-view sheet.
Step 1: open the app and upload the character
Open Motion Transfer. From Create home, find Motion Transfer in the apps area or app search.
- Select Choose character.
- In the asset picker, select Upload to choose an image from your device.
- Wait for the upload progress to finish.
- Confirm that the Character field contains the intended image.
The picker also offered saved Assets, Characters, Products, Scenes, Brand Styles and Camera tabs. If you select an existing suitable image, use Use Selection. You do not need to create a saved Character entry first to upload a file.
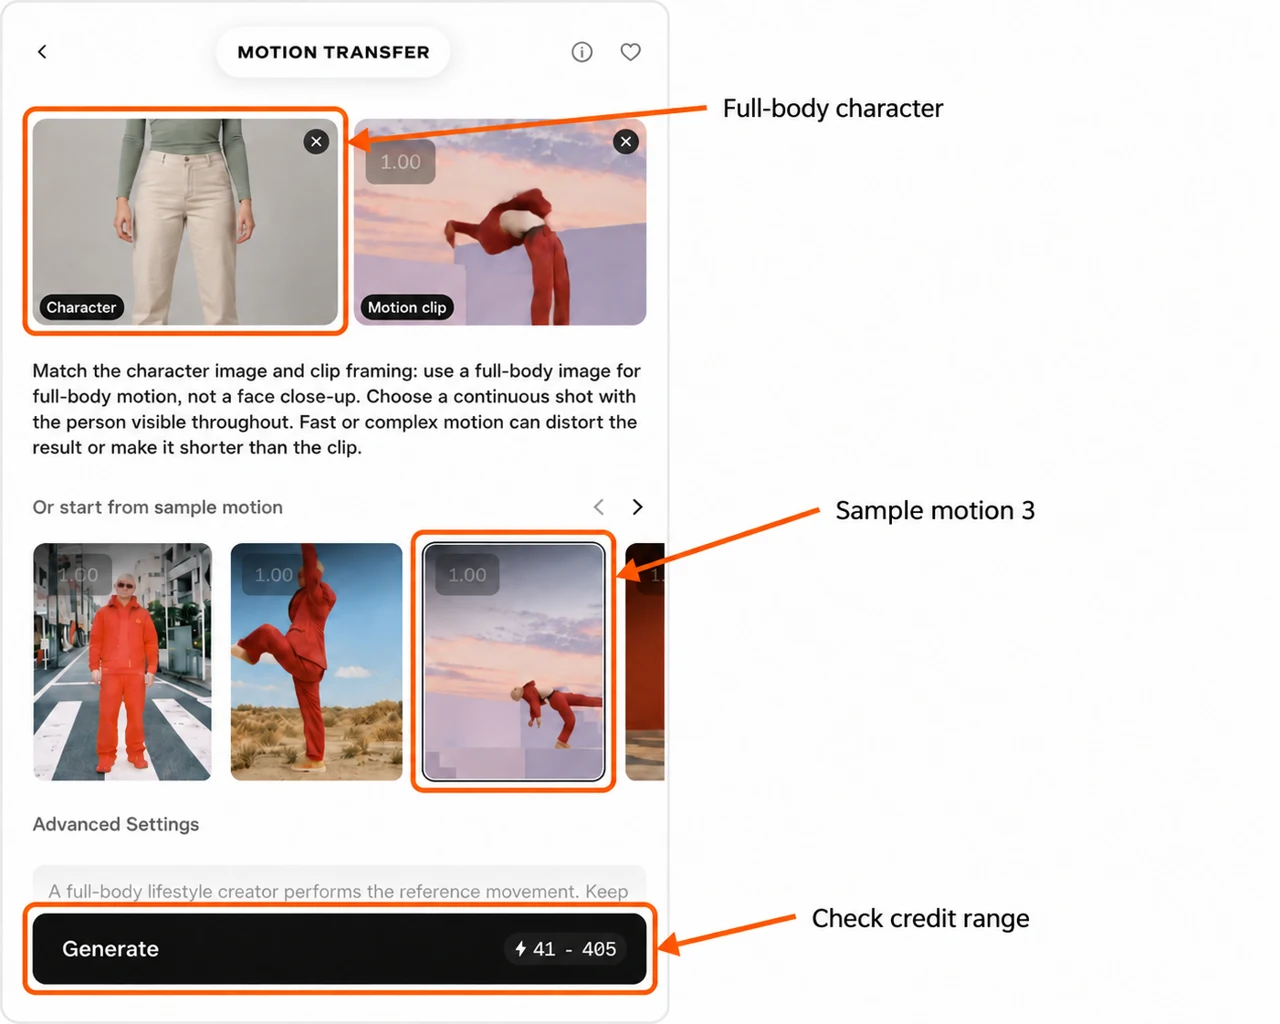
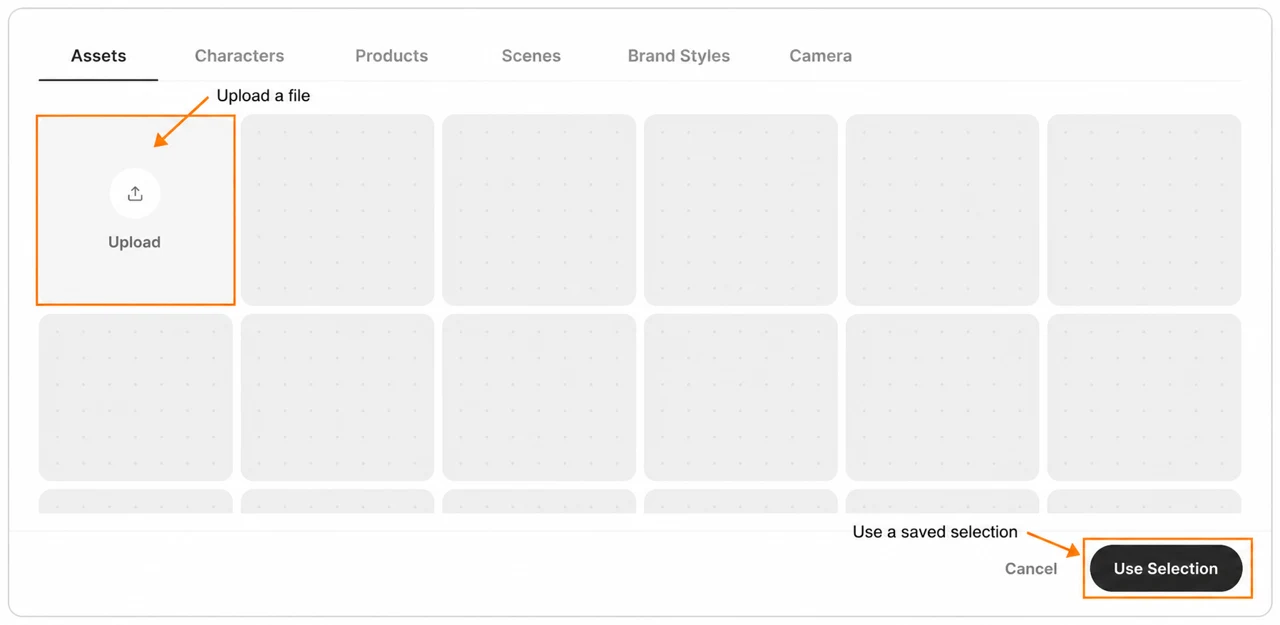
Use Remove character or the × on the image card to replace the input. For a fair motion comparison, keep this file unchanged between attempts.
Step 2: choose a sample motion or your own clip
Our session showed seven sample motions, labelled Sample motion 1 through Sample motion 7. Use the horizontal arrows to reach cards outside the first group. Click a card and check its selected border.
We used Sample motion 3 first, then Sample motion 5. The sample numbering is from our checked session; inspect the card content if the app changes its ordering.
| Reference | Source length we measured | Movement visible in the sample |
|---|---|---|
| Sample motion 3 | About 8.60s | Wide stances, bending and backward movement beside pale steps |
| Sample motion 5 | About 5.43s | An inverted movement in a mountain-and-grass setting |
Watch the motion references
The sample players use Pika’s public files. If a sample is replaced, open the app and inspect its current cards before repeating this test.
The input photo and motion source are different things. The red-clothed person in a sample is the movement reference; the female creator image is the character we asked to animate.
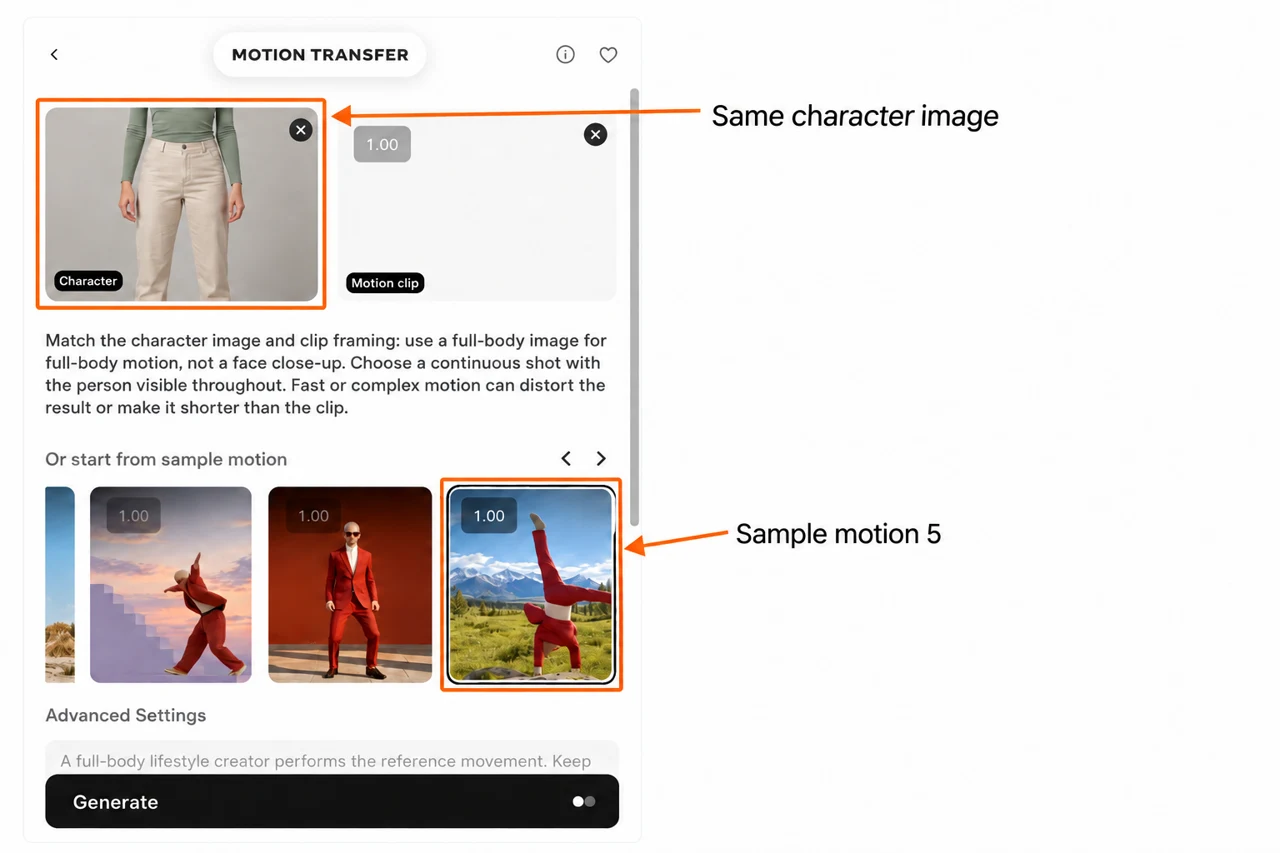
Using your own motion clip
Select Choose motion clip, then upload or choose a suitable saved video. Keep one performer visible in one continuous shot, with framing that matches your character image.
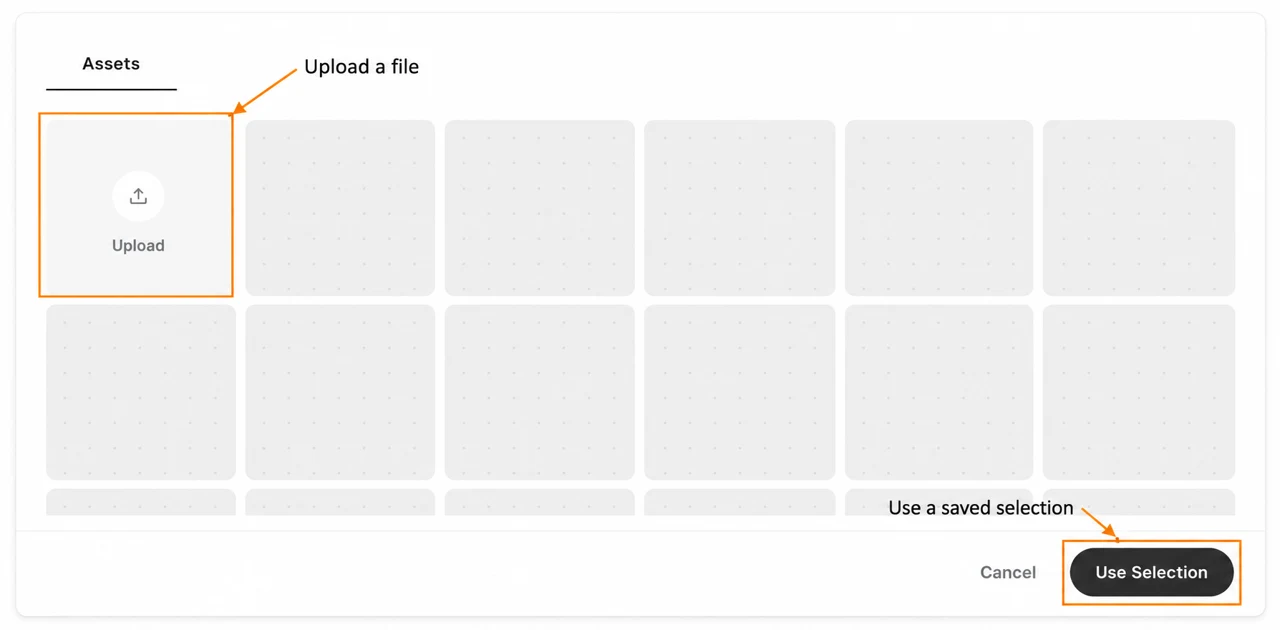
A full-body performance needs a full-body character photo. For a half-body reference, start with compatible framing. A face close-up gives the app little information for a move involving the legs.
We tested the built-in samples, not a custom clip upload. The button and picker workflow were inspected; custom-file results are outside this comparison. Use a clip you have permission to use.
Step 3: keep the settings consistent
Scroll to Advanced Settings. We kept the following values fixed across both attempts.
| Setting | Our choice | Reason |
|---|---|---|
| Optional prompt | Same clothing brief in both tests | Avoid changing the text while comparing motion |
| Character Pose | Follows motion clip | Use the reference performance as the pose workflow |
| Sound | Off | Inspect movement without keeping the sample’s audio |
| Resolution | 1080p | Keep the app’s default quality for both tests |
Our exact prompt:
A full-body lifestyle creator performs the reference movement. Keep the face, sage top, beige trousers and white sneakers consistent.
The prompt is optional. It is guidance, not a guarantee of perfect identity or clothing. I keep it short and avoid asking for a different action that competes with the reference.
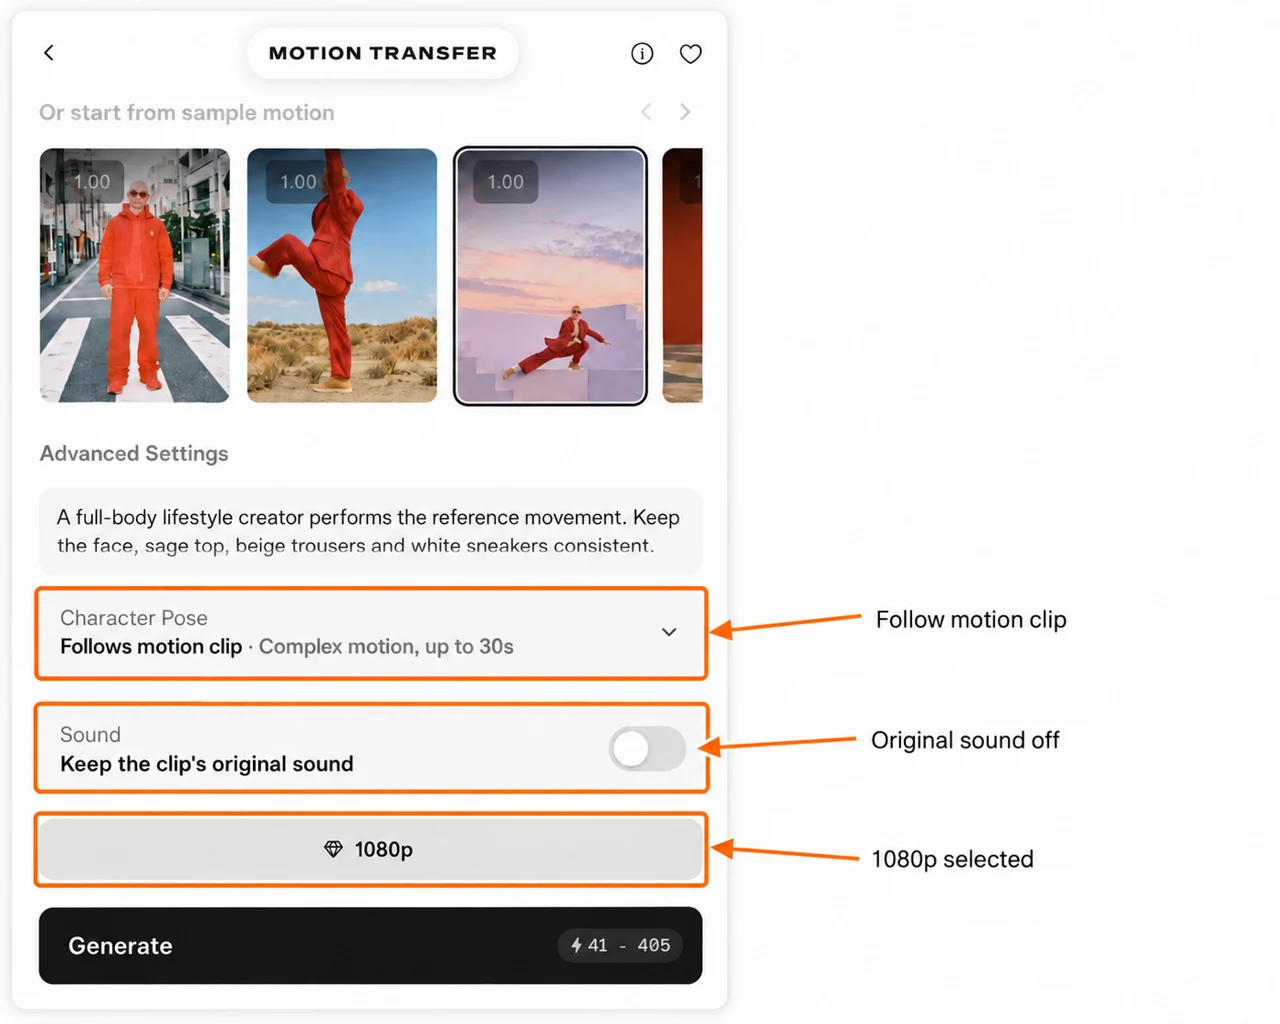
What does Character Pose change?
The menu gave two choices with different limits:
- Follows motion clip: labelled “Complex motion, up to 30s.”
- Follows character image: labelled “Follows the camera, up to 10s.”
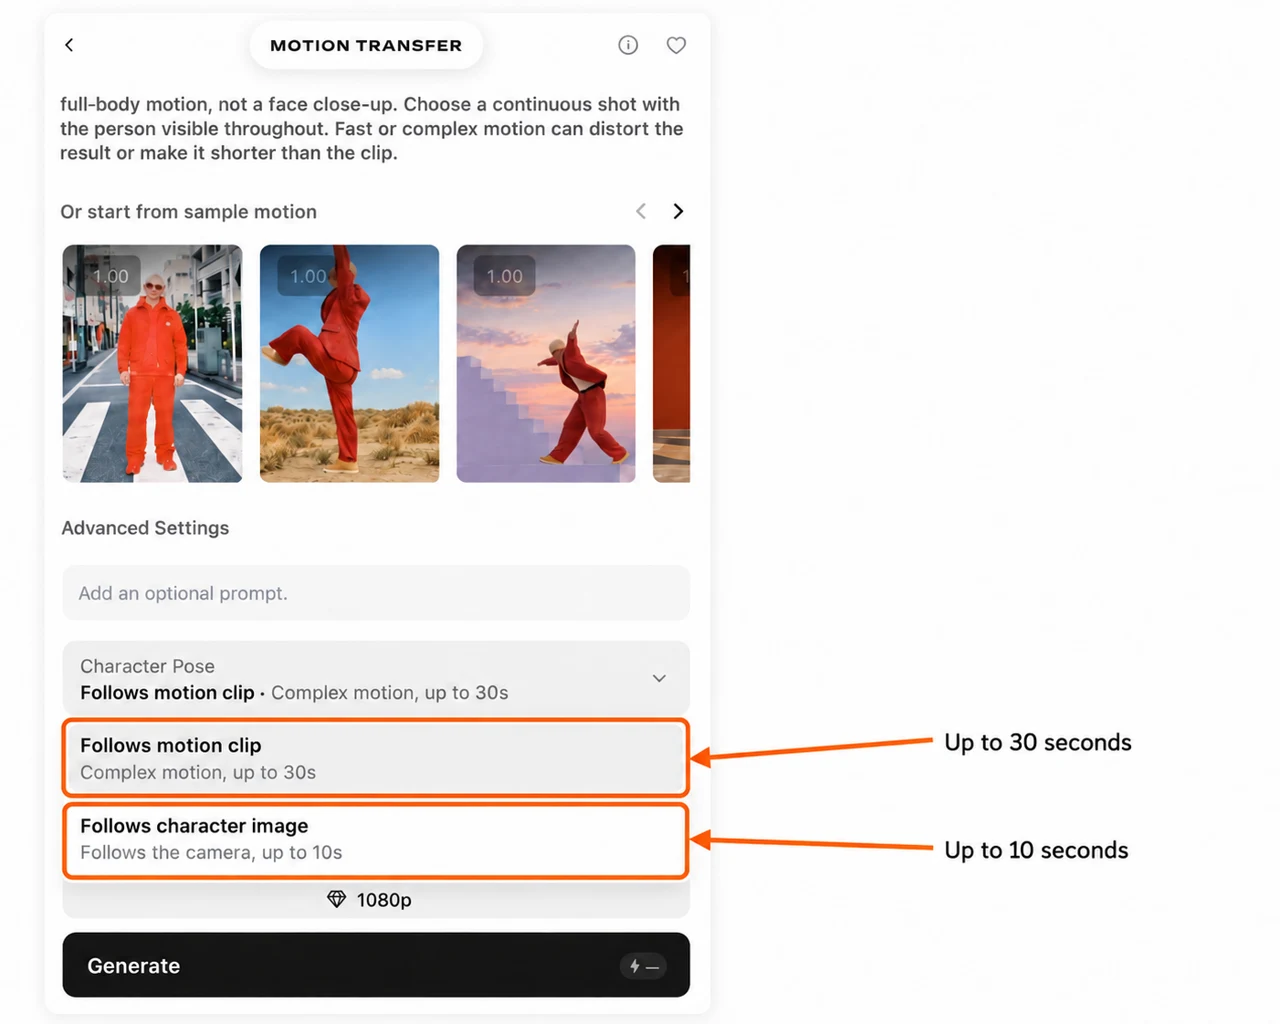
I chose Follows motion clip because we were transferring the sample’s full-body movement. We inspected the second option but did not generate with it, so this guide does not claim it solved pose or camera problems.
There was no separate duration selector. The source clip and chosen pose workflow set the context; the finished file still needs a length check. Our references were both under ten seconds.
Step 4: generate once and wait for the result
Wait for the credit quote to settle, then press Generate once. At our selected 1080p settings, both inputs showed 41–405 credits before submission. The lower number was not the final charge for our first result.
Our first attempt completed on the app page under Your result, with playback, Expand result, Download and Save to project. The second attempt opened a project. In that workflow, open the completed video’s details to see its references and download toolbar. We waited for completion rather than submitting the same test again.
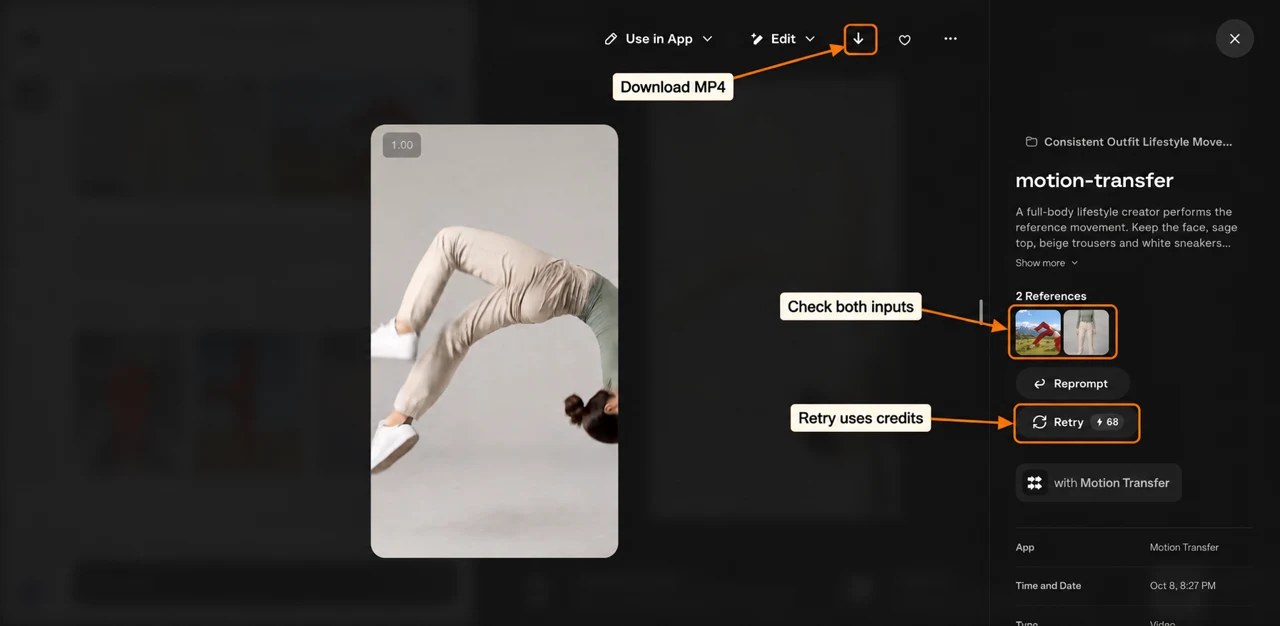
Select Download on the app result, or the download arrow at the top of asset details, to save the MP4. Keep the original, then import it into your video editor. Saving or downloading a finished result does not require another generation.
For the second test, we kept the female image and prompt, selected Sample motion 5 and generated once more. This changed one input: the motion reference.
What did the tests show?
Sample motion 3: compare poses across the clip
Our first downloaded result is 8.50 seconds at 1088 × 1904 pixels, with no audio track. We selected 1080p in the app; those are the actual file dimensions, not an assumed 1080 × 1920 export.
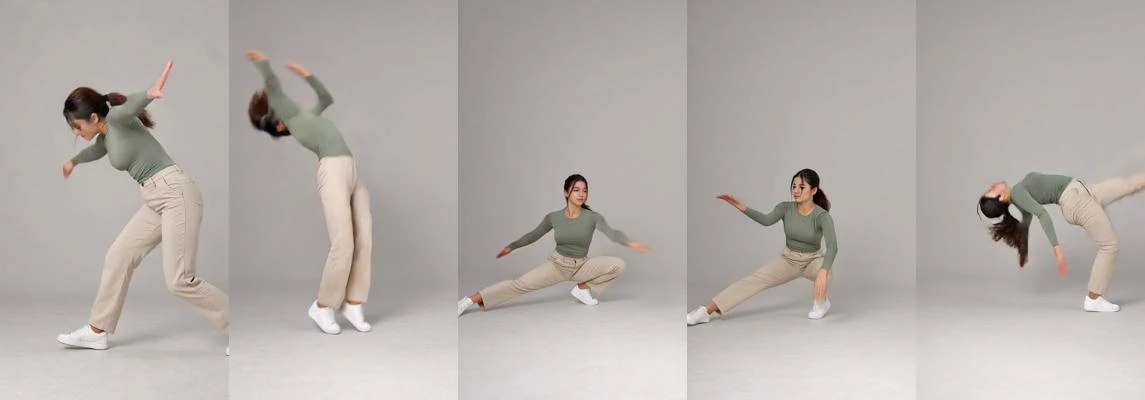
The sampled frames show a wide stance and backward movement while keeping the source’s plain studio setting. A foot reaches the frame edge during the wide pose, and part of the body leaves the crop near the end. I would check those moments in the full video before choosing a section for a post.
This frame check is useful evidence, but it is not a frame-by-frame anatomy or identity score. Play the video and watch the hands, joints, face and foot contact throughout.
Sample motion 5: a different movement from the same photo
The second file is 5.33 seconds at 1088 × 1904 pixels, also with no audio track. It begins with an inverted pose, then moves through backward bending and raised arms.
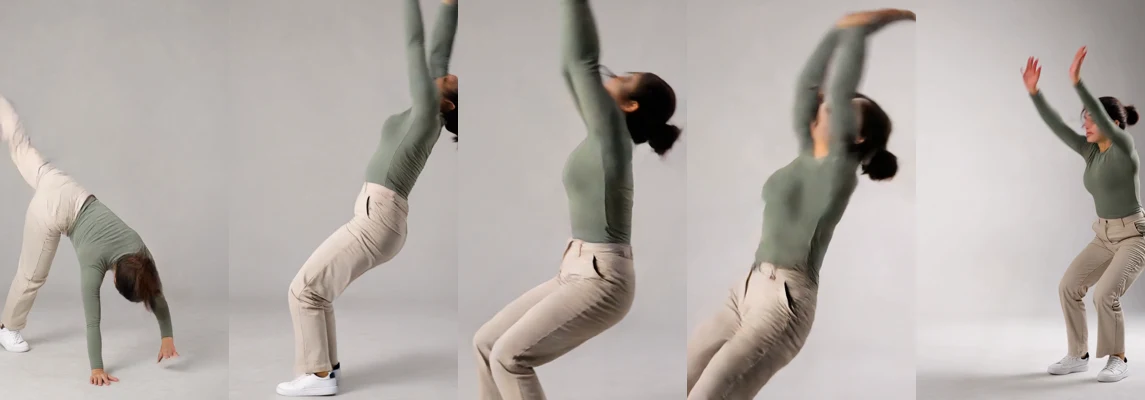
My choice from these sampled frames: Sample motion 3 keeps more of the body visible through several poses. Sample motion 5 has stronger framing problems for an outfit introduction. I would not use the whole second result for a post that needs the head and shoes visible throughout.
Both outputs are slightly shorter than their references. Neither reproduces the sample’s outdoor or stepped setting; these attempts retain the character photo’s plain studio background. Review the full files before choosing an extract. This is a two-attempt walkthrough, not a general success-rate test.
What did it cost?
| Attempt | Quote before submission | Settled account charge |
|---|---|---|
| Same female image + Sample motion 3 | 41–405 credits | 122 credits |
| Same female image + Sample motion 5 | 41–405 credits | 68 credits |
| Two videos total | Quotes were ranges | 190 credits |
For the first job, the balance moved from 609 to 204 during generation, then settled at 487 after completion. The 405-credit drop was temporary; the completed net charge was 122. Do not treat an in-progress balance change as the final cost.
For the second job, 487 credits temporarily became 82, then settled at 419. Its asset details listed Cost 68 tokens, matching the final balance change. The two jobs therefore used 190 credits in total.
These are Motion Transfer workspace charges from our session. Check the quote for your inputs and quality; the same range does not promise the same final charge for every clip. The two source images were created separately for this tutorial, so this table counts only the Pika video jobs.
I would spend on one useful short test first. A simpler reference can be more useful than a longer or more demanding move. We did not test 720p pricing or establish a price-per-second rule from these attempts.
Check the result before using it
| Check | What I look for | Next change to try |
|---|---|---|
| Face and hair | Identity shifts during turns or bends | Try a slower reference with the face visible |
| Hands and joints | Fingers, elbows or knees changing shape | Use a simpler gesture with less overlap |
| Clothing | Outfit edges, colour or texture drifting | Start with clearer clothing in the input |
| Foot contact | Sliding, floating or feet leaving the frame | Match framing and leave more room around the body |
| Timing | Missing or shortened movement | Shorten the reference to one useful action |
| Audio | A silent output when you expected the original sound | Check Sound before the next attempt; add a track in your editor |
These are troubleshooting starting points, not guaranteed fixes. Save the input image, motion selection and settings beside the output so you know what changed on the next attempt.
Questions before your first test
Do I need to generate a new image for every motion?
No. Our two outputs use the same uploaded female file. Keep the image fixed when you want to compare movement. Replace it only when the framing or character needs to change.
Can I keep the motion clip’s sound?
The Sound switch says “Keep the clip’s original sound” and was on by default. We turned it off for these tests. This is not a text-to-audio control; we did not test sound-on output here.
Is the built-in sample person the output character?
No. The sample is the movement source. Your selected character image supplies the person you want in the result. Check both input fields before submitting.
Why use a full-body image instead of a portrait?
The app specifically asks you to match image and clip framing. A full-body move needs information about the torso, legs and shoes. Our Character card showed a cropped thumbnail, but the uploaded file itself included the whole body.
Should a beginner start with these acrobatic samples?
Try them if you want to inspect a demanding example. For a first clip you hope to use quickly, I would choose a simple step, wave or turn with one person fully visible. Decide what the post needs before choosing a dramatic move.