
In this guide, we start with a five-second Pika 2.5 portrait clip, then choose its framing, angle and motion in Camera Director. I use Gemini Omni 1.1 Flash for the camera setup shown in the screenshots.
Watch the source below, then follow the steps to upload it and choose a shot. We will work through two examples: a close-up push-in and a wider view from above. Interface checked 9 October 2026.
Watch the clip we are changing
We kept the scene simple: one adult character, a mug, a desk and a plain wall. That gives us useful details to check after a camera edit: face, fingers, mug shape and background.
Review your source before editing. Use the action in the clip as your reference when checking a new camera view.
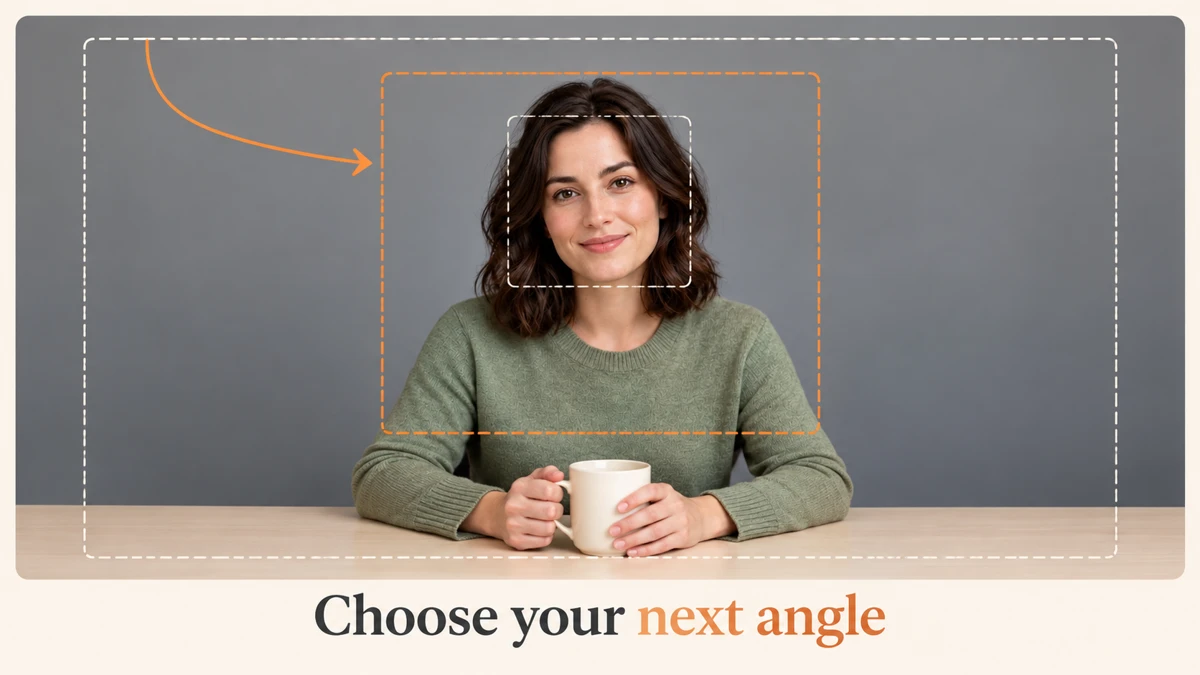
Want to repeat the setup? Download this source clip. Use your own original clip for a real project. The featured image uses framing guides to show where you could place attention.
What is Pika Camera Director?
Camera Director asks a video model to reshoot an existing clip with a different framing, camera angle or movement. You attach a video, choose the shot and review the camera brief before generating.
I would consider it when a creator needs a closer reaction shot, an editor wants a second viewpoint, or a product seller wants to try a different camera move. It asks the model to keep the scene and performance consistent, but that instruction is not a guarantee. Inspect the finished clip before using it.
Should I use it for this job?
| What you need | My starting point | Check before spending credits |
|---|---|---|
| A tighter crop from the same view | Try a normal editor crop first | Does the original have enough detail? |
| A new viewpoint or camera movement | Camera Director | Are changes to unseen parts of the scene acceptable? |
| A first clip from a still photo | Pika 2.5 image-to-video | Create the source before opening Camera Director |
| Different lighting | Relight Media | Keep the camera goal separate from the lighting goal |
| A character copying a motion clip | Motion Transfer | That is a different task from changing the camera |
For a mug listing, I would reject an edit that changes the product’s shape or colour. For a creator portrait, I would check the face and hands first. More movement is useful only when it helps the shot.
Step 1: make a steady source with Pika 2.5
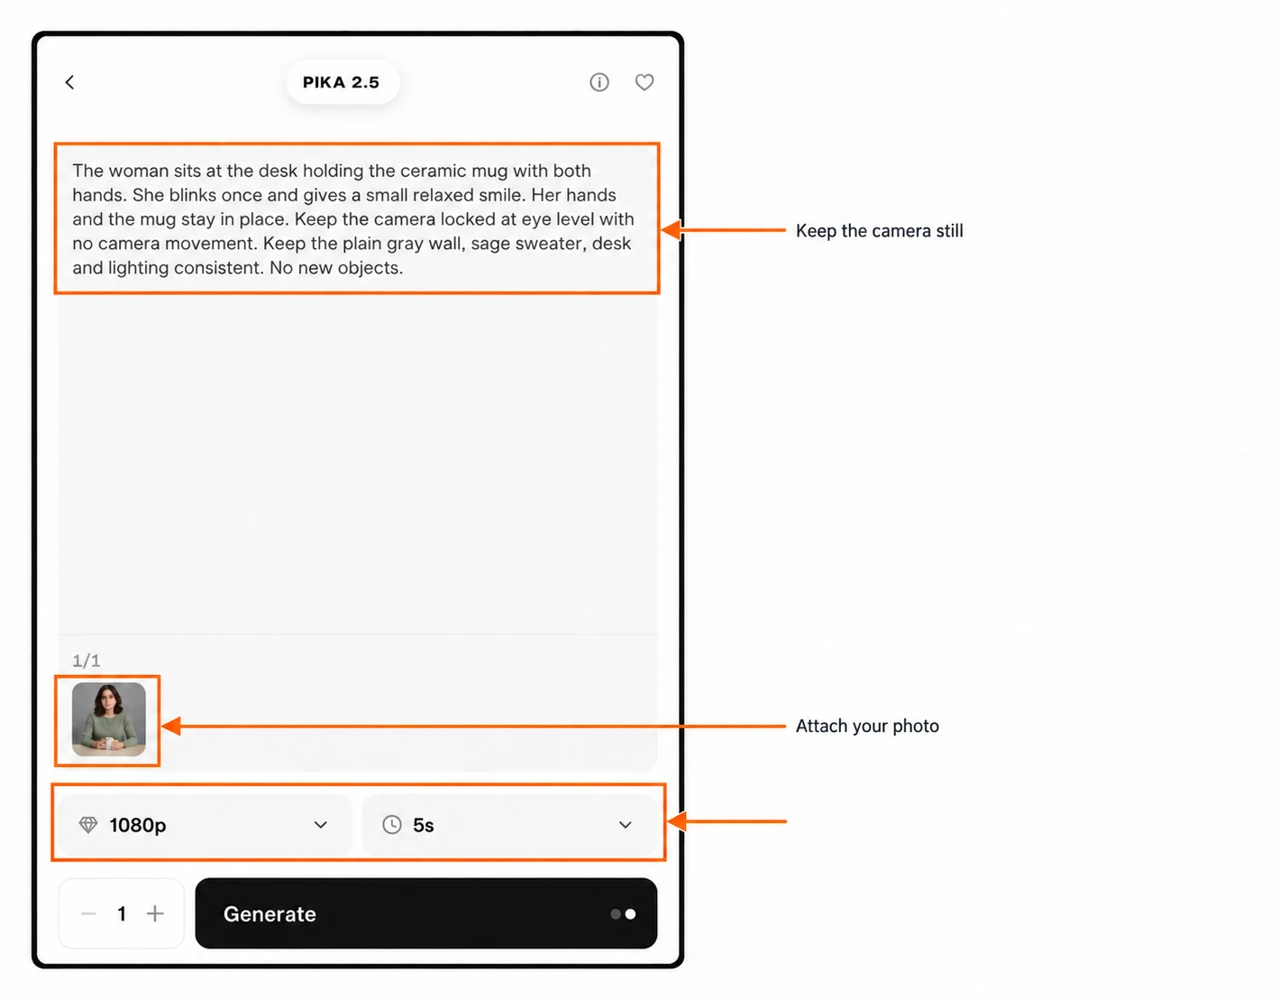
- Open Pika 2.5.
- Attach our original portrait, or use a clear photo you own.
- Describe a small action and ask for a fixed camera.
- Select 1080p, 5s and one generation. Check the credit quote, then generate.
- Open the finished asset and download the video.
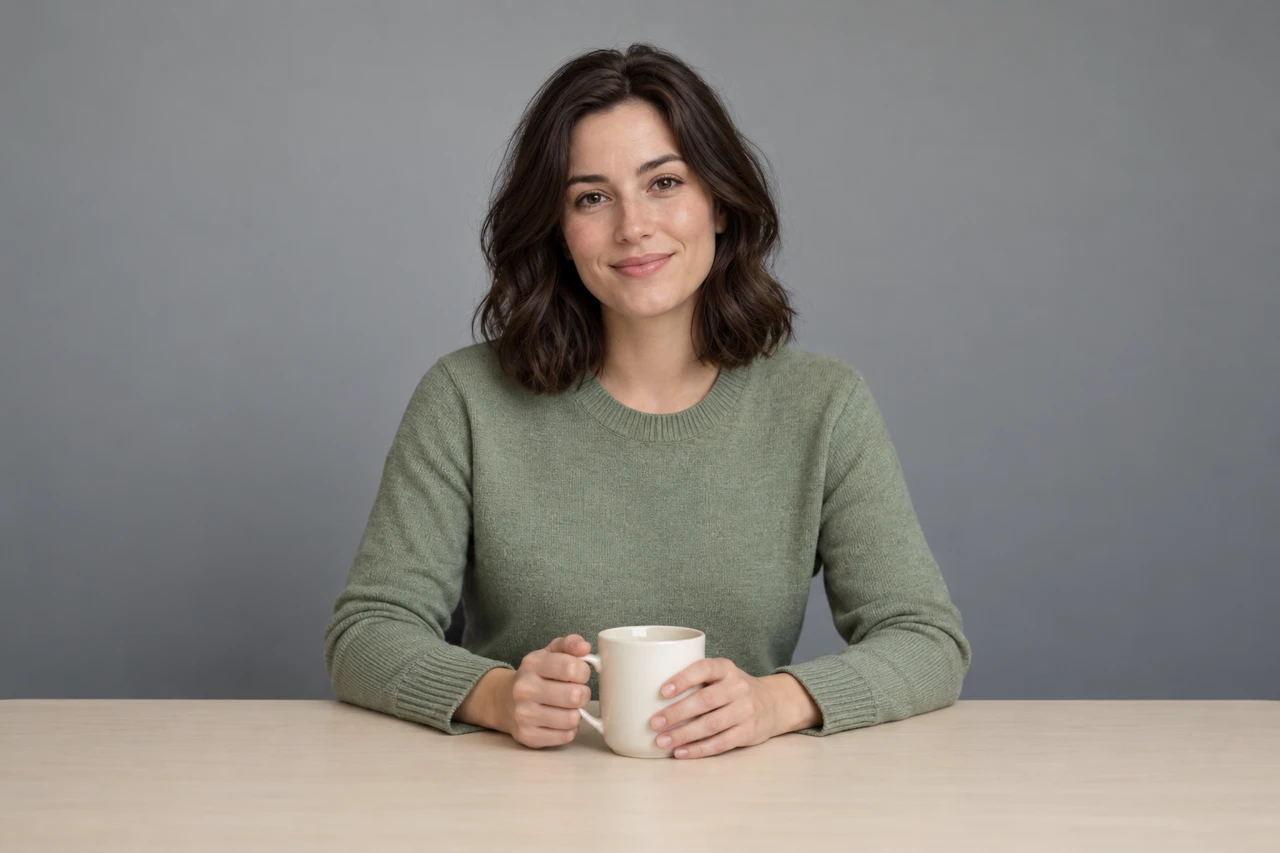
Our exact prompt:
The woman sits at the desk holding the ceramic mug with both hands. She blinks once and gives a small relaxed smile. Her hands and the mug stay in place. Keep the camera locked at eye level with no camera movement. Keep the plain gray wall, sage sweater, desk and lighting consistent. No new objects.
Step 2: upload and trim one continuous shot
- Open Camera Director.
- Select Choose source video on the empty form.
- In the asset picker, choose Upload and select the downloaded MP4. For an existing saved asset, select it and confirm Use Selection.
- Check the preview. Use Play to review the attached clip.
- Drag the yellow handles at either end of the timeline to keep one shot. The form asks for 4–10 seconds.
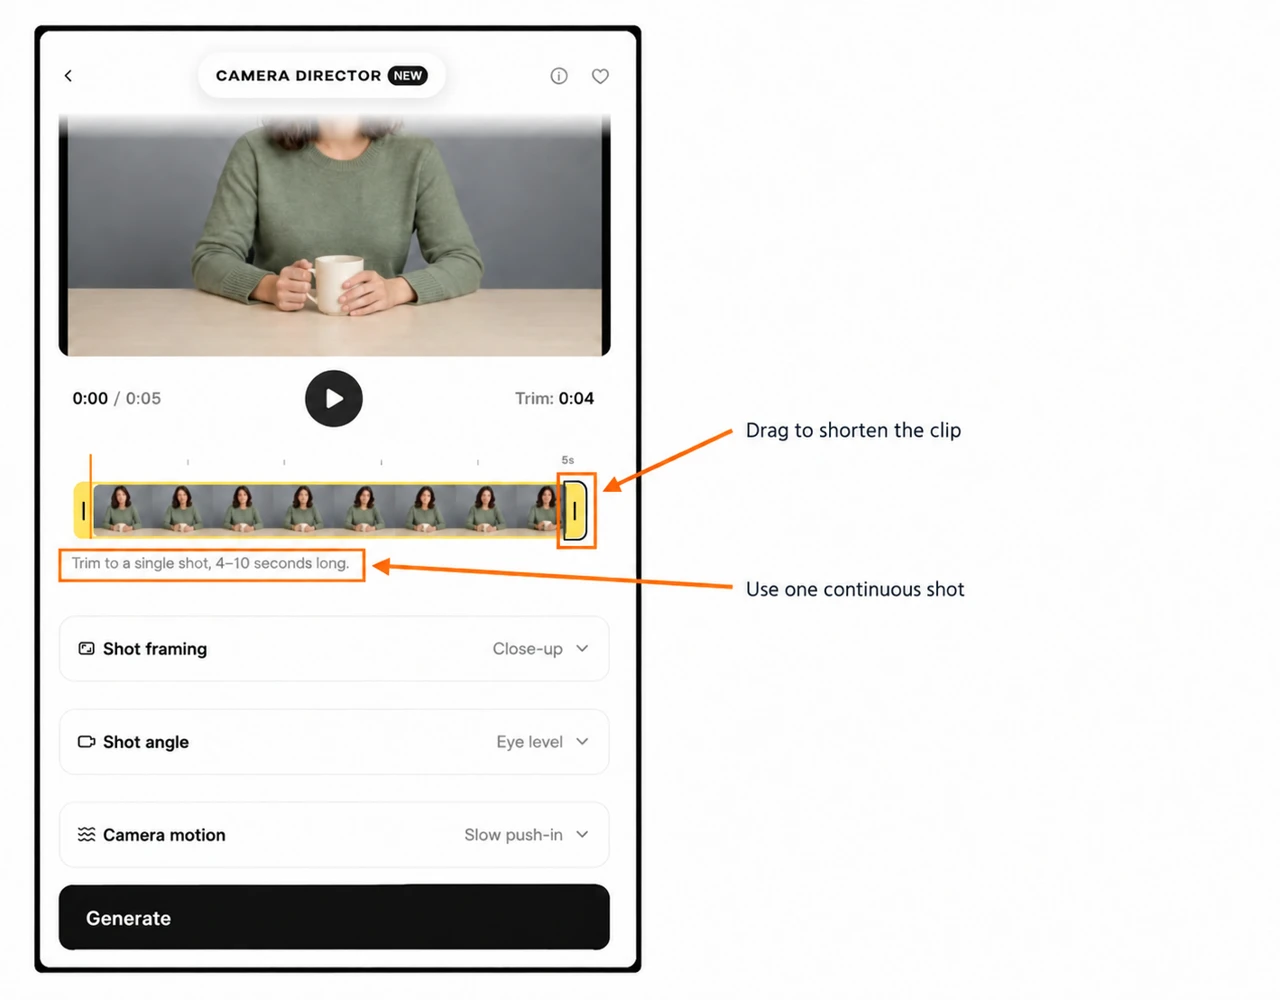
Keep a quiet start and enough time for the camera move. Several scene cuts make it harder to judge a consistent edit. Remove video clears the attached clip if you picked the wrong file.
Step 3: choose the edit model first
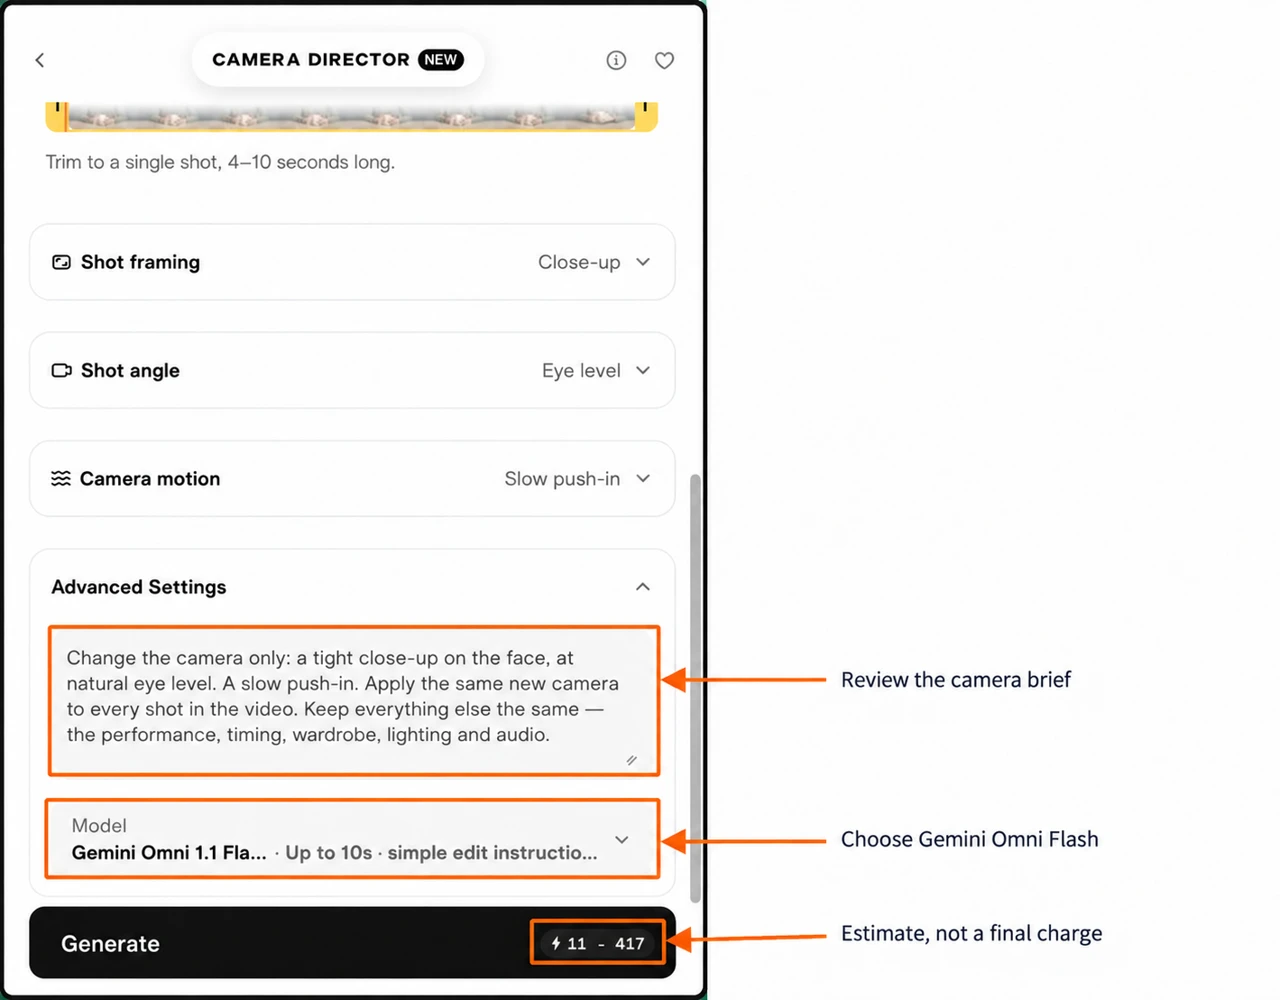
Open Advanced Settings, then the Model menu. Our fresh form selected Seedance 2.5. We changed it to Gemini Omni 1.1 Flash, shown with “Up to 10s · simple edit instructions.”
The model changes the available settings and the generated prompt. Select it before writing a custom brief. In our Gemini form, separate Resolution and Sound controls disappeared. The 1080p setting above belongs to the Pika source, not a Gemini resolution selector.
The Seedance form offers 480p, 720p and 1080p plus an Original audio setting. Those controls belong to that model; check the form again when switching to Gemini.
Step 4: choose Shot framing
Framing answers how much of the subject and scene should be in the shot? Expand Shot framing and select one card. Check the selected outline and the name in the section header.
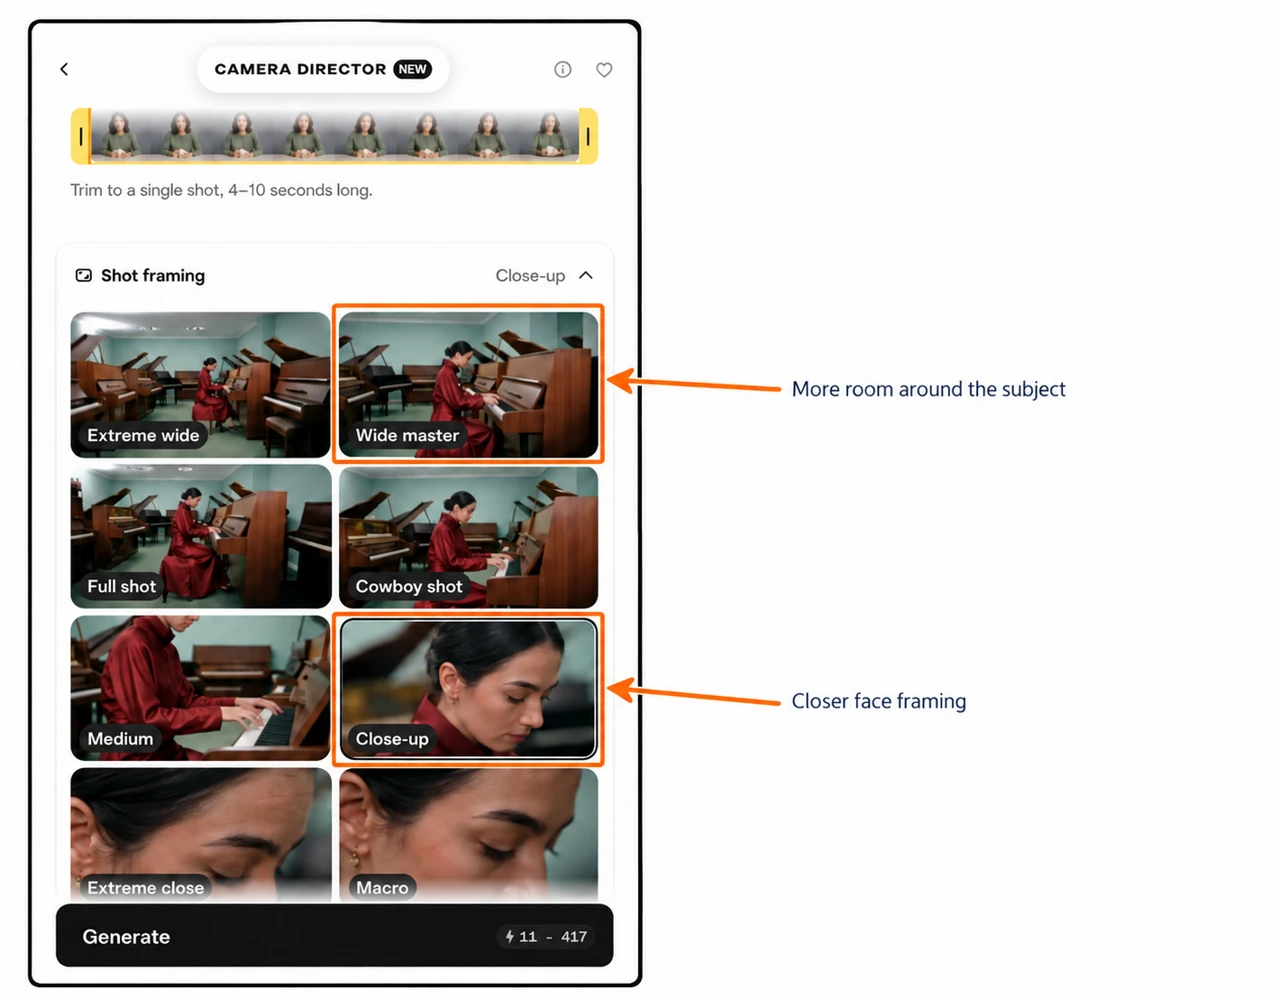
| Framing | What it asks for | A practical reason to try it |
|---|---|---|
| Extreme wide | A distant view with plenty of surroundings | Establish the location |
| Wide master | A broad view of the scene and subject | Keep the action and setting readable |
| Full shot | The subject’s full body | Show posture or movement |
| Cowboy shot | A view around the thighs and up | Keep hands and upper-body action together |
| Medium | A closer upper-body view | Show a person holding a product |
| Close-up | Tight attention on the face | Emphasise a reaction |
| Extreme close | A very small part of the face or subject | Pick out a specific detail |
| Macro | Very close detail | Explore surface texture |
| Insert detail | A shot of a meaningful object or detail | Show the mug or another story detail |
Some requested views need details absent from the source. A full-body shot from a seated portrait may require the model to invent the rest of the scene. I would start closer to the existing view when accuracy matters.
Step 5: choose Shot angle
Angle answers where is the camera looking from? It is separate from shot size: a close-up can still be at eye level or from above.
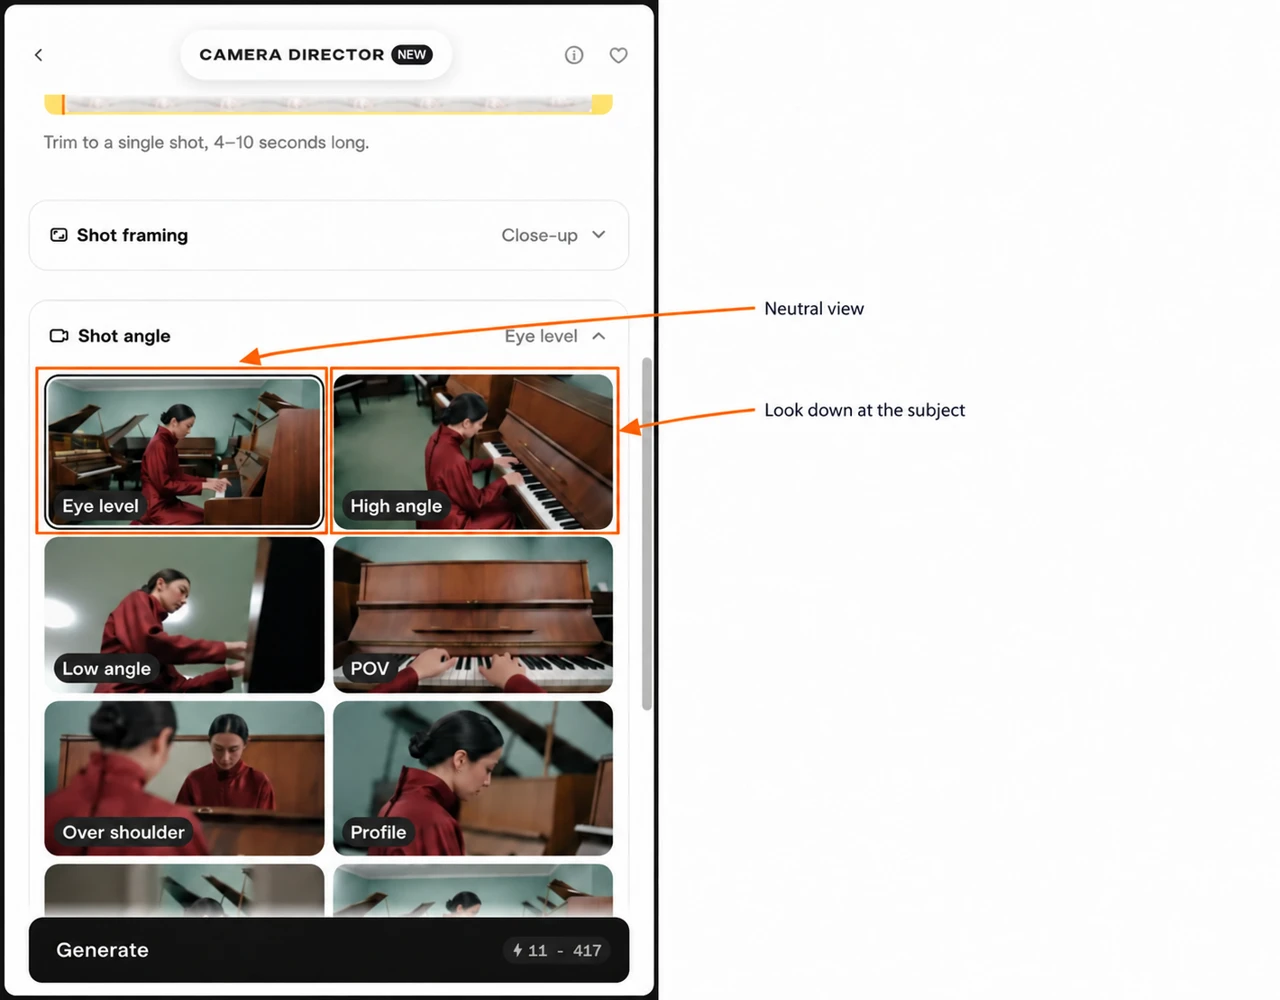
| Angle in our settled Gemini form | How I would use it |
|---|---|
| Eye level | A neutral conversation or portrait view |
| High angle | Look down toward a subject or tabletop |
| Low angle | Look upward for a stronger sense of height |
| POV | Ask for a view from a participant’s position |
| Over shoulder | Frame past someone toward the scene |
| Profile | Show the subject from the side |
| Through frame | View the scene through foreground framing |
| Reflection | Ask for a reflected view; inspect geometry carefully |
The menu can change with the model. These are the Gemini options we observed after the form settled, not a promise that every model has the same list.
Step 6: choose Camera Motion
Motion answers how does the camera move during the clip? Expand the section, select one card and check the header before generating. The cards can play short examples when hovered.
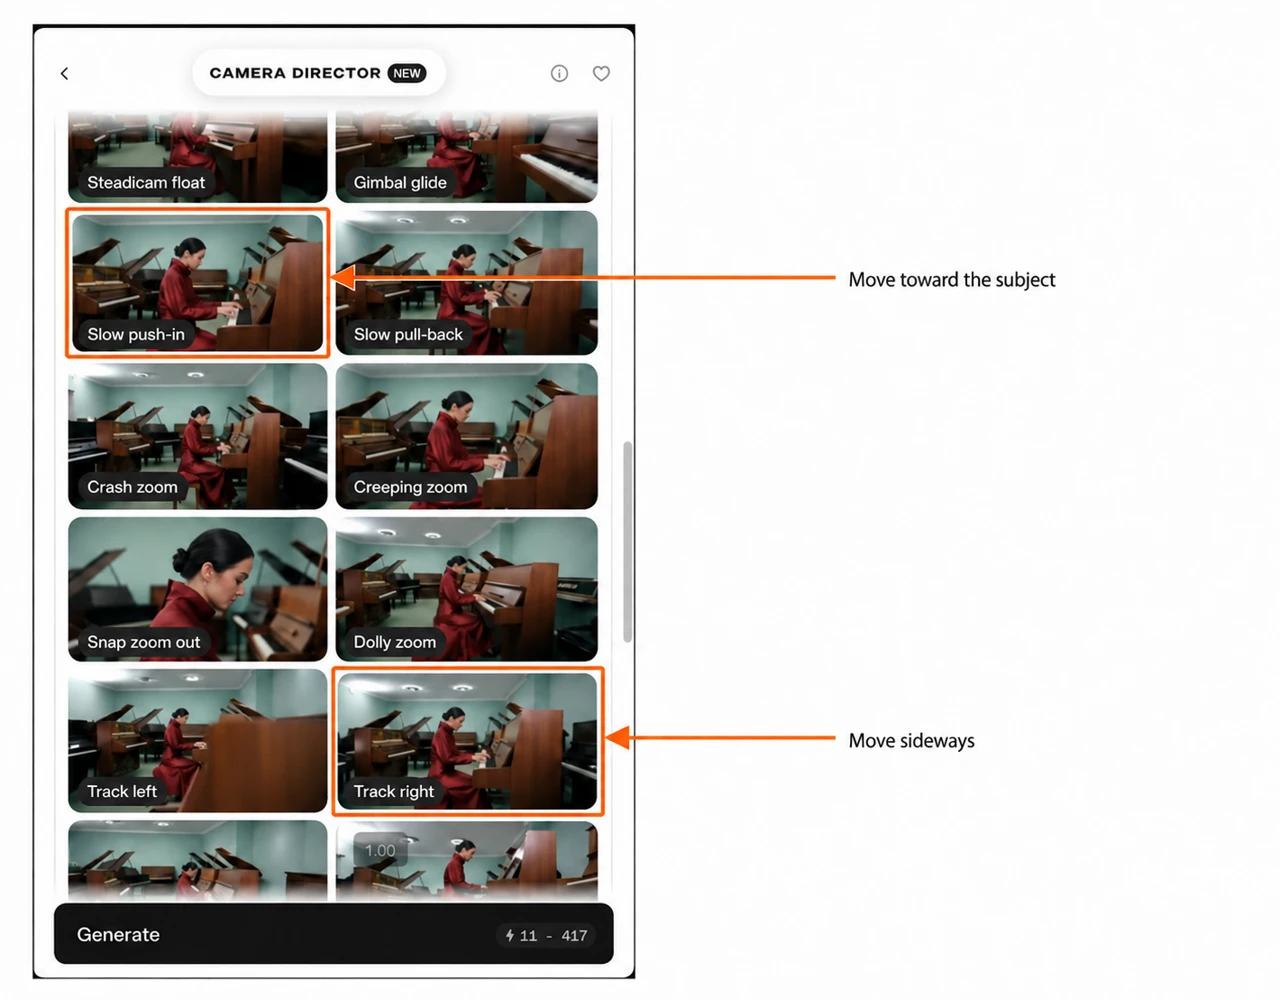
| Motion group | Options we observed for Gemini | What the request is aiming for |
|---|---|---|
| Still or slight movement | Locked off, Subtle breathe | A fixed or nearly fixed view |
| Operator feel | Handheld, Run-and-gun, Steadicam float, Gimbal glide | Different levels of shake or smooth camera travel |
| Move closer or farther | Slow push-in, Slow pull-back | Gradual movement toward or away from the subject |
| Zoom effects | Crash zoom, Creeping zoom, Snap zoom out, Dolly zoom | Sudden or gradual size change; dolly zoom also asks for perspective change |
| Sideways or around | Track left, Track right, Half orbit | Travel across or partly around the scene |
| Rise, pan or tilt | Pedestal rise, Whip pan, Slow pan, Tilt up reveal, Tilt down | Change camera height or direction |
| Focus effects | Rack focus, Soft focus drift | Shift what appears sharp |
| Stylised motion | Slow roll, Snorricam | Rotate the view, or request a camera fixed relative to the subject |
For a first try, I would choose one gentle move. A fast pan, orbit or strong perspective change asks for more reconstruction of the scene. Use the groups above to choose a movement that supports your scene.
Step 7: review Advanced Settings and the credit quote
The Prompt combines the three selected camera choices. You can edit its text, but read it again after changing a card or model: our form rewrote the brief as choices changed.
For our first example, the generated text was:
Change the camera only: a tight close-up on the face, at natural eye level. A slow push-in. Apply the same new camera to every shot in the video. Keep everything else the same — the performance, timing, wardrobe, lighting and audio.
That is a preservation request. It does not establish that a finished edit will keep every detail. Use a short instruction with one clear goal and remove conflicting directions.
The Generate button in the screenshot shows 11–417 credits. Read both numbers: this is an estimate range, not a fixed 11-credit price. Check the quote for your selected model and attached clip before generating.
Wait for the price to settle after changing a setting. For budgeting, allow room for the upper end of the displayed range and check the completed asset for the actual charge. The Pika 2.5 source cost 45 credits in this setup; Camera Director has its own separate quote.
Example 1: bring attention to the face
Choose Close-up → Eye level → Slow push-in. Keep Gemini Omni 1.1 Flash selected and the original five-second source attached. Review the first brief above, then press Generate after checking your quote.
This is the example I would try for a short reaction or a portrait opening. The goal is a tighter face view with a gentle approach.
After generation, check the face at the beginning, middle and end. Does the mug remain recognisable? Do the hands stay stable? Does the move begin smoothly, or does the shot jump to a different crop?
Example 2: show more of the scene from above
- Keep the same original source attached. Do not use the first camera edit as the next source.
- Choose Wide master.
- Choose High angle.
- Choose Track right.
- Check Gemini Omni 1.1 Flash, then read the updated brief and quote.
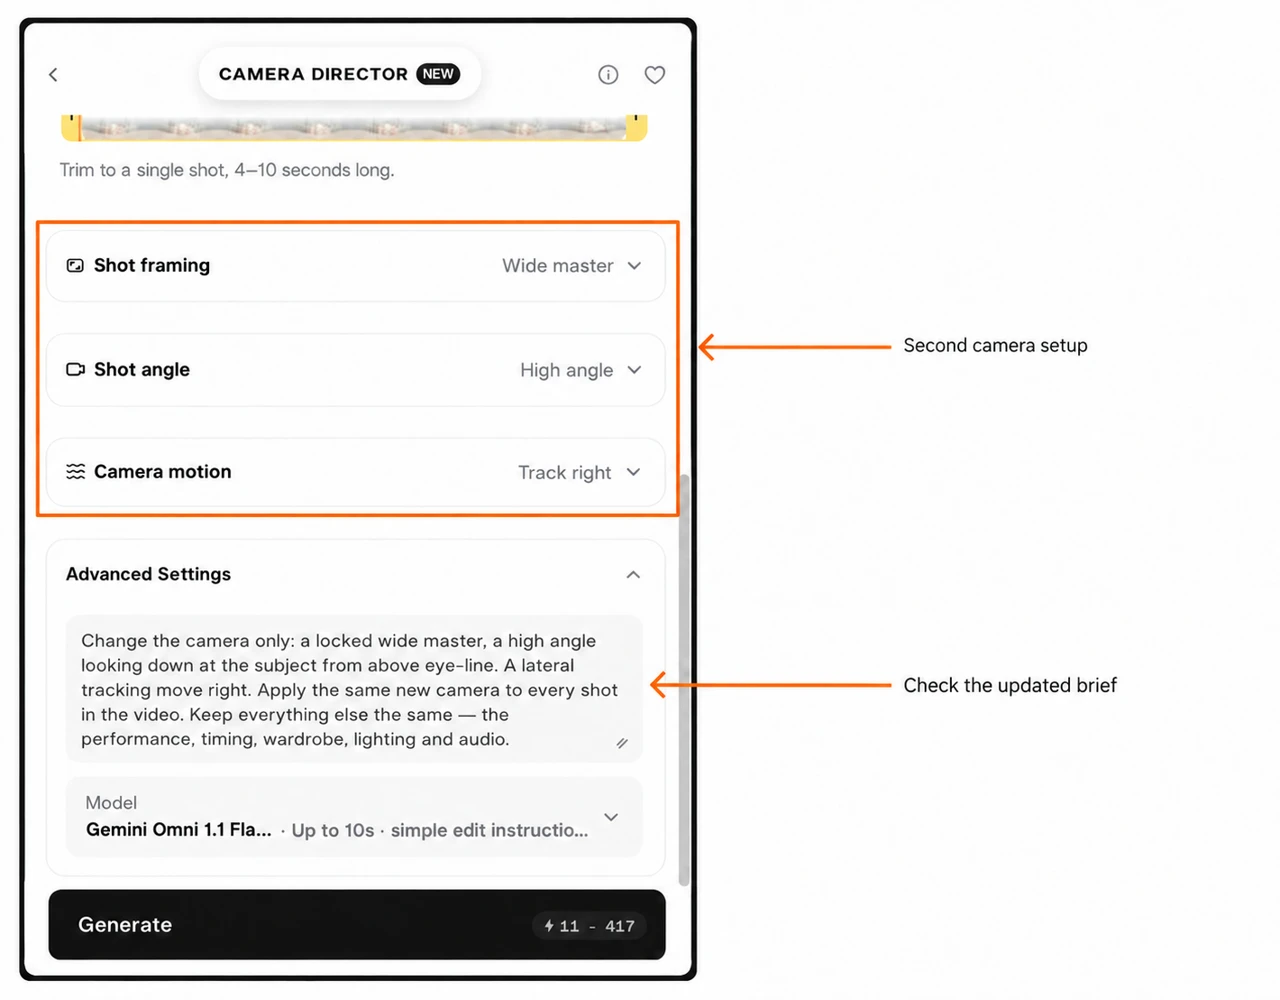
The form wrote:
Change the camera only: a locked wide master, a high angle looking down at the subject from above eye-line. A lateral tracking move right. Apply the same new camera to every shot in the video. Keep everything else the same — the performance, timing, wardrobe, lighting and audio.
Notice the phrase “locked wide master” alongside a tracking move. Read the assembled prompt for mixed directions. If the goal is sideways travel, a clearer custom version would be “Use a wide master from a high angle with a gentle lateral tracking move to the right. Keep the subject’s performance and scene consistent.” Keep the brief consistent with the movement you selected.
This example changes three choices together. It could compare two useful shot designs, but it would not isolate the effect of tracking alone. For that, keep framing and angle fixed and change only motion.
Check a finished camera edit before keeping it
I would play the full clip, then pause at matching moments in the original and camera version. Check:
- Subject: face, body proportions, clothing and hand position.
- Objects: mug rim, handle, colour and shape.
- Scene: wall, desk edges, shadows and any new objects.
- Camera: the requested framing, angle, movement and end position.
- Timing and sound: duration, action timing and any audio track.
Download only the version that serves the shot. Keep a record of the source, three camera selections, model, prompt and actual charged credits. If your source has dialogue or music, check the sound in the edited clip too.
Common questions
Can Camera Director start from a photo?
The form we checked asks for a source video. Make a clip from the photo first, as we did with Pika 2.5, then attach that video.
Is Gemini Omni Flash the same as Pika 2.5?
No. Pika 2.5 made our source clip. Gemini Omni 1.1 Flash is the edit model used in the Camera Director setup shown here. Keep those two steps and their costs separate.
Where is the 1080p control?
We used 1080p in the Pika 2.5 source form. Our Camera Director Gemini form did not show a separate resolution selector. Other model forms can have different controls.
Does the screenshot mean an edit costs 11 credits?
It shows 11–417, so 11 is the lower end of an estimate range. Read the full range before pressing Generate and check the final charge on the completed asset.