
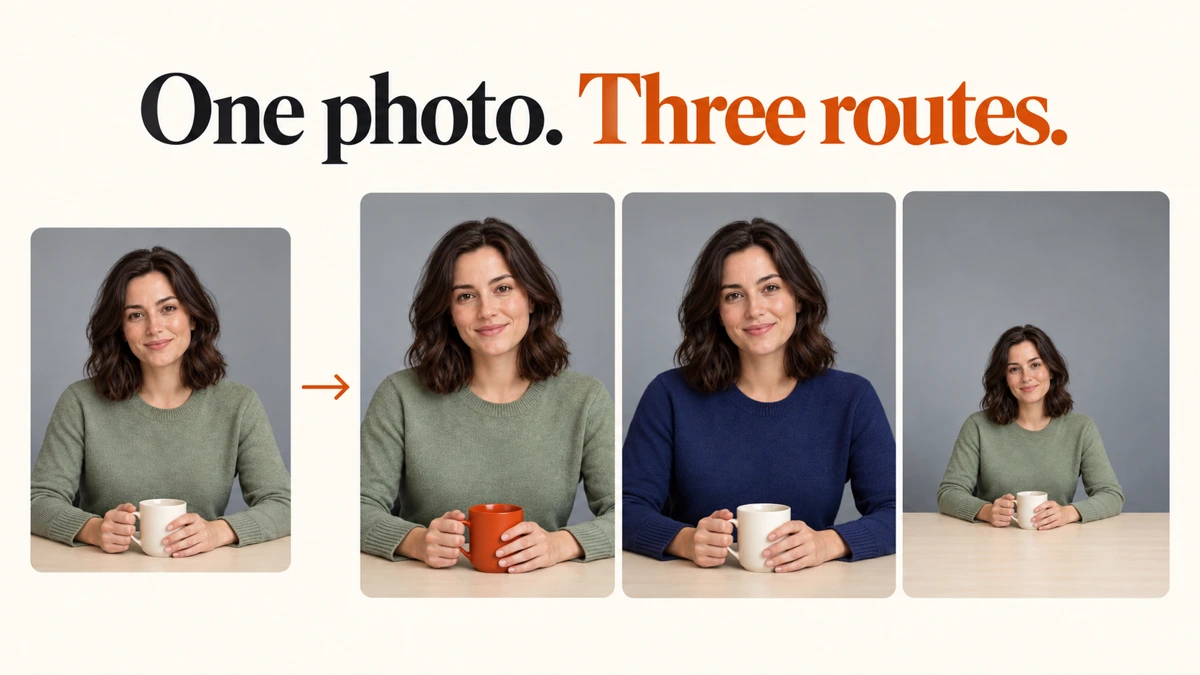
I used one portrait to test Pika Edit Image’s three options: Edit, Expand and Upscale. We changed a mug, changed a sweater with a pinned note, made two new canvas layouts, and enlarged the original photo.
The five examples cost 29 credits in total. Start with the results below, then choose the workflow that solves your own photo problem. Interface checked 9 October 2026.
One photo, five examples






| Example | Settings we used | File dimensions | Recorded charge |
|---|---|---|---|
| Orange mug | Edit, Ideogram 4.5, Medium | 1280 × 853 | 6 credits |
| Navy sweater with a pin | Edit, Ideogram 4.5, Medium | 1280 × 853 | 6 credits |
| Space on the right | Expand, 16:9, 1K, Low | 1280 × 720 | 2 credits |
| Vertical composition | Expand, 9:16, 1K, Medium | 720 × 1280 | 2 credits |
| Larger portrait | Upscale, Standard, 2×, face switch off | 2560 × 1706 | 13 credits |
Open each image at full size. The enlarged photo will look similar in a small page card; its main change is the file dimensions.
What is Pika Edit Image?
Pika Edit Image is a photo workspace with three jobs. Edit changes content inside a photo. Expand fills space around a placed photo. Upscale increases its dimensions.
I would use Edit for a product colour or wardrobe correction, Expand for room around a subject, and Upscale for a larger crop or delivery file. These examples use a fictional portrait from our existing asset library.
| What you need | Choose | First check |
|---|---|---|
| Change an object, background or clothing | Edit | Name the change and what must stay |
| Mark a particular part of the photo | Edit with a pinned note | Put the pin on the actual target |
| Make a wide header or vertical post | Expand | Ratio and subject placement |
| Keep the composition but increase dimensions | Upscale | Source size, model and scale |
For a lighting change, our Relight Media guide provides a separate workflow. For moving footage, use a video app; the checked Edit Image page accepts photos.
Step 1: upload a photo and choose the workflow
- Open the Edit Image app.
- Select Edit, Expand or Upscale at the top.
- Click Add a photo.
- Choose Upload in the picker for a device file, or select a saved asset and confirm Use Selection.
- Wait for the photo preview, then check the selected workflow again.
The upload card lists PNG, JPG and HEIC. We uploaded a PNG copy of our original WebP asset. The images on this website are WebP copies for page use.
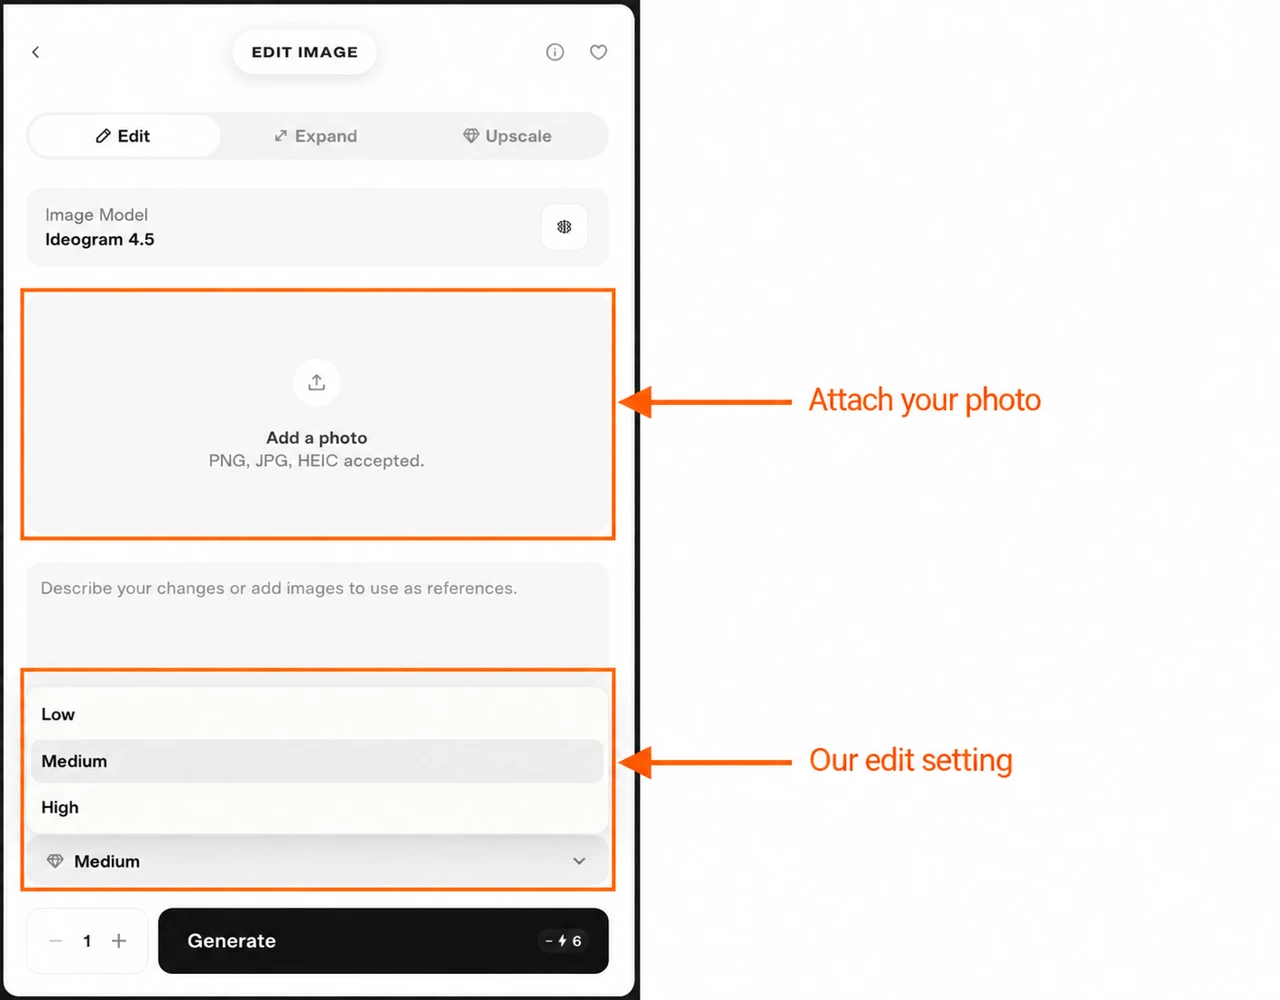
Use the cross on the preview to remove the source and attach another photo. To reproduce our examples, save the original portrait and convert a copy to PNG or JPG before uploading.
Edit: change one thing inside the photo
Step 2: choose an image model and quality
Ideogram 4.5 was selected by default. We kept it for both Edit examples and selected Medium quality with one generation.
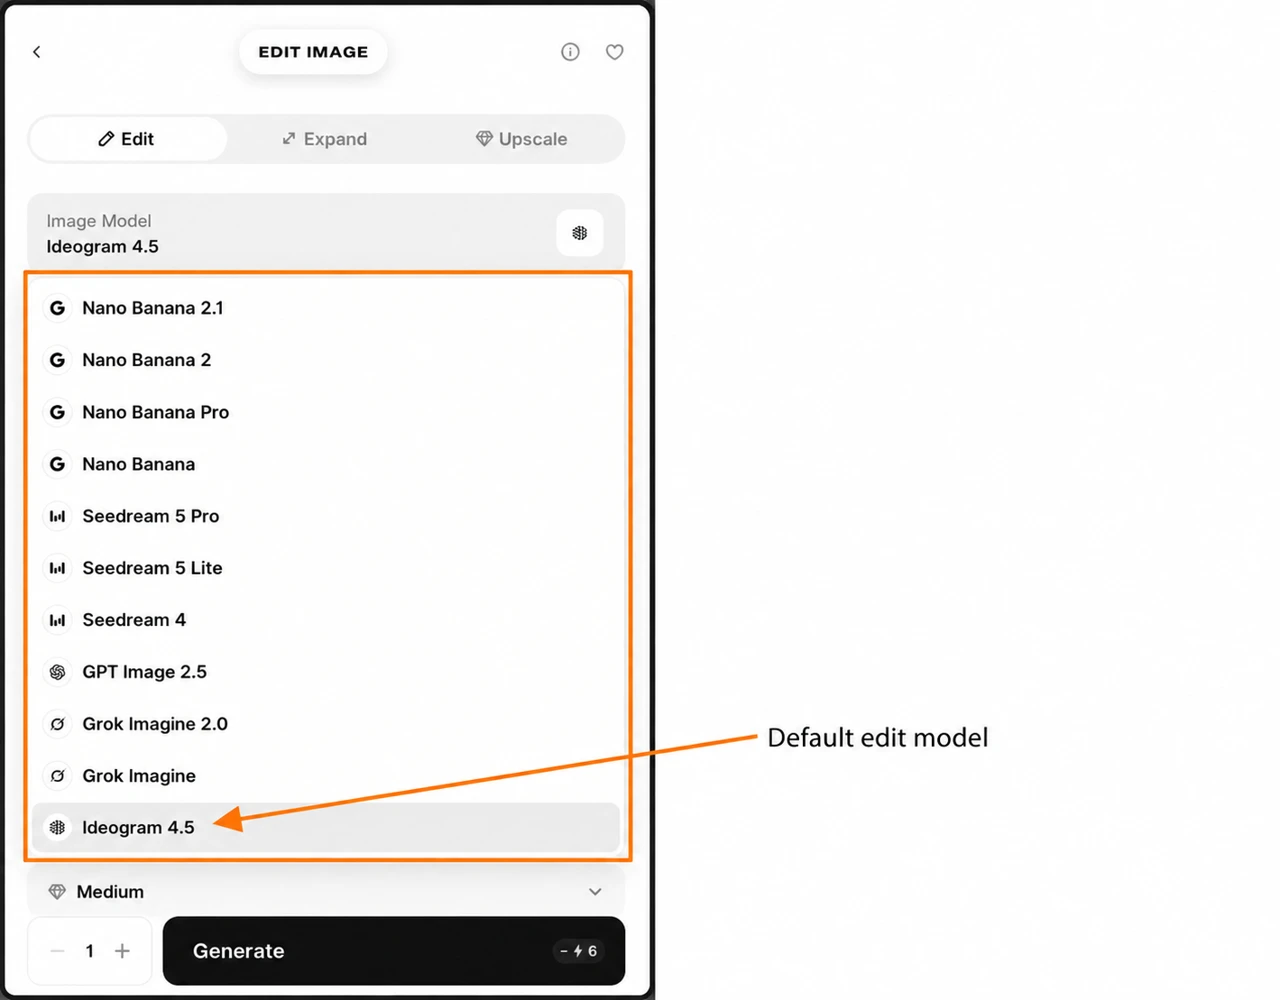
The menu also listed Nano Banana 2.1, Nano Banana 2, Nano Banana Pro, Nano Banana, Seedream 5 Pro, Seedream 5 Lite, Seedream 4, GPT Image 2.5, Grok Imagine 2.0 and Grok Imagine. You can choose another model; recheck the form and credit quote after changing it.
The checked Ideogram form offers Low, Medium and High quality. I would begin with one Medium attempt, inspect it, and only then pay for another setting if there is a specific problem to fix.
Step 3: write a focused instruction
Name the object, the change and the parts to retain. A vague instruction such as “make it better” gives little direction.
For our first example, I entered:
Change only the ivory ceramic mug to a terracotta orange ceramic mug. Keep the woman, hands, pose, face, sweater, desk, lighting and grey background unchanged.
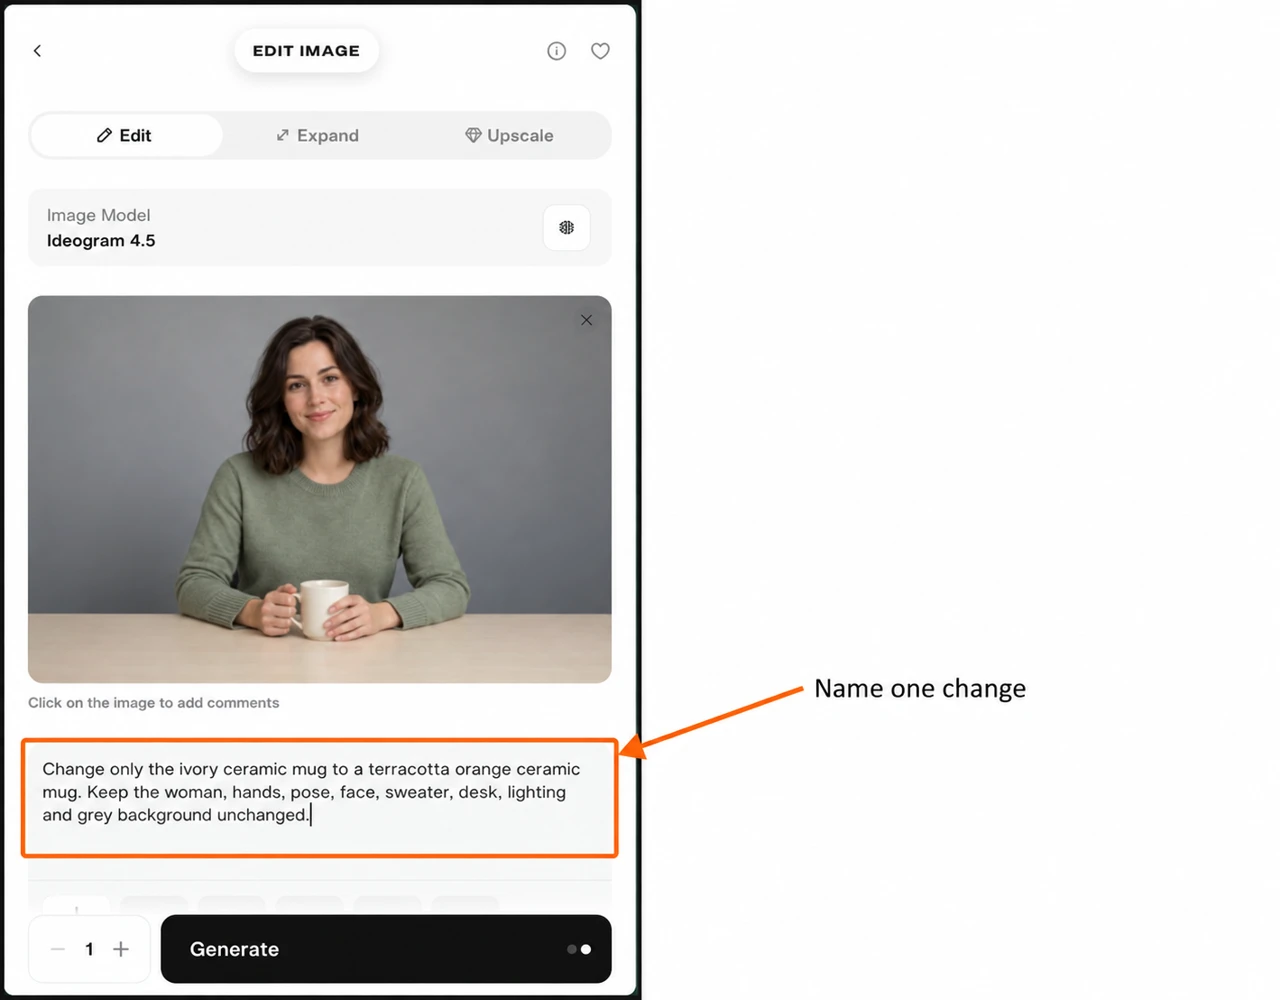
Keep Generations at 1, wait for the quote, then click Generate. Open the finished asset in the project and inspect the whole photo.
The mug became orange while the overall portrait and pose remained recognisable. I would inspect the fingers, handle and mug rim before using it in a product post. A request to preserve the rest is an instruction, not a guarantee that every pixel stays identical.
Step 4: use a pin for a particular area
- Click the part of the uploaded photo you want to change.
- A numbered pin and note field appear.
- Write a short note about that area.
- Click the round checkmark to save the note.
- Add an overall instruction in Instructions so the local note has context.
You can also use Pin a spot on the photo, then check its location. Clicking the intended area is clearer when the target is a small object.
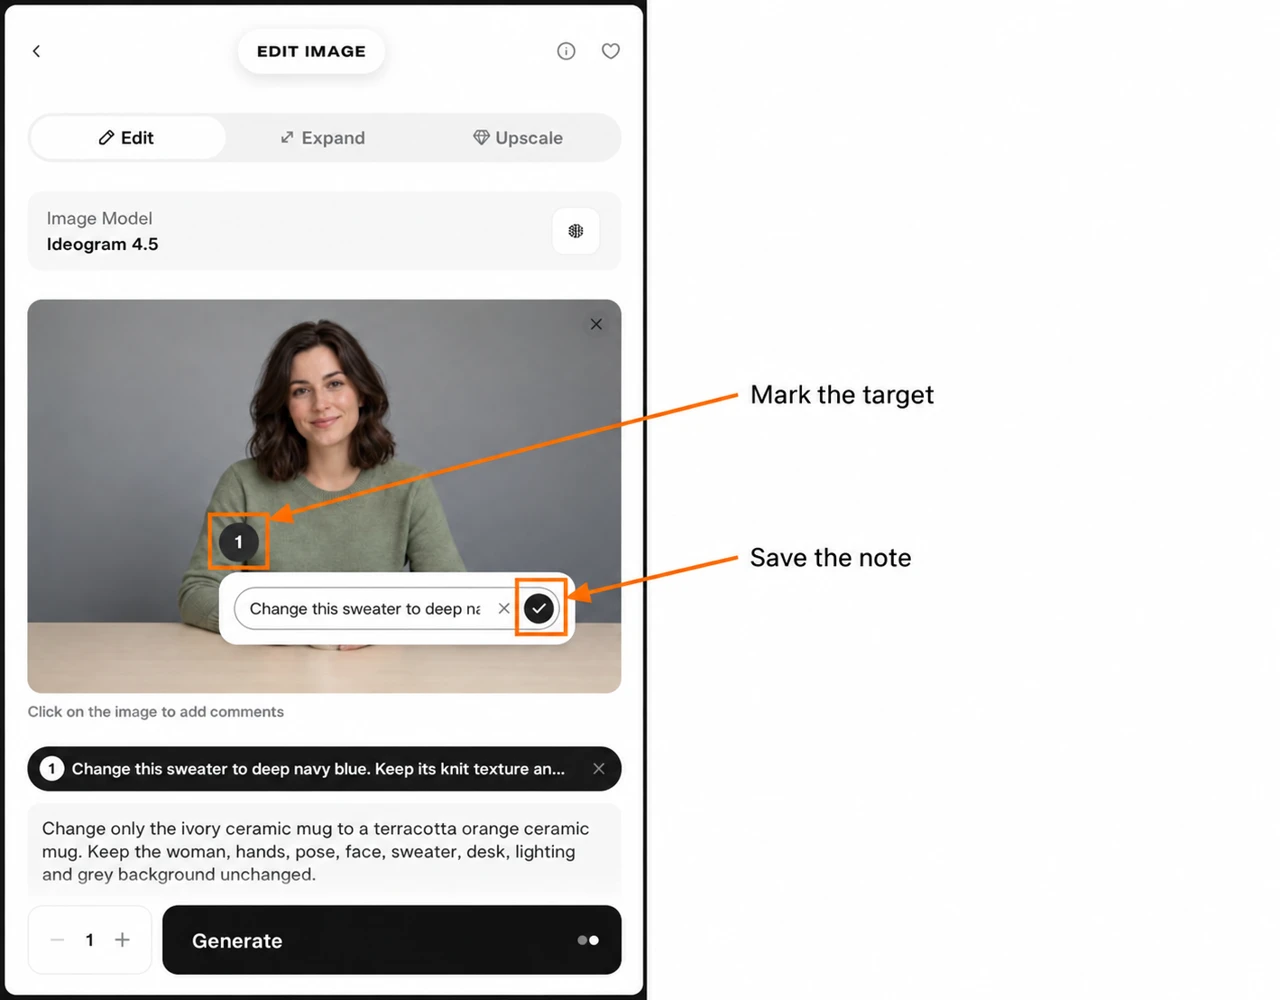
Our saved note:
Change this sweater to deep navy blue. Keep its knit texture and shape.
Our overall instruction:
Change only the sage green sweater to deep navy blue, following the pinned note. Keep the face, hairstyle, hands, ivory mug, desk, pose and grey background unchanged.
Pika included the saved pin location in the job prompt: 36% across, 62% down, measured from the top-left. We used the original green-sweater portrait, with Ideogram 4.5, Medium and one generation.
The sweater changed to navy and the mug remained ivory. This is useful for showing a colour option, but I would compare fabric texture and sleeve edges before using it as an accurate clothing sample.
Click a saved pin to reopen its note. Use the cross on its note chip to remove it when starting a different edit. Switching options can retain earlier instructions or pins; review them before another submission.
Step 5: optional references and generation count
The plus below Instructions opens reference attachments. Its picker offers uploaded files and saved assets. Add a relevant reference when an instruction needs an example of an object or style, then explain its role in your text.
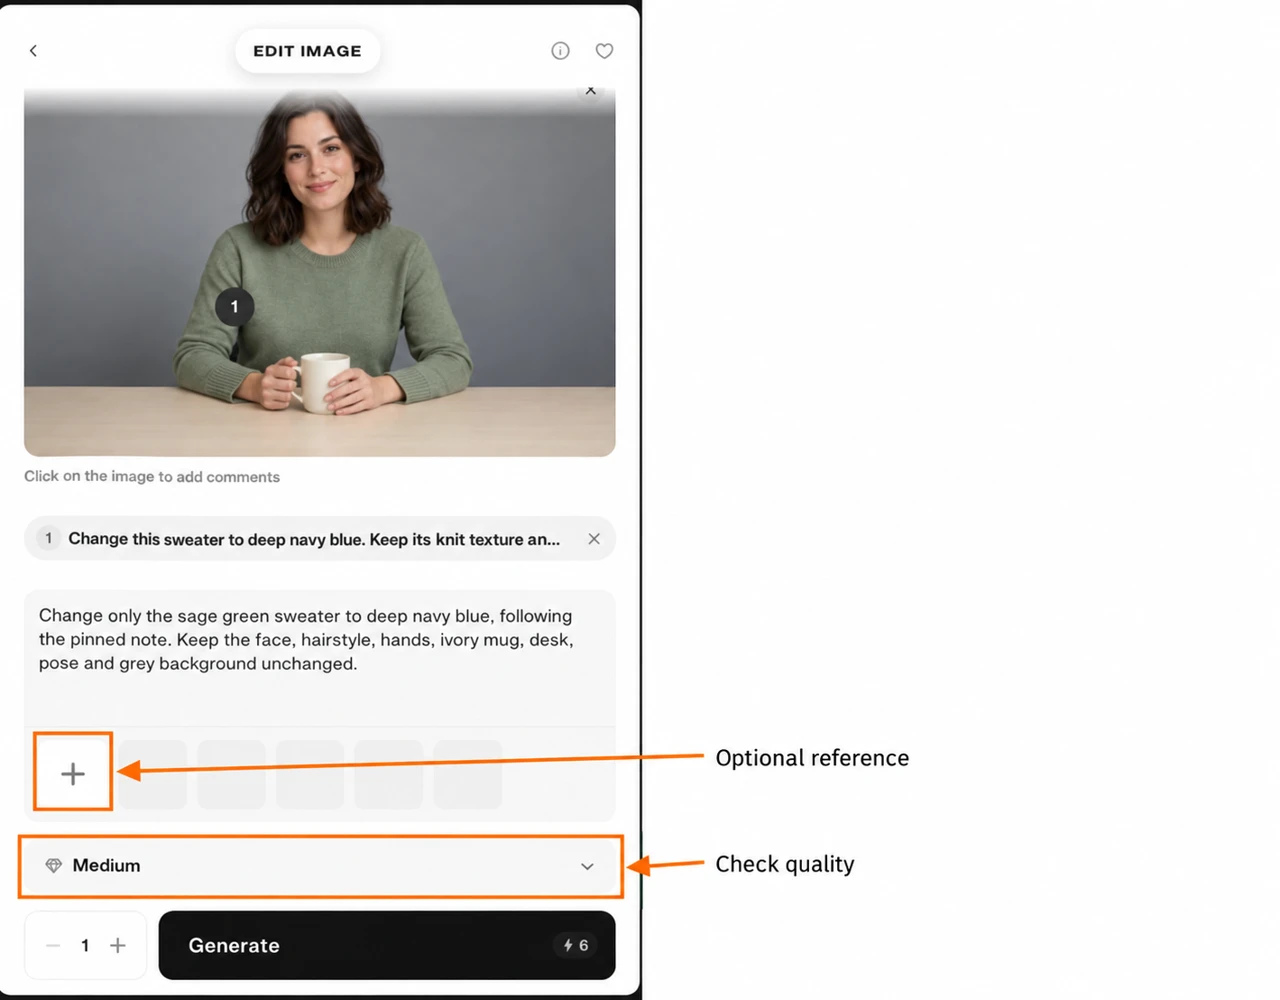
Our two edits use no extra reference images. Do not attach unrelated photos and expect the app to know which parts to borrow.
The minus and plus beside Generations change the number of attempts. We inspected the count at 2, then returned to 1 for the tests. More attempts can increase the quote; they do not make an individual edit more precise.
Expand: make room around the photo
Step 2: choose the canvas shape
Select Expand. The preview becomes a canvas: the photo occupies one part, and the checkerboard marks space to fill.
The ratio menu offers 1:1, 3:2, 2:3, 4:3, 3:4, 16:9 and 9:16.
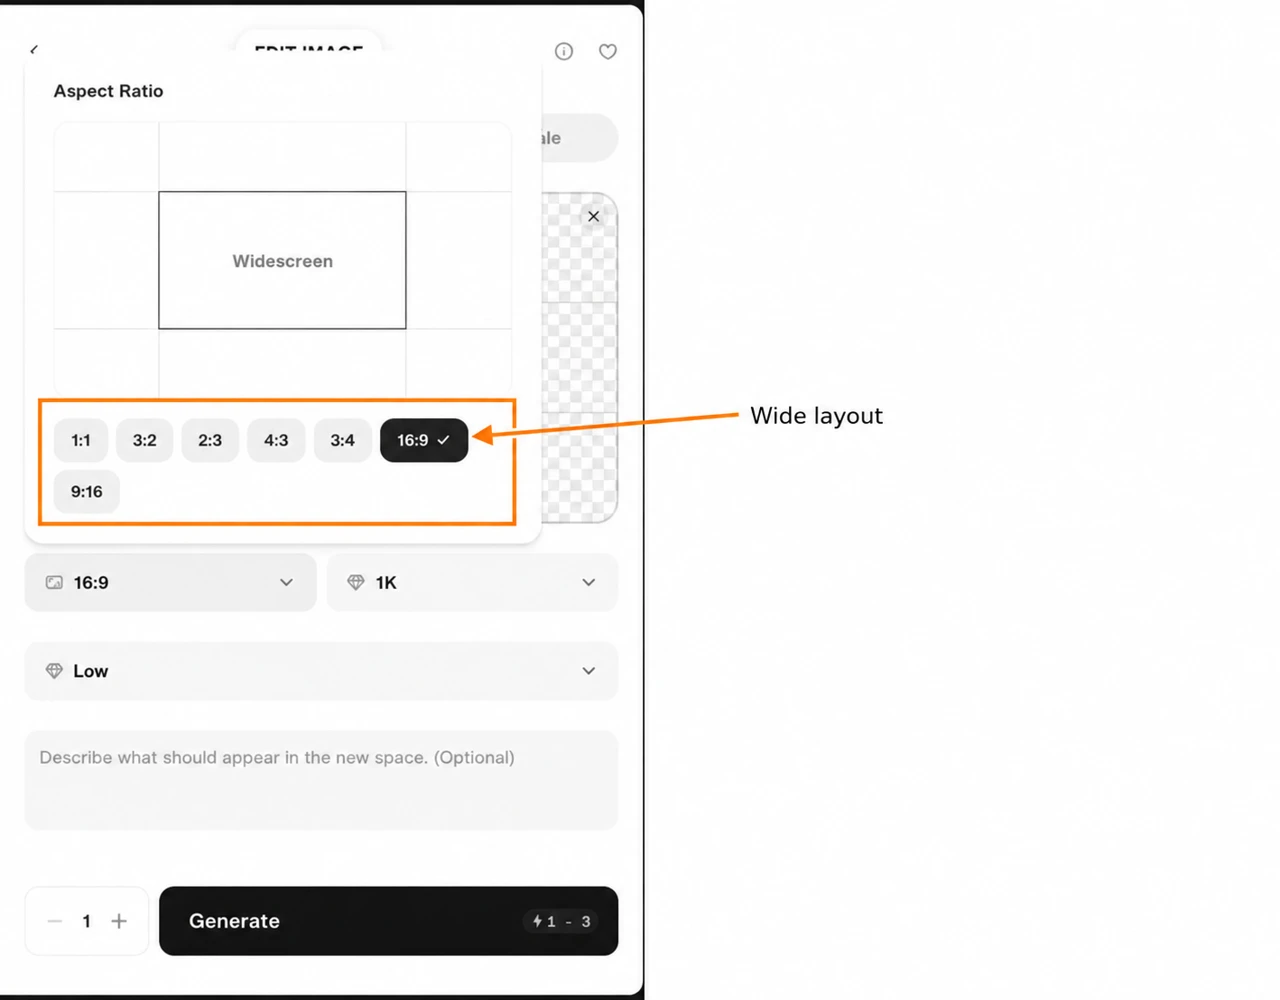
I chose 16:9 for room beside the subject and 9:16 for a vertical layout. Choose the shape your final post needs before spending credits.
Step 3: drag, resize and nudge the photo
- Drag the photo to move it within the canvas.
- Drag a square corner handle to resize its placed area.
- Focus the photo placement control and use arrow keys to nudge it.
- The control also identifies plus and minus as resize shortcuts.
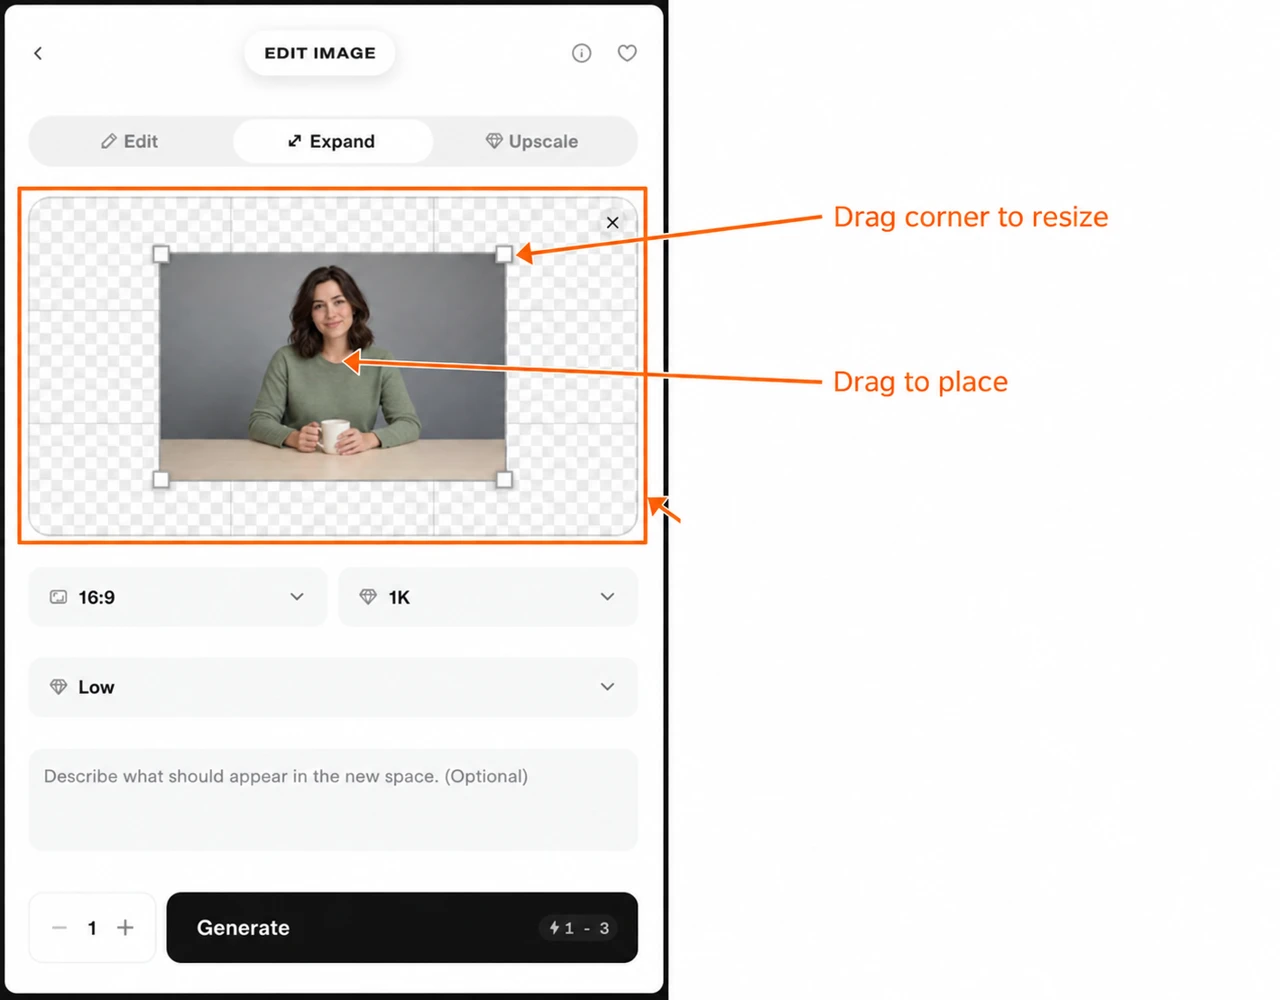
For our wide version, I dragged the original left so more space remained on the right. For the vertical version, the photo stayed near the centre and I tested an upward keyboard nudge.
Leave useful space, not a tiny subject lost in a large canvas. Resize and placement determine how much new scene the model must invent.
Step 4: choose resolution, quality and direction
The resolution menu offers 1K, 2K and 4K. Both examples used 1K; the downloaded wide file is 1280 × 720 and the vertical file is 720 × 1280.
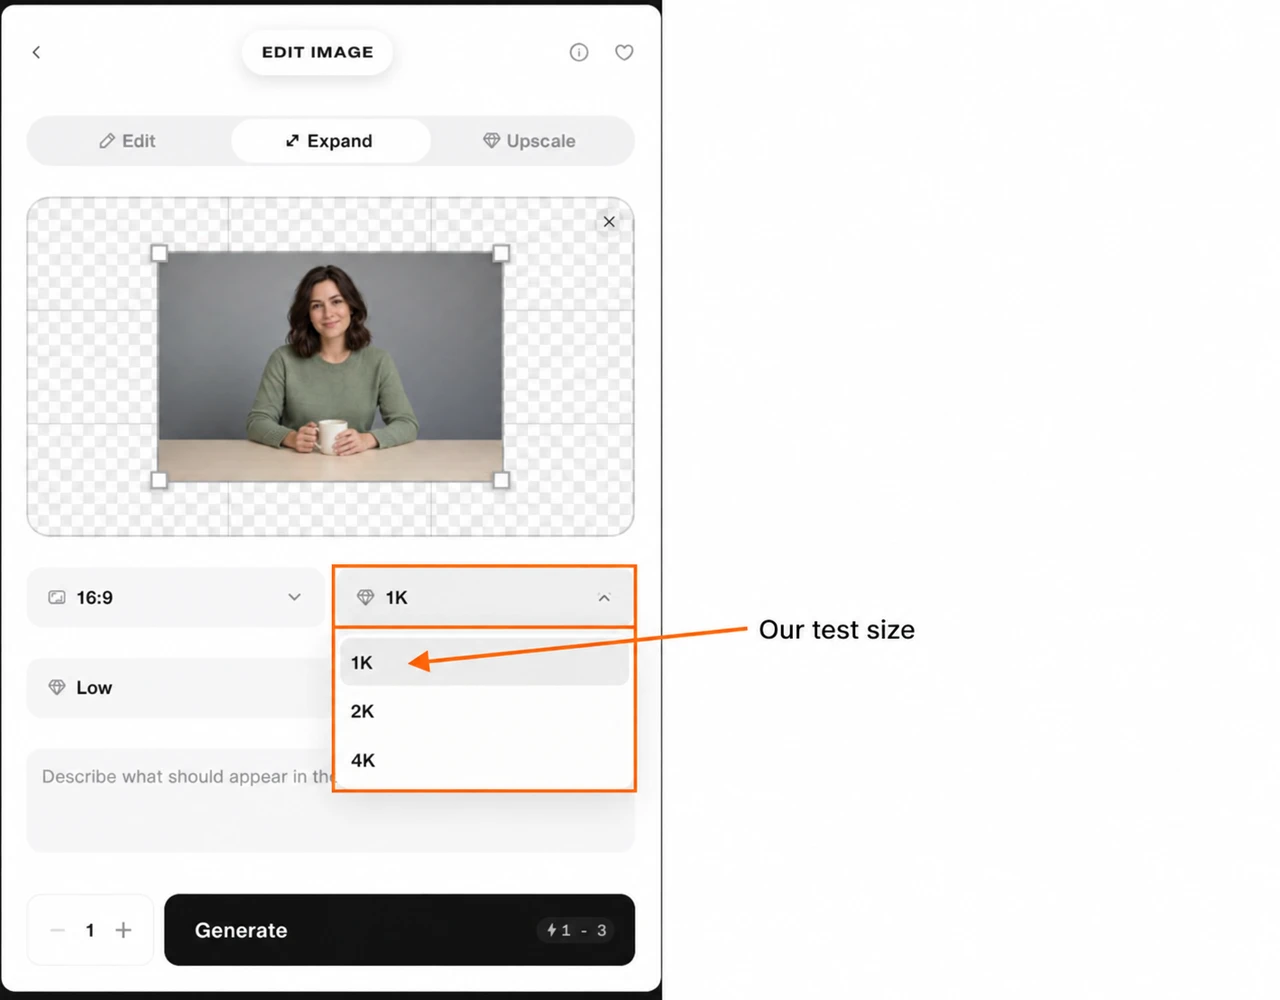
Expand’s quality menu offers Low, Medium, High, Extra High and Max. This differs from the three-choice Ideogram Edit quality menu.
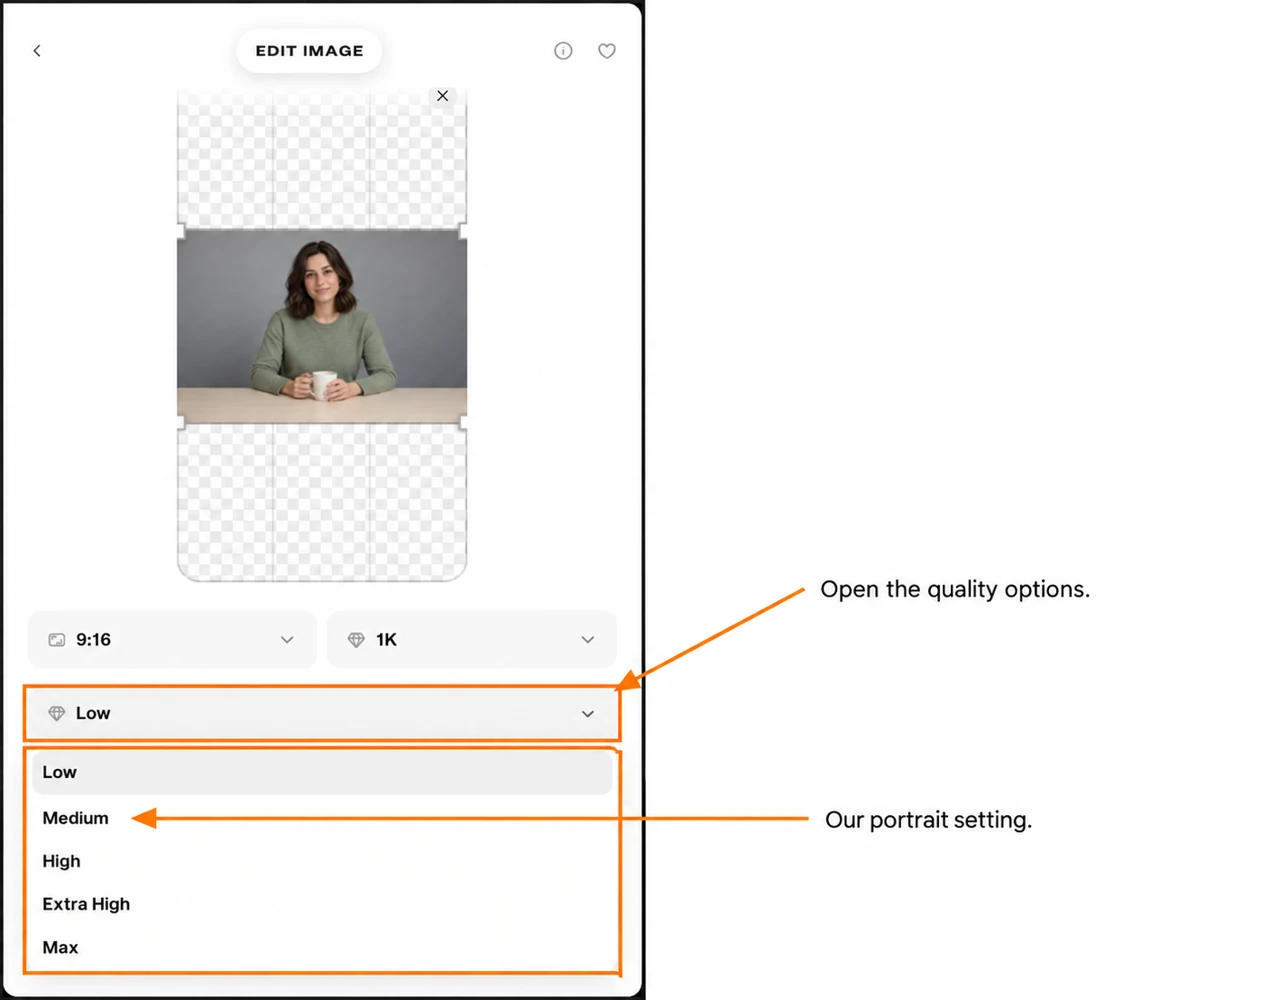
Direction is optional. Describe what belongs in the new space and the parts you want to retain. It is not the same job as rewriting the photo.
Example 3: a wide layout with room on the right
Settings: 16:9 → 1K → Low → one generation. Move the photo left, then enter:
Extend the grey studio wall and pale wooden desk naturally into the empty space. Keep the original woman, face, green sweater, hands and ivory mug unchanged. Leave clear grey space on the right for a short headline; do not add any text or objects.
Click Generate after the quote settles.
The new scene gives the subject more room and leaves clear wall space on the right. It cost 2 credits. Add the headline later in your page or design editor; do not ask the image model to create lettering unless that is part of your task.
Example 4: a vertical layout
Settings: 9:16 → 1K → Medium → one generation.
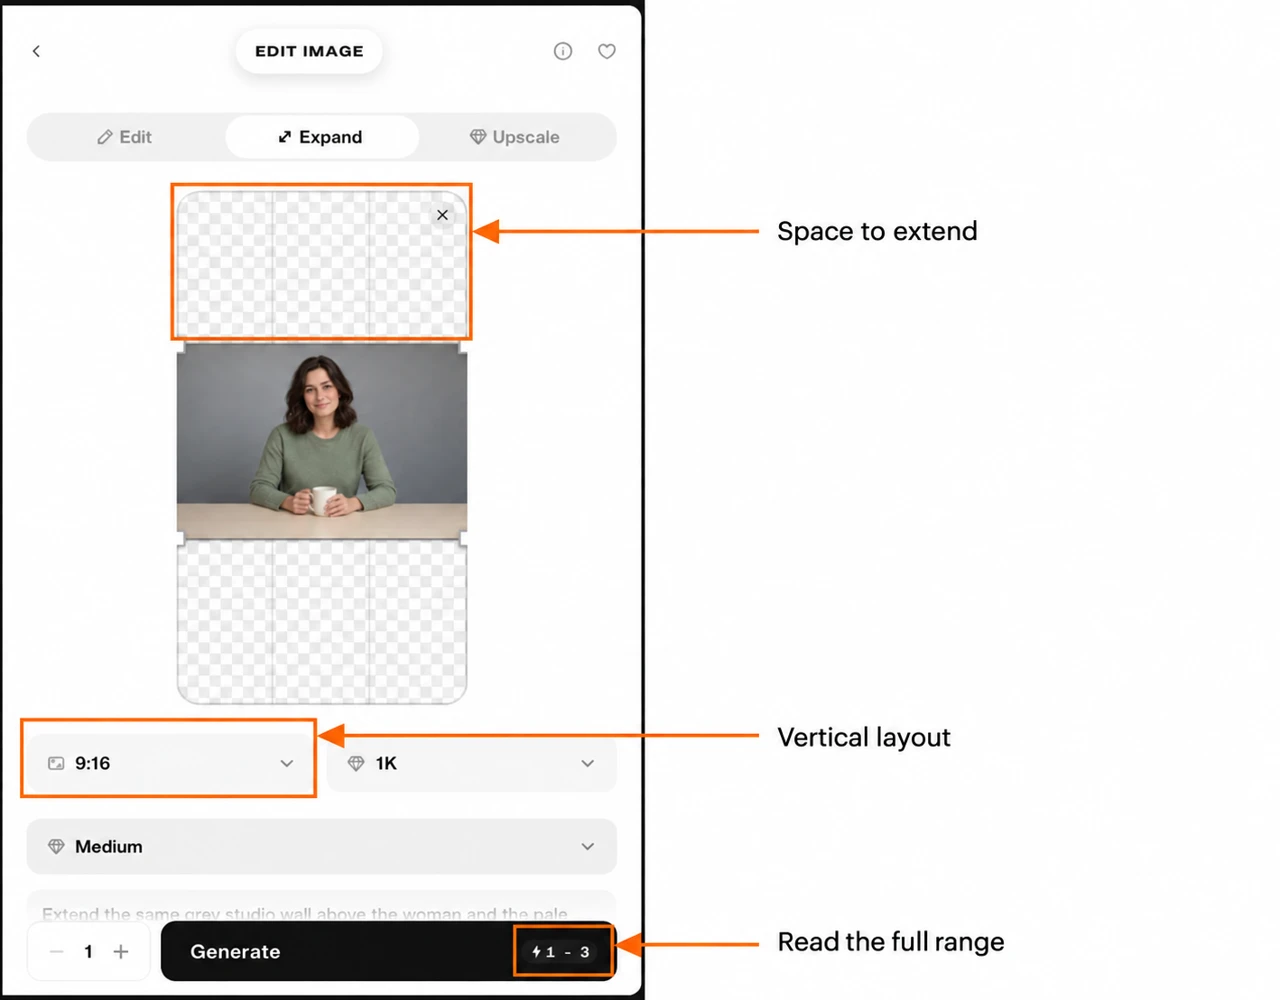
Direction:
Extend the same grey studio wall above the woman and the pale wooden tabletop below. Keep the existing portrait unchanged, with the woman, ivory mug and hands centred. Do not add objects, text or extra people.
This file cost 2 credits. It has more wall above the subject and more table below. I would crop some of that space for a post that needs the person to fill more of the frame.
Pika adds a preservation instruction to expansion jobs. Still compare the finished image with the original: an expanded scene should not be treated as evidence that the newly filled area existed.
Upscale: increase the photo dimensions
Step 2: choose an upscale model
Select Upscale. The form shows the source dimensions and a separate Upscale model menu.
It lists Standard, Low resolution, CGI, High fidelity, Text and Wonder 3. We used Standard. These labels belong to this editor; the dedicated Upscale app has a different menu.
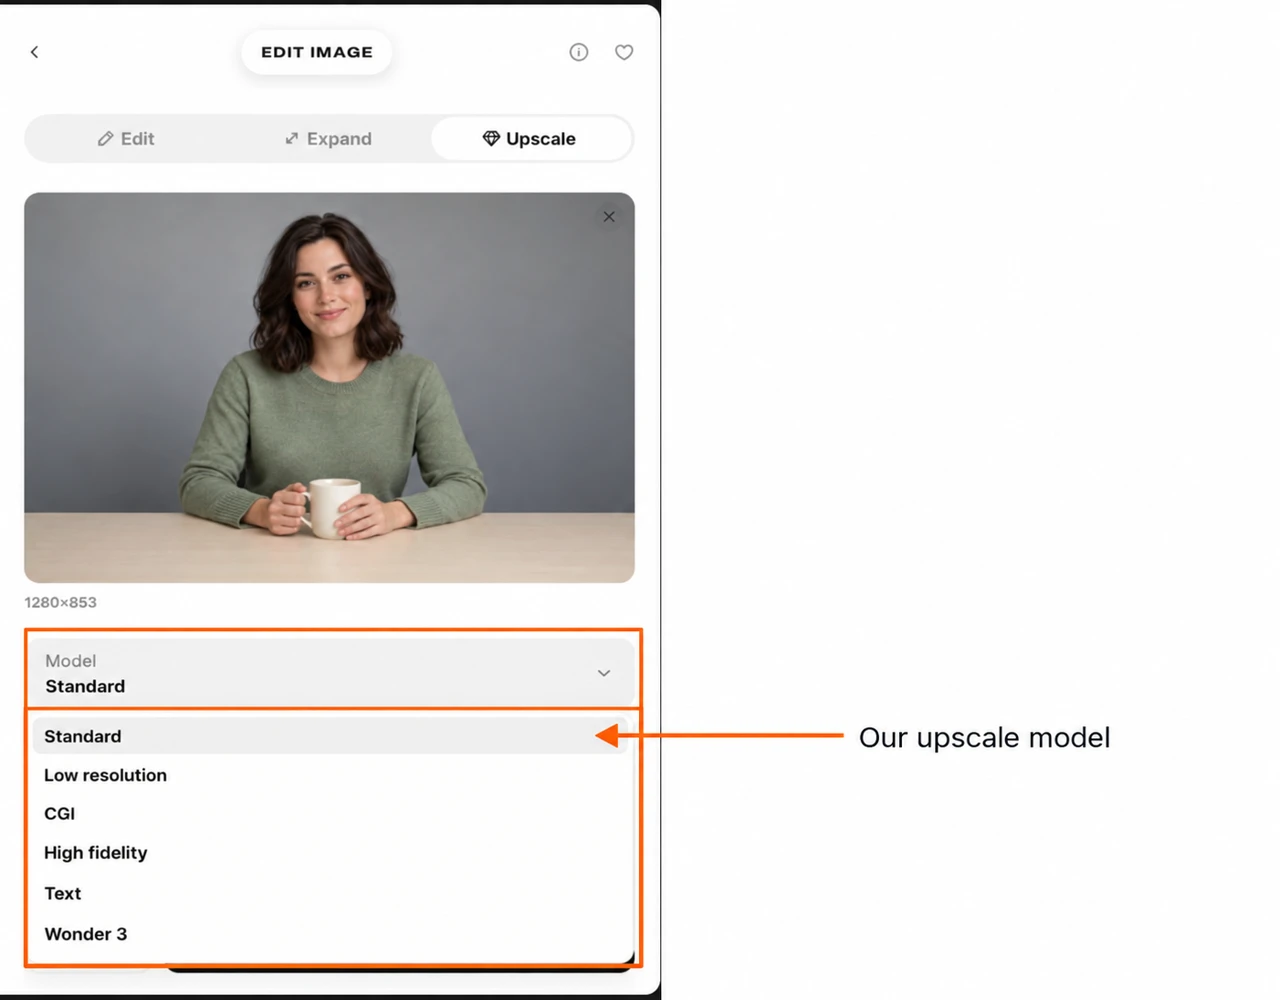
I would consider Low resolution for a small source, CGI for rendered work, and Text for lettering, then inspect a short test. We did not test those options against Standard, so the names are not a quality ranking.
Step 3: select 2×, 3× or 4×
The scale buttons explicitly offer 2×, 3× and 4×. The form shows the expected dimensions before generating.
For our 1280 × 853 photo, 2× means 2560 × 1706. It doubles both sides, making the total pixel count four times larger.
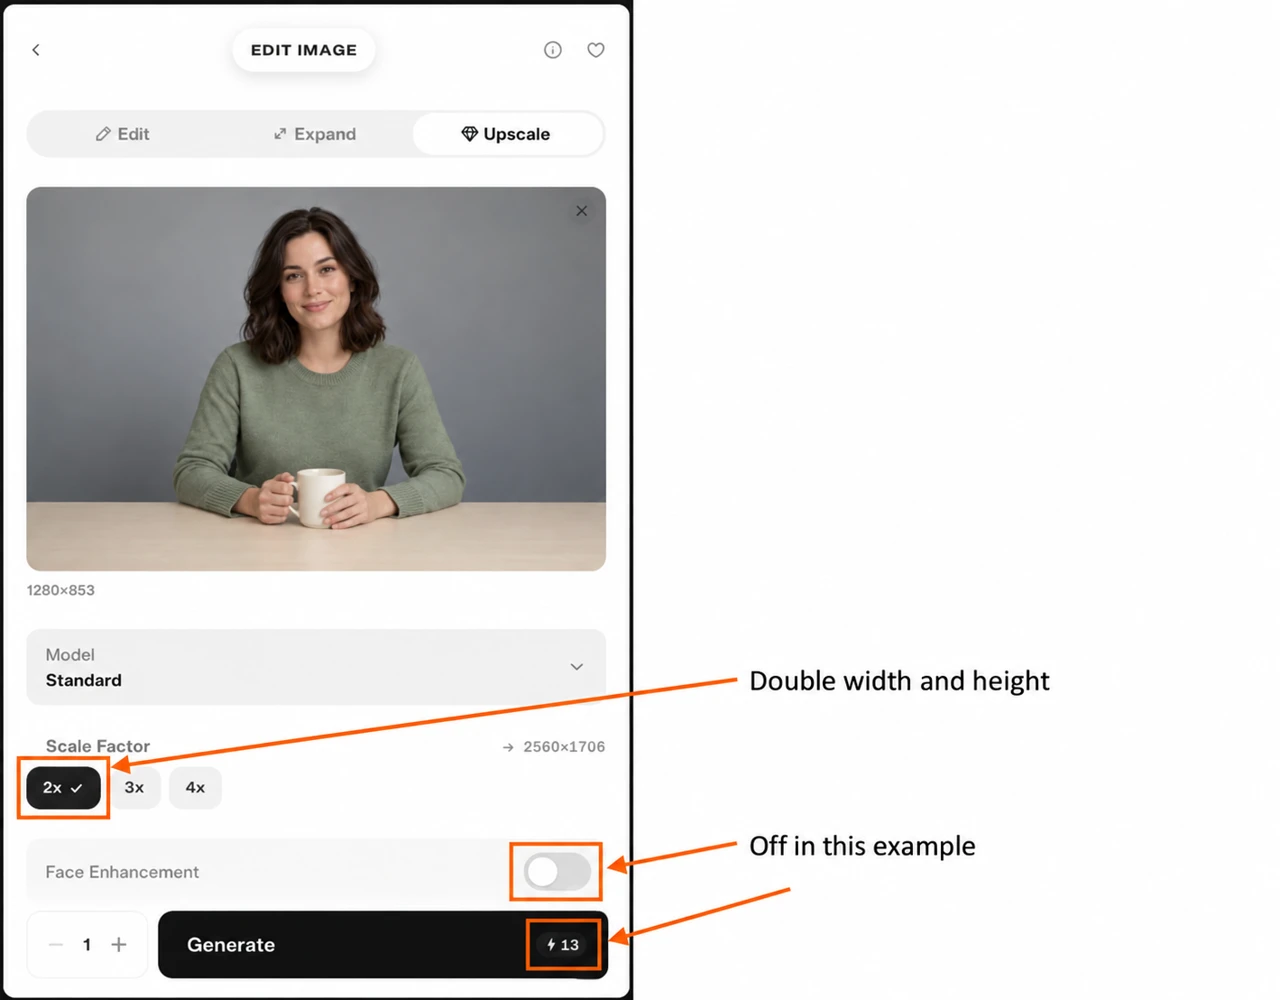
Face Enhancement was off by default here. We left it off. Turn it on if face treatment is part of your goal, then inspect eye shape, hair and skin carefully. It starts on in our checked dedicated Upscale app, so check the actual switch rather than assuming the two forms match.
Example 5: a 2× portrait
- Keep the original photo attached.
- Choose Standard and 2×.
- Leave Face Enhancement off to repeat our test.
- Set Generations to 1 and read the quote.
- Click Generate, open the finished asset and check its dimensions.
The downloaded file was JPEG, 2560 × 1706, and cost 13 credits. This checked form did not offer an export-format selector or the dedicated app’s sharpening, smoothing and compression sliders.
Use enlargement when you need the extra dimensions. It does not turn uncertain details into reliable ones. Check lettering, fabric and faces at the size you intend to publish.
Save your result and check the cost
Open a completed asset in the project, then use its download control in the top toolbar. The details panel records the dimensions and charge. Our edit and expansion downloads were PNG; the upscale download was JPEG.
| Workflow | Quote we saw | Recorded charge for our example |
|---|---|---|
| Edit, Ideogram 4.5, Medium, 1 generation | About 6 credits | 6 each |
| Expand, 1K, 1 generation | 1–3 credits | 2 each |
| Upscale, Standard, 2×, 1 generation | 13 credits | 13 |
Read the whole range. A 1–3 estimate does not mean the job costs exactly 1 credit. Our balance changed from 326 to 297 after the five completed jobs.
Before using the file, compare it with your source. Check the requested change, parts that should remain, borders of expanded areas, fingers, text and face detail. Keep the original and the downloaded file so you can choose a different treatment later.
The gallery and step examples on this page use WebP copies. Open their full-size links when you need a closer inspection.