
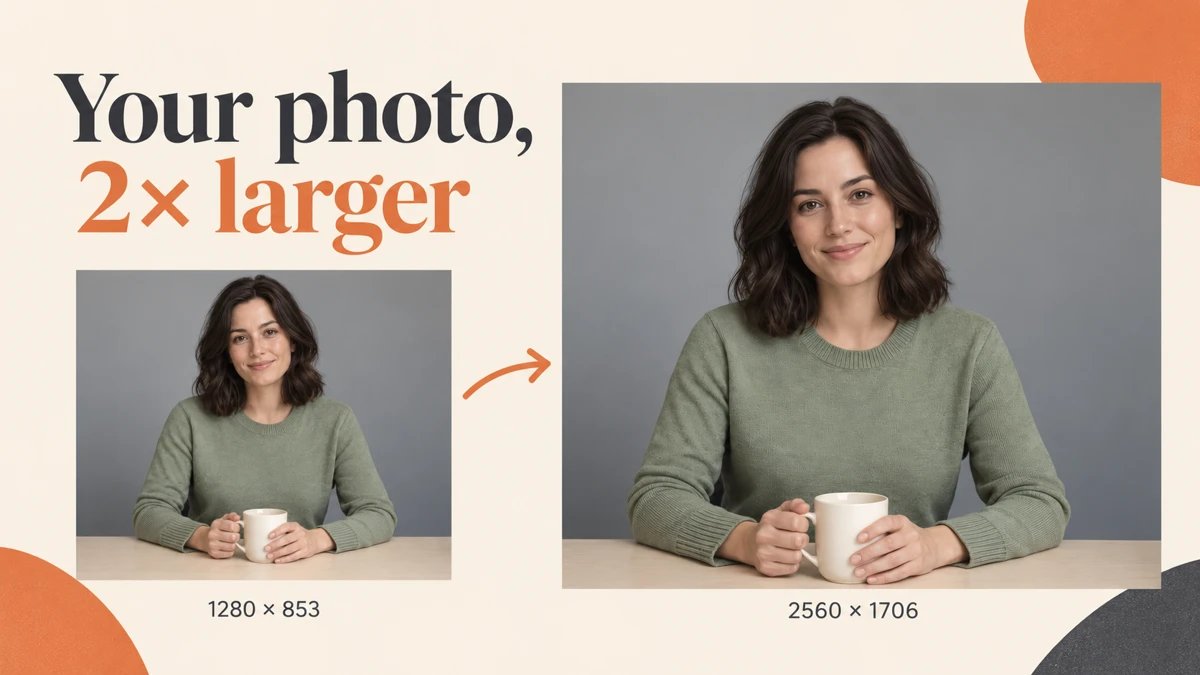
I used our portrait asset to make a 2× photo upscale in Pika. We will follow that setup, inspect the enlarged image, then work through the separate video controls using an existing clip.
Start with the photo pair below. The original is 1280 × 853; the enlarged file is 2560 × 1706. Our Standard, PNG, 2× setup with Face Enhancement on cost 13 credits. Interface checked 9 October 2026.
See the original and enlarged photo


My starting point: choose 2× when you need more room to crop or a larger image for a layout. I would not pay for a bigger file if the existing image already fits the job. Enlargement also needs a detail check; more pixels do not prove more accurate detail.
What is Pika Upscale?
Pika Upscale enlarges an uploaded image or video and offers models for different kinds of media. The file you attach determines which settings appear.
For images, you choose a model, export format, scale and face treatment. For videos, you choose a model, a 1080p or 4K target and optional export or restoration controls.
Creators can use it for a portrait crop, sellers for a larger product photo, and editors for footage that needs a larger delivery size. It cannot recover a missing label or prove that reconstructed texture is true to the original. Check product lettering, skin and fine edges before publishing.
| Your goal | Start here | What I would inspect |
|---|---|---|
| Enlarge a normal photo | Standard, 2× | Face, hair and object edges |
| Keep detail in an already sharp photo | Preserve Detail | Texture and sharpening halos |
| Work with a small or compressed photo | Low-Resolution Safe | Blocky areas and lost detail |
| Enlarge a screenshot or logo | Text & Shapes | Every letter and straight edge |
| Prepare a video with few manual controls | Starlight Fast | Model quote and target size |
| Adjust video restoration yourself | Proteus | Noise, halos and consistency between frames |
Step 1: attach your image or video
- Open the Upscale app.
- Click Add a photo or video.
- In the asset picker, choose Upload for a device file, or select a saved asset and confirm Use Selection.
- Wait for the upload and preview to finish. A photo opens image settings; a clip opens video settings.
- Use Change source, the cross at the preview’s upper right, to choose a different file.
The form lists PNG, JPG, WebP and HEIC for images, plus MP4, MOV and WebM for videos. Use the best original you have rather than a screenshot of it.
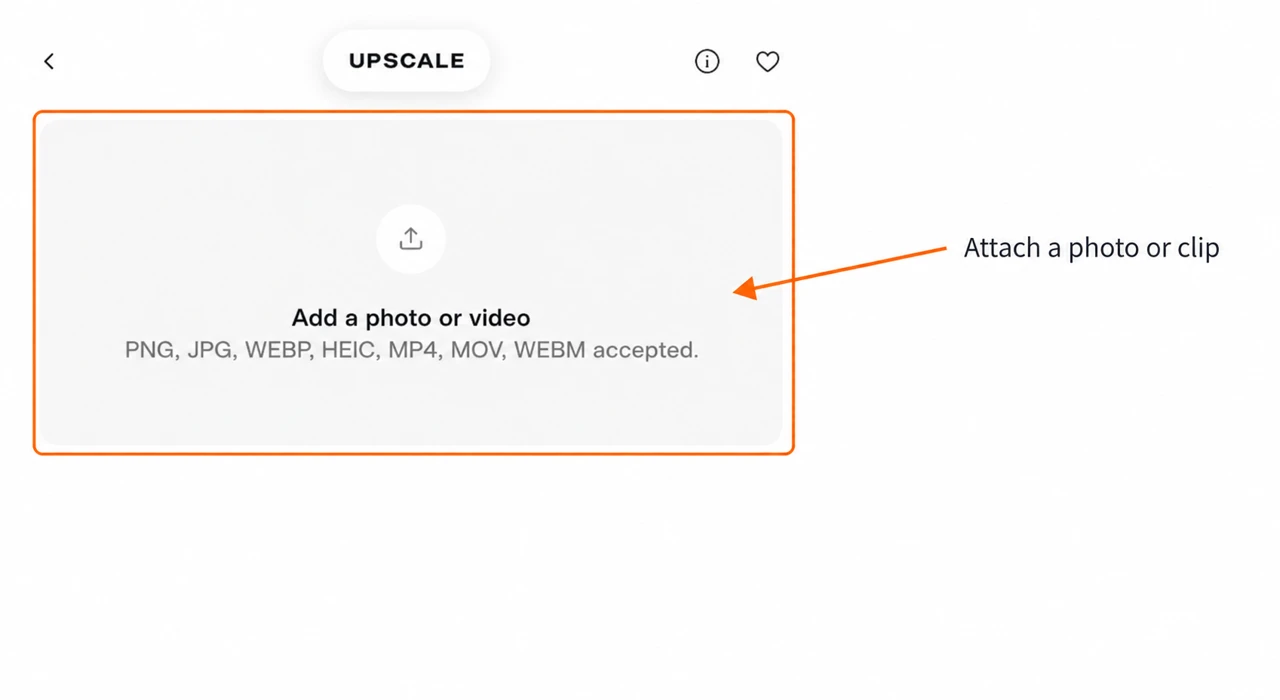
Download our portrait to repeat the image steps. You can choose any suitable image or video of your own.
Image step 2: choose a model
Open the model menu beneath the preview. Standard is the default we used for the portrait. Match the workflow to the source rather than selecting a name because it sounds stronger.
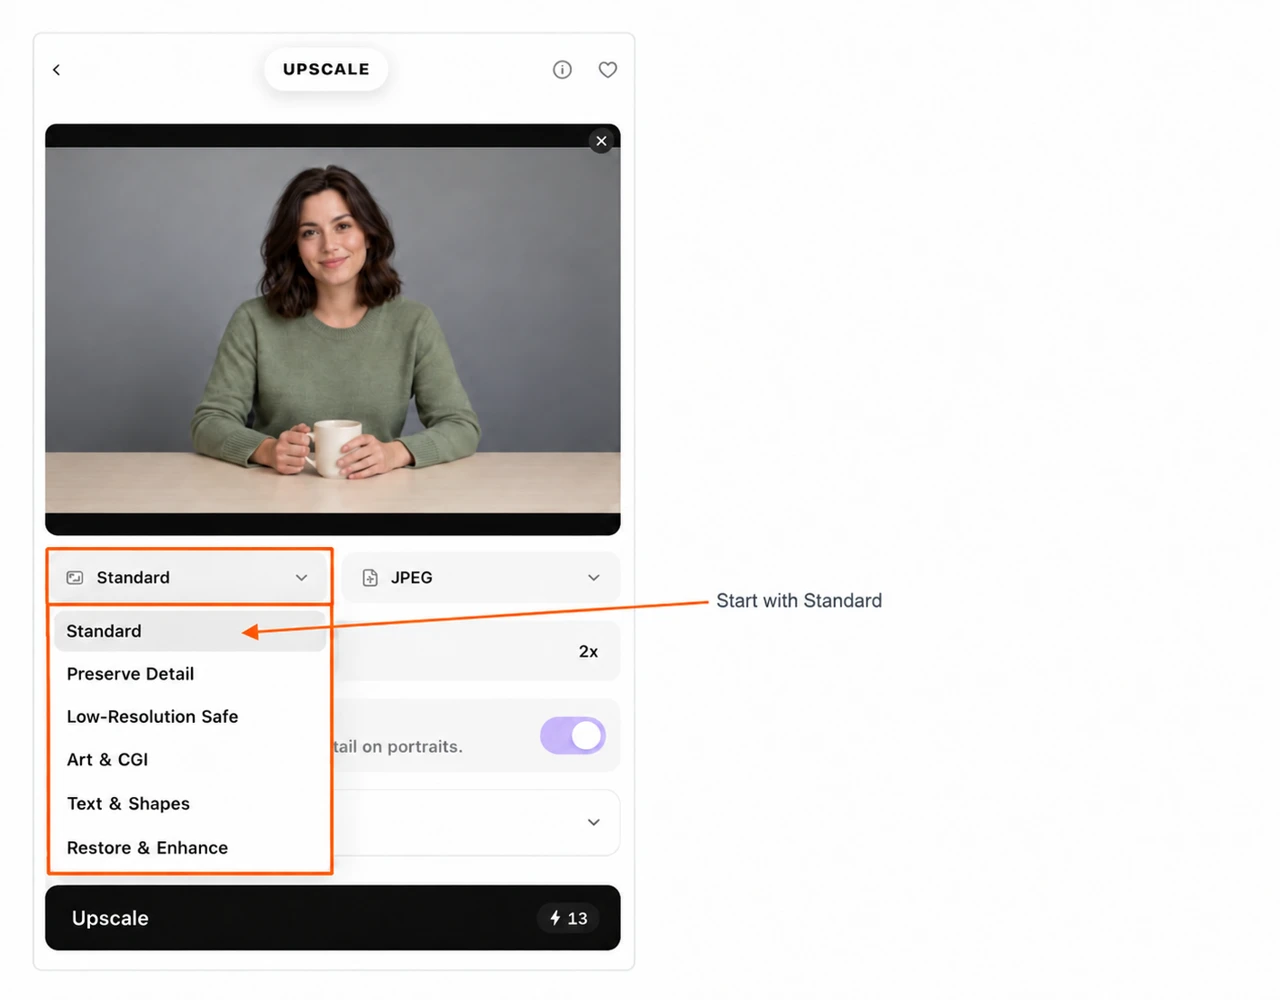
| Image model | When I would consider it |
|---|---|
| Standard | A general photo starting point; used in this guide |
| Preserve Detail | An already sharp source with detail worth retaining |
| Low-Resolution Safe | A small or compressed source |
| Art & CGI | Illustration, rendered artwork or computer-made scenes |
| Text & Shapes | Screenshots, lettering, logos and geometric work |
| Restore & Enhance | A source needing a restoration-focused attempt; inspect changed detail closely |
The first three and Text & Shapes also have source-matching guidance in the app’s FAQ. The remaining names describe options you can try; this portrait does not compare the quality of all six models.
Image step 3: choose format, scale and face treatment
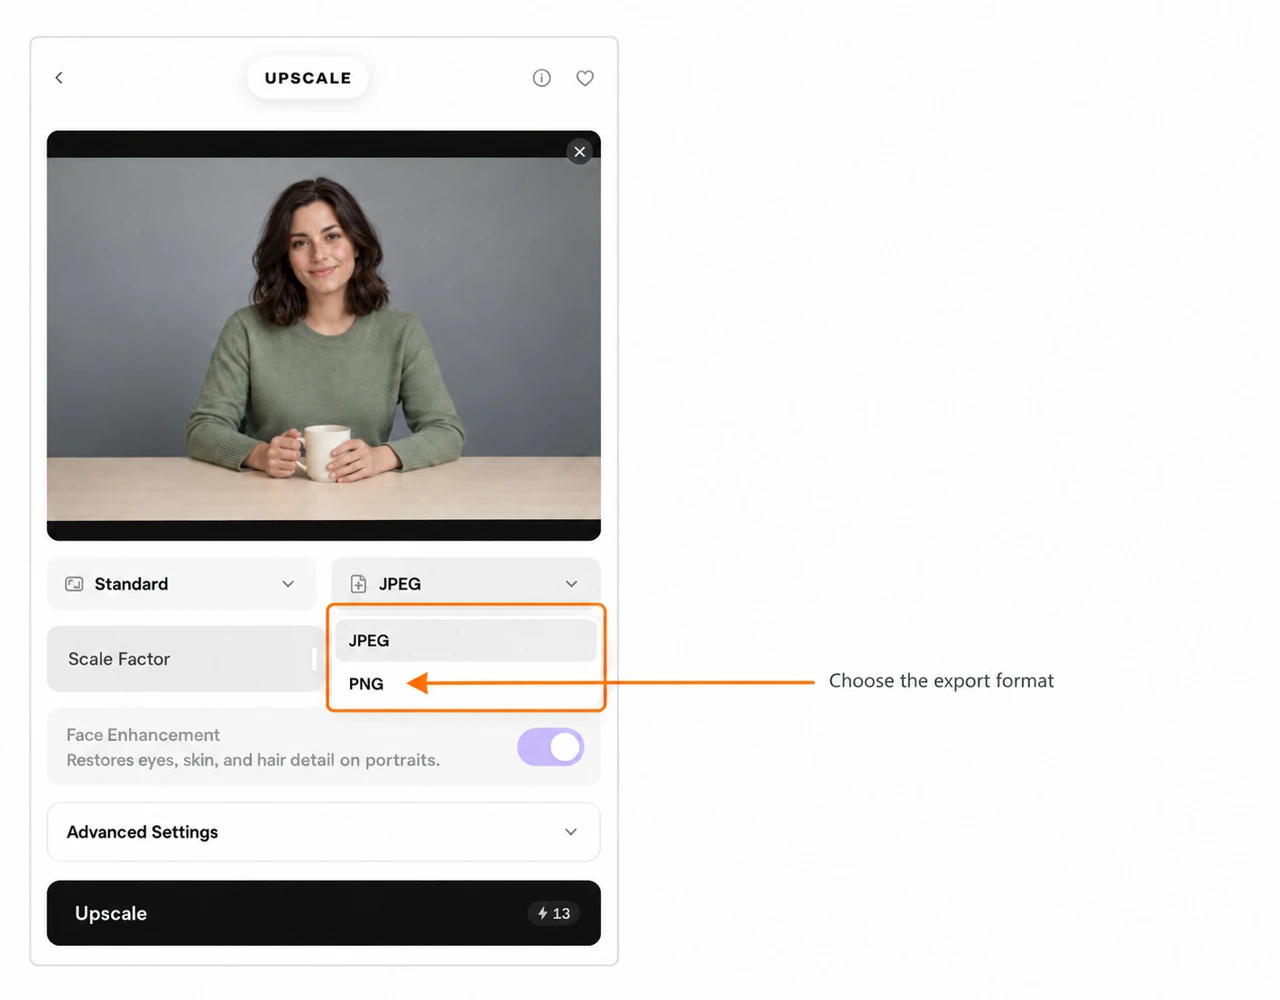
JPEG or PNG
The export menu offers JPEG and PNG. I chose PNG for the example so we could keep the downloaded image for inspection. JPEG is useful when a smaller photo file matters; PNG avoids JPEG compression in the saved export.
Scale Factor
The image scale control spans 2× to 4×. At 2×, both width and height double, so the total pixel count becomes four times larger. Our 1280 × 853 photo became 2560 × 1706.
Start at 2× and judge the result at the size you will actually use. Pika’s app FAQ states a 24-megapixel image limit, so a large source may have a smaller available factor. A larger factor can also change the quote.
Face Enhancement
The face switch is on by default. Its purpose is to restore eyes, skin and hair detail in a portrait. We kept it on for this example. For a product, logo or scene without faces, I would turn it off unless there is a reason to keep it.
Inspect identity, eye shape and skin texture. A face can look cleaner while losing details you wanted to retain.
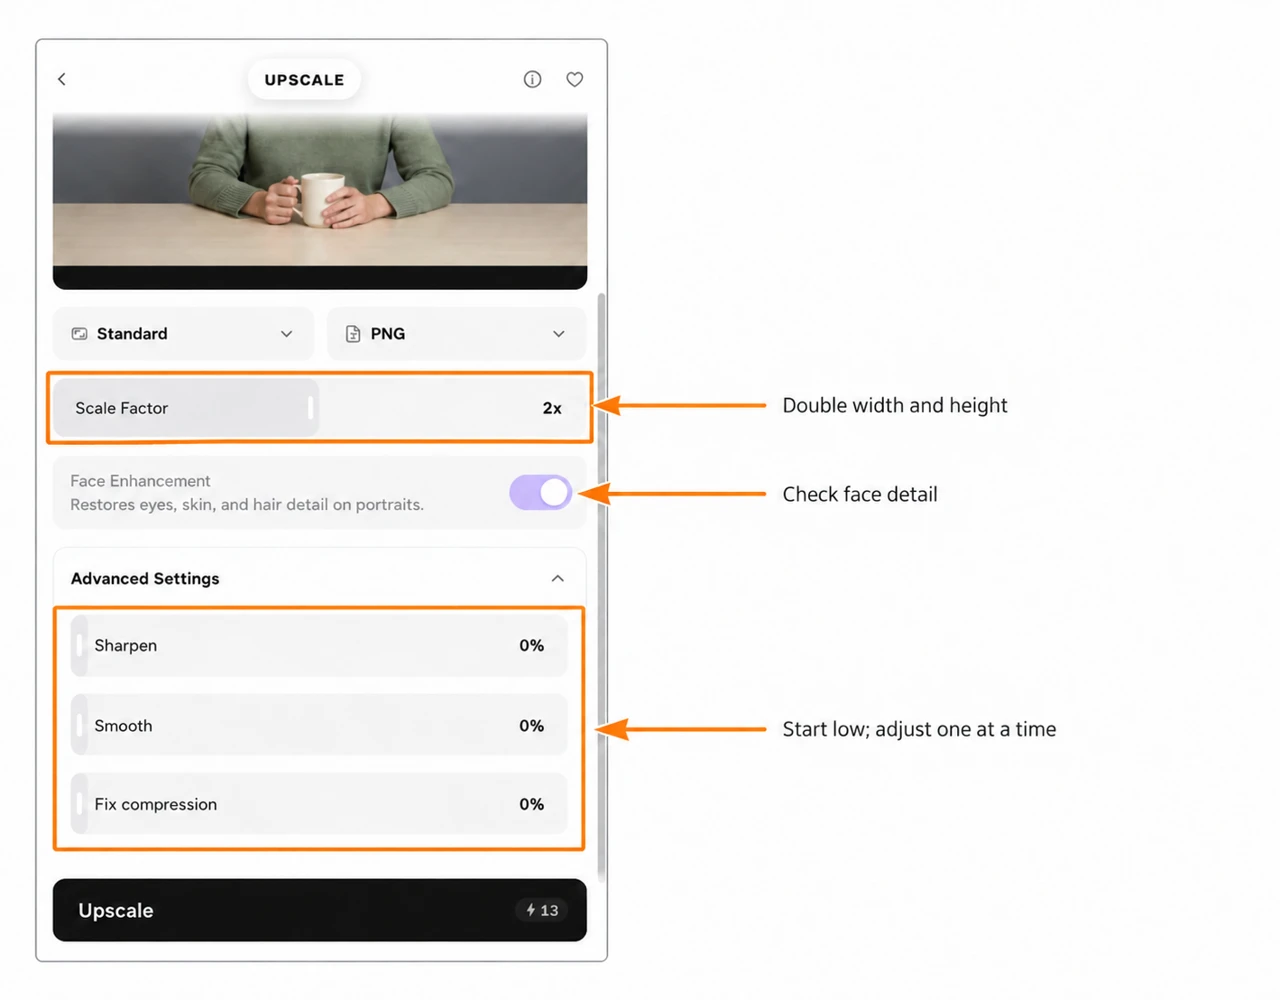
Image step 4: adjust detail only when needed
Expand Advanced Settings. In the Standard form, each slider spans 0–100%. We left all three at zero for the example.
| Control | What it is for | What to watch |
|---|---|---|
| Sharpen | Increase edge definition | Bright outlines and brittle hair detail |
| Smooth | Reduce rough or uneven texture | Skin and fabric becoming too flat |
| Fix compression | Address compression damage | Fine lettering and texture changing |
Move one control a little, then compare before raising it again. These are not three sliders to push to maximum. Controls can vary by model: Restore & Enhance showed Sharpen and Smooth, while Standard, Preserve Detail and Low-Resolution Safe also showed Fix compression in our checked forms.
Image step 5: upscale, inspect and download
- Confirm Standard → PNG → 2× → Face Enhancement on.
- Leave Sharpen, Smooth and Fix compression at 0% to repeat our setup.
- Wait for the quote, then click Upscale once.
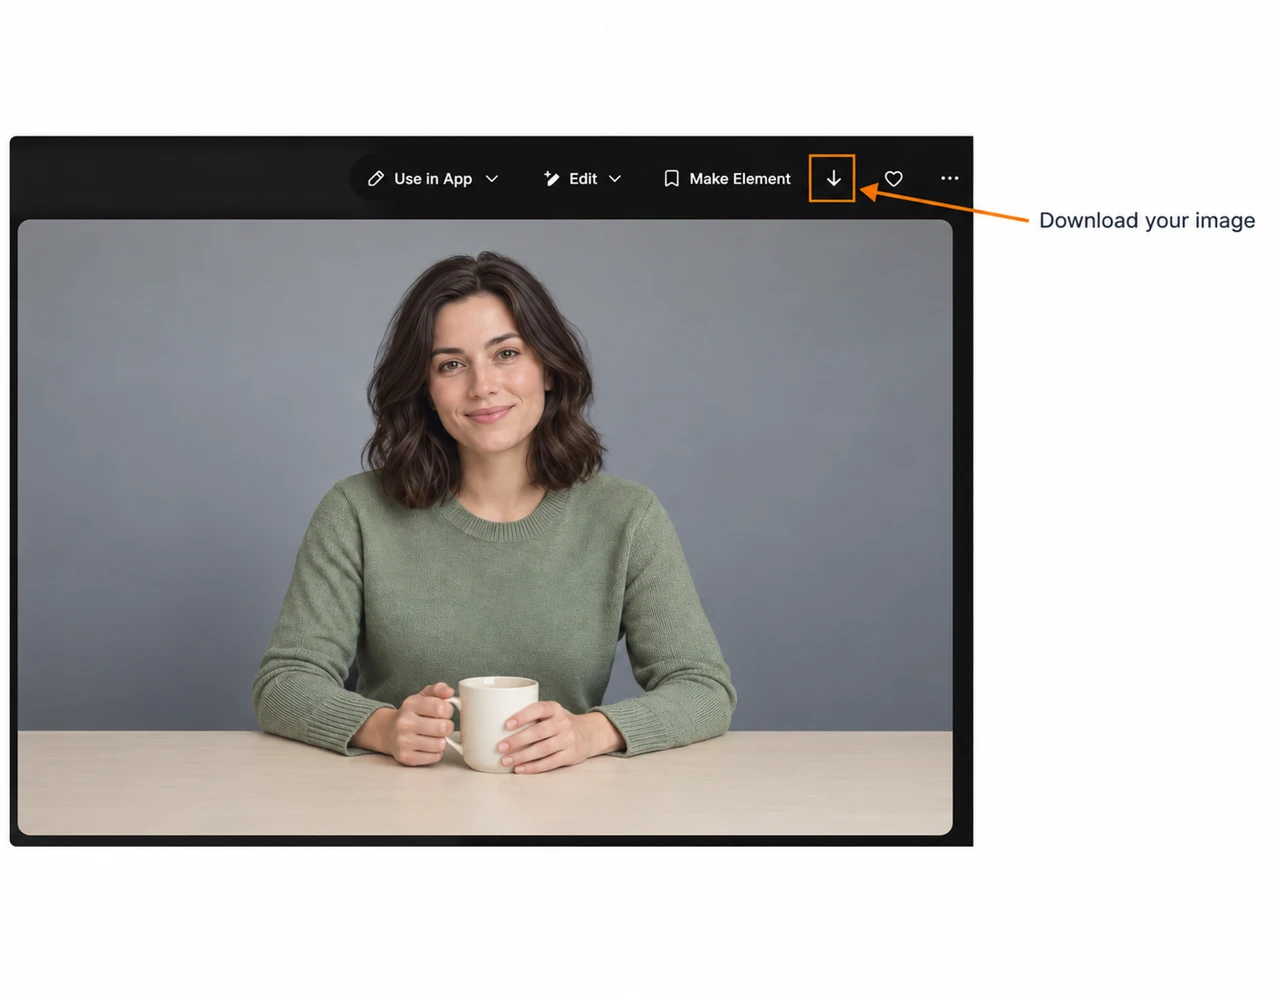
- Open the image in the project when it is ready.
- Select the download arrow in the top toolbar.
Look at matching detail crops
These crops show the same face region. The original crop is 300 × 300 pixels; the corresponding enlarged crop is 600 × 600. Both appear at the same display size below. We have not added sharpening to these page copies.
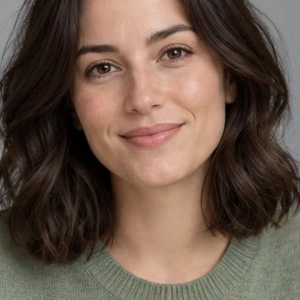
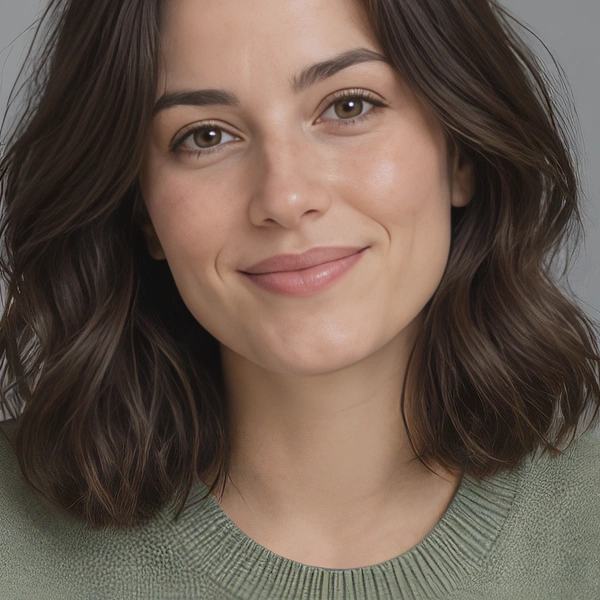
The overall pose, mug and scene remain recognisable. Hair and skin have a smoother treatment in the enlarged version. I would check those areas at full size before calling the change an improvement. This example demonstrates a larger file, not a promise of accurate new texture.
Video step 1: upload a clip and choose its model
Use Change source to attach a video, or open the app again and choose Add a photo or video. We uploaded our five-second Pika portrait clip to explore the controls. You can use another suitable clip.
The video section here is a settings walkthrough. The photo above is the completed upscale example.
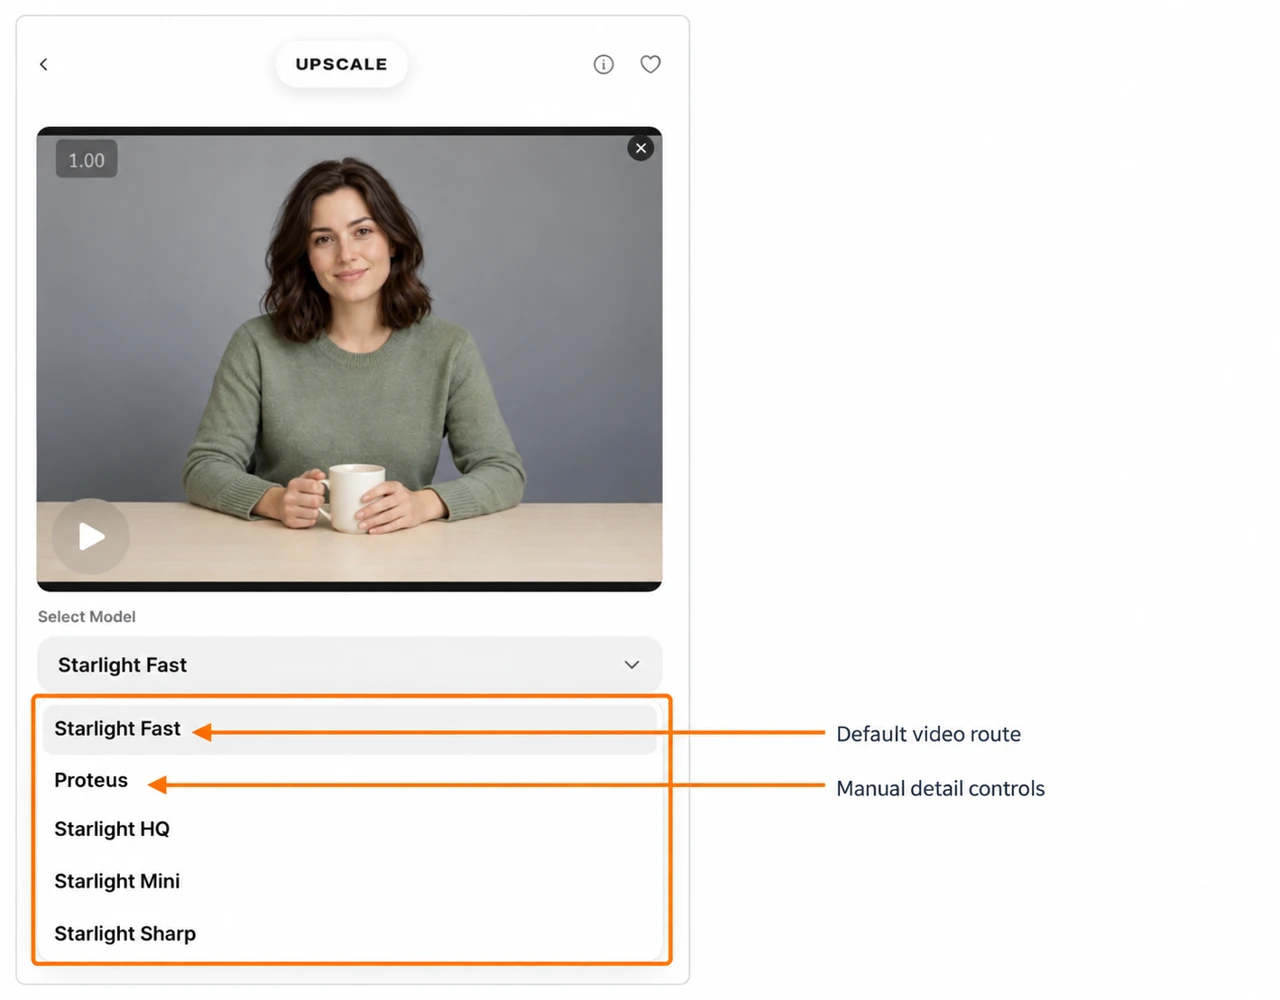
| Video model | How I would choose a workflow |
|---|---|
| Starlight Fast | The default; Pika recommends it as a general starting point |
| Proteus | Use when you want manual restoration controls; the app describes it as its cheapest, most tunable workflow |
| Starlight HQ | Pika suggests it for a main or prominent shot; check the quote first |
| Starlight Mini | Another Starlight choice with the simpler form; compare a short sample before choosing it for a whole project |
| Starlight Sharp | Another simpler Starlight workflow; inspect edges closely rather than choosing it by name alone |
The Starlight forms we inspected kept target size and H.264 export without Proteus’s five detail sliders. These are control differences, not a video quality ranking.
Video step 2: choose 1080p or 4K
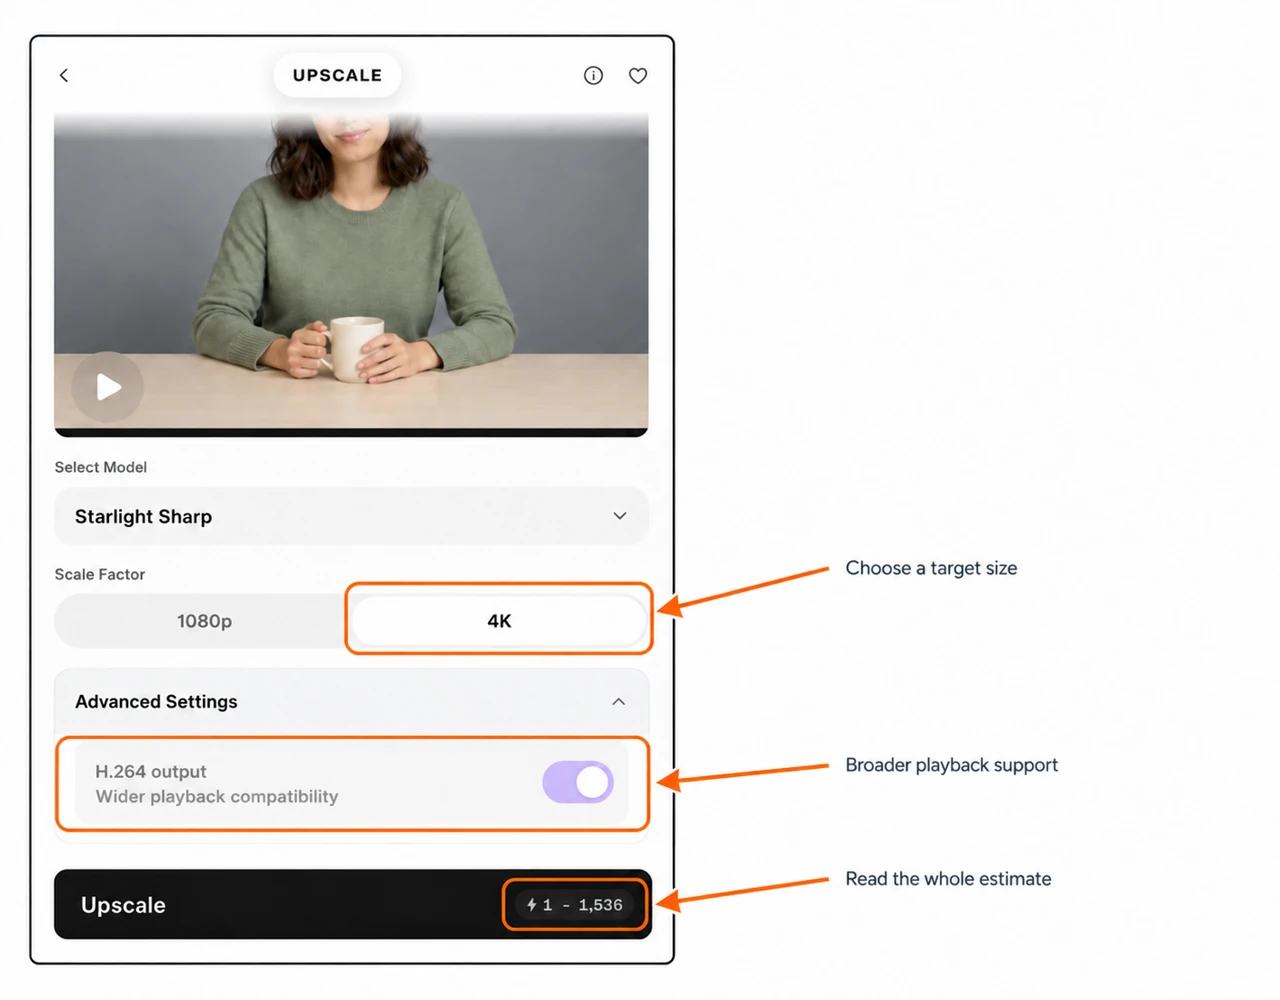
Under Scale Factor, select 1080p or 4K. These are target sizes rather than the photo’s 2×–4× multiplier. Choose the delivery size your project needs and allow the quote to update.
For a small web player, I would start with 1080p. For a larger edit or crop, consider 4K if the extra file size and credit quote fit the job. Do not assume a 4K target makes soft footage contain true 4K detail.
Video step 3: use Proteus for manual adjustments
Choose Proteus, then expand Advanced Settings. The five sliders run from 0–100%. Begin at zero and change only the control that addresses a problem in your source.
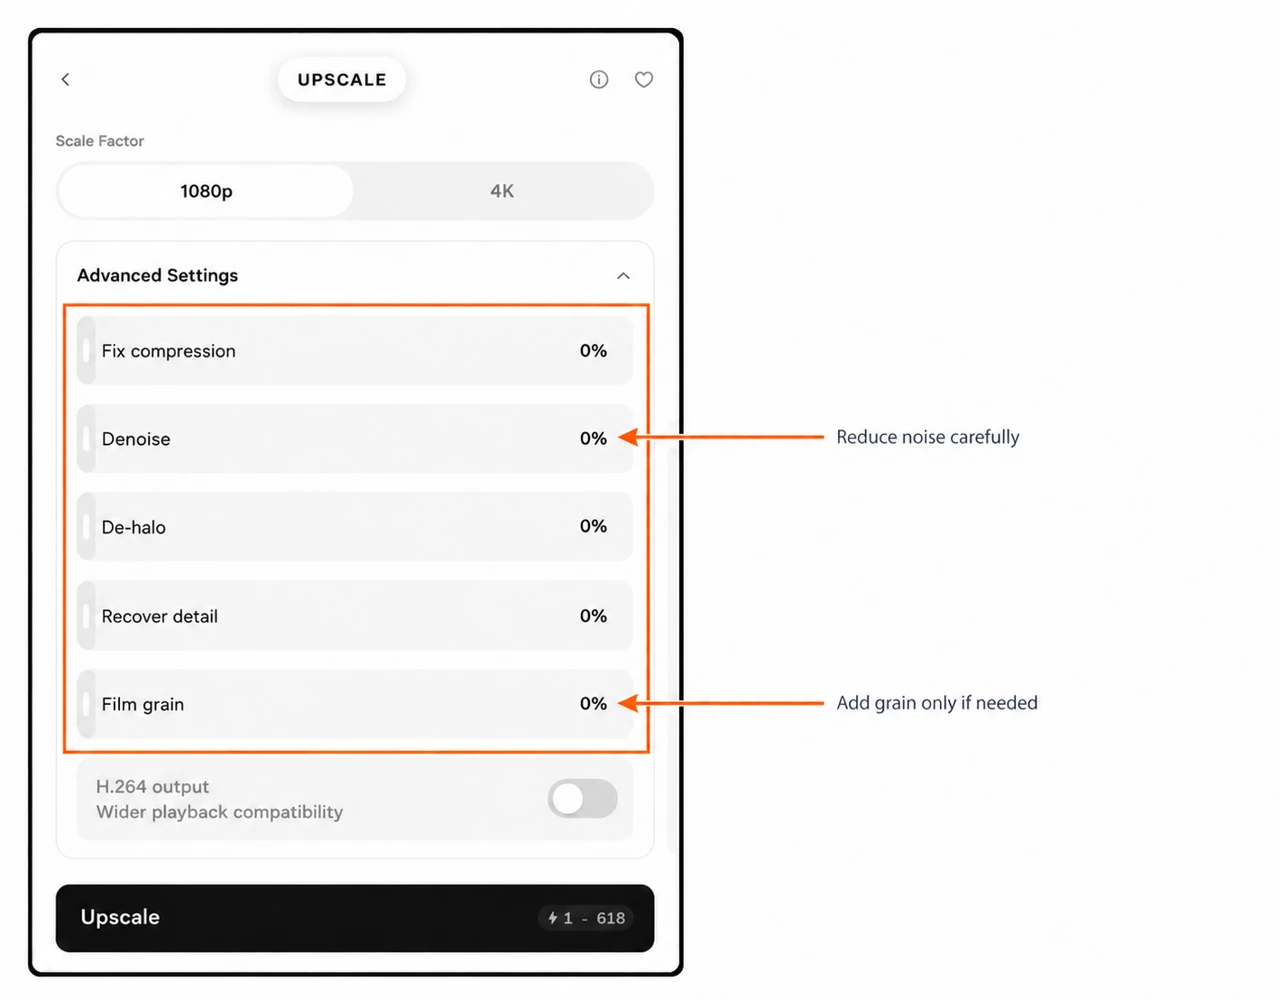
| Proteus control | Purpose | My check |
|---|---|---|
| Fix compression | Address blocky compression damage | Lettering, faces and repeating patterns |
| Denoise | Reduce unwanted noise | Fine texture should not disappear |
| De-halo | Reduce outlines around edges | Hair and high-contrast object borders |
| Recover detail | Restore fine structure | Avoid harsh or changing texture across frames |
| Film grain | Add a grain treatment | Keep it consistent with the rest of your edit |
Use a short representative clip before processing a long file. A setting that helps one paused frame may look poor during motion.
Video step 4: check H.264, frame rate and cost
H.264 export: expand Advanced Settings and enable the switch labelled H.264 output when broader playback compatibility is the goal. It is off in the default form we checked. The screenshot above shows where it sits below Proteus’s sliders; the Starlight screenshot shows it enabled.
Frame rate: Pika’s app FAQ says Starlight expects clips at 30 fps or below and warns before submission for faster footage. The app says it preserves frame rate and audio. Our source is silent, so this guide does not demonstrate an audio-preservation result.
Credits: read the entire range on Upscale. Our uploaded clip showed 1–768 with Starlight Fast at 1080p, 1–618 in the captured Proteus form, and 1–1,536 with Starlight Sharp at 4K. These are captured estimates, not completed video charges. Quotes can update after a model or size change.
When you are ready with your own clip, confirm the file, model, target size, detail controls and quote before pressing Upscale. Open the finished asset to inspect motion, sound and dimensions, then download it with the toolbar arrow.
Before you use the enlarged file
- Open it at full size, then check it at the size your audience will see.
- Read text and product labels rather than judging only the overall picture.
- Inspect faces, hair, fingers and high-contrast borders.
- For a video, play the full clip and check detail during movement.
- Keep the original so you can return to it if the treatment is too strong.
For a website, serve an appropriately sized WebP photo rather than sending every reader the largest export. Keep the full file available for closer inspection, as we do with the image links in this guide.