
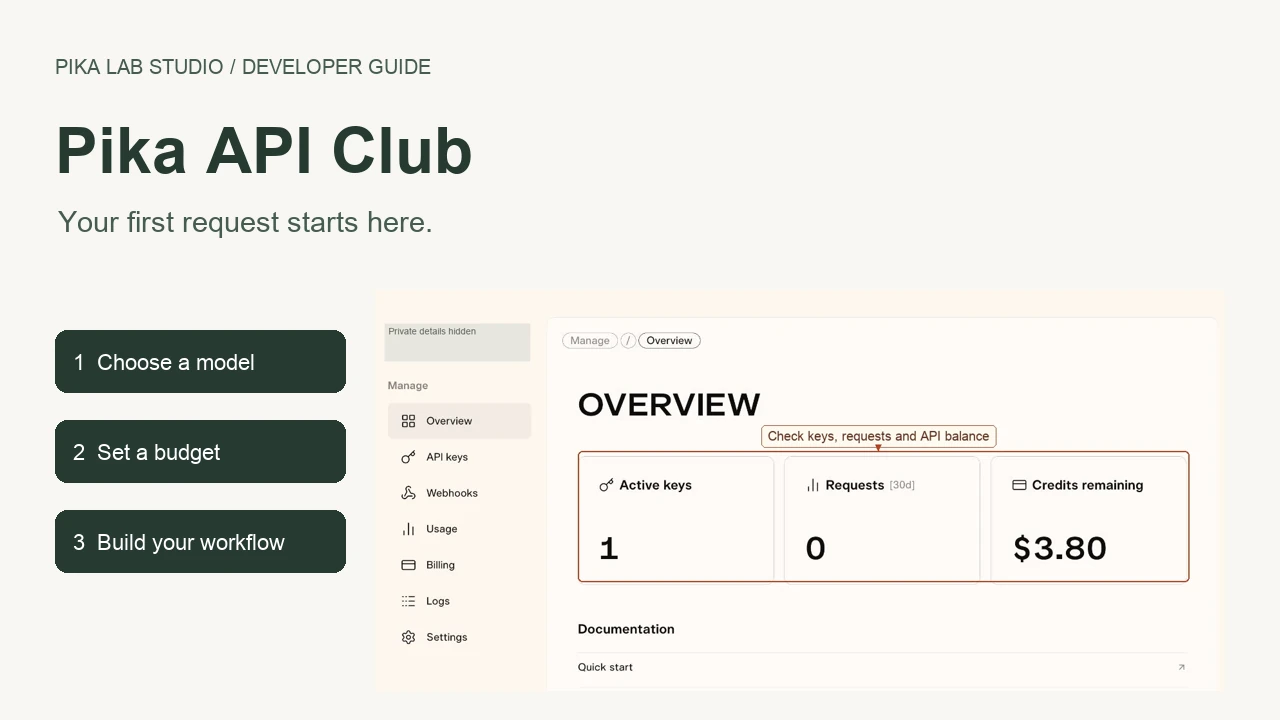
What is Pika API Club?
Pika API Club is a membership service for using AI models through one API. It gives builders access to video, image, audio and language models, with a dashboard for keys, spending and request history. An API lets your own application ask a model to do a task and receive the result.
I would use it when I want generation inside a website, an app or a repeatable workflow. For making an occasional clip by hand, I would start with the Pika Create guide. We’ll begin with the dashboard, prepare a small video request, then cover the tools for running it from your own project.
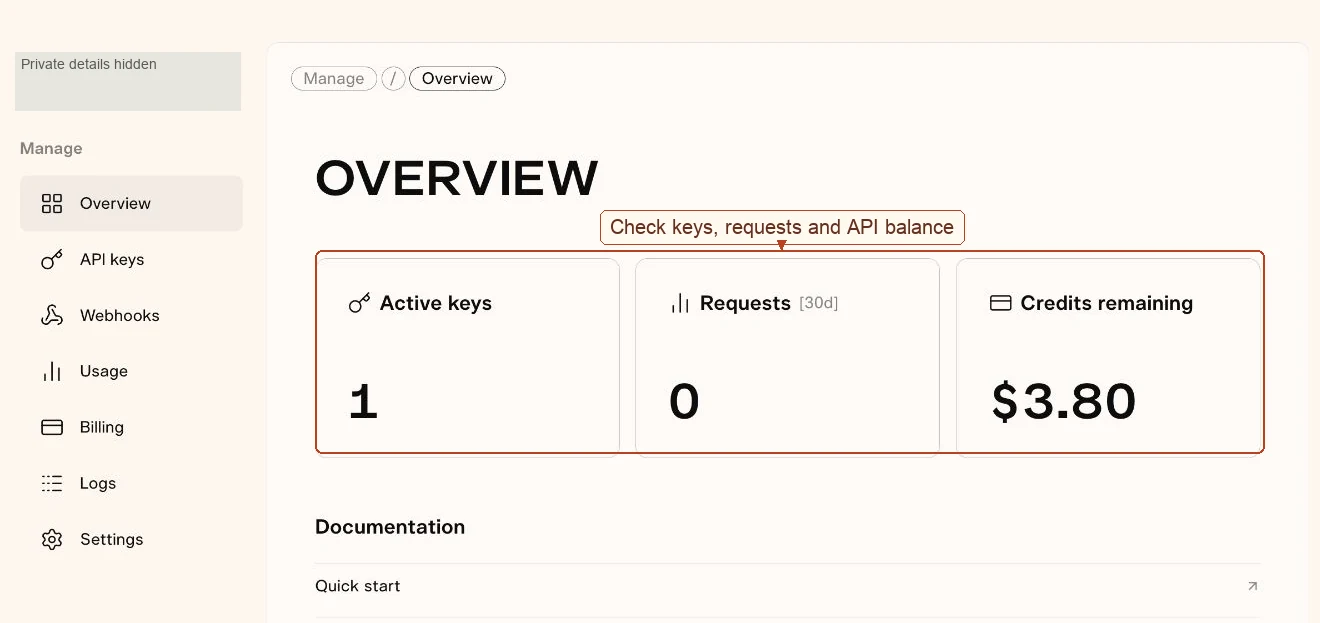
Keep that tab open. Use its top navigation and sidebar to follow the steps below.
Who should use it?
| Your goal | Best starting point | What you need |
|---|---|---|
| Try a model before writing code | Models → Playground | An account and enough API balance for the selected request |
| Add video generation to an app | Model API reference | A backend that keeps the key private |
| Let a coding agent build an integration | For Agents | A coding workspace and a server-side secret |
| Process a set of approved product photos | One successful request, then a controlled queue | Per-key limits, request tracking and a budget |
| Receive finished-job notifications | Webhooks | A public HTTPS endpoint you control |
| Find why a request failed | Logs | The request ID or filters for the relevant run |
My beginner recommendation: choose one model and one small task. Check its price, prepare the request in the playground, and inspect the result before turning it into a batch.
Pika API Club or Pika Create?
Pika Create is the browser workspace for building and editing media. API Club is the developer workspace for calling models from software, testing requests and managing API usage. The API dashboard displays a dollar balance; keep this budget separate from estimates in our Pika Create credit calculator.
You can use the API playground without writing code. To put generation on your own website, you still need a private server-side integration. A static page must never contain your API key.
Membership and generation costs
Pika lists $10 per month for API Club membership, plus pay-as-you-go model usage. Its membership information offers new members $10 toward their first month of usage. Treat that as an introductory credit, not a promise of $10 every month.

A small Pika 2.5 budget
The dedicated Pika 2.5 Text to Video → Pricing page lists these five-second options:
| Setting | Listed rate | One successful five-second run | Five successful runs |
|---|---|---|---|
| 720p | $0.04 per second | $0.20 | $1.00 |
| 1080p | $0.09 per second | $0.45 | $2.25 |
These are usage calculations from the displayed rates. They exclude the membership fee and any applicable checkout taxes. Recheck the selected operation’s Pricing tab before submitting; another model or input mode can have a different billing unit.
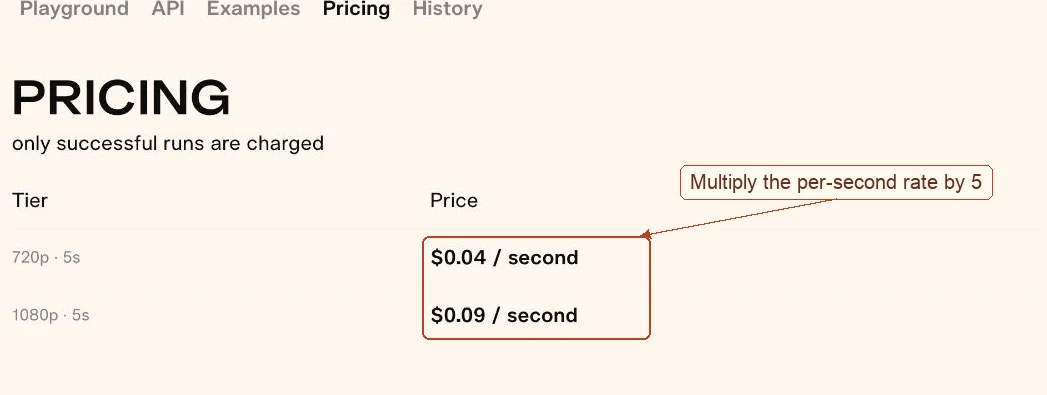
The page says only successful runs are charged. A completed clip that you personally dislike is still a successful generation, so budget for revisions. In your application, read the settled job charge rather than assuming an estimate is the final bill.
The main Pricing page also has an Estimate your Savings calculator. Select the model and operation, then the available resolution, duration, input options and generation count. Its comparisons are vendor estimates; use the selected model’s own rate and your expected volume to plan spending.
Step 1: understand the dashboard
Open Dashboard → Overview. Check the organization selector first so your keys and usage belong to the intended organization.
| Sidebar item | Use it to |
|---|---|
| Overview | Check active keys, requests in the last 30 days and remaining balance |
| API keys | Create a project key, inspect its status, set limits or revoke it |
| Webhooks | Register callbacks and inspect delivery attempts |
| Usage | Review spending by source and time period |
| Billing | Manage membership, funds, payment method and invoices |
| Logs | Find individual requests and inspect their details |
| Settings | Manage organization details, email alerts and retention |
| Agent | Open setup instructions for an AI tool |
| Docs | Read the Quick Start and model references |
The organization menu includes Join an organization. Use it when you need an existing team’s workspace; joining and permissions depend on that organization’s process.
The documentation shortcuts on Overview open Quick start, API keys & auth, Make a request, Async jobs & polling, Uploads, and Model catalog. I would start with Quick Start, then keep the chosen model’s API page open beside my code.
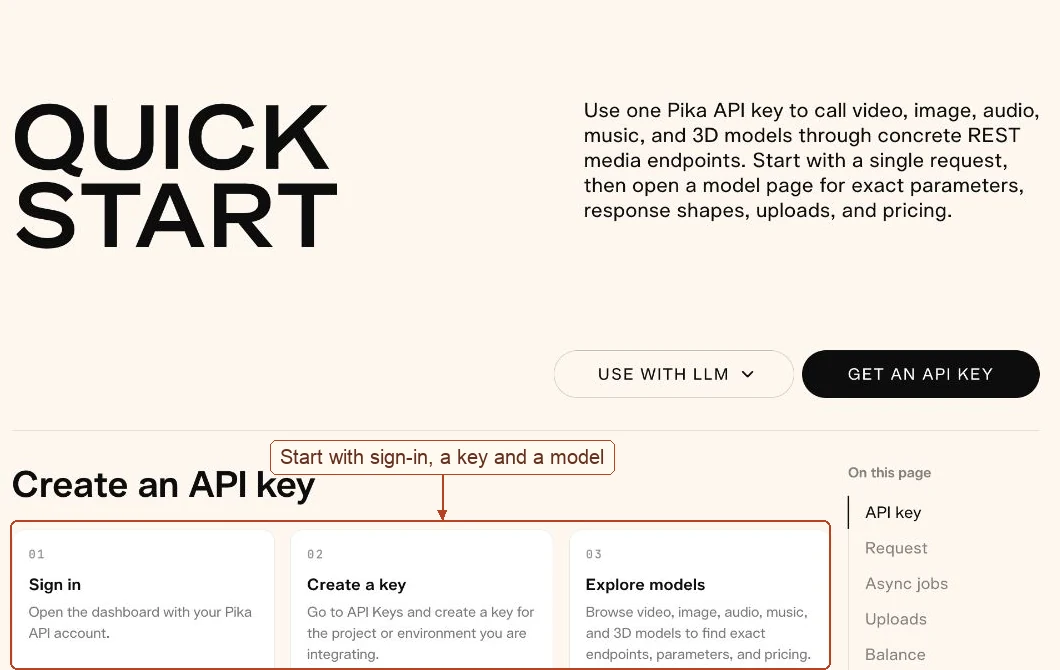
Step 2: create and protect an API key
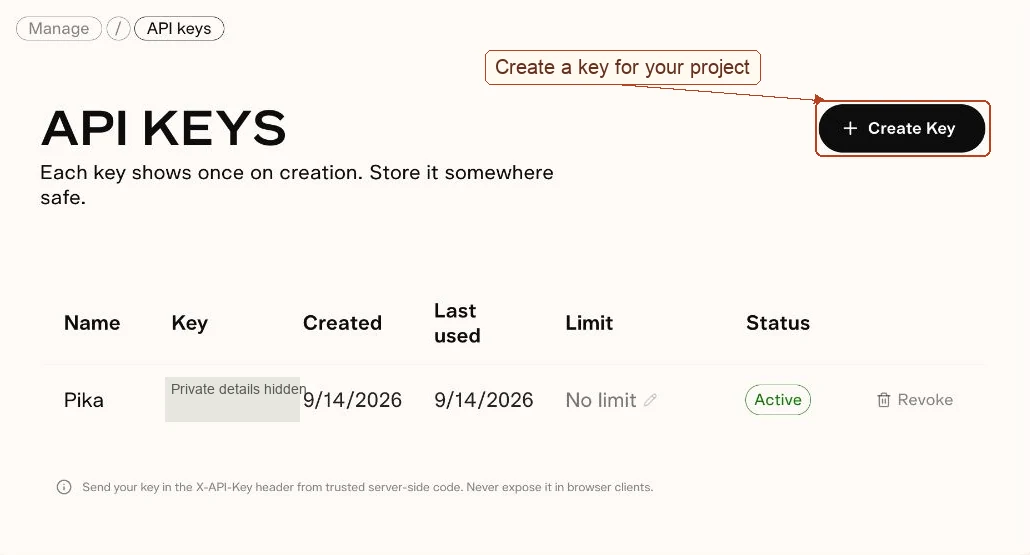
- Open API keys in the sidebar.
- Select Create Key.
- Give it a clear name, such as
product-video-testorproduction-server. - Create the key and store it in your server’s secret manager or private environment configuration.
- Keep the full key private. The dashboard says it is shown once at creation.
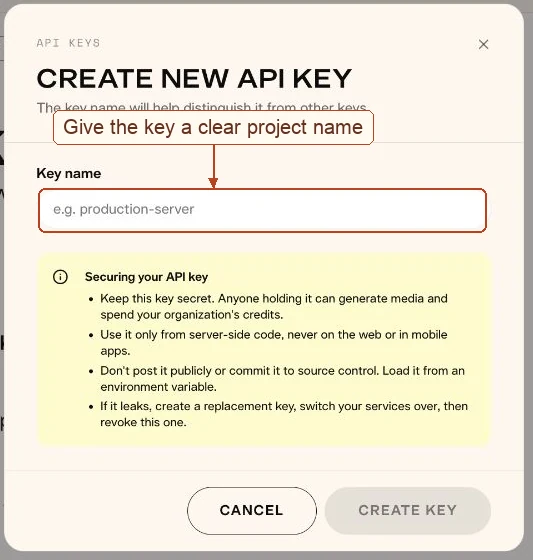
Send the key in the X-API-Key header from trusted server-side code. Do not place it in a browser script, public repository, screenshot, chat message or mobile application bundle.
If a key is exposed, create a replacement, update the services that use it, then revoke the old key. Revoke stops a key from being useful to those services, so identify its dependencies first.
Set a limit before automating
Select the key’s Limit control. Enter a Daily limit (USD) and, if useful, a Lifetime limit (USD), then save.
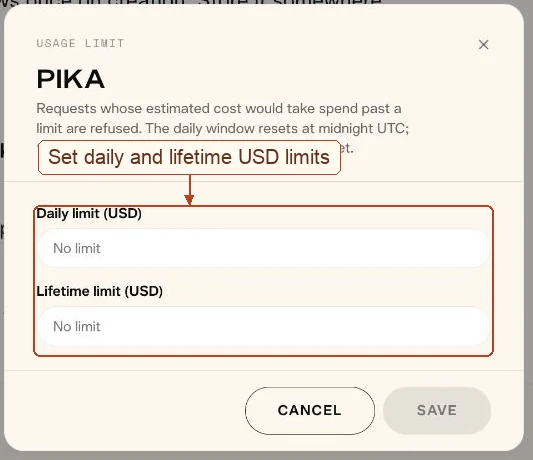
The form says a request is refused when its estimated cost would push spending past a limit. A small test budget helps prevent an agent or repeated request from spending more than you intended. A key limit does not replace checking the organization’s available balance.
Step 3: choose a model and operation
Open Models. Filter by Video, Image, Audio, LLM or Upscale, or use the search control. The catalog also groups models by provider and highlights recently added models.

A model name alone is not enough. Text to Video starts from a description; Image to Video needs an image. Other operations accept video, audio or reference inputs. Check the input-to-result labels before opening a playground.
| Model view | What to do there |
|---|---|
| Playground | Prepare inputs and run an interactive request |
| API | Read authentication, endpoint, fields, accepted values and errors |
| Examples | Inspect the model’s sample generations |
| Pricing | Check the billing unit and configuration-specific rate |
| History | Review your recent runs for that model |
Copy OpenAPI Schema provides the machine-readable specification. Use with LLM provides a way to give model documentation to an assistant. Use these when building an integration so it follows the selected model’s actual fields.
Step 4: prepare a first playground request
Open Pika 2.5 → Text to Video → Playground. I use a simple mug scene here because one subject and one small movement make the result easier to judge.
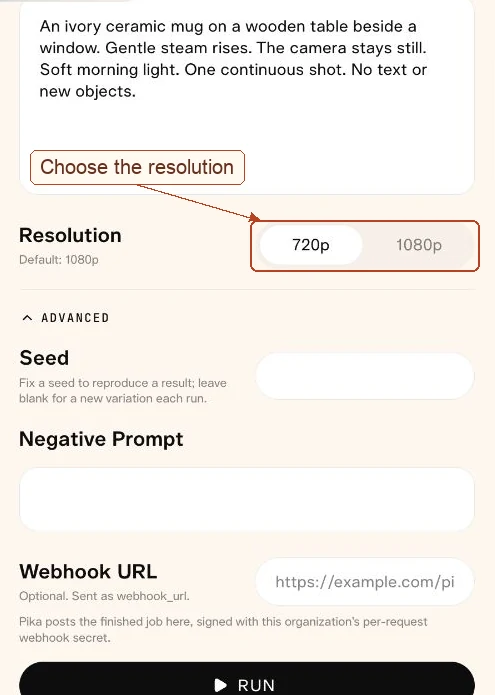
Paste this into Prompt:
An ivory ceramic mug on a wooden table beside a window. Gentle steam rises. The camera stays still. Soft morning light. One continuous shot. No text or new objects.
- Select 720p for the smaller usage cost, or 1080p when you need that output setting.
- Open Advanced to inspect optional fields.
- Leave the seed blank for a fresh variation, or record a chosen seed when comparing settings. A fixed seed is a reproducibility aid, not a promise that every future run will be identical.
- Use Negative Prompt to describe unwanted elements.
- Leave Webhook URL empty for a simple manual test. Add it only when your callback receiver is ready.
- Read the rate below Run, confirm your budget, then submit one request.
Understand Form, JSON and code views
Open Request view to choose Form, JSON, cURL, Python or TypeScript. Form is easiest for setting up a request; JSON is useful for checking the exact parameter names.
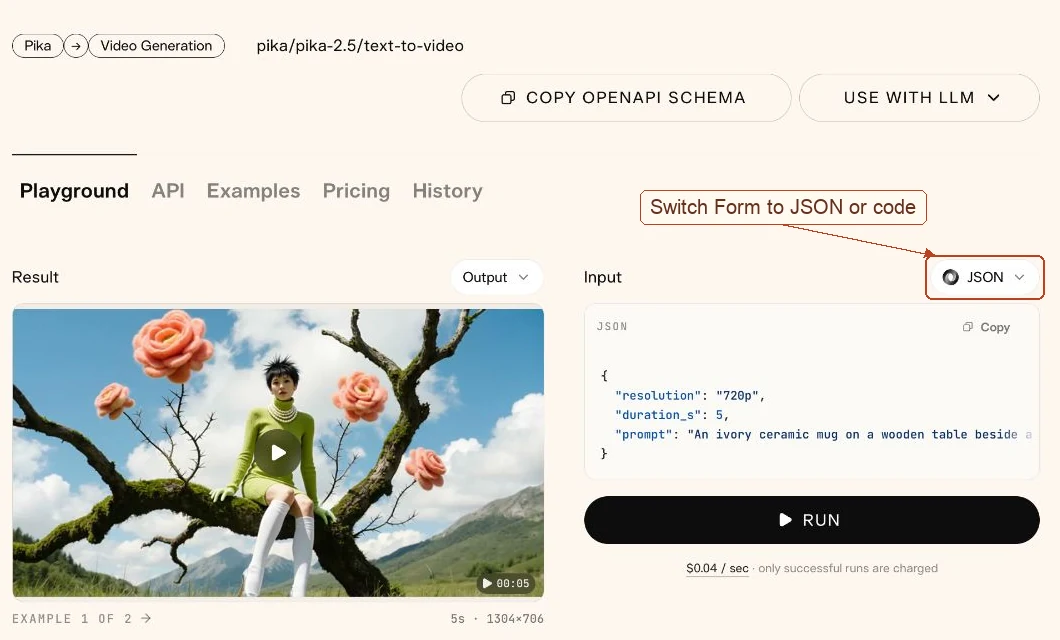
Our prepared JSON contains resolution, duration_s and prompt. Do not replace duration_s with another model’s field name just because it looks similar.
When your request finishes, inspect the whole video, then use the result’s available playback and download controls. Check object shape, motion, framing and unwanted changes before requesting another version. Examples contains vendor samples; History helps you find your own runs.
Step 5: call the API from your project
Open the model’s API tab. Confirm its authentication header, generate endpoint, accepted input fields and response format.
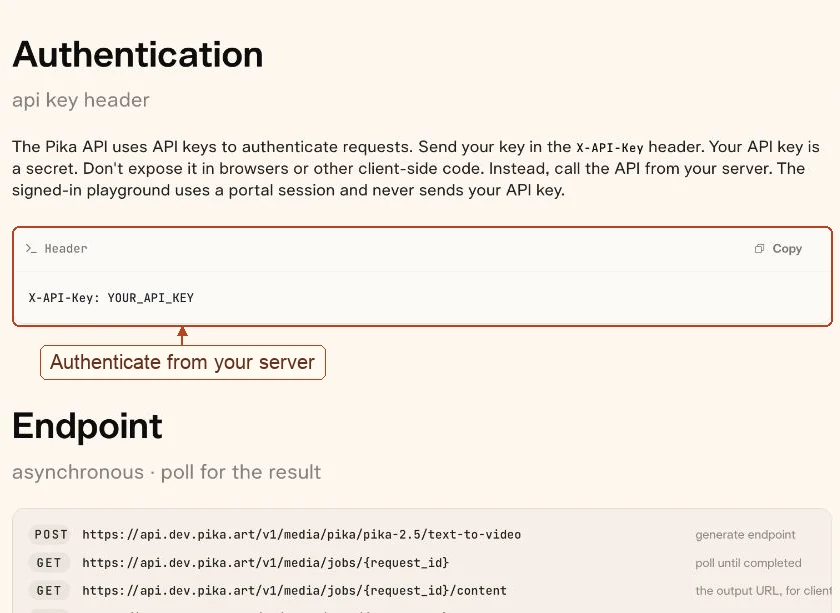
For Pika 2.5 text-to-video, the documented request uses:
POST /v1/media/pika/pika-2.5/text-to-videoThe following JavaScript is a server-side request example based on that specification. Configure PIKA_API_KEY privately before running it. Running the submit request can incur a generation charge.
const apiKey = process.env.PIKA_API_KEY;
if (!apiKey) throw new Error('Configure PIKA_API_KEY on the server.');

const base = 'https://api.dev.pika.art';
const response = await fetch(`${base}/v1/media/pika/pika-2.5/text-to-video`, {
  method: 'POST',
  headers: {
    'X-API-Key': apiKey,
    'Content-Type': 'application/json'
  },
  body: JSON.stringify({
    resolution: '720p',
    duration_s: 5,
    prompt: 'An ivory ceramic mug on a wooden table. Gentle steam rises. The camera stays still. Soft morning light. No text or new objects.'
  })
});

const job = await response.json();
if (!response.ok || job.status === 'failed') {
  throw new Error(job.error?.message || job.message || 'Request failed.');
}
console.log('Save this job ID:', job.id);
Save job.id before continuing. A queued response means Pika accepted a job; it does not mean the video is finished.
Retrieve the video and final charge
Request GET /v1/media/jobs/{request_id} with the same authentication header. Replace the placeholder with the saved ID. Poll with a delay while the status is queued or running; stop when it becomes completed or failed.
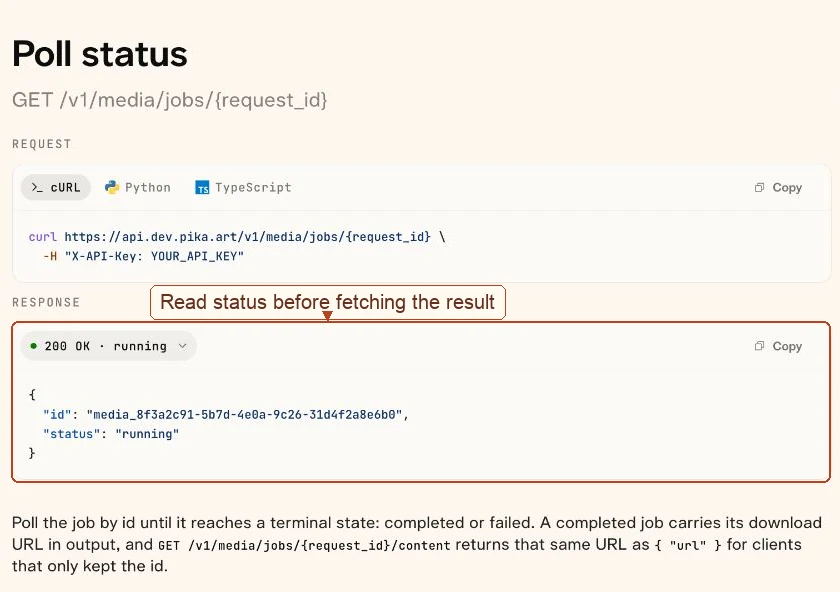
For this video operation, a completed result exposes output.video.url. The documented /content endpoint can also return the output URL when your application only kept the job ID.
For spending records, inspect billing.state:
settled: recordcharge_micro_usdagainst the job ID. Divide by 1,000,000 to convert to USD.pending: the charge is still settling; the Quick Start suggests polling after 1, 2, then 5 seconds.unavailable: the billing lookup failed; it does not mean the request was free. Wait at least 30 seconds before checking again.
Billing can be null in the submission response and webhook payload. Use a settled polling response for the final charge. For example, 200,000 micro-USD equals $0.20.
Step 6: upload an image, video or audio file
Choose an operation that accepts your input type. The API cannot read a file merely because it exists on your laptop.
- Request
POST /v1/media/uploadswith the file’s correctcontent_typeand exactsize_bytes. - Read the returned
upload_urlandurl. - Upload the file bytes with an HTTP PUT to
upload_url, using the matching content type. - Pass
urlinto the selected model’s documented input field.
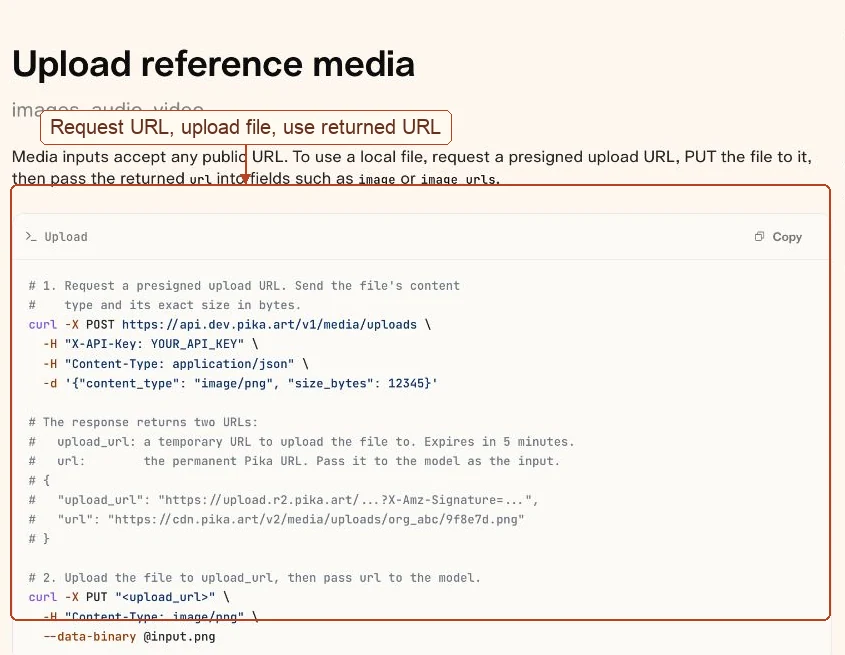
The presigned upload address expires after five minutes. Request a new one if it expires. The model input field may be image, image_urls or something else: use that operation’s schema rather than guessing.
For a product-photo project, I would first check the photo with our image readiness checklist, upload it, then prepare one image-to-video request with limited motion.
Step 7: connect an AI agent
Open For Agents in the top navigation, or Agent in the dashboard sidebar. This page provides setup instructions for Claude Code, Codex, Cursor, Grok Bot, Lovable, Replit and ChatGPT.
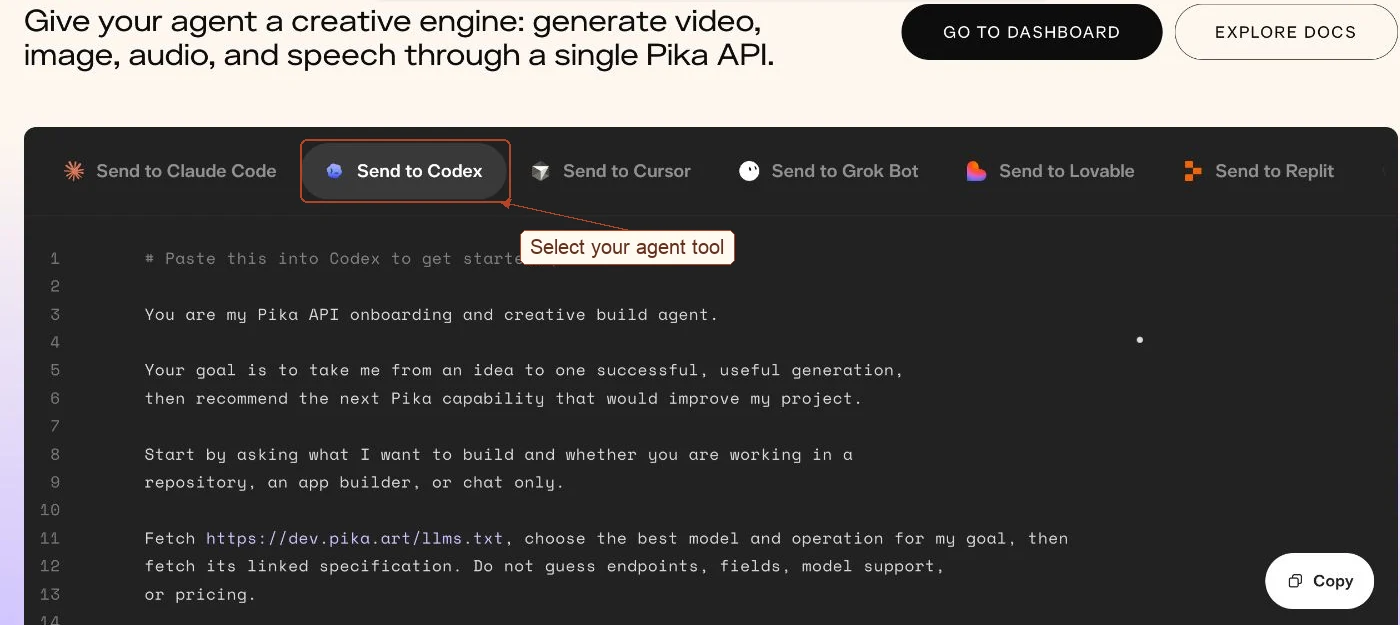
- Select your tool’s tab.
- Use Copy to copy the onboarding instructions.
- Paste them into your agent’s project or conversation.
- Explain the result you want, the available input and your budget.
- Configure the API key through the project’s private server-side secret setup.
- Review the chosen model, operation and cost before the first run.
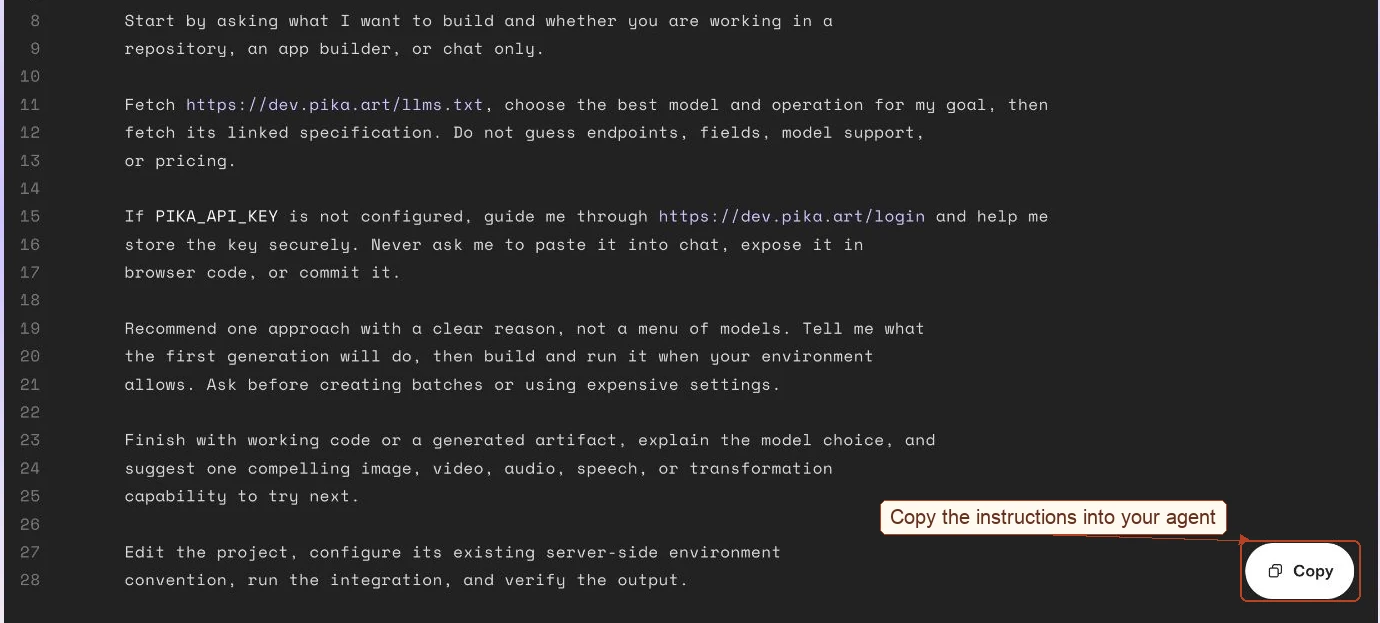
Pika’s instructions direct the agent to read its llms.txt index and the linked model specification. They also distinguish a coding workspace from a chat-only environment. A chat assistant can help prepare code; actual execution requires an environment that can run it and access the configured secret.
Give the agent a useful brief
Build a server-side prototype that animates one approved product photo. Use Pika 2.5 if its current image-to-video specification supports the requested settings. Read the current schema and pricing first. Prepare one five-second request at the lower available resolution. Show me the expected usage cost before submitting. Keep the key in the server environment. Save the job ID, retrieve the result and record its settled charge. Do not submit a batch.
For an Astro site like ours, that integration needs a server endpoint or a separate backend. Keep the public guide static; put the paid generation request behind server-side controls, user authentication and spending limits.
Step 8: receive finished jobs with webhooks
A webhook lets Pika notify your server when a job finishes, so your app does not have to keep asking for status.
Open Webhooks → Add endpoint. Enter a public HTTPS address that your application controls and a description that identifies its purpose.
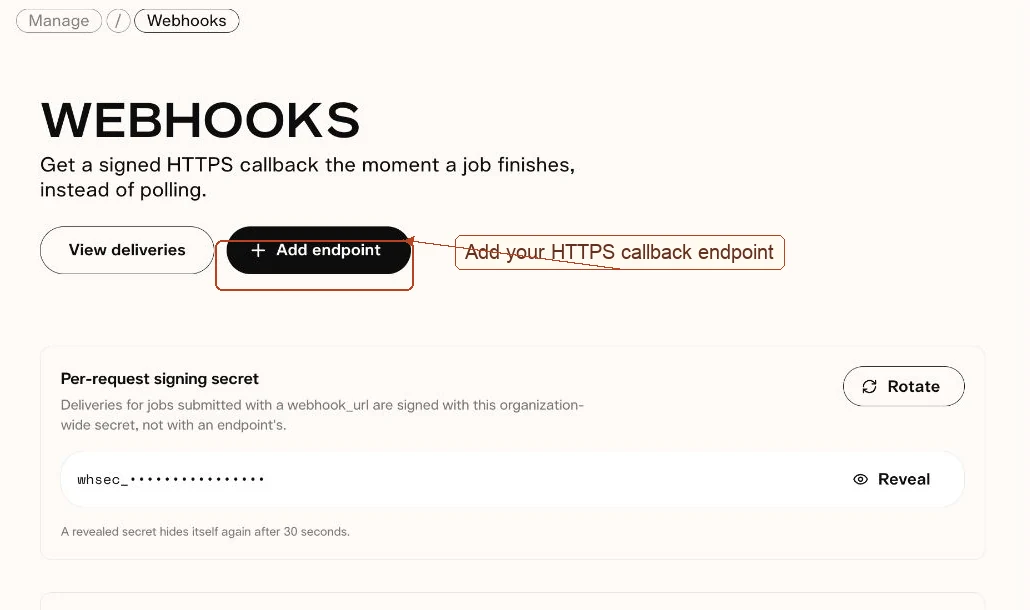
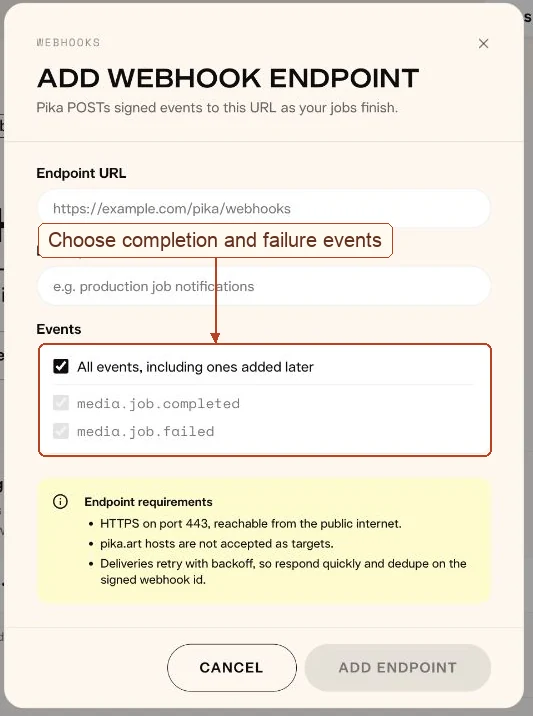
The form lists media.job.completed and media.job.failed. Selecting All events also includes events added later. The endpoint must use HTTPS on port 443 and be reachable from the internet; Pika’s form rejects Pika-hosted addresses as targets.
Verify and process callbacks
Verify the Standard Webhooks signature before trusting a delivery. Deduplicate by the signed webhook ID because retries reuse it. Respond promptly and perform longer processing outside the callback response.
For a job submitted with webhook_url, the dashboard says Pika uses the organization’s per-request signing secret, not a registered endpoint’s secret. Keep that distinction in your receiver configuration.
Reveal temporarily displays the per-request secret; the page says it hides again after 30 seconds. Rotate changes that secret, so coordinate receiver updates before using it. Never include a revealed secret in a tutorial screenshot.
Check deliveries
Open View deliveries, filter by delivery status and use the refresh control. This page includes registered endpoints and per-request callback addresses.
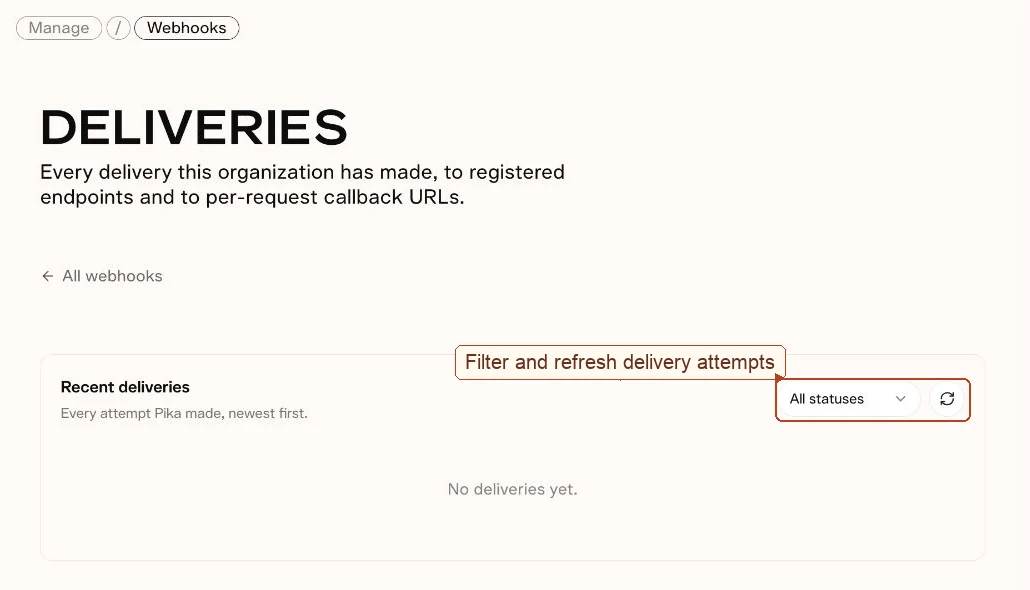
If a callback fails, check public reachability, HTTPS, signature verification and the receiver’s response. Read the job status separately before submitting a replacement generation.
Step 9: track usage and inspect logs
Use Usage for spending trends and Logs for individual requests. They answer different questions.
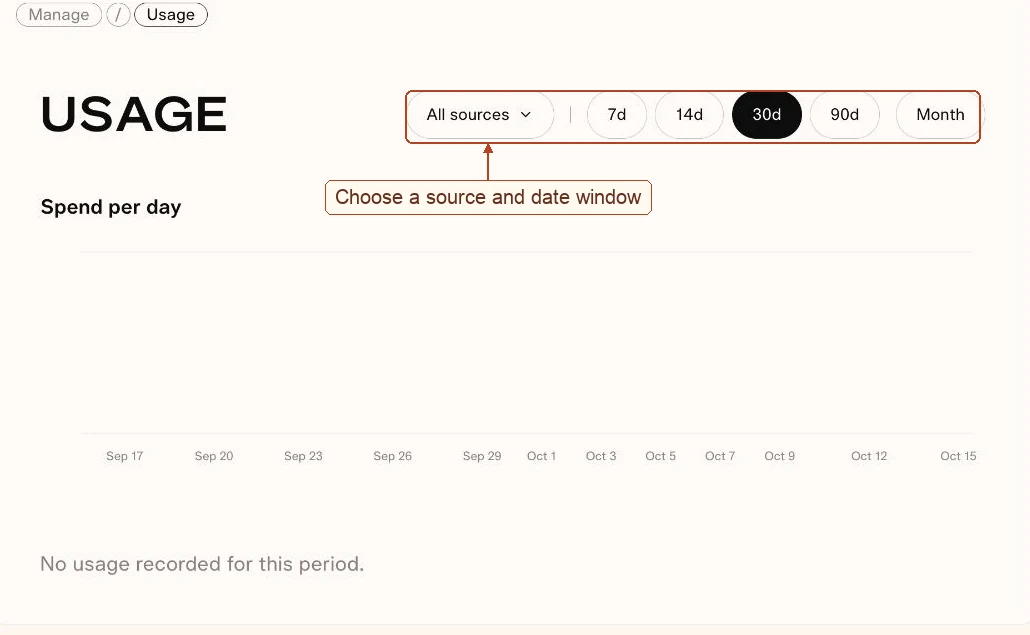
In Usage, choose All sources, Playground, or an available API key. Then choose a time window. An empty period does not mean the account has never generated anything; widen the date range when needed.
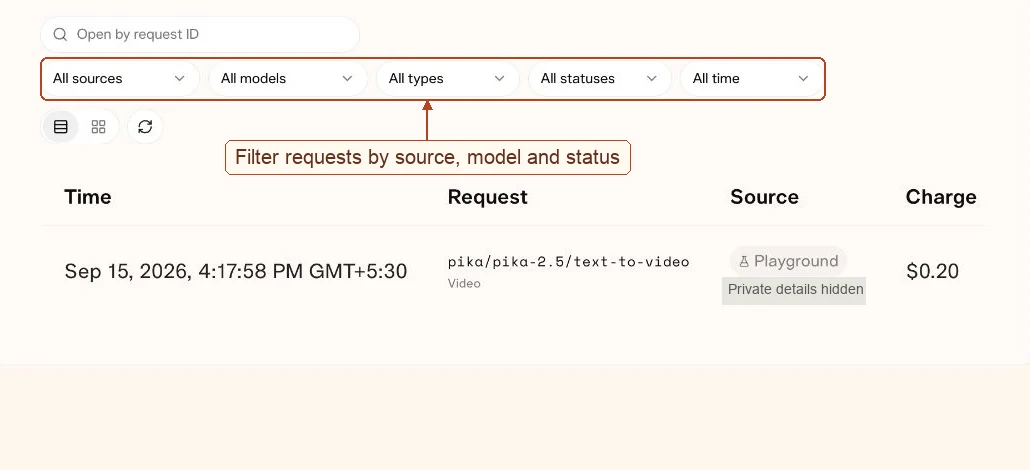
In Logs you can:
- Open a request by its ID.
- Filter by source, model, type, status and time.
- Switch between Table and Gallery.
- Refresh the list.
- Open a request to inspect status, model, charge, source, time, parameters and identifiers.
The detail panel includes Request, Response, Download and Run again where available. Running again starts another generation; use it deliberately after reviewing the earlier request.
Step 10: manage funds and invoices
Open Billing. It separates membership status from the current usage balance, payment method, automatic funding and invoice details.
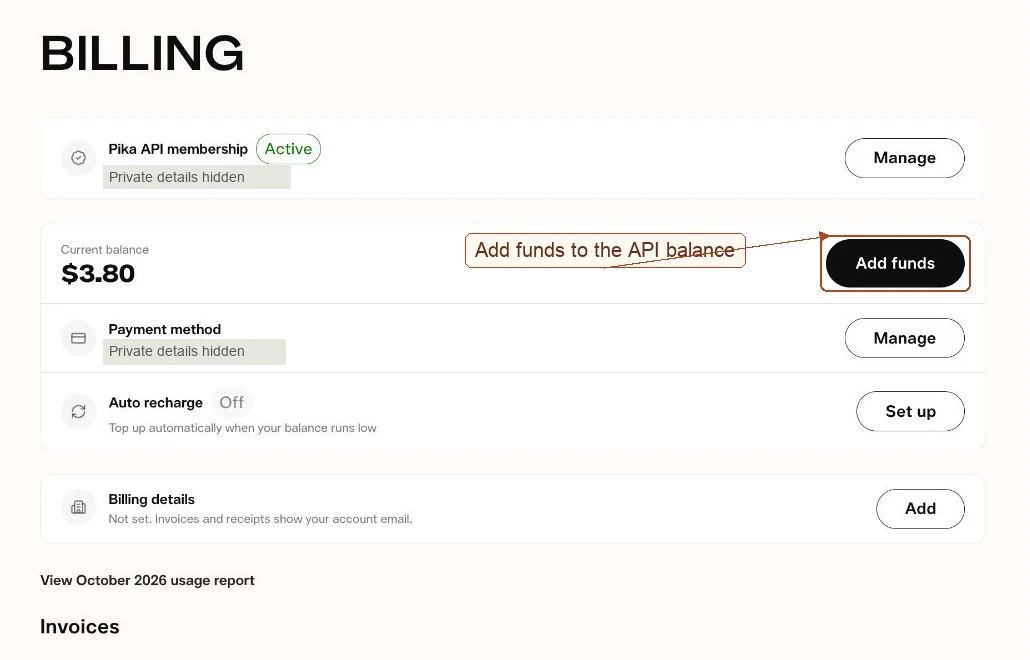
Add funds
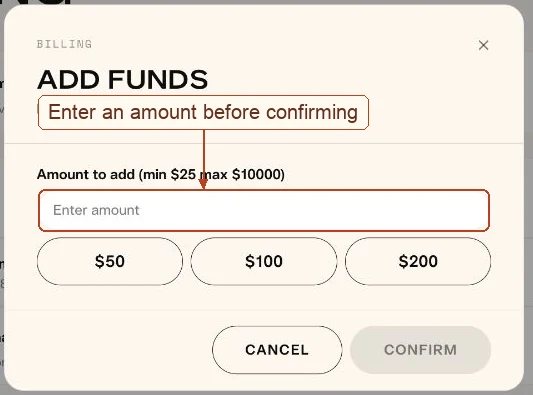
Select Add funds, enter the amount, review it and confirm when ready. The inspected form allows $25 to $10,000, with $50, $100 and $200 preset buttons.
Set up automatic funding
Open Auto recharge → Set up. The form has a switch, a balance threshold and a refill amount. When automatic funding is off, its explanatory text says it only emails at the threshold.
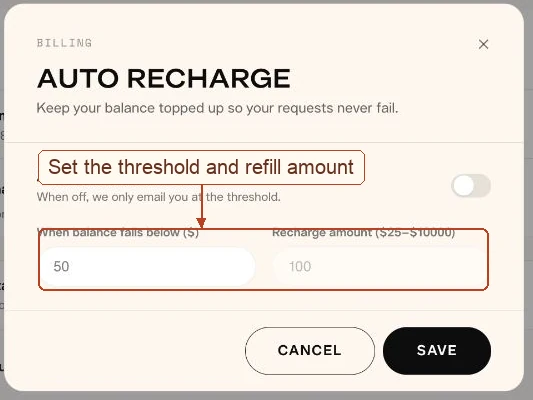
Use automatic funding only when you want repeat charges as the balance falls. Keep per-key spending limits in place as a separate control.
Add invoice details
Open Billing details → Add. Enter the company name and address fields, then save. The form says changes apply to future invoices and receipts; previously issued documents do not change.
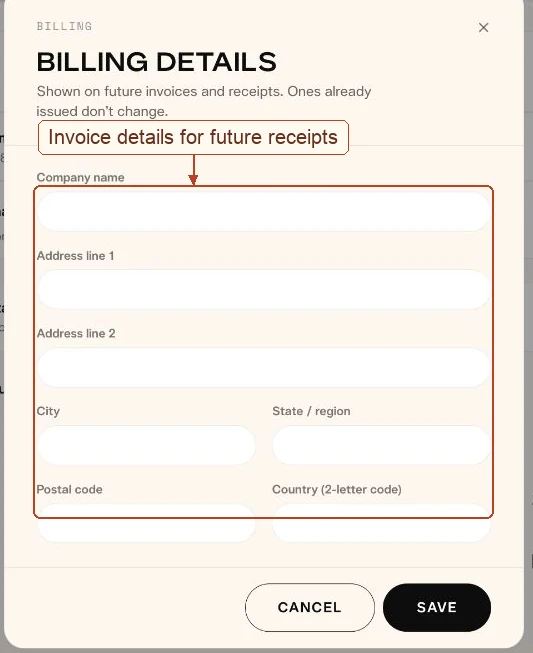
The Billing page also links to the current month’s usage report and lists invoices with Date, Amount, Status and View. Open the relevant invoice when you need its receipt or billing record.
Step 11: review organization settings
Open Settings. Use the organization name control to manage its name, and review the Email alerts preference for general updates and low-balance messages.
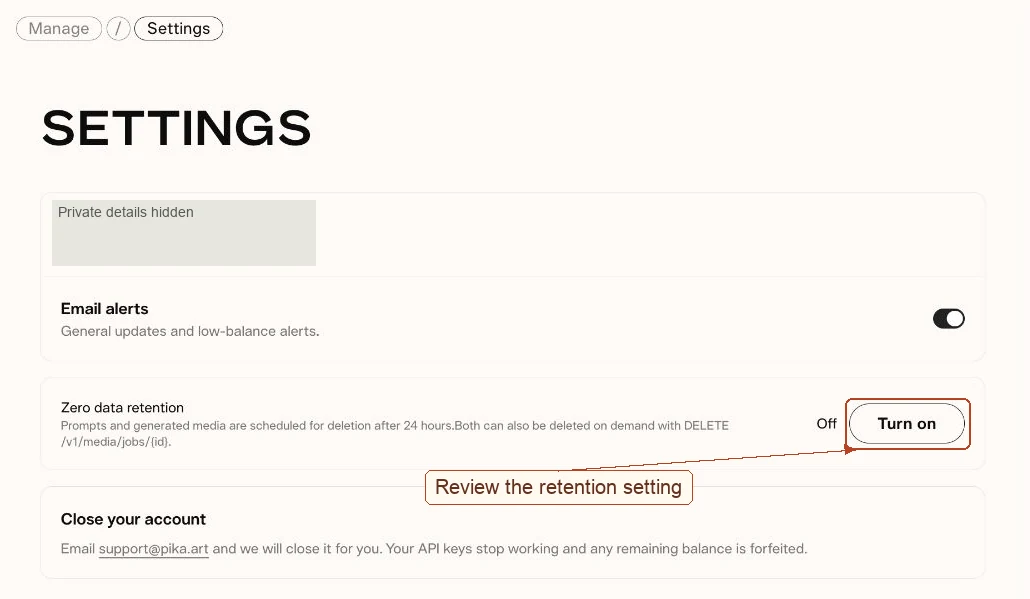
The Zero data retention section describes scheduling prompts and generated media for deletion after 24 hours. Its switch is separate from email alerts. Read that setting before enabling it, and save any result you need in your own storage.
The documentation also provides DELETE /v1/media/jobs/{id} to erase stored job media and the captured prompt and parameters. This is a deletion operation, not a way to cancel a pending charge. After deletion, the content endpoint can return 410.
The Close your account section directs users to support and states that API keys stop working and remaining balance is forfeited. Use that account-closure process only when you intend to close the API account.
Useful projects to build next
| Project | First useful version | Add after that works |
|---|---|---|
| Product-photo animator | One uploaded photo, one short clip, one download | A queue, approval step and spending cap |
| Narrated product preview | A short clip plus a separate spoken line | Audio timing and final video assembly |
| Automatic captions | One existing clip sent to a caption operation | Editable captions and an export review |
| Clip finishing workflow | One supported trim, merge or compose task | Saved presets for repeat work |
| Team generation tool | A private server endpoint and request history | User access controls and per-user budgets |
Check the selected model’s specification at every step. The presence of a model in the catalog does not mean every input type or setting is supported.
Fix common request problems
| What you see | What to check next |
|---|---|
| 401 | The server has a valid key and sends it in X-API-Key. |
| 403 | The key is active, and the organization balance or applicable billing limit covers the request. Read the returned error details. |
| 404 | The endpoint’s vendor, model and operation are correct, and the job belongs to the organization. |
| 409 | The job may still be processing, or an idempotency key was reused with a different body. |
| 422 | Read the named field in the validation message. Check required inputs, accepted values and JSON types. |
| 429 | Slow requests down. Respect Retry-After when present and inspect rate or queue limits. |
| 503 | Wait and retry with backoff; avoid immediately repeating a large batch. |
| A video is ready but the charge is missing | Check billing.state and wait for settlement. A missing billing field is not a zero charge. |
| The output does not match the prompt | Review the actual clip, simplify motion and change one input at a time. |
If a submission returned a job ID, keep it. Check that request before creating another one so a delayed result does not become an unnecessary repeat charge.
Frequently asked questions
Do I need to know how to code?
You can explore models and prepare requests in the playground without writing code. Adding generation to your own application requires a server-side integration, which you can build yourself or with a coding agent.
Does the membership include unlimited generation?
No. API Club lists a monthly membership fee and separate pay-as-you-go model usage. The advertised first-month credit is an introductory allowance, not unlimited generation.
Can I put the API key in my website JavaScript?
No. Keep it on your server or in a private secret manager. Browser code and public build files can expose the key to visitors.
How much is a five-second Pika 2.5 text-to-video request?
The displayed API rates work out to $0.20 at 720p or $0.45 at 1080p for one successful five-second run. Membership is separate. Check the model’s current Pricing tab before submitting.
Can an agent generate directly from the For Agents page?
The page supplies setup instructions to copy into your chosen tool. The agent needs an execution environment and a privately configured key to make API requests; a chat-only tool may provide code and guidance instead.
How do I know the final usage cost?
Poll the job until its billing state is settled, then read charge_micro_usd and divide by 1,000,000. Use the job ID to avoid counting the same charge twice.
Should I use polling or webhooks?
Polling is a simple starting point for a small prototype. Webhooks suit an application that already has a public HTTPS receiver and needs completion notifications. You can still poll a finished job to retrieve its settled billing details.