
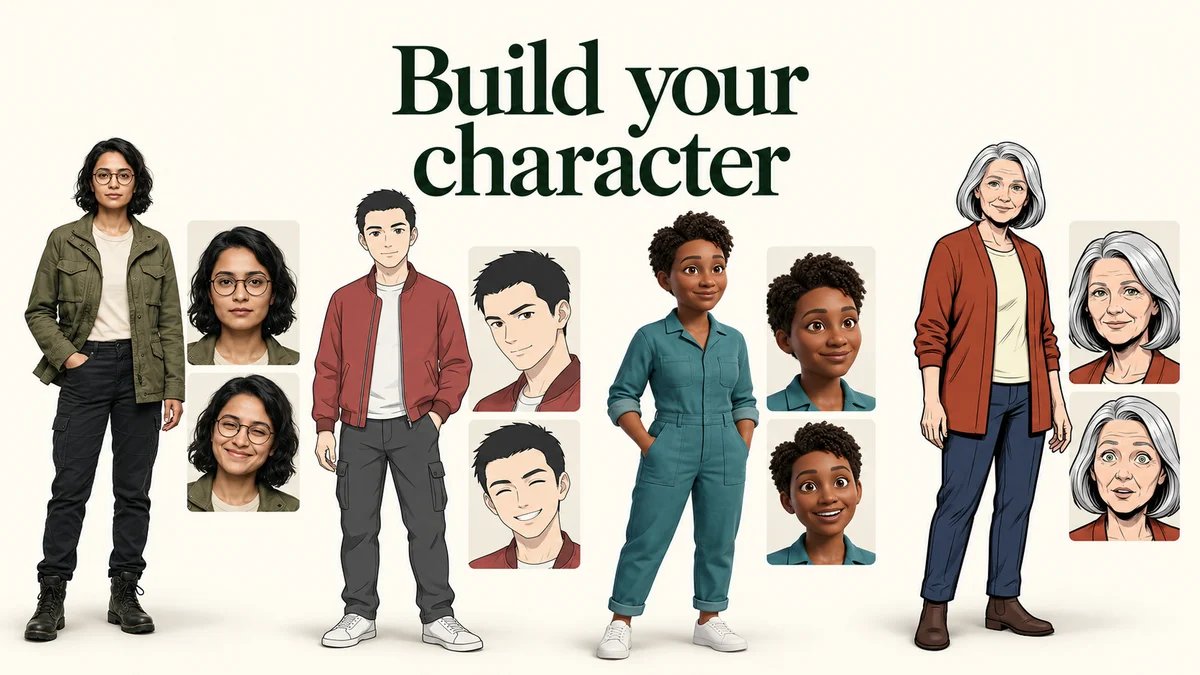
I use Character Studio to give a recurring person a clear starting reference: face, hair, outfit and expressions in one sheet. It makes images. The sheet itself is not a talking character or a video.
We tested all three options on 8 October 2026: one uploaded portrait, four descriptions in four styles, and four trait combinations. Nine completed sheets cost 45 Pika credits. Below you can inspect the inputs, outputs and two early trait submissions that produced no output before choosing your workflow.
See what each workflow made
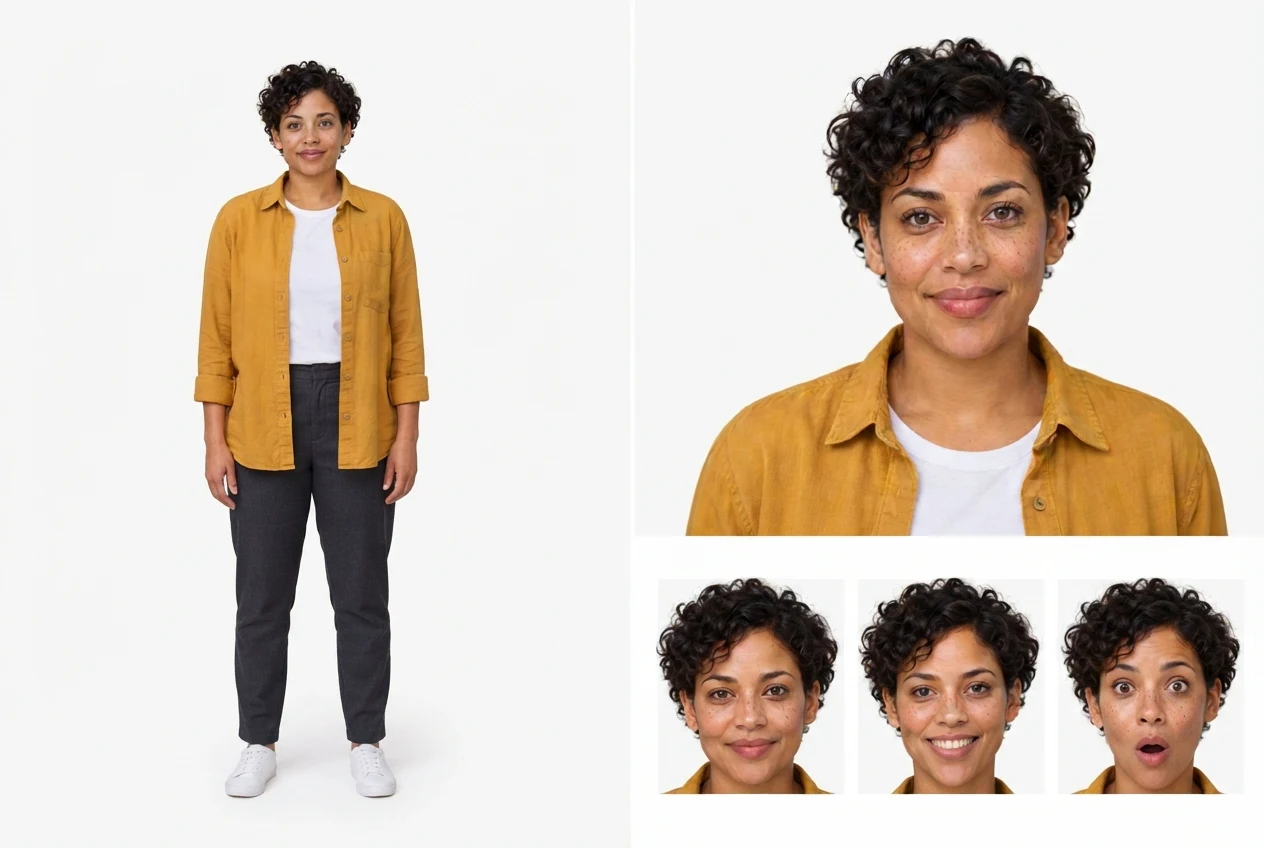
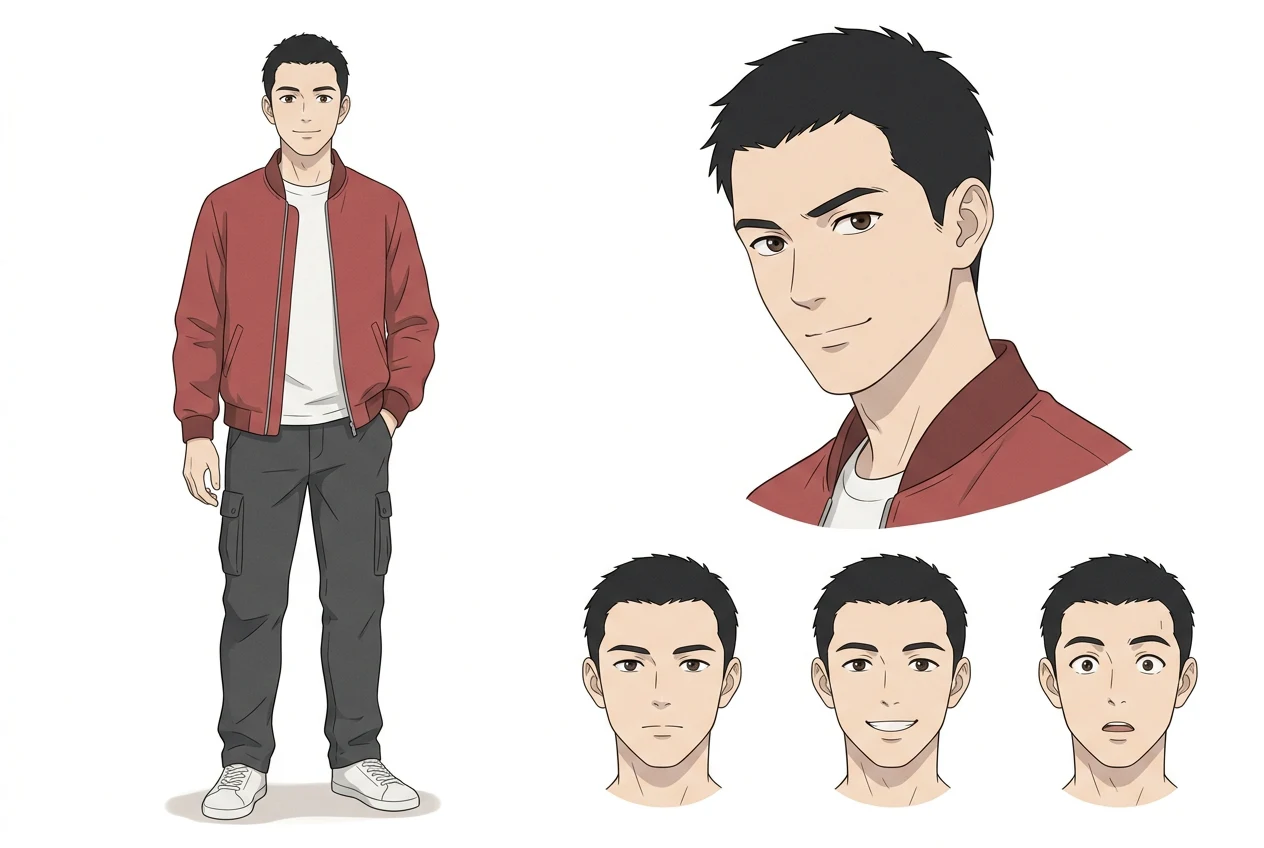
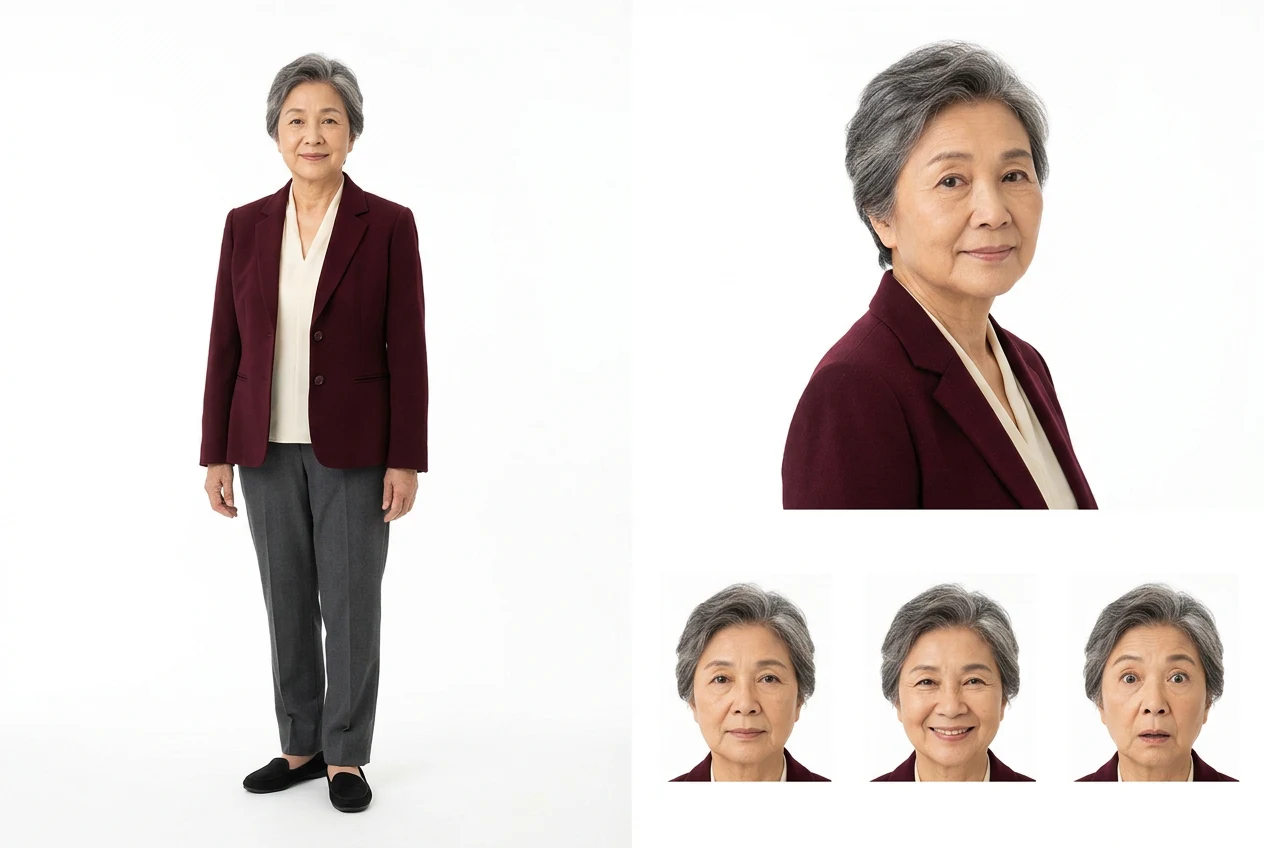
All nine downloads were 1264 × 848, reported as 3:2. Each includes a full-body view, a larger face view and three expressions. The angle, spacing and divider lines vary. Tap an image to inspect it at full size.
Choose a workflow and a useful job
| Start with | Choose | Why I would use it |
|---|---|---|
| An existing character photo | Upload Image | Build views around an approved face |
| A person you can describe | Describe | Specify hair, clothing, age and style in words |
| A rough idea, no long prompt | Build From Traits | Choose a starting person from cards and colors |
Creators: plan a recurring host before building scenes. Story writers: agree on a cast before a storyboard. Teachers: develop an illustrated guide character. Small teams: share one reference rather than separate descriptions.
The value is a common reference to check later work against. We did not test identity retention across multiple scenes or measure engagement. A sheet does not guarantee that later images or videos keep every detail.
Step 1: Open Character Studio
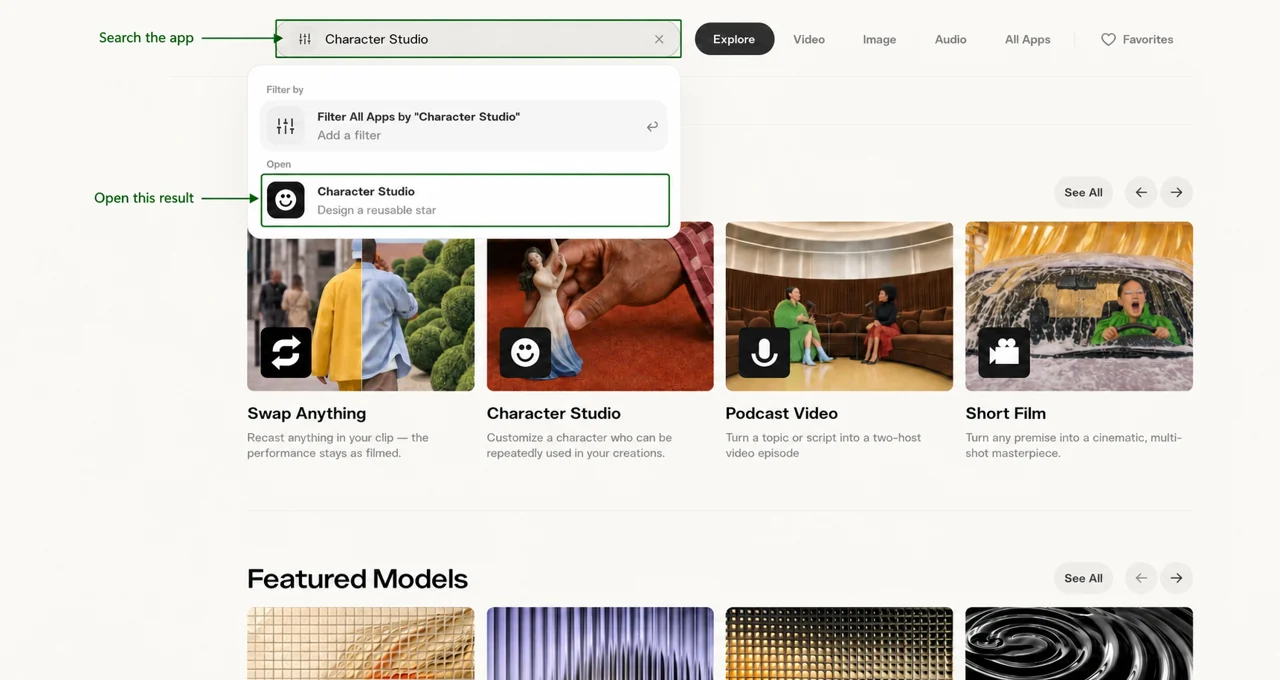
From Create home, scroll below the main prompt area and find Character Studio. Your layout may group it under Create Anything from Scratch; our checked layout placed its card in Featured Apps.
If the card is off to the side, use app search. Type Character Studio, then choose its result under Open. You can also open Character Studio directly.
Step 2: Name it, choose a model and read the quote
Give the character a name you will recognize in Library. We used fictional people rather than celebrity references.
Voice is a separate choice. Its menu includes Rachel, Adam and Sarah. We kept No voice for every sheet. We inspected the menu but did not generate or compare speech; selecting a voice does not make the image speak.
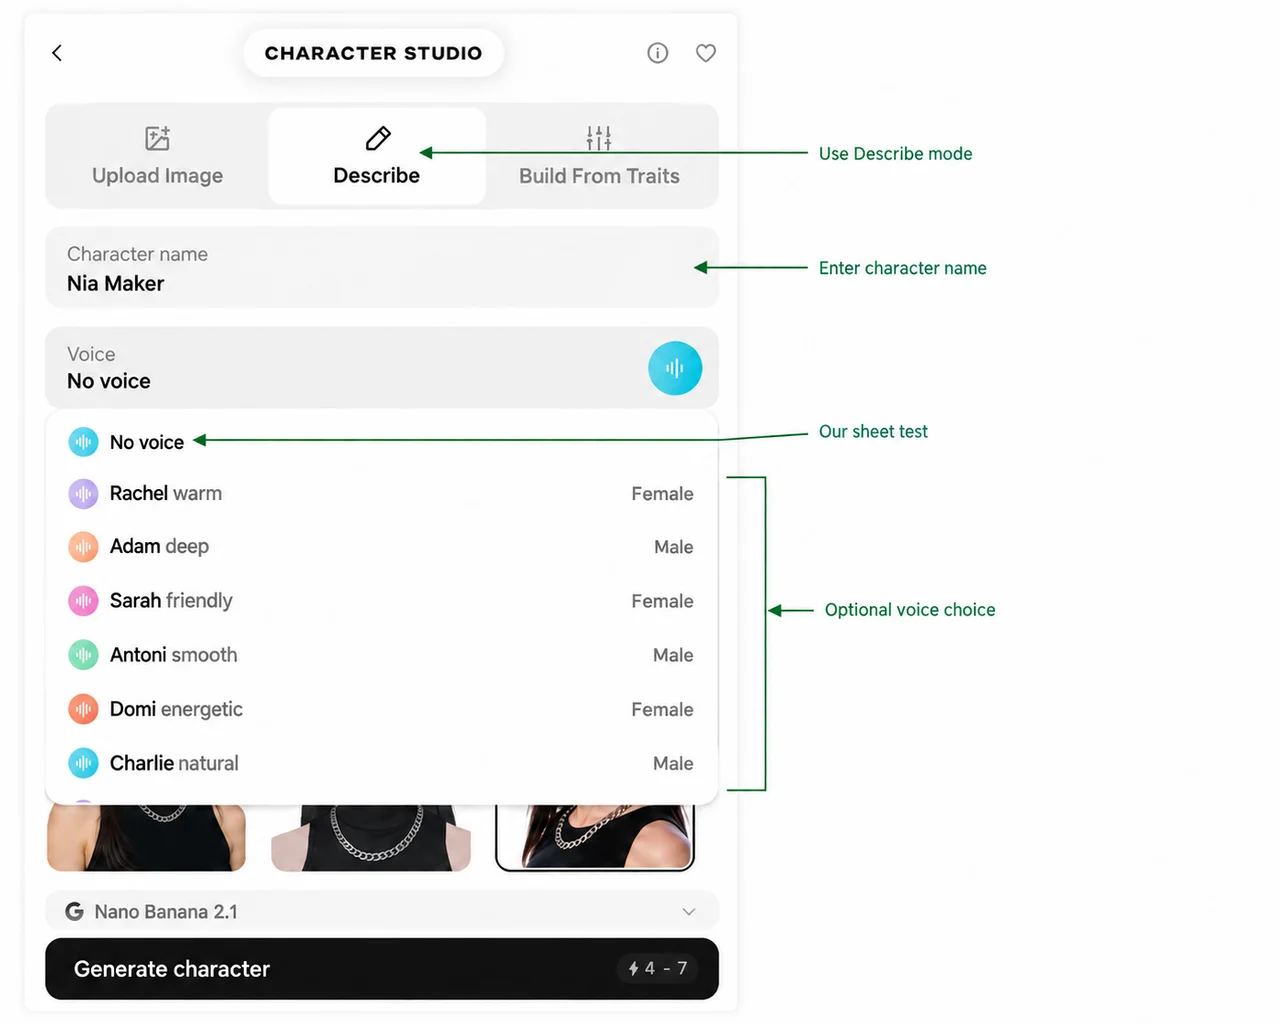
Keep the selected default for your first attempt. Upload Image opened with Nano Banana Edit. Describe and Build From Traits opened with Nano Banana 2.1.
Open Image model to choose another listed model. Our menu also offered GPT Image 2.5, Nano Banana Pro, Ideogram v4 and Seedream choices. We inspected these options but tested only the defaults.
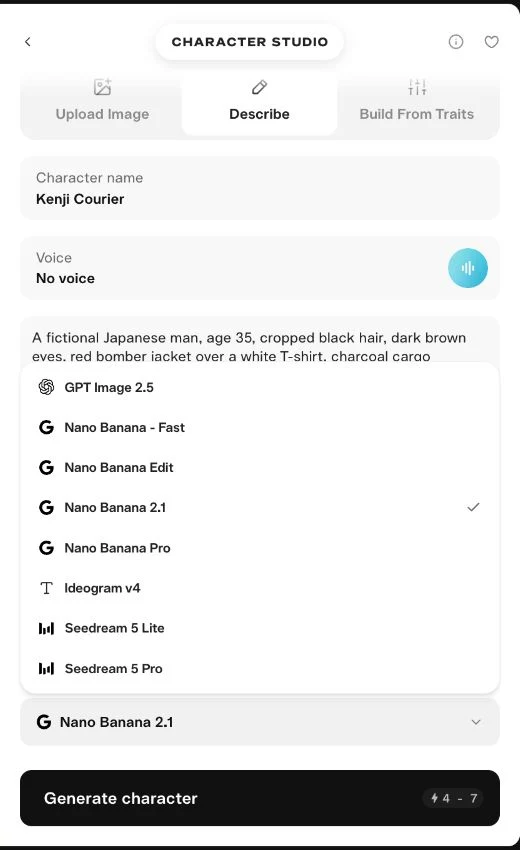
Wait until Generate character shows its estimate. A dash or temporary disabled button means it has not settled. Our quotes were 4–5 credits for Upload Image and 4–7 for the other options.
The completed cost can differ from the upper end of the quote. Check the finished asset details. Our observed amounts are at the end of this guide.
Workflow 1: Upload Image — start with a face
Use it for: an approved fictional host, a character sketch or a photo you have permission to use. I choose this workflow when a particular face matters more than inventing a new person.
1. Prepare a front-facing photo
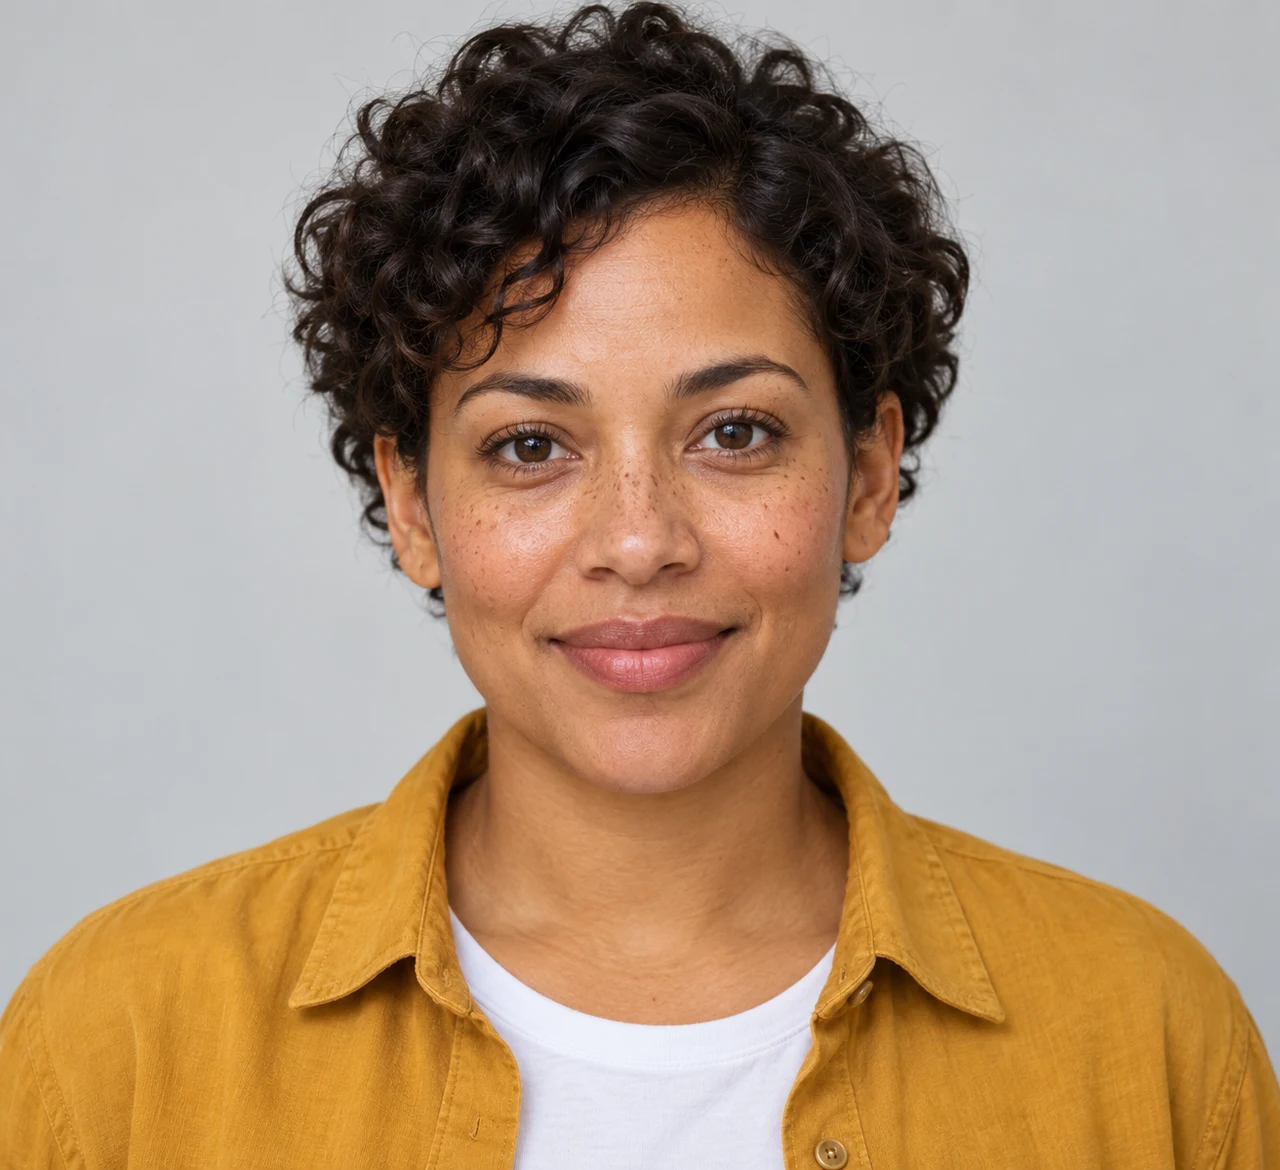
Keep the eyes, face shape and hair clear. Avoid a hand over the face, a severe side angle or several people in one image. We created this fictional portrait outside Pika.
2. Attach the photo
Select Upload Image → Attach a front-facing photo. In the picker, choose Assets → Upload, then your file. It accepts PNG, JPG and WebP. A saved asset can be chosen with Use Selection.
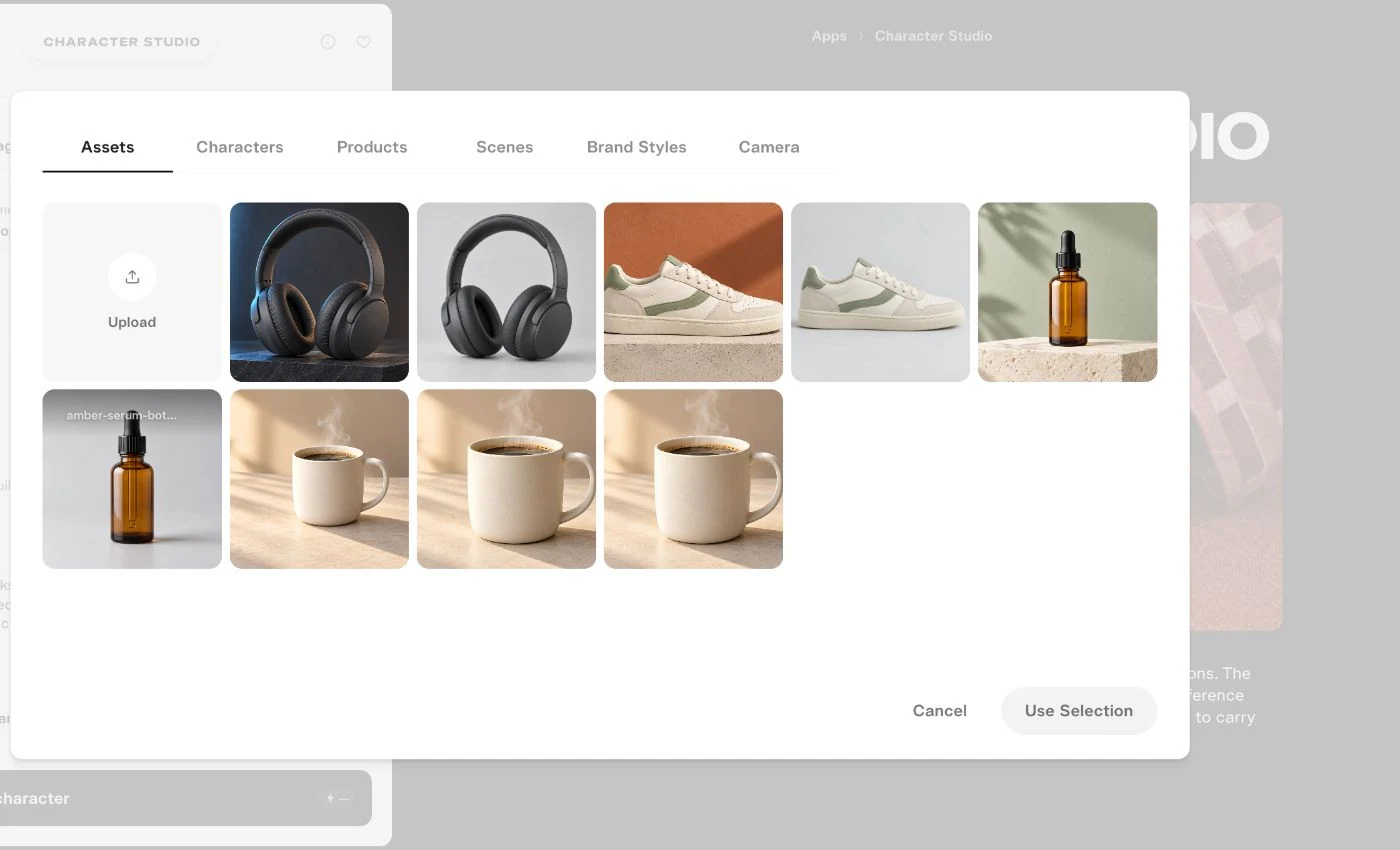
3. Add the missing details
Our portrait stops at the shoulders. I added trousers and shoes in Background story so the model had a full outfit to work with. A story gives context; it is not a request to draw a workshop background.
Name: Maya Workshop. Default model: Nano Banana Edit. Voice: No voice.
A fictional workshop teacher, age 32, who helps beginners repair household objects. Keep short curly hair, freckles and mustard overshirt. Add charcoal trousers and plain white trainers for the full-body view.
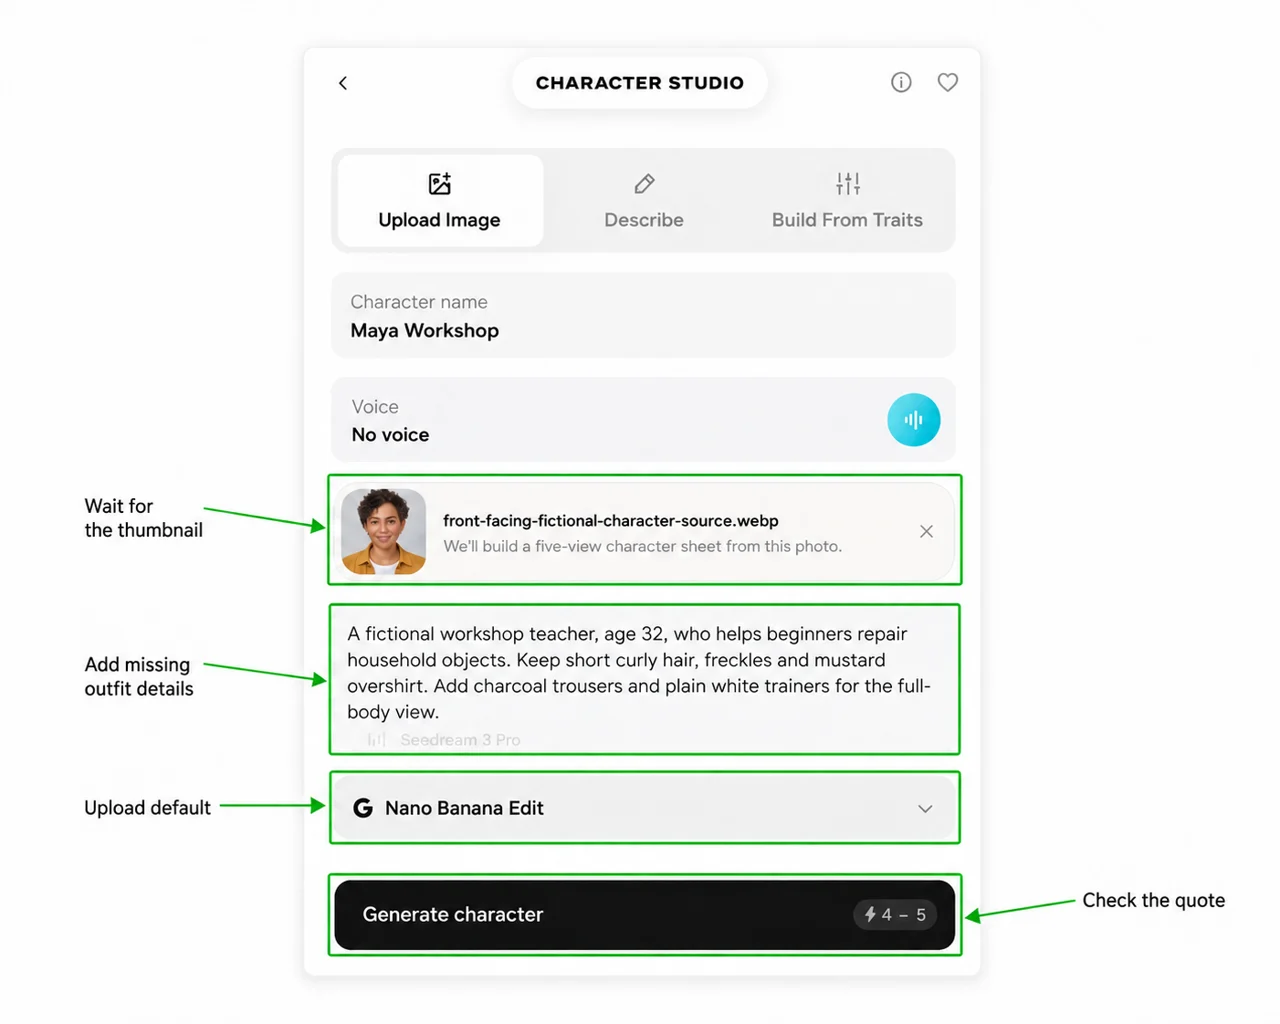
4. Generate and compare with the portrait
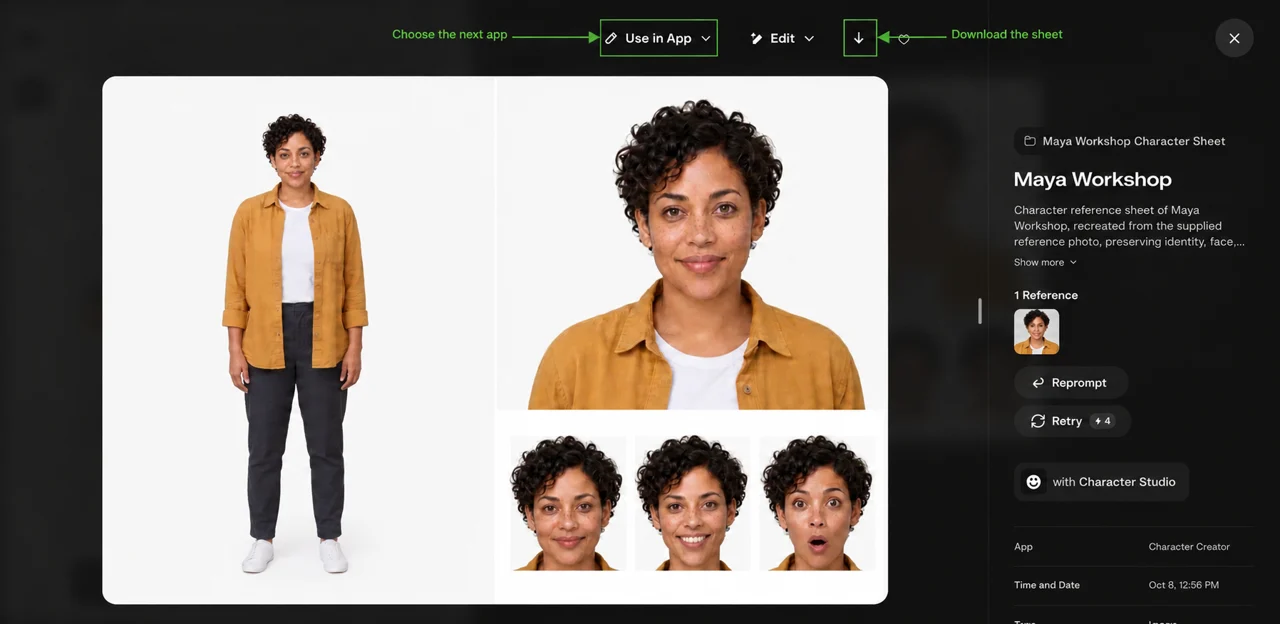
What I kept: curly hair, freckles and mustard clothing are recognizable in this attempt. What I would inspect: the large face view is nearly front-facing rather than a strong three-quarter angle. The sheet cannot prove exact face matching.
Workflow 2: Describe — four people, four styles
Use it for: a new story character, an illustrated host or a specific outfit you can describe. I choose this workflow when wording matters more than preset cards.
- Choose Describe and enter a name.
- Write appearance, age, hair, clothing and one distinctive detail.
- Select Style, keep the default model, and read the quote.
- Generate once, then inspect all five views.
The style strip lists Realistic, Anime, 3D Animation, Comic, Cartoon, GTA, Low Poly 3D and Claymation. Use its arrows to reveal cards off to the side. A thumbnail shows a style direction, not your future character.
We tested four styles below with different gender descriptions, origins, ages and outfits. These are four different people, not a controlled comparison of one person across styles. Keep the same description if you want to isolate a style change.
Mira Field — Realistic · 6 credits
Useful for: a documentary host concept. Input: Mira Field, Realistic, Nano Banana 2.1, No voice.
A fictional Indian woman, age 28, short wavy dark hair, warm brown eyes, round glasses, olive field jacket, cream T-shirt, dark trousers and practical boots. Friendly documentary host. Full outfit visible, plain white background, no text.
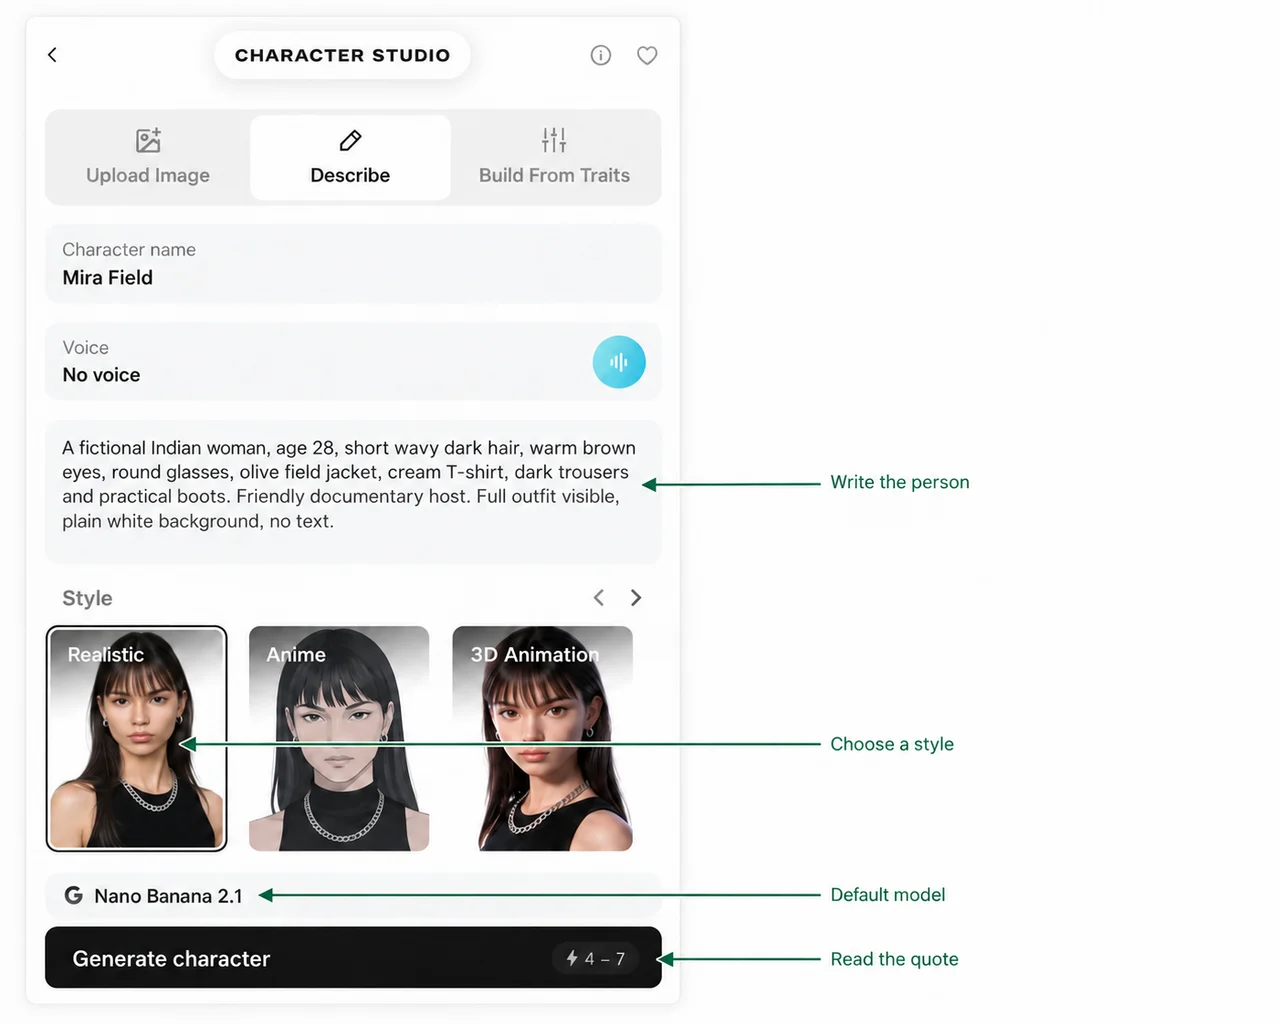
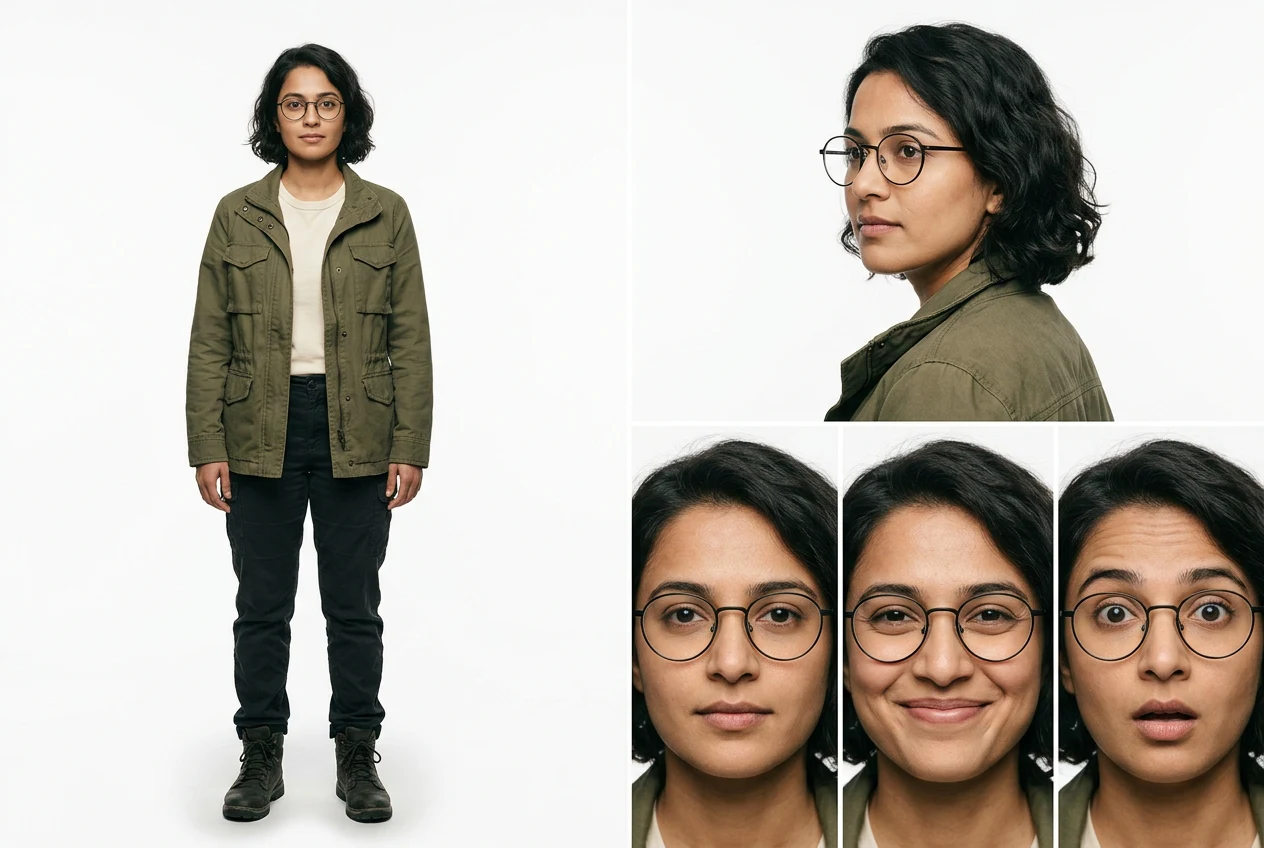
Our review: Glasses, wavy hair, olive jacket and boots appear across the sheet. I would check glasses shape and fingers at full size.
Kenji Courier — Anime · 5 credits
Useful for: an illustrated courier or story lead. Input: Kenji Courier, Anime, Nano Banana 2.1, No voice.
A fictional Japanese man, age 35, cropped black hair, dark brown eyes, red bomber jacket over a white T-shirt, charcoal cargo trousers and white trainers. Cheerful bicycle courier, no bicycle or props. Full outfit visible, plain white background, no text.
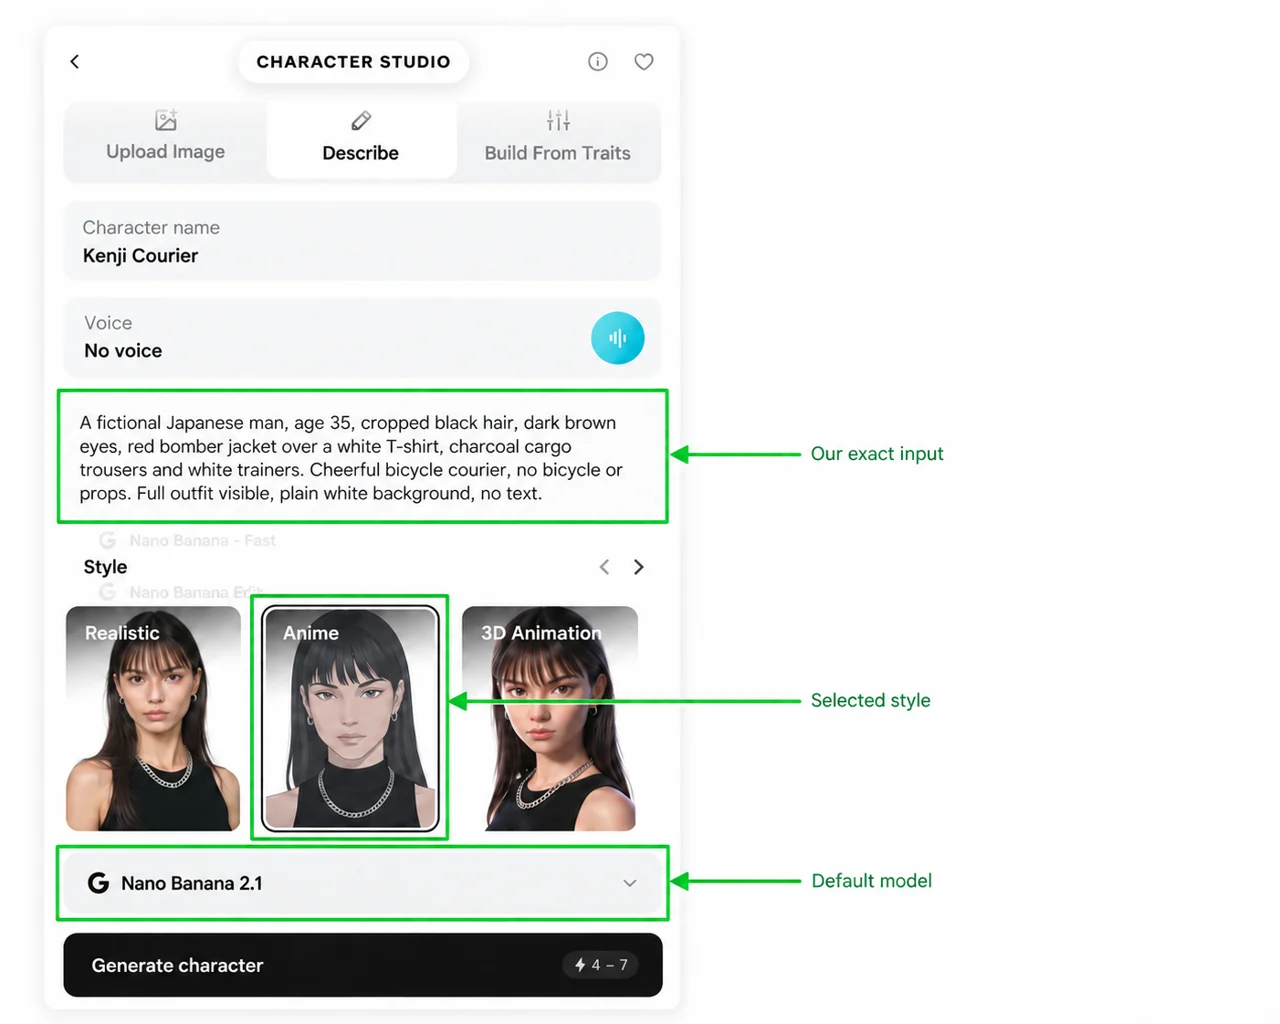
Our review: The red jacket and cargo trousers appear in the anime sheet. The full-body pose includes a hand in a pocket; our prompt did not specify neutral arms.
Nia Maker — 3D Animation · 5 credits
Useful for: a workshop explainer character. Input: Nia Maker, 3D Animation, Nano Banana 2.1, No voice.
A fictional Black non-binary adult, age 42, short coiled dark hair, brown eyes, teal utility jumpsuit and plain white trainers. Curious workshop host with a calm smile. No tools or props. Full outfit visible, plain white background, no text.
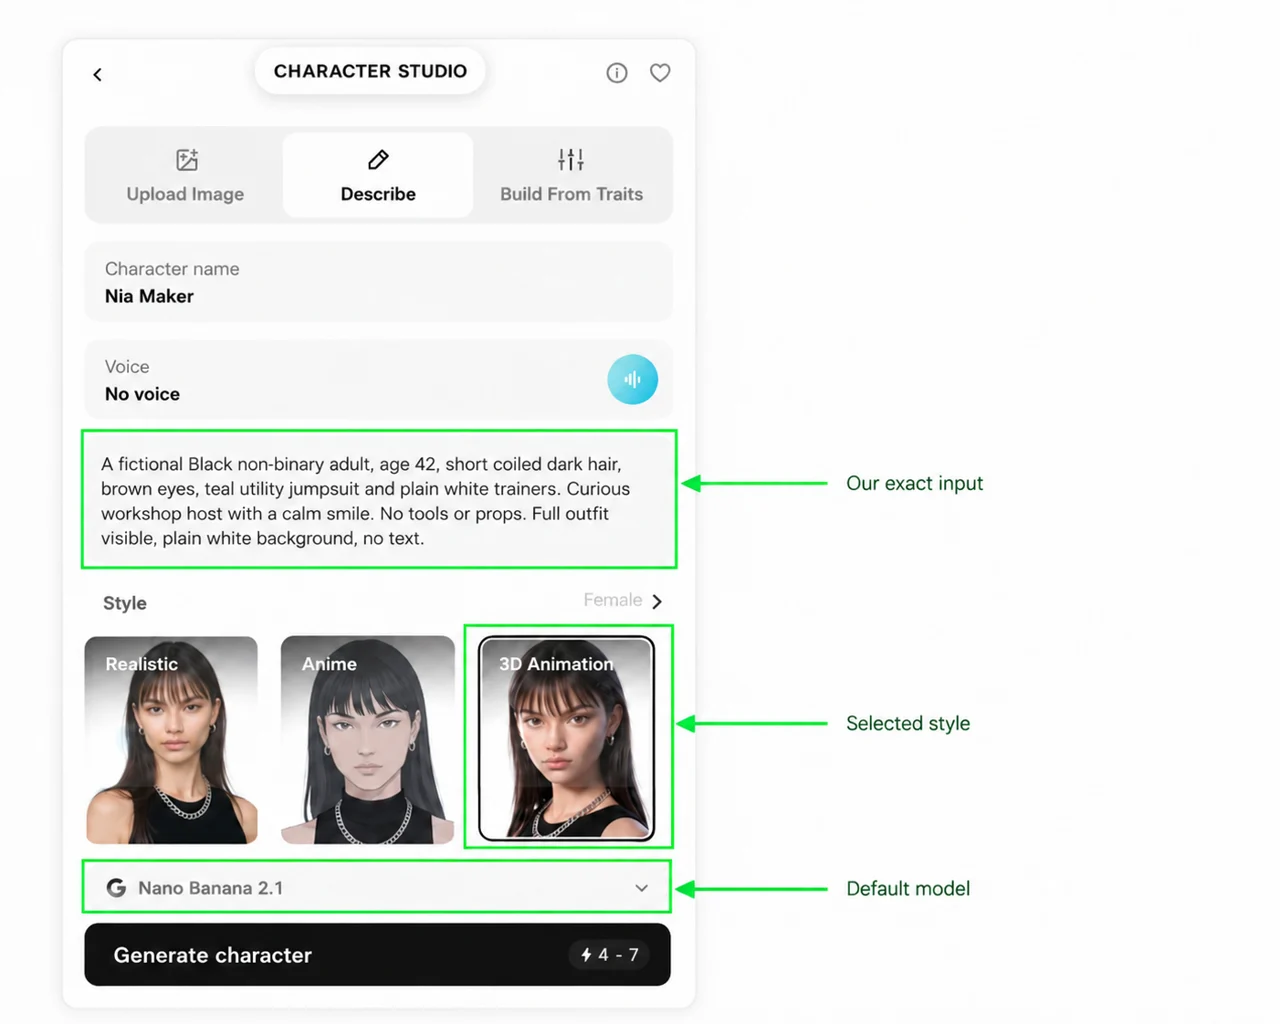
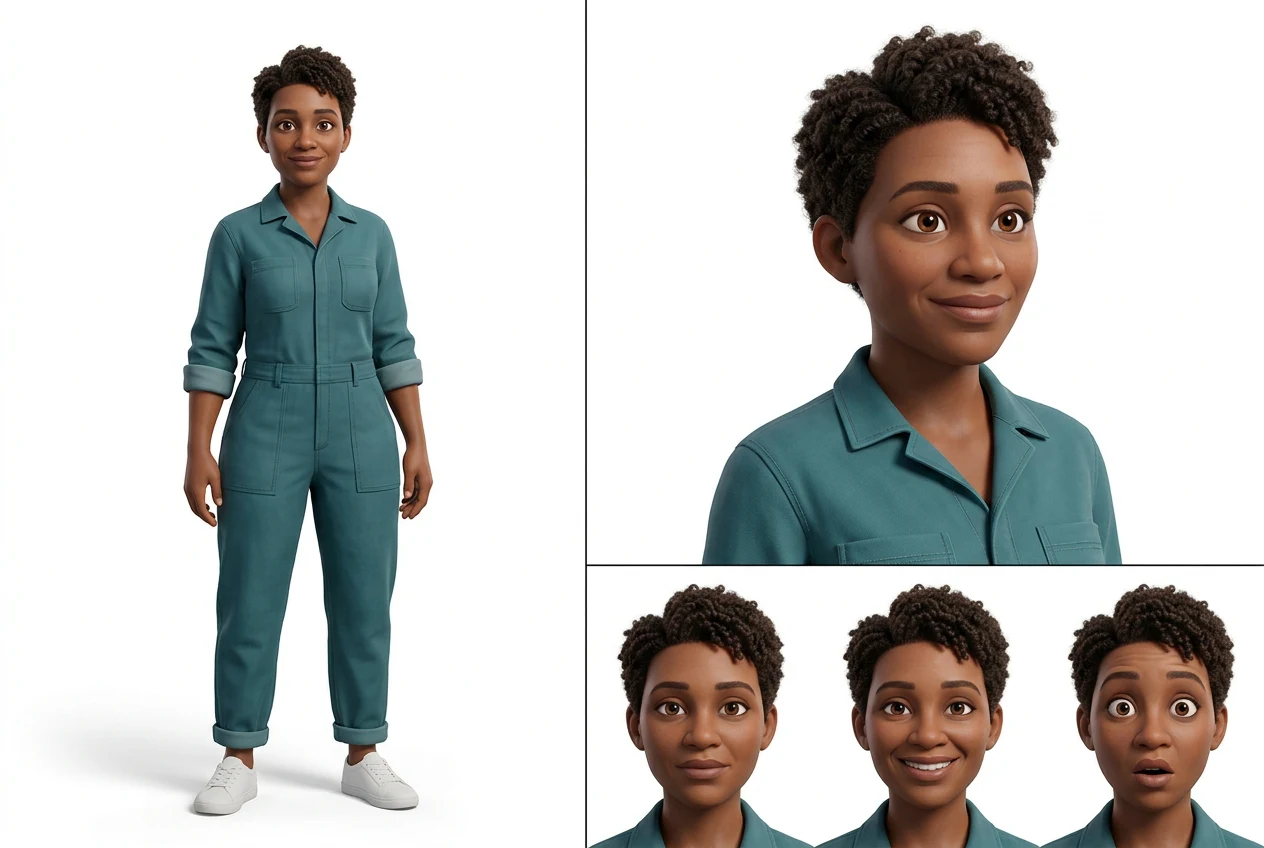
Our review: The teal jumpsuit and coiled hair appear in a 3D rendering. Thin black divider lines were added even though the app prompt requested no lines.
Elena Gardener — Comic · 5 credits
Useful for: a community story or illustrated lesson. Input: Elena Gardener, Comic, Nano Banana 2.1, No voice.
A fictional European woman, age 67, silver hair in a short bob, green eyes, rust cardigan, cream shirt, navy trousers and brown ankle boots. Kind community gardener. No plants or props. Full outfit visible, plain white background, no text.
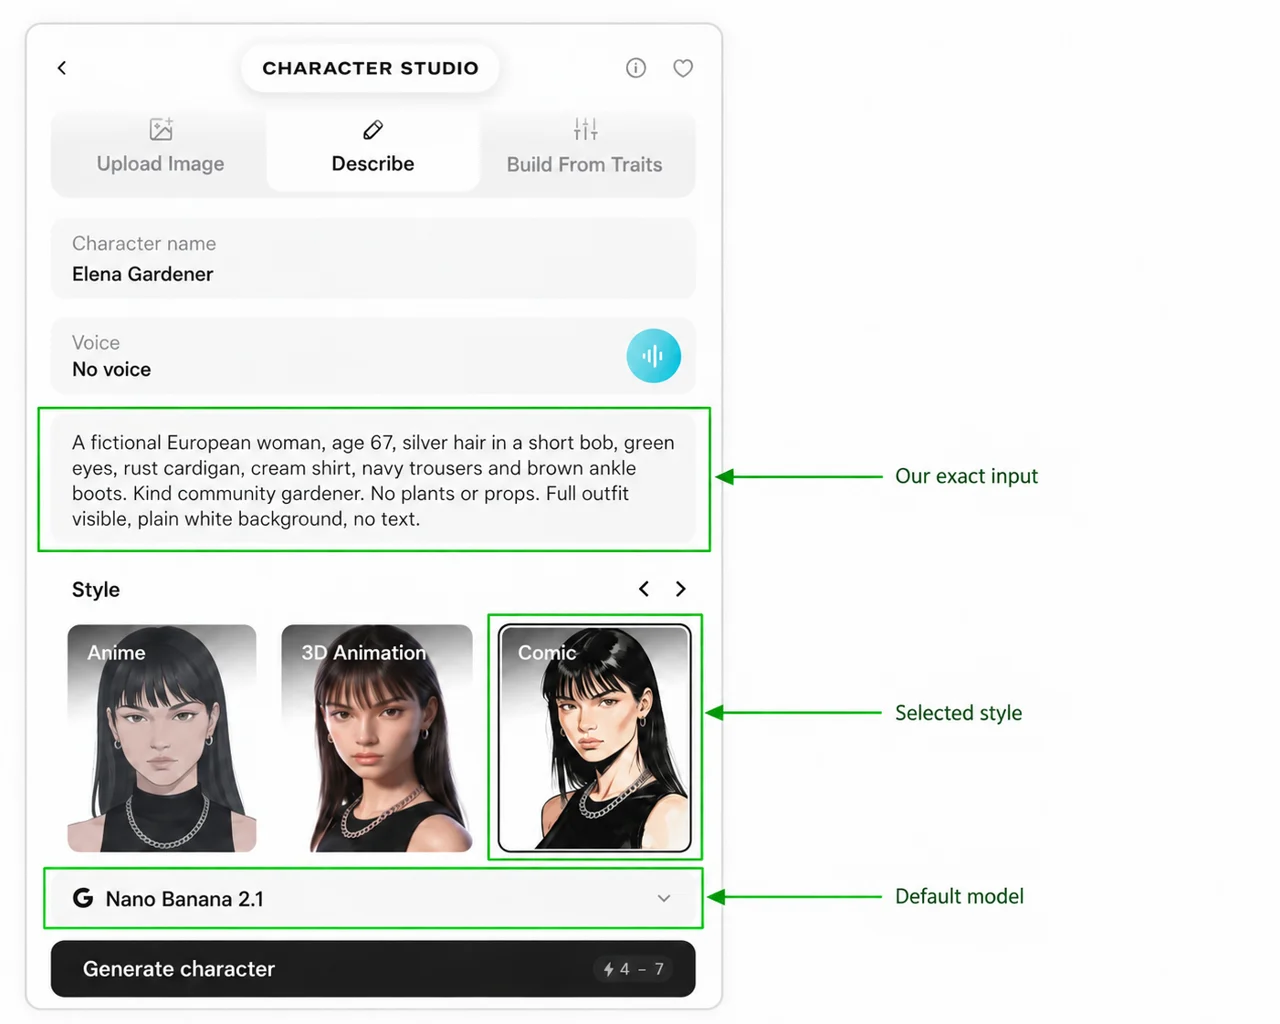
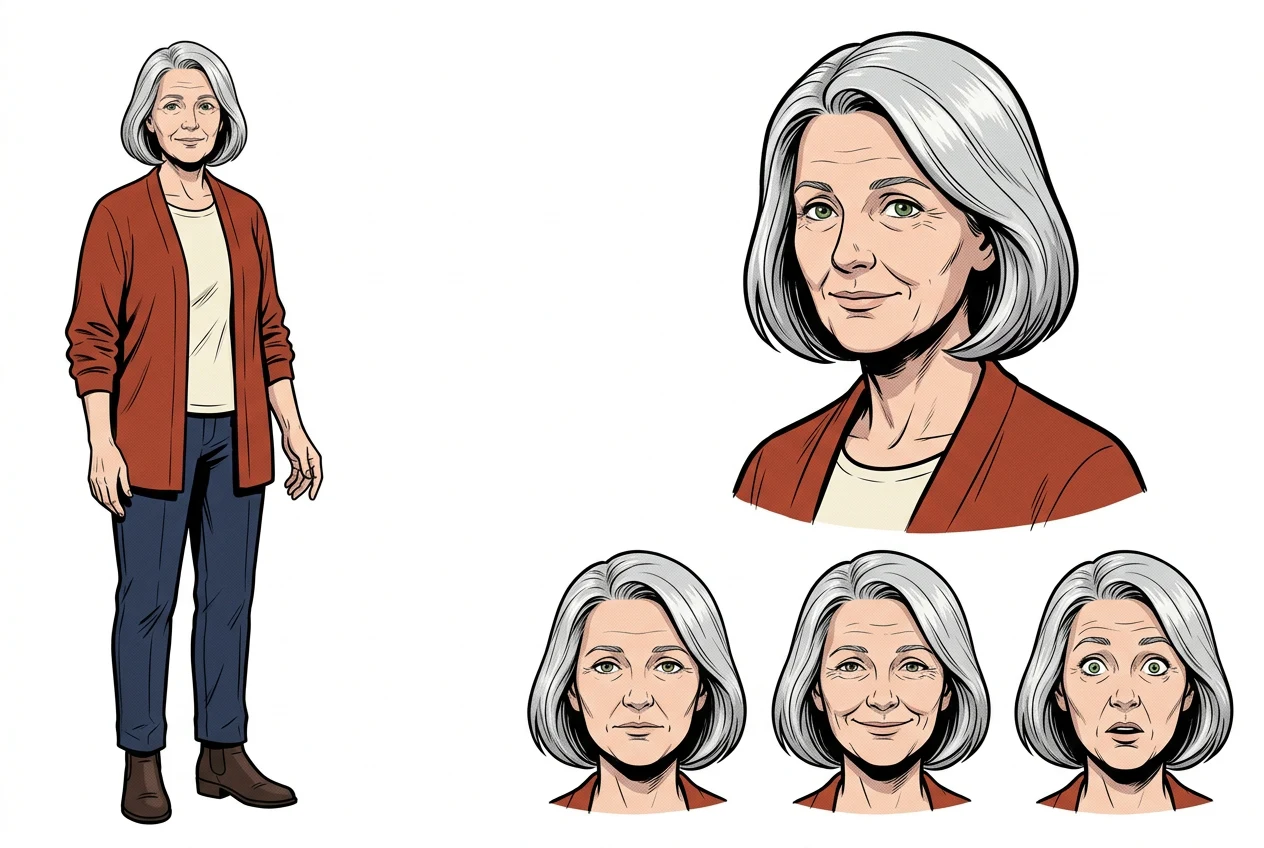
Our review: Silver hair and rust clothing appear with drawn outlines. The large face view is only slightly turned; inspect it before treating it as a side reference.
Workflow 3: Build From Traits — choose the person in parts
Use it for: a first draft when you know the age, clothing direction or character type but do not want to write a full description. I would refine the result before using it in a series.
1. Choose Character Type and Gender
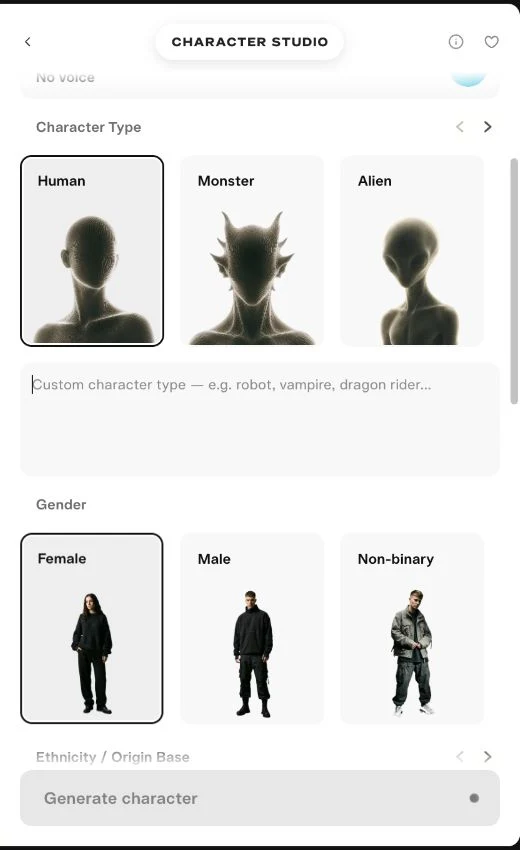
Character Type includes Human, Monster, Alien, Elf, Crocodile, Bug, Mantis, Dog and Cat. Custom character type lets you state another type. We tested Human; creature cards were inspected but not generated.
Gender offers Female, Male and Non-binary. It is a prompt choice, not something we can verify from a face. Our examples use all three options.
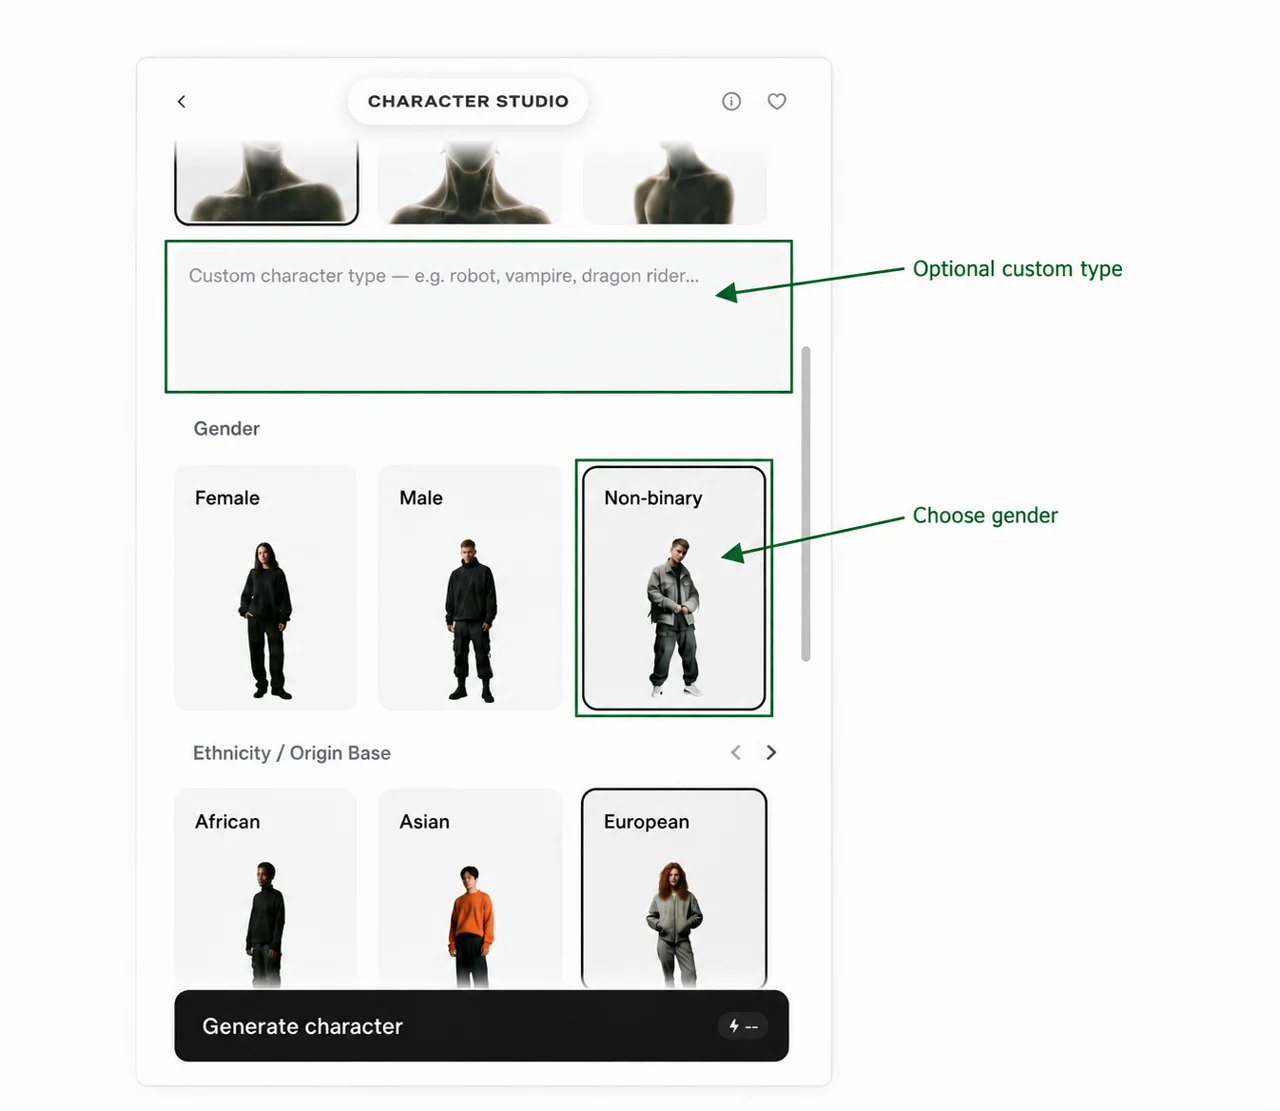
2. Choose Origin, Skin and Eyes
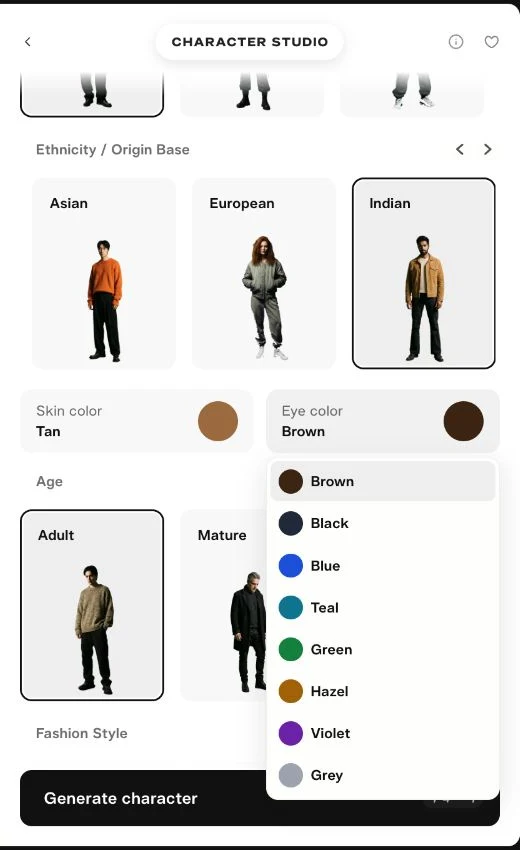
Ethnicity / Origin Base includes African, Asian, European, Indian, Middle Eastern and Mixed. Treat it as a broad prompt cue for a fictional character. It does not establish anyone’s ethnicity or nationality.
Skin color offers Ebony, Deep, Umber, Tan, Beige, Fair, Porcelain and Ivory. Eye color offers Brown, Black, Blue, Teal, Green, Hazel, Violet and Grey. I choose colors deliberately rather than assuming the origin card sets them.
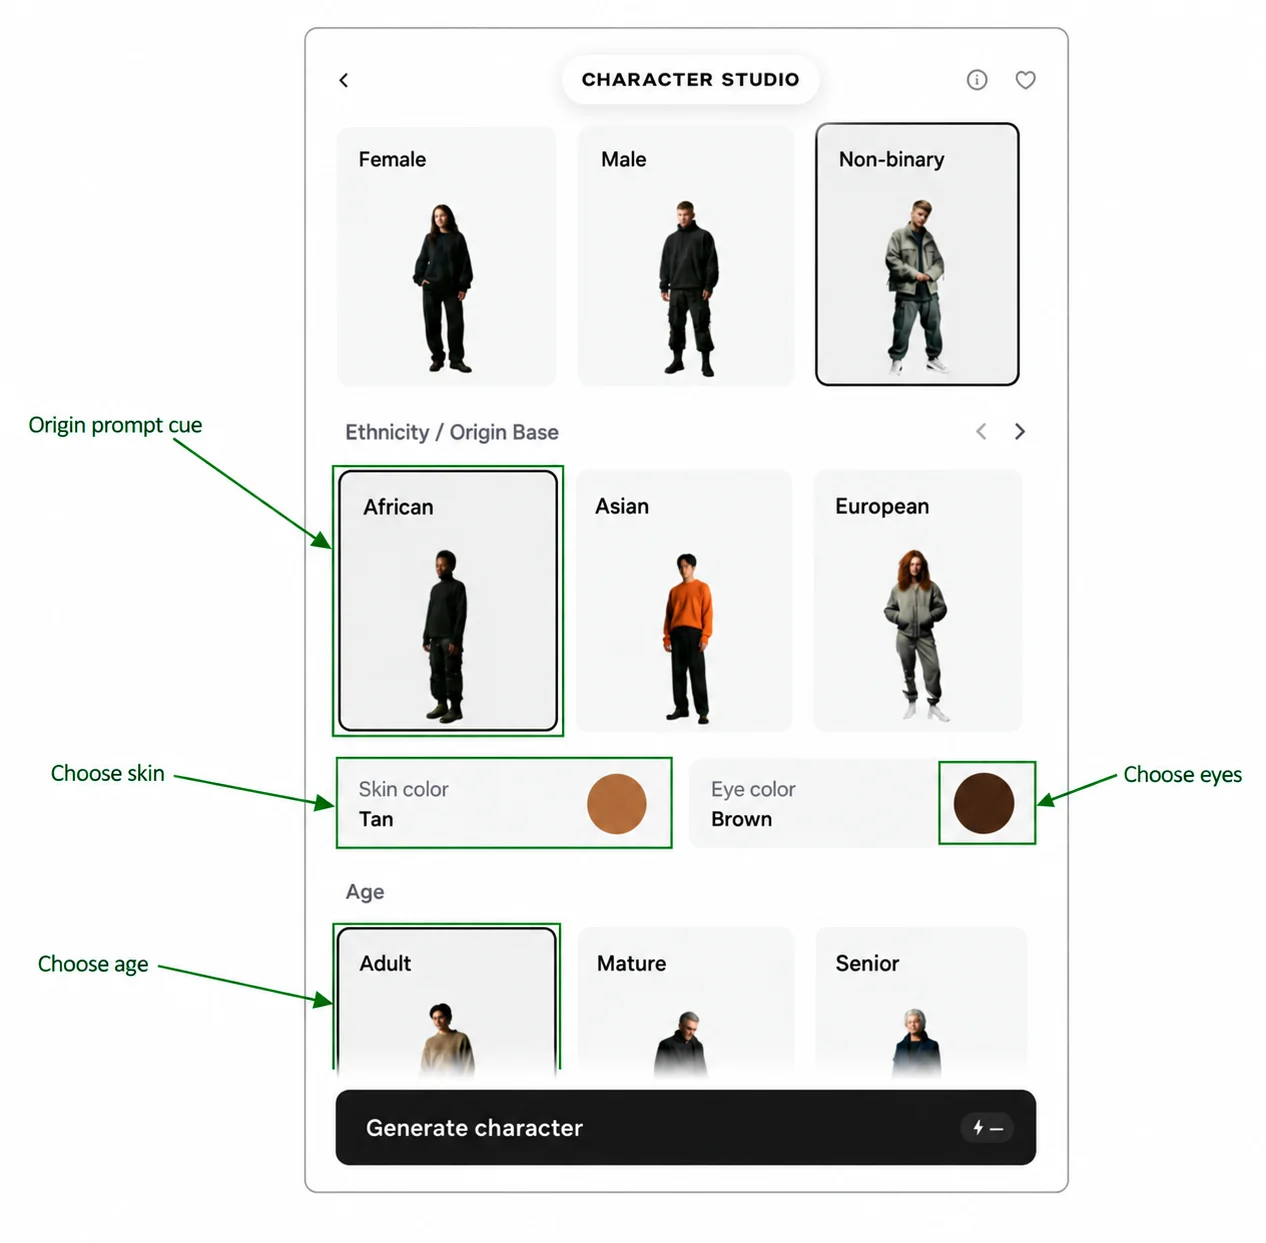
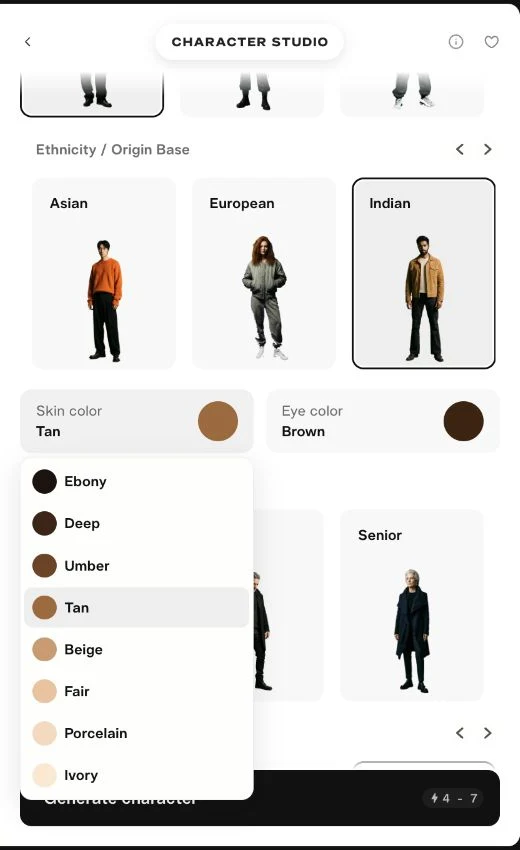
3. Choose Age and Fashion
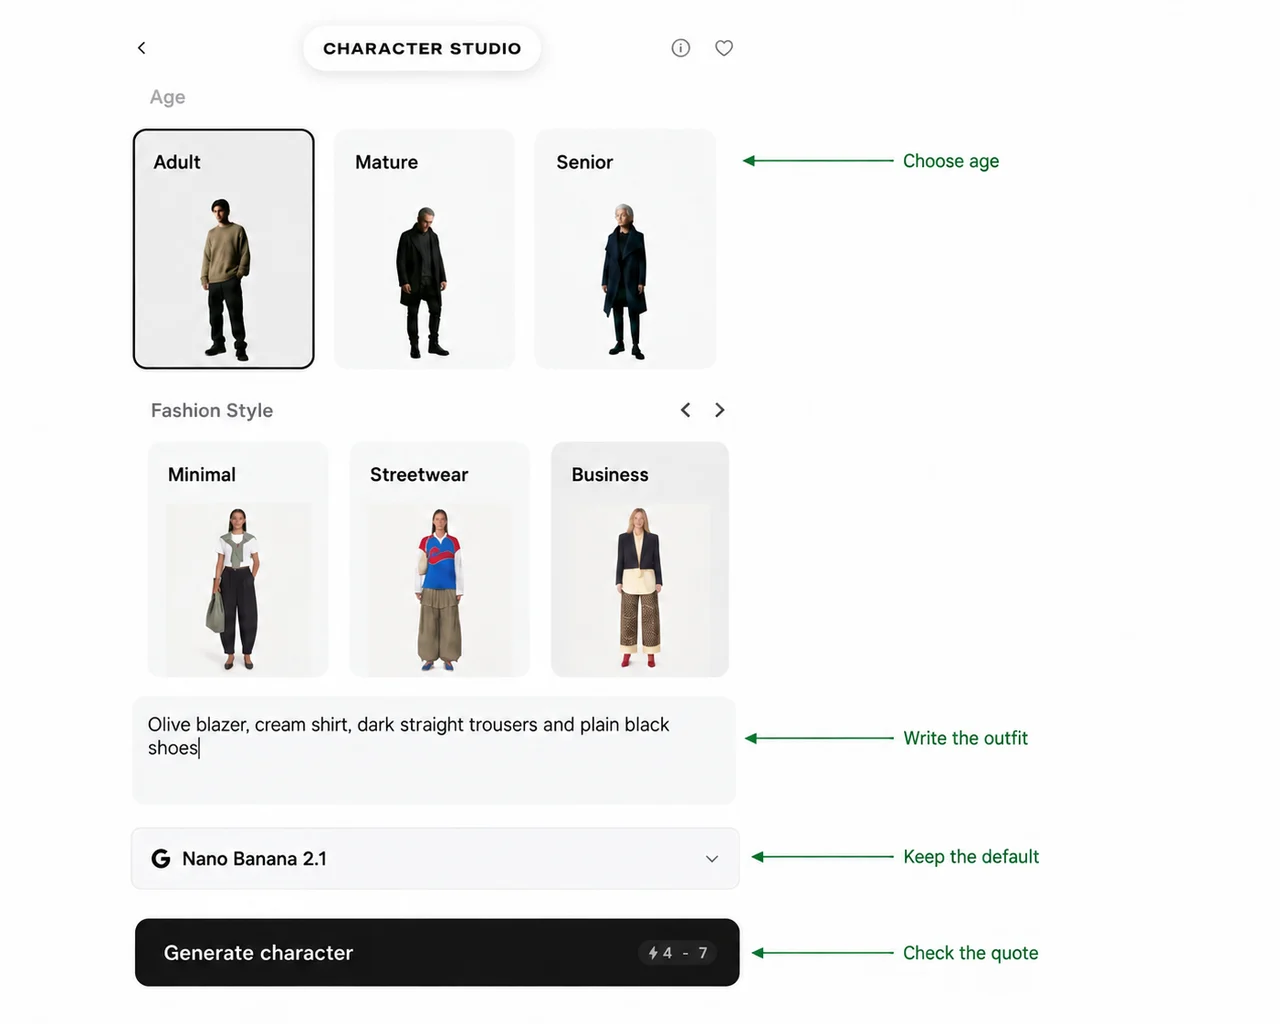
Age offers Adult, Mature and Senior. There is no exact-age field in this workflow. Use Describe when a particular number matters.
Fashion Style includes Athleisure, Minimal, Streetwear, Business, Avant Garde and Formal. Custom fashion style states the garments, colors and shoes. Entering it replaces the fashion preset direction in the generated prompt. We used exact clothing text in all four completed attempts.
4. Generate a complete trait brief
Keep Nano Banana 2.1, read the quote, and generate. Our first preset-only Asha request produced no completed job. The Omar request returned Invalid request, also without an output.
Later requests completed after I entered Human in the custom-type field and supplied exact outfit text. Human resolved back to its card selection. I changed both inputs, so this does not establish which change helped or guarantee a fix.
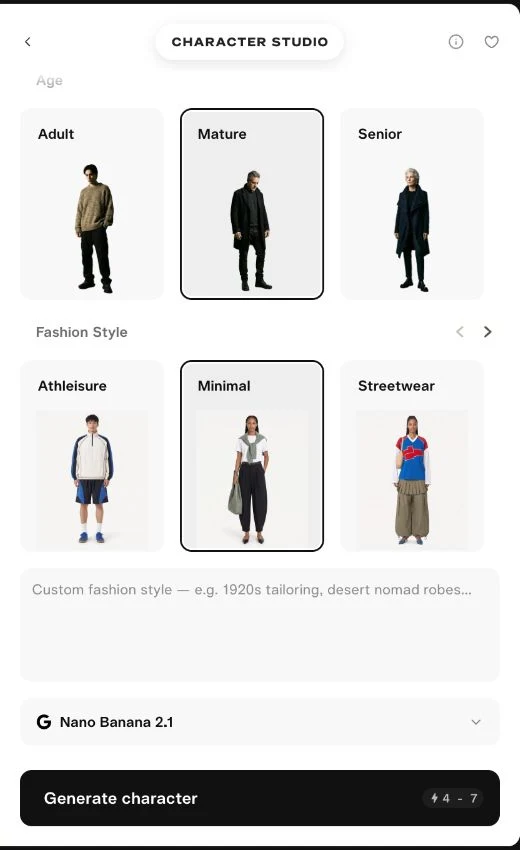
If the error repeats, check the name and selected model, wait for the quote, and try one clear outfit description. Check Jobs before submitting again. Describe is another workflow, but its output should not be presented as a trait test.
Four completed trait inputs and outputs
Each used Human, Brown eyes, Nano Banana 2.1 and No voice. Each completed sheet cost 5 credits. Open a case for exact choices, its input screenshot and output.
Asha Presenter — Adult / Business · 5 credits
Useful for: a formal presenter concept.
| Field | Our input |
|---|---|
| Type | Human |
| Gender | Female |
| Origin | Indian |
| Skin / Eyes | Tan / Brown |
| Age | Adult |
| Starting fashion card | Business (then replaced by custom outfit) |
| Custom outfit | Olive blazer, cream shirt, dark straight trousers and plain black shoes |
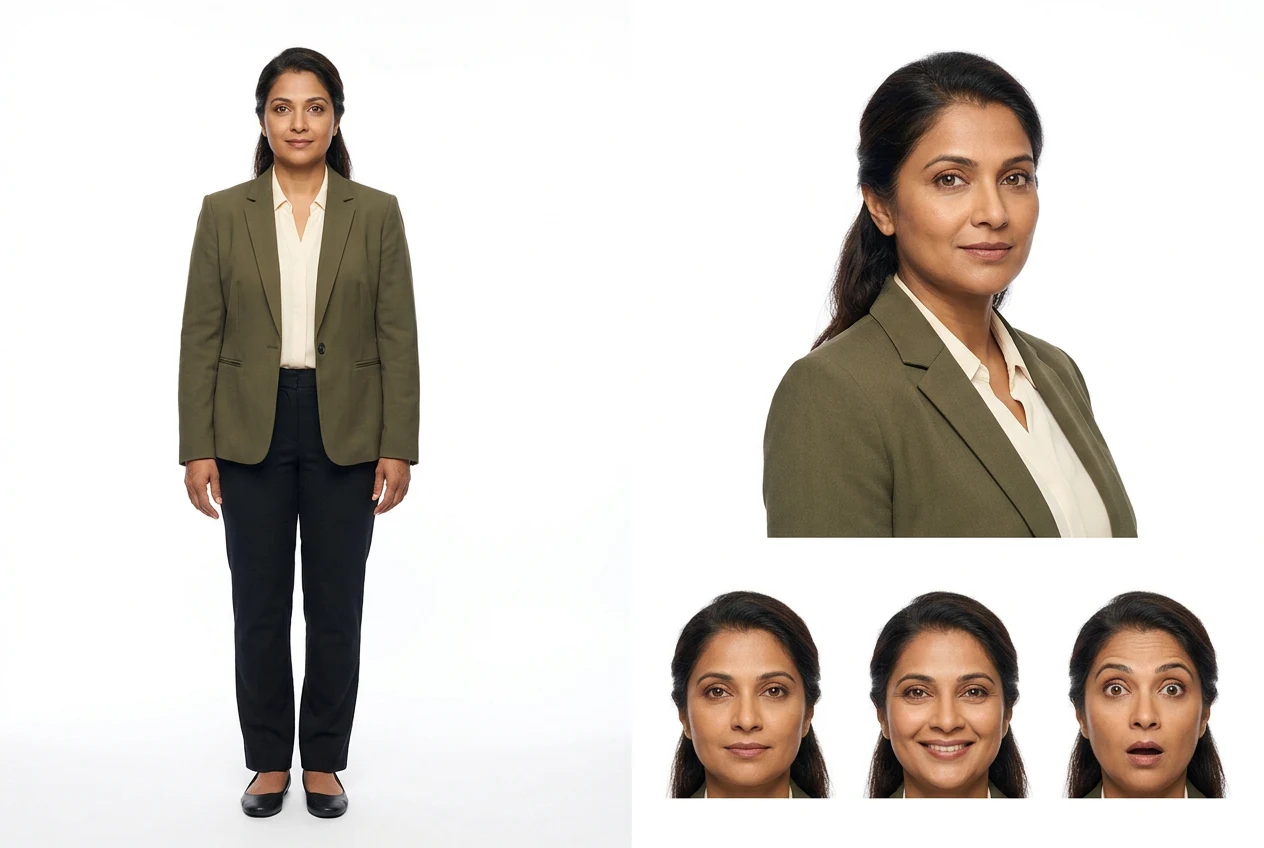
Our review: The olive blazer and dark trousers match the clothing direction. Hair was not specified; the model chose a long dark style.
Omar Analyst — Mature / Minimal · 5 credits
Useful for: a calm explainer concept.
| Field | Our input |
|---|---|
| Type | Human |
| Gender | Male |
| Origin | Middle Eastern |
| Skin / Eyes | Tan / Brown |
| Age | Mature |
| Starting fashion card | Minimal (then replaced by custom outfit) |
| Custom outfit | Plain navy knit sweater, grey straight trousers and brown shoes |
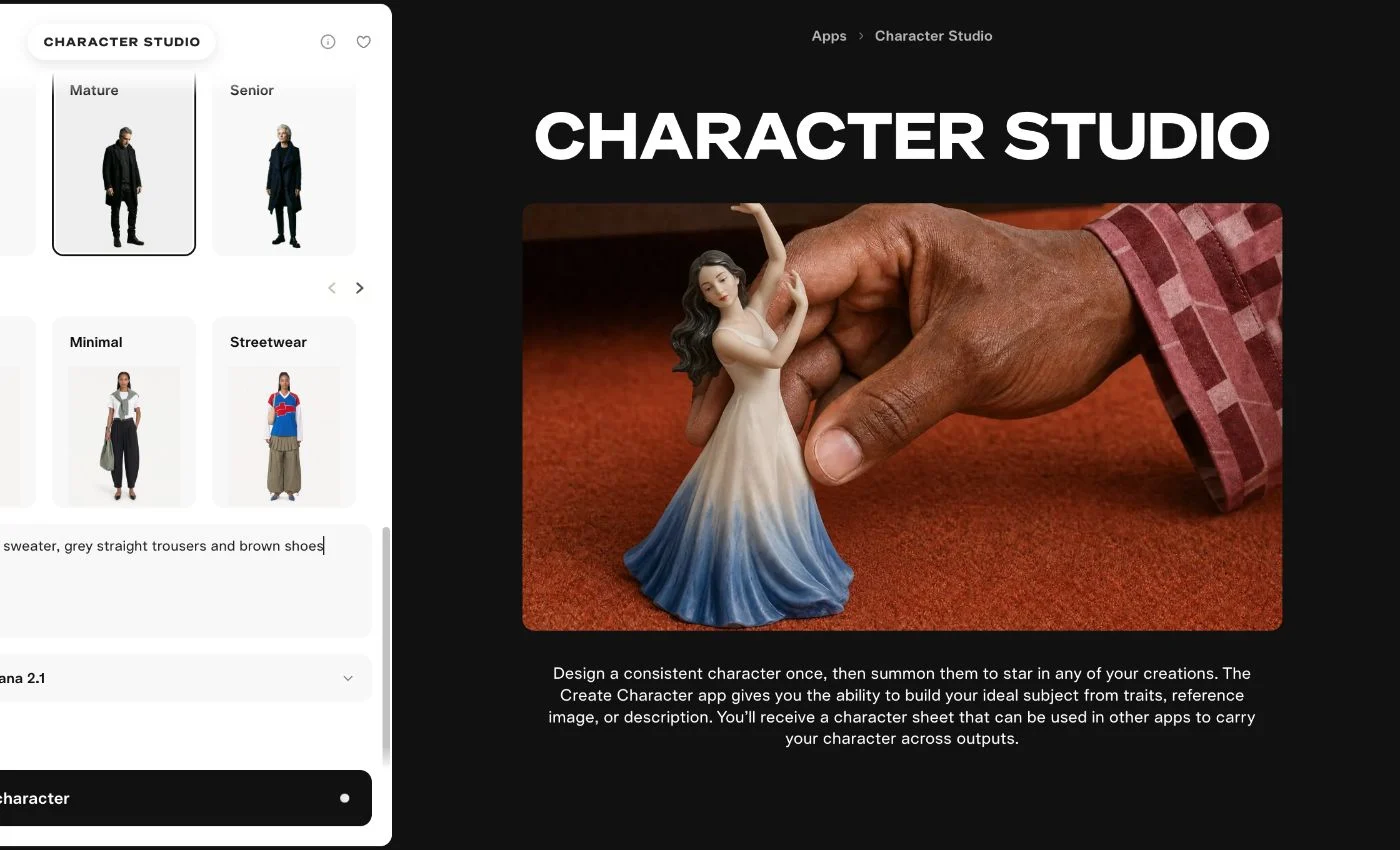
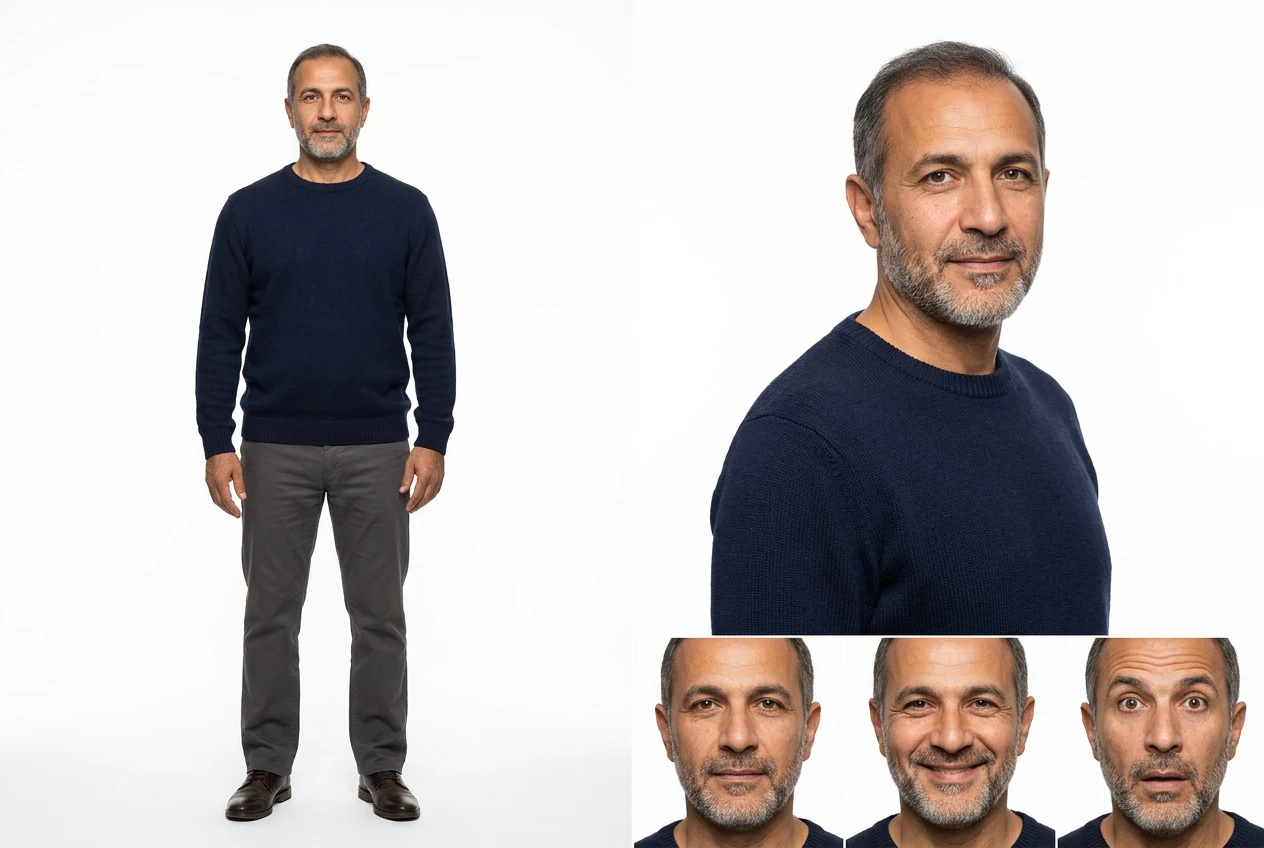
Our review: The navy knit and grey trousers appear in the sheet. The model chose short greying hair and facial hair; those details were not selected.
Jordan Runner — Adult / Streetwear · 5 credits
Useful for: a casual recurring host concept.
| Field | Our input |
|---|---|
| Type | Human |
| Gender | Non-binary |
| Origin | African |
| Skin / Eyes | Deep / Brown |
| Age | Adult |
| Starting fashion card | Streetwear (then replaced by custom outfit) |
| Custom outfit | Teal hoodie, charcoal joggers and white trainers |
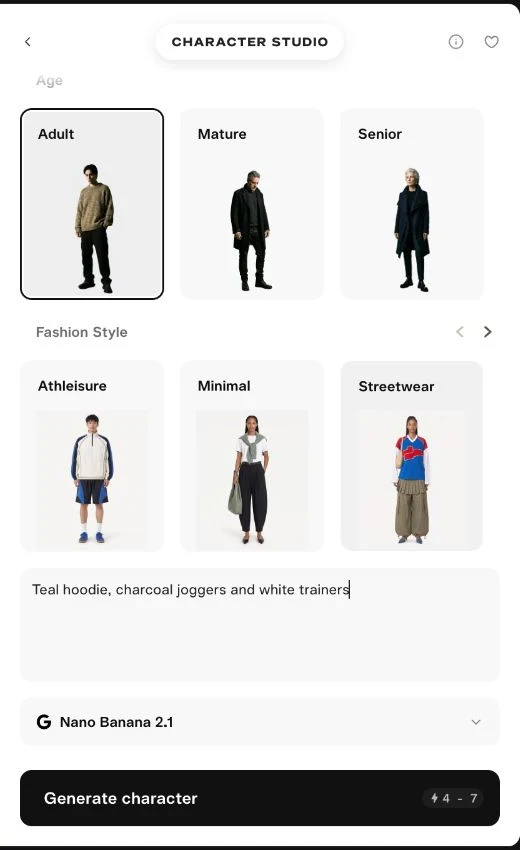
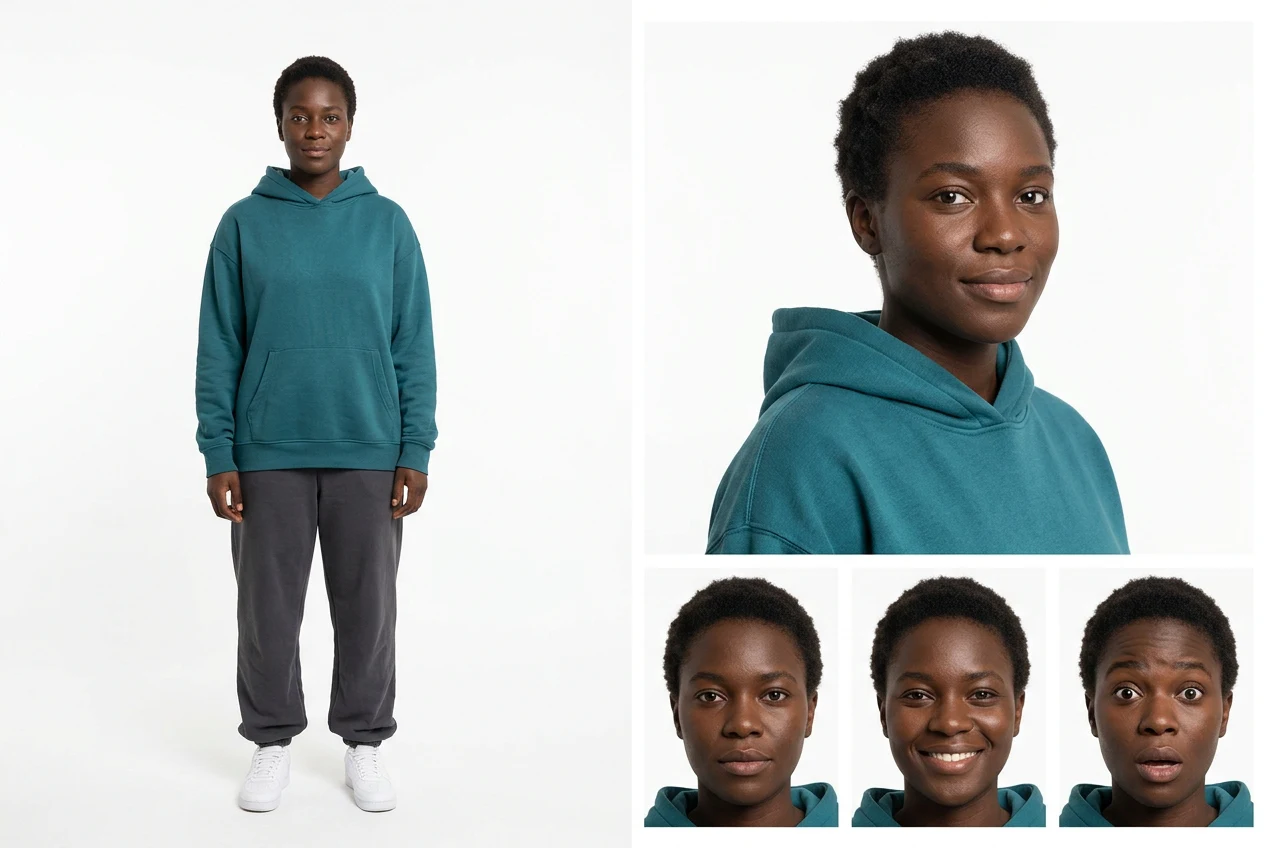
Our review: The teal hoodie and white trainers appear in relevant views. The crop and expression sizes differ from the other sheets. Gender identity cannot be inferred from the image.
Lin Mentor — Senior / Formal · 5 credits
Useful for: an older mentor or story character.
| Field | Our input |
|---|---|
| Type | Human |
| Gender | Female |
| Origin | Asian |
| Skin / Eyes | Beige / Brown |
| Age | Senior |
| Starting fashion card | Formal (then replaced by custom outfit) |
| Custom outfit | Burgundy tailored jacket, cream blouse, charcoal trousers and flat black shoes |
Our review: Grey hair and burgundy tailoring appear in the sheet. The exact age and hairstyle were chosen by the model, not supplied as numbered settings.
Review the sheet before the next step
- Face and hair: compare all five views; check glasses, marks and hairline.
- Outfit: check colors, sleeves, shoes and buttons.
- Body: inspect fingers, feet and proportions.
- Expressions: confirm neutral, smile and surprise are distinct.
- Layout: check the face angle, missing views and added divider lines.
I would keep these attempts as starting references, then choose one approved sheet. We have not tested the same identity in a second scene. The 3D sheet’s black lines and Maya’s shallow face angle show why completion alone is not approval.
Find, download and reuse the character
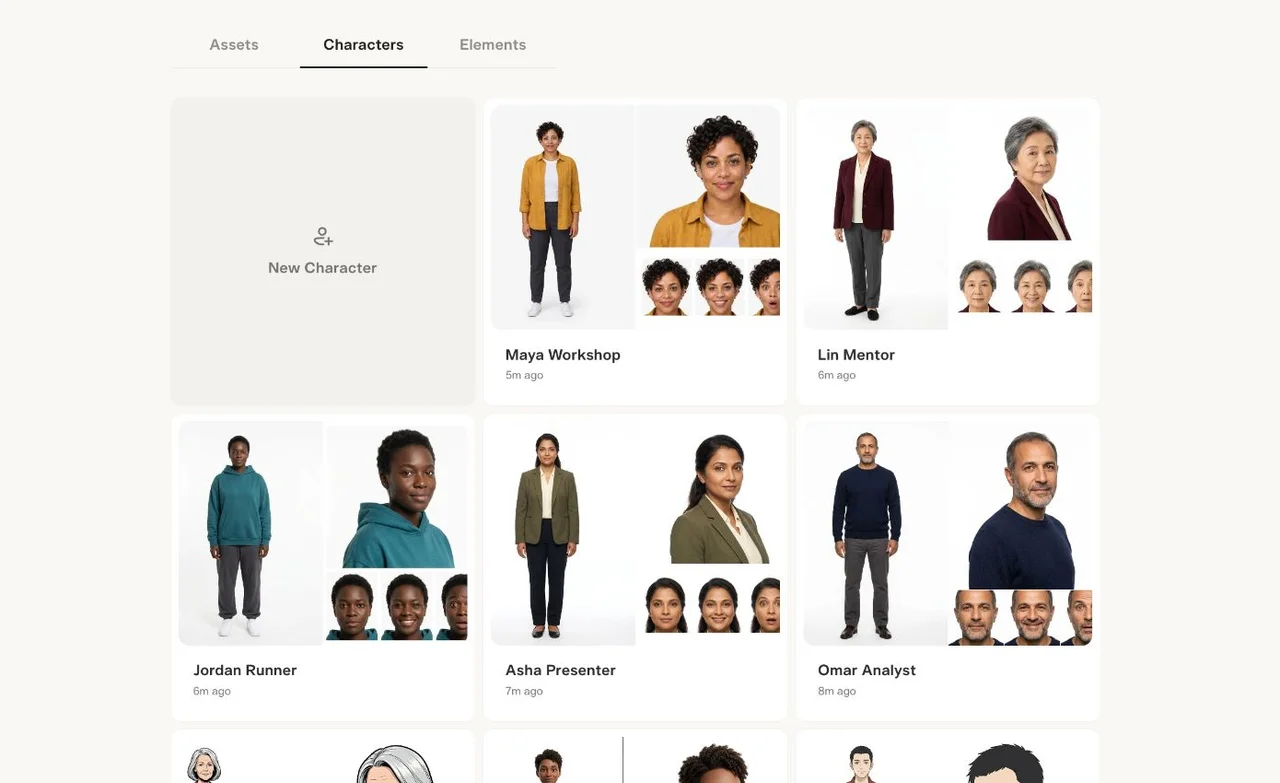
Our nine completed characters appeared in Library → Characters automatically. Their cards include an edit button. Completed sheets are also available through their projects.
Open a completed asset and use its download arrow to save the sheet. Reprompt revisits the input. Retry submits another generation at its displayed cost. We did not press Retry on a completed sheet.
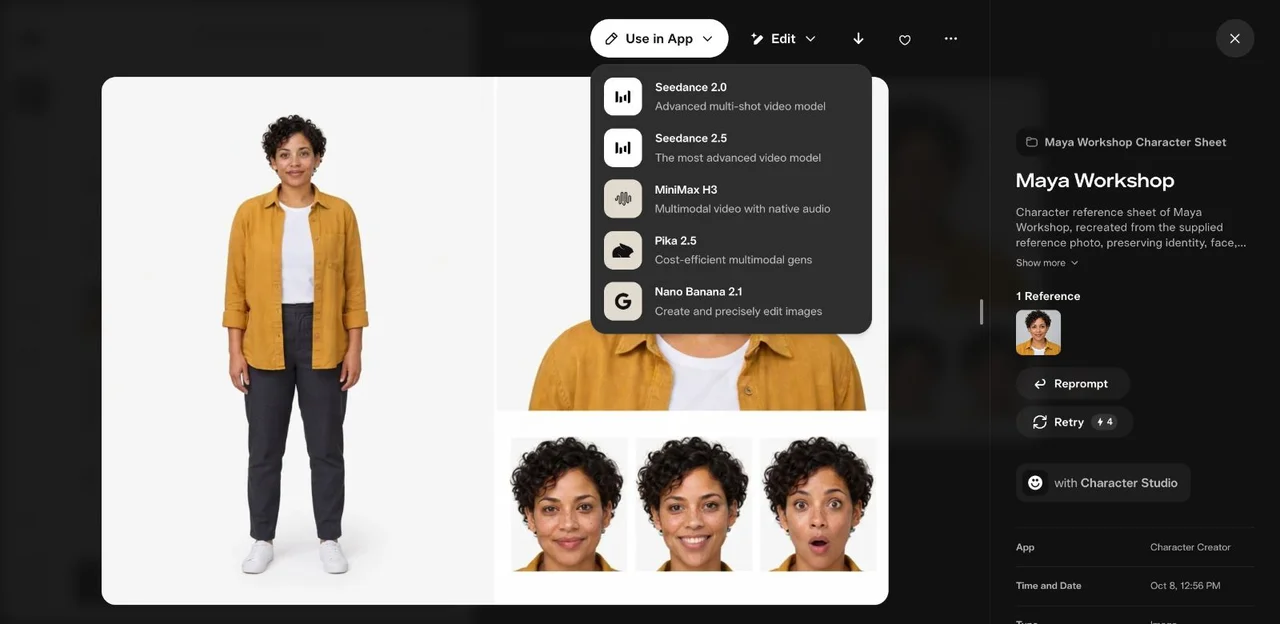
Use in App opened choices including Pika 2.5, Nano Banana 2.1, Edit Image, Upscale and Relight Media. These are separate jobs with their own quotes. We inspected the picker but did not generate a video or test those follow-up operations here.
For a single-person clip, I would prepare one approved view before animating it. The whole sheet includes five faces and several bodies in one image. See our image-to-video guide for the separate video workflow.
What our nine sheets cost
| Workflow / example | Quote | Completed cost |
|---|---|---|
| Upload: Maya | 4–5 credits | 4 |
| Describe: Mira / Realistic | 4–7 credits | 6 |
| Describe: Kenji / Anime | 4–7 credits | 5 |
| Describe: Nia / 3D Animation | 4–7 credits | 5 |
| Describe: Elena / Comic | 4–7 credits | 5 |
| Traits: Asha | 4–7 credits | 5 |
| Traits: Omar | 4–7 credits | 5 |
| Traits: Jordan | 4–7 credits | 5 |
| Traits: Lin | 4–7 credits | 5 |
| Total: nine completed sheets | 45 credits |
The nine completed costs add up to 45 credits. The two early preset-only submissions produced no completed job or extra observed charge. Check your own quote; these figures are dated observations, not a fixed price.
The total excludes the portrait created outside Pika, subscription, editing, speech, animation and future retries. You do not need nine sheets to start. I would budget one attempt, inspect it, then decide if another attempt is useful.
Your first project in five decisions
- Job: recurring host, story lead or teaching character?
- Input: an approved photo, a precise description or traits?
- Look: photograph, drawing or 3D character?
- Pass condition: which face, outfit or view must remain correct?
- Next step: keep the sheet, revise it, or prepare a view for a separate scene?
Save the name, original input, choices, prompt, model, completed cost and acceptance note together. I keep rejected attempts labelled. That gives us a clear reference when the next scene changes the character.