
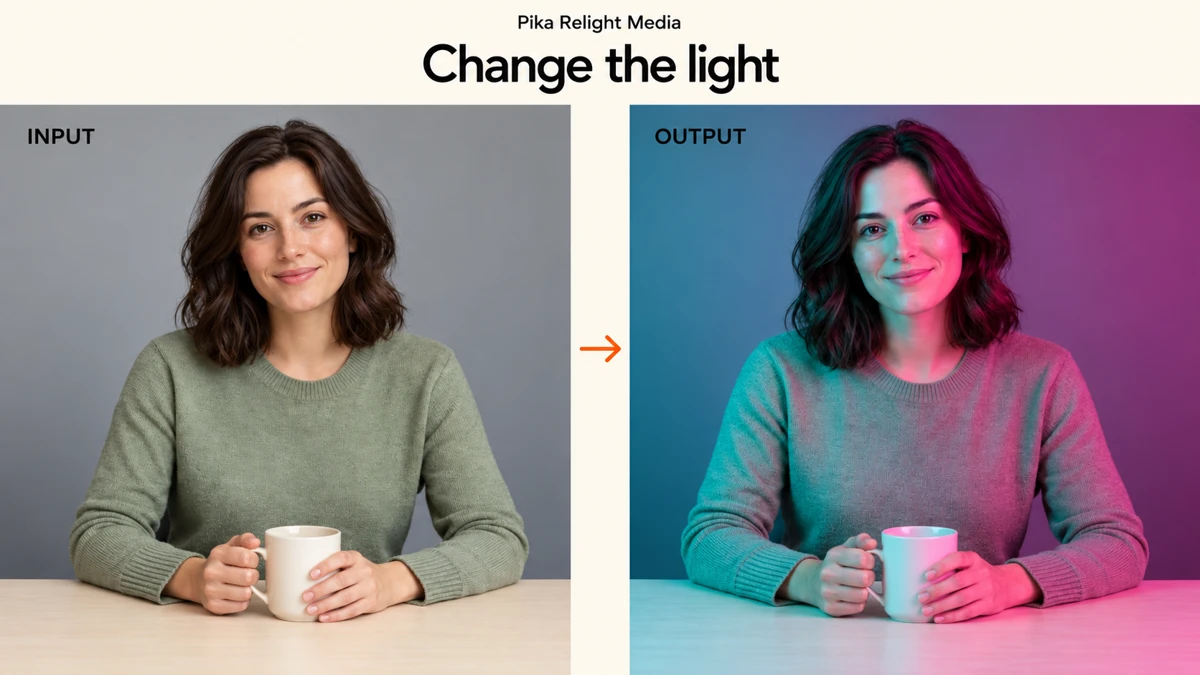
I used one neutral portrait to test Presets, Edit and Describe in Pika Relight Media. We generated five finished photos, from soft white light to a cyan-and-magenta setup, and kept the original input fixed.
Start with the results below, then repeat the workflow that fits your project. I show each output again beside its settings so you can compare the instruction with what the app actually made. Checked 8 October 2026; five generations cost 35 credits in our session.
See the input and five real outputs

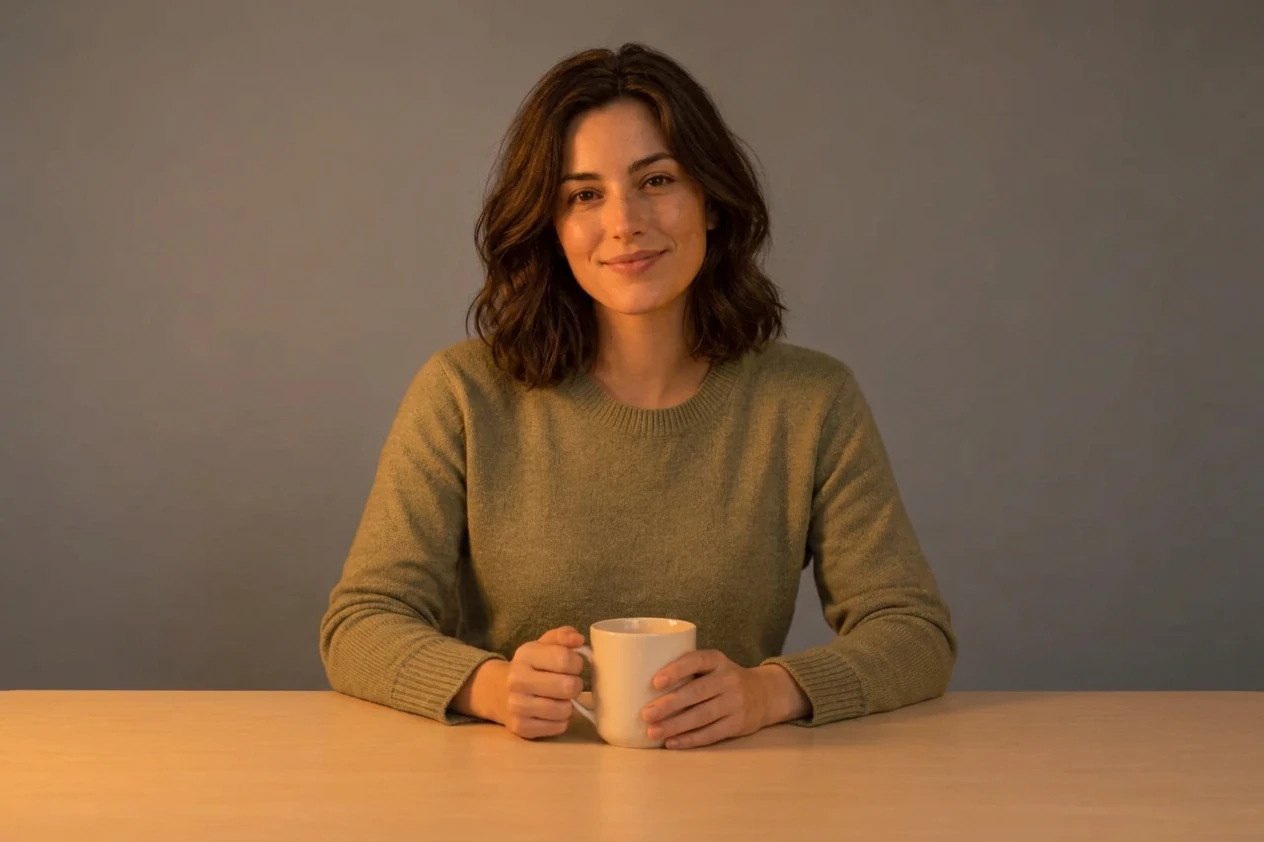
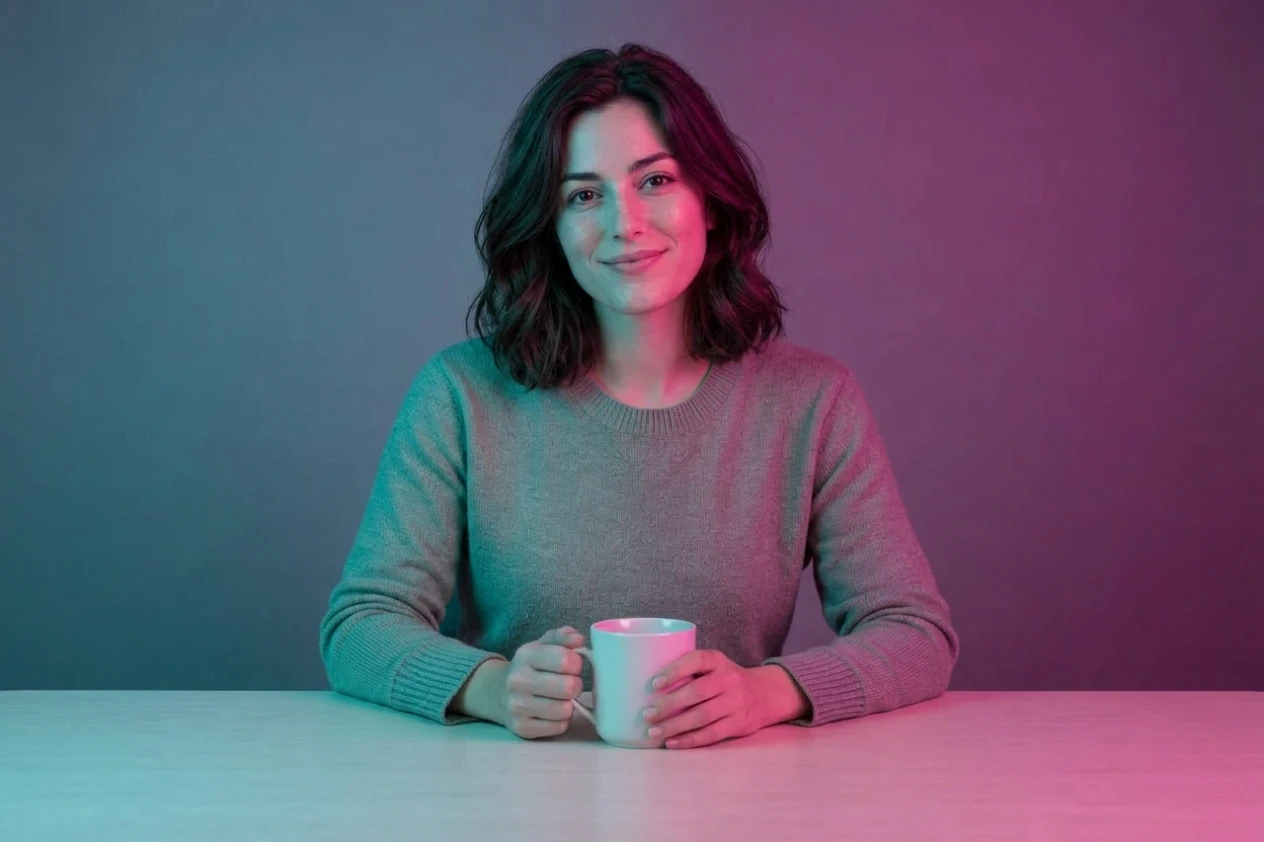
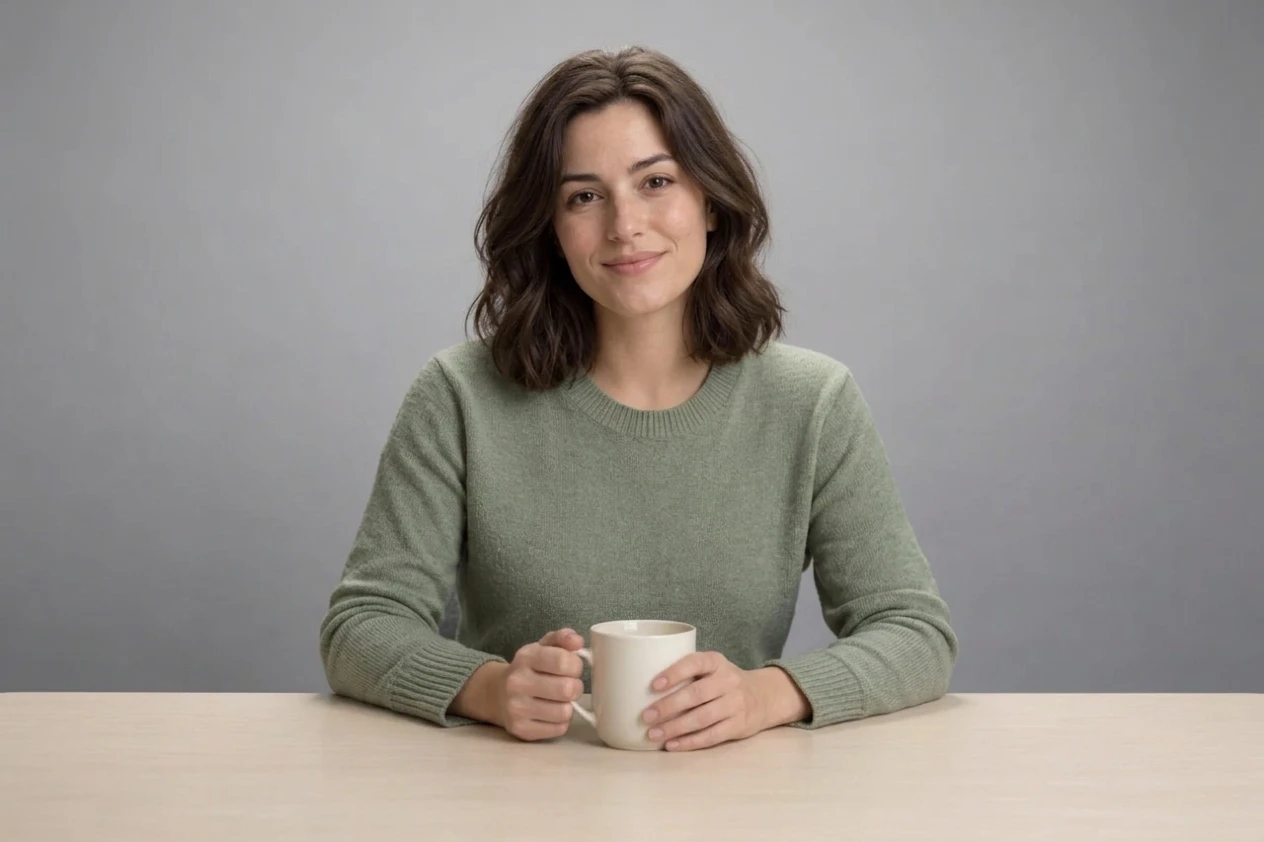
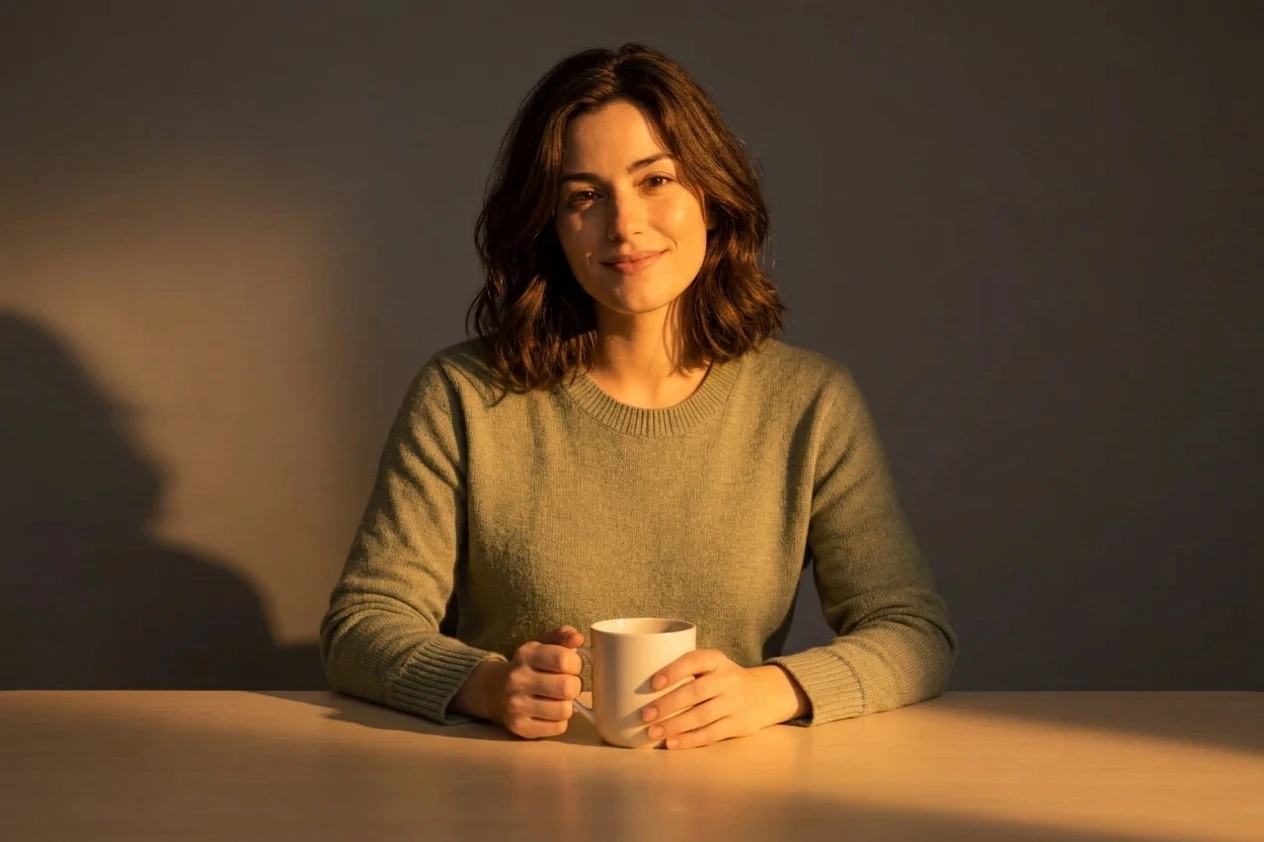
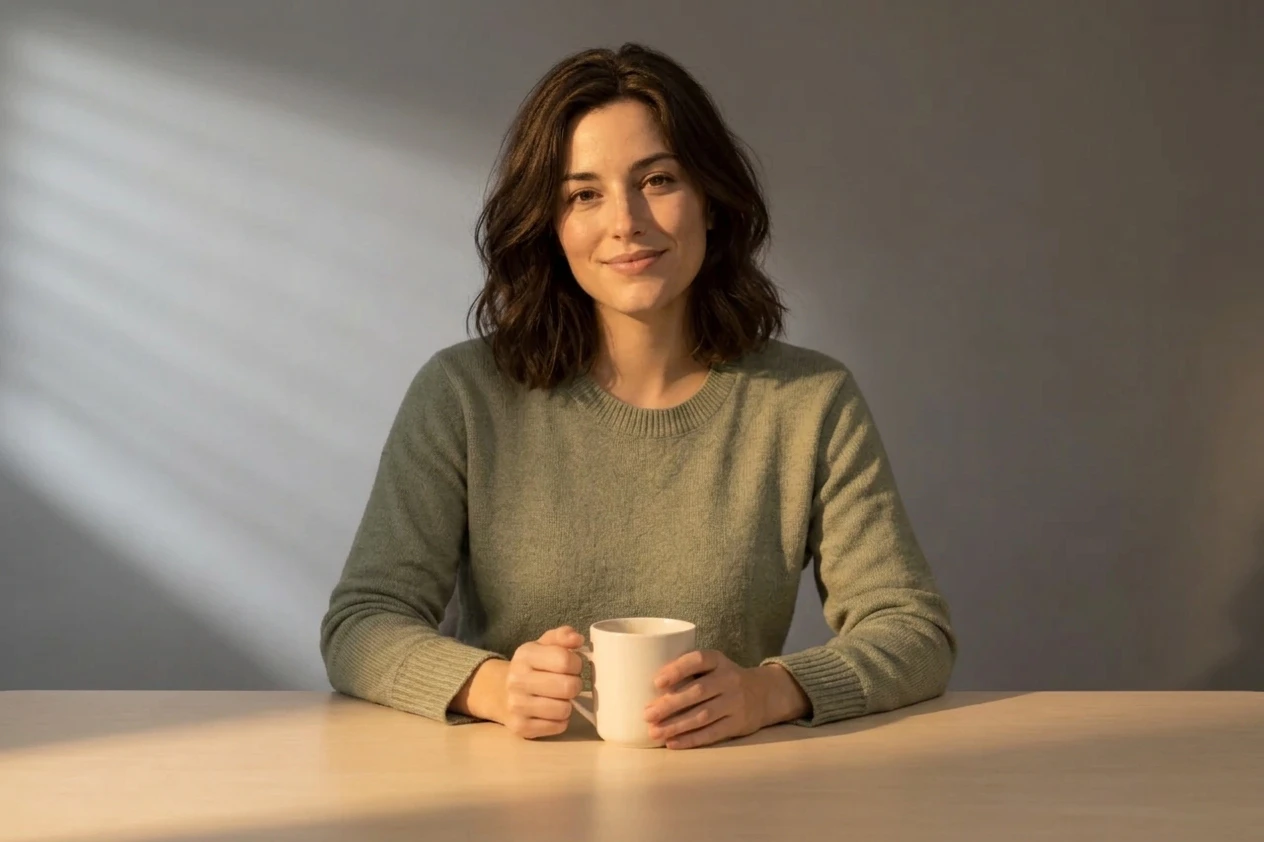
My pick: I would start with Golden Hour for a warm creator portrait, Neon Night for a colour-led cover, and the soft manual setup when I need a quieter change. The hard tungsten test has a more obvious wall shadow. Check the face and product colour before choosing a result.
The Describe attempt is also a useful lesson: our written brief was added to the previous manual light setup. Its saved prompt contained opposing directions. I explain that below instead of treating it as a controlled daylight test.
What is Pika Relight Media?
Pika Relight Media changes the lighting of an uploaded photo or video. Its three tabs let you choose a preset, position and adjust individual lights, or write a lighting brief.
It is useful for creators trying a different mood on an existing portrait, product sellers checking how colour and shadow affect a shot, and editors planning a consistent look. You supply the picture or clip; the app produces a new result from your setup.
We tested photos only here. The app accepts a video, but these five photo results do not establish video pricing, frame consistency or audio behaviour. There was no model chooser in our checked photo form; we used the app’s own workflow.
Which workflow should I choose?
| Your goal | Start here | What you control |
|---|---|---|
| Try a familiar mood quickly | Presets | A named lighting setup |
| Place light on a specific side | Edit | Light point, direction, colour, brightness and diffusion |
| Ask for a specific shadow pattern | Describe | Text added to the lighting setup |
| Keep skin and product colour easy to judge | Edit with white light | A neutral starting point; still inspect the result |
I would choose one useful test before generating a set. Changing the light can also change how clothing, skin and a product appear; a striking result may be a poor fit for a colour-sensitive listing.
Step 1: open the app and upload a clear source
- Open the Relight Media app.
- Click the upload icon in the middle of the lighting stage. On our empty form, the bottom “Add a photo or clip” button showed an add-image notice; the stage icon opened the picker.
- In Assets, select Upload and choose your photo. For a saved asset, choose the file and confirm Use Selection.
- Wait for the upload to finish. The photo appears in the small stage and the bottom action becomes Relight photo.
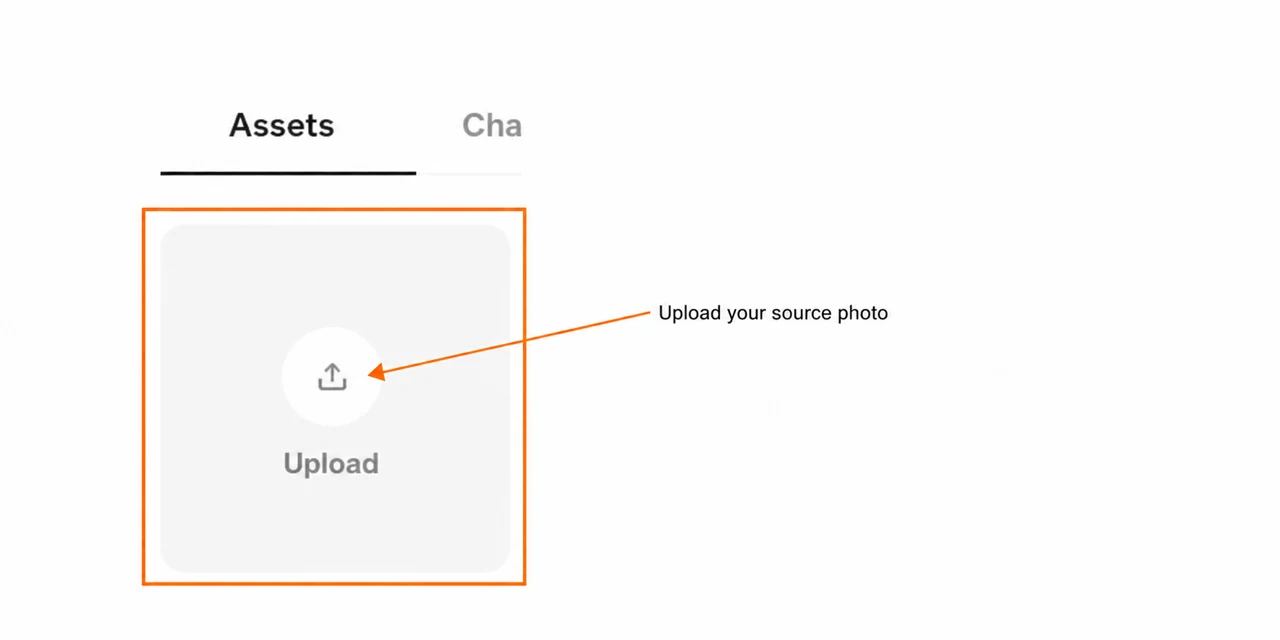
Use a sharp image with room around the subject and readable detail in both dark and light areas. For this test I chose a plain wall, sweater and ceramic mug so changes in light would be easy to compare.
Download our shared input photo to follow along. It is an original generated character, not a photo of a customer. Replace media, the circular icon at the stage’s upper right, opens the picker again after upload.
Workflow 1: Presets — choose a mood
Test 1: Golden Hour
- Select Presets.
- Choose Golden Hour and check its selected outline.
- Keep the original photo attached.
- Wait for the quote to appear, then press Relight photo once.
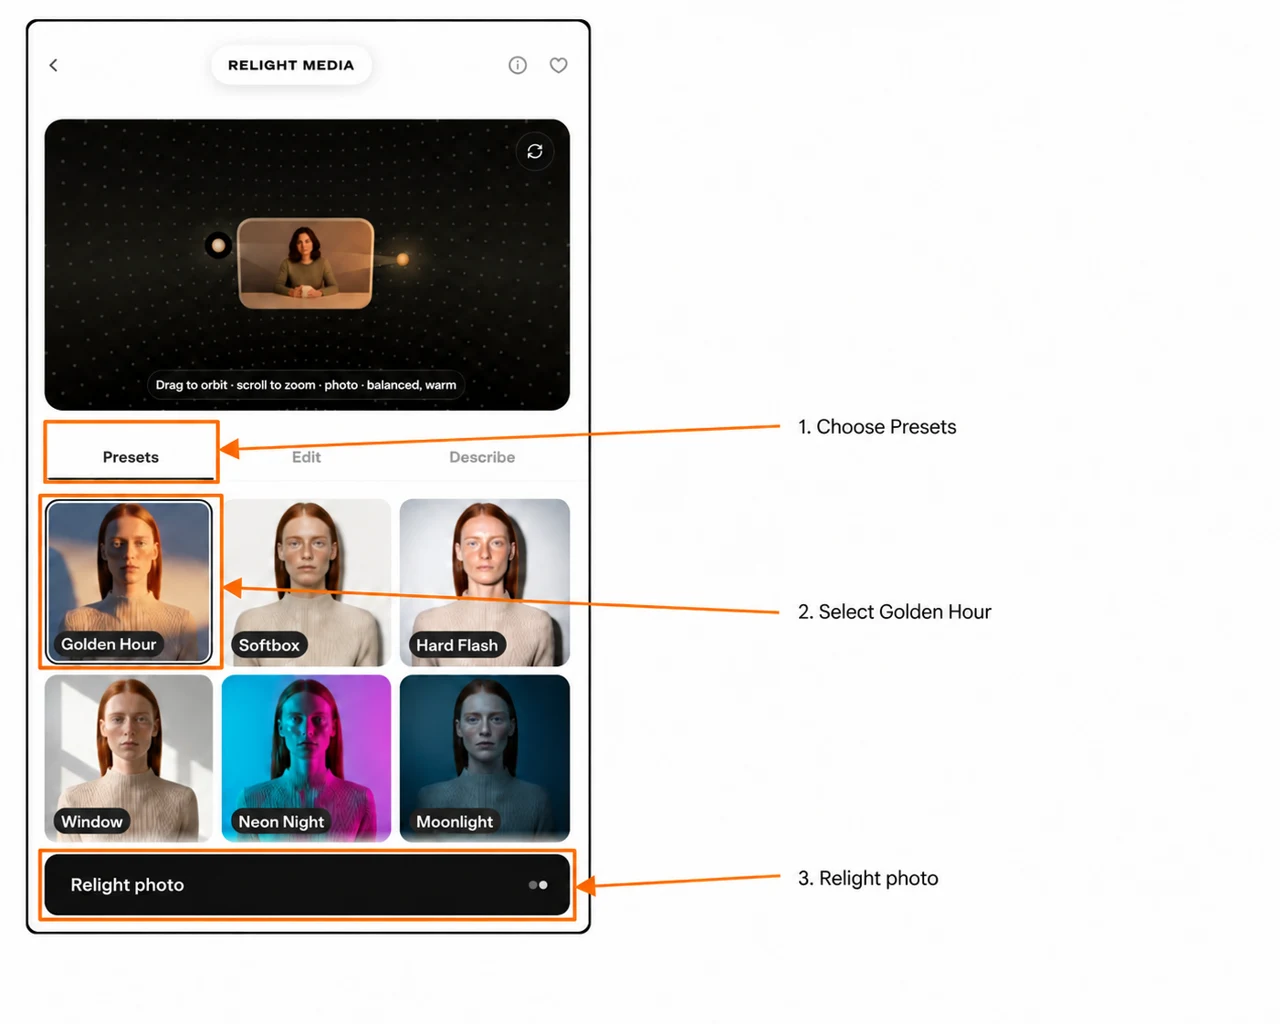
The result warms the skin, sweater and desk. I would use this for a cosy portrait or coffee-themed post. I would check a product’s true colour before using it in a listing.
Test 2: Neon Night
Keep the same original image. Select Neon Night and press Relight photo again after checking the new quote. We did not upload the Golden Hour result as the next input.
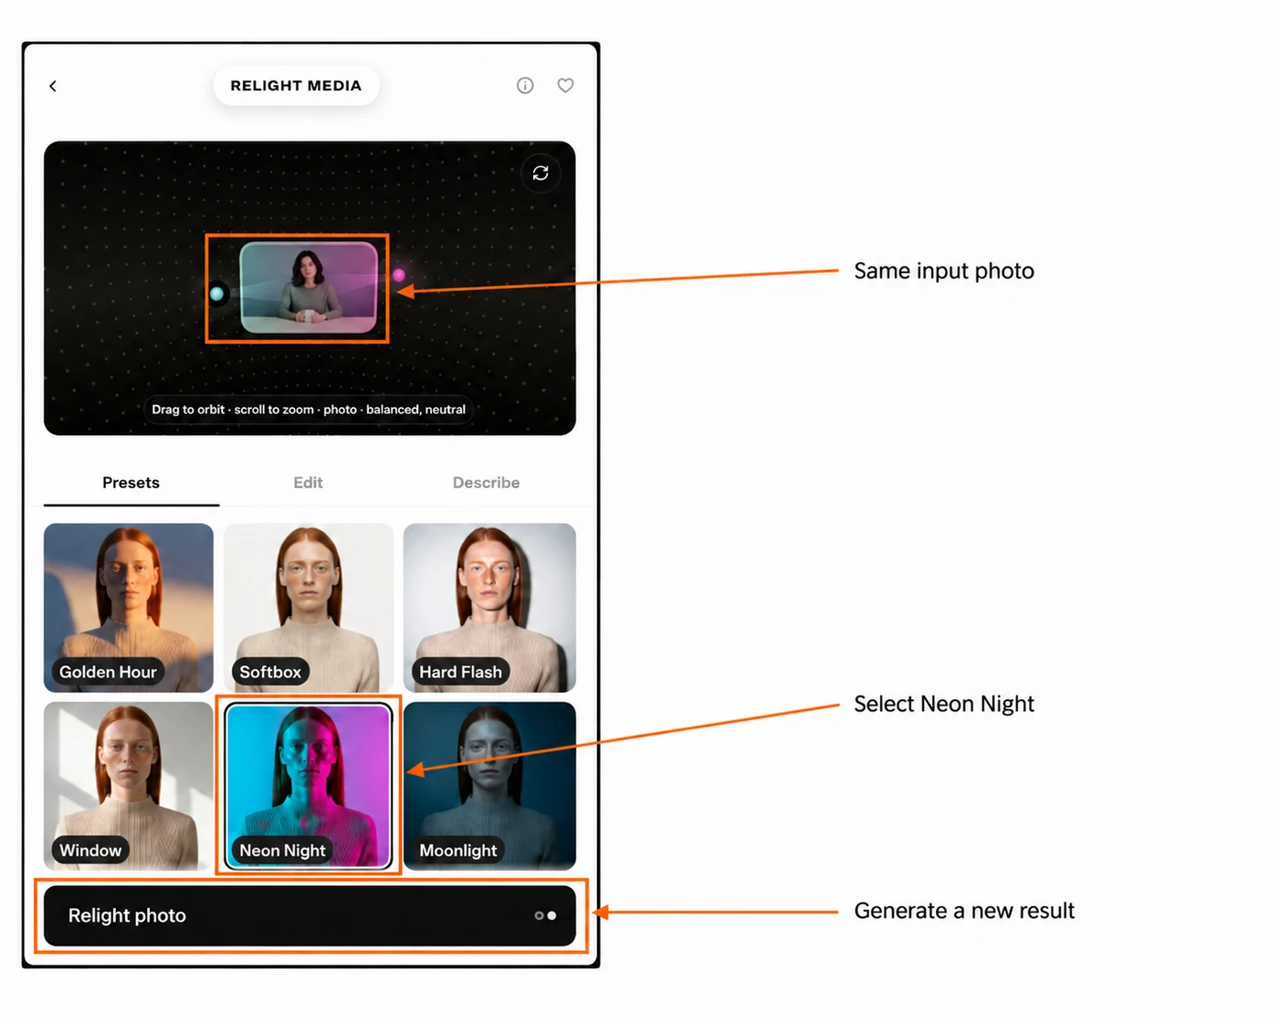
The cyan and magenta split is much stronger than Golden Hour. I would try it for a music post or a creator cover. It changes the sweater and skin colour too, so I would avoid presenting it as an accurate product-colour sample.
Other preset choices we inspected
The checked list contained Golden Hour, Softbox, Hard Flash, Window, Neon Night, Moonlight, Back Light and Spotlight. Scroll the controls to see the lower cards. We generated the first two examples above; the remaining cards were inspected, not tested.
Workflow 2: Edit — position and tune a light
Select Edit. A light chip selects the light whose controls you are changing. Add light creates another point; Remove light removes that setup light. It does not delete the source photo.
We started from the Neon Night setup, removed Light 2 and changed Light 1 to white. This matters: switching tabs kept the earlier lights rather than starting a blank setup.
| Control | What I use it for |
|---|---|
| Light 1 / Light 2 chips | Select the light to adjust |
| Add light | Add another source to the setup |
| Direction | Choose Top, Front, Right, Left, Back or Bottom |
| Colour | Choose a swatch or use Custom light color |
| Brightness | Adjust the selected light’s strength |
| Diffuse | Adjust its softness; our 80% and 15% tests are below |
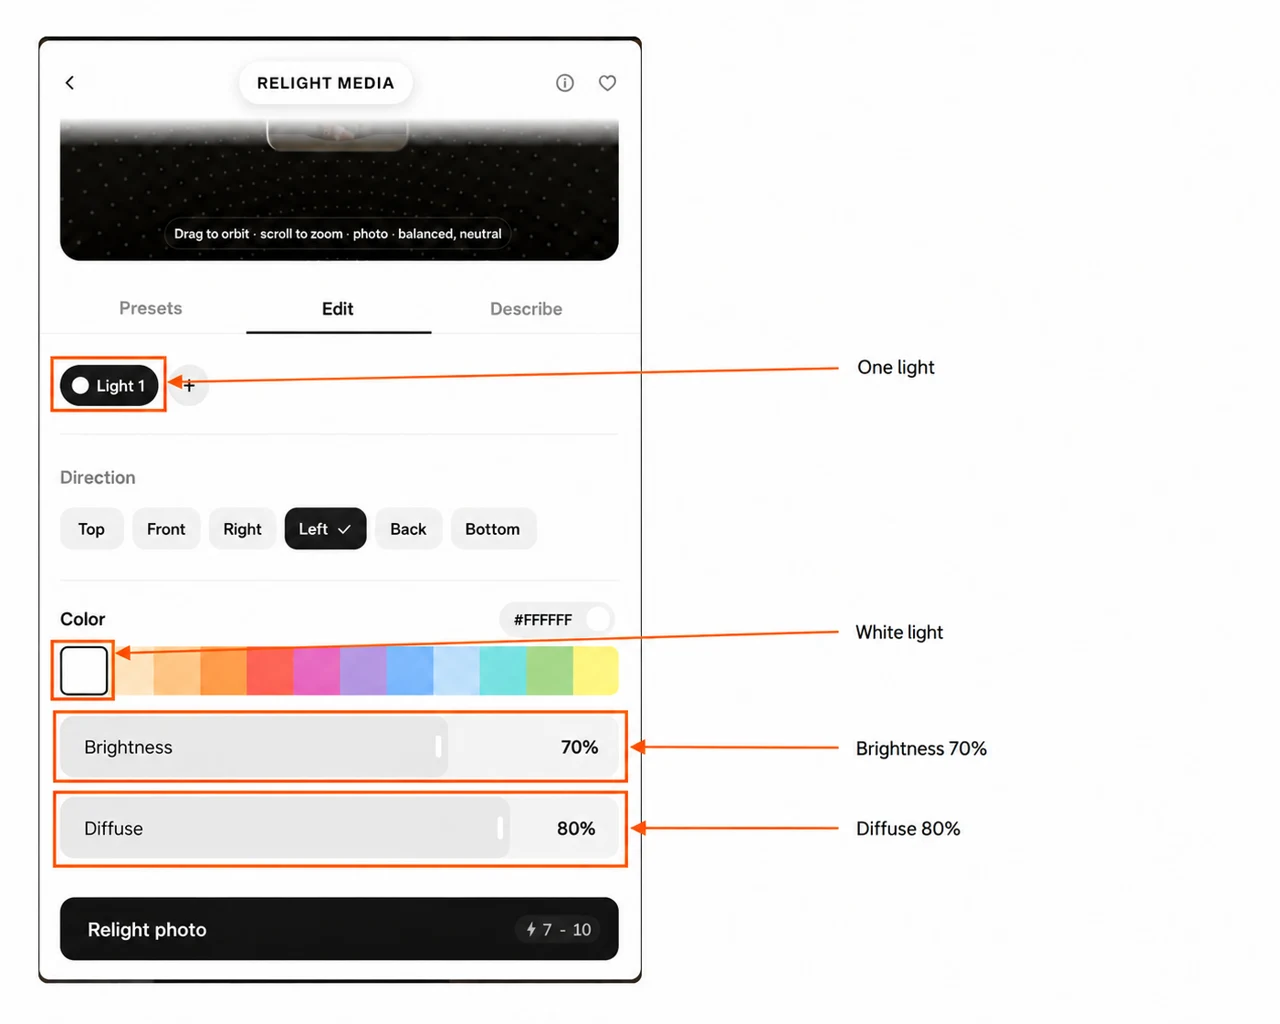
The colour row offered White, Warm white, Tungsten, Candle, Sunset red, Magenta, Lilac, Sky blue, Ice, Cyan, Leaf and Banana. We generated with White and Tungsten; we did not test every swatch or the custom picker.
Test 3: soft white light, then drag the point higher
- Keep one light and select Light 1.
- Set Left, then White (
#FFFFFF). - Set Brightness 70% and Diffuse 80%.
- Scroll the left controls upward to see the whole stage.
- Drag the white light point upward and slightly toward the photo, as shown next.
- Press Relight photo after the setup and quote update.
How to drag the light point
Grab the small glowing dot outside the photo, hold and move it, then release. We moved the left-side dot diagonally upward and slightly right. Its new position was above and left of the subject.
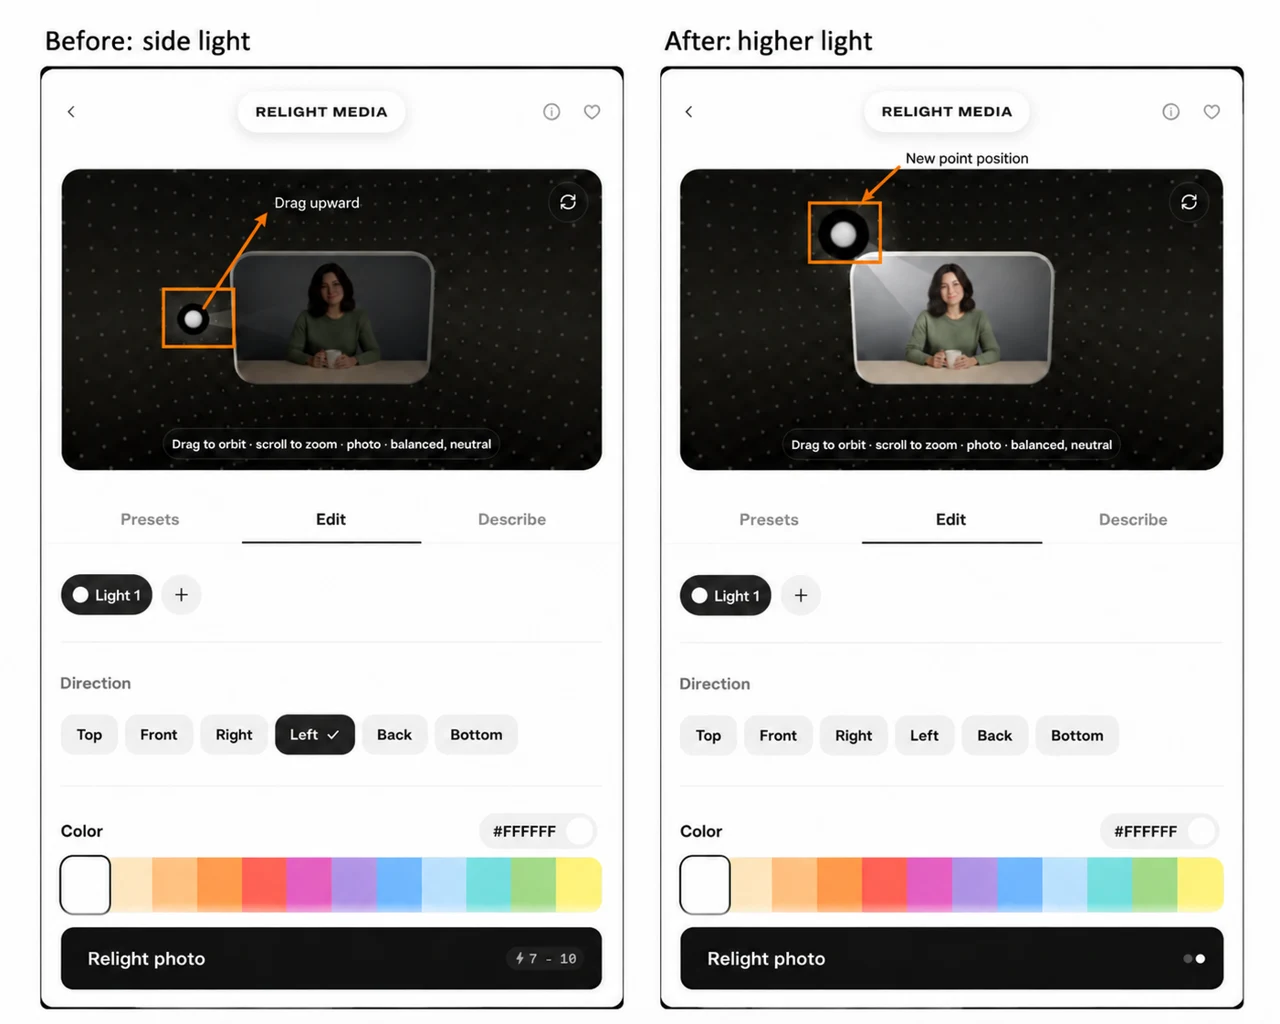
The Left direction button lost its selected tick after the drag. That was a useful confirmation that we had moved away from the fixed direction preset. You do not need to copy our screen coordinates; use the dot’s position relative to your photo.
Dragging empty stage space has a different purpose: the app labels it Drag to orbit. Scrolling over the stage changes its zoom. These help inspect the setup; they are not photo crop controls. Scroll over the settings panel when you want to reach Brightness and Diffuse.
The stage is a setup preview, not a finished export. Our stage looked dark at one side-light position, but the generated soft-light photo was much brighter. Judge the downloaded output.
I would choose this result when I want the mug and sweater to remain easier to judge. The effect is restrained on this already evenly lit source; I would not promise a dramatic rescue of a badly exposed photo from this test.
Test 4: a harder warm light from the right
For the next attempt, keep the original input and the single light. Select Right to return to a fixed direction, choose Tungsten (#FFC98A), then set Brightness 85% and Diffuse 15%. Press Relight photo once.
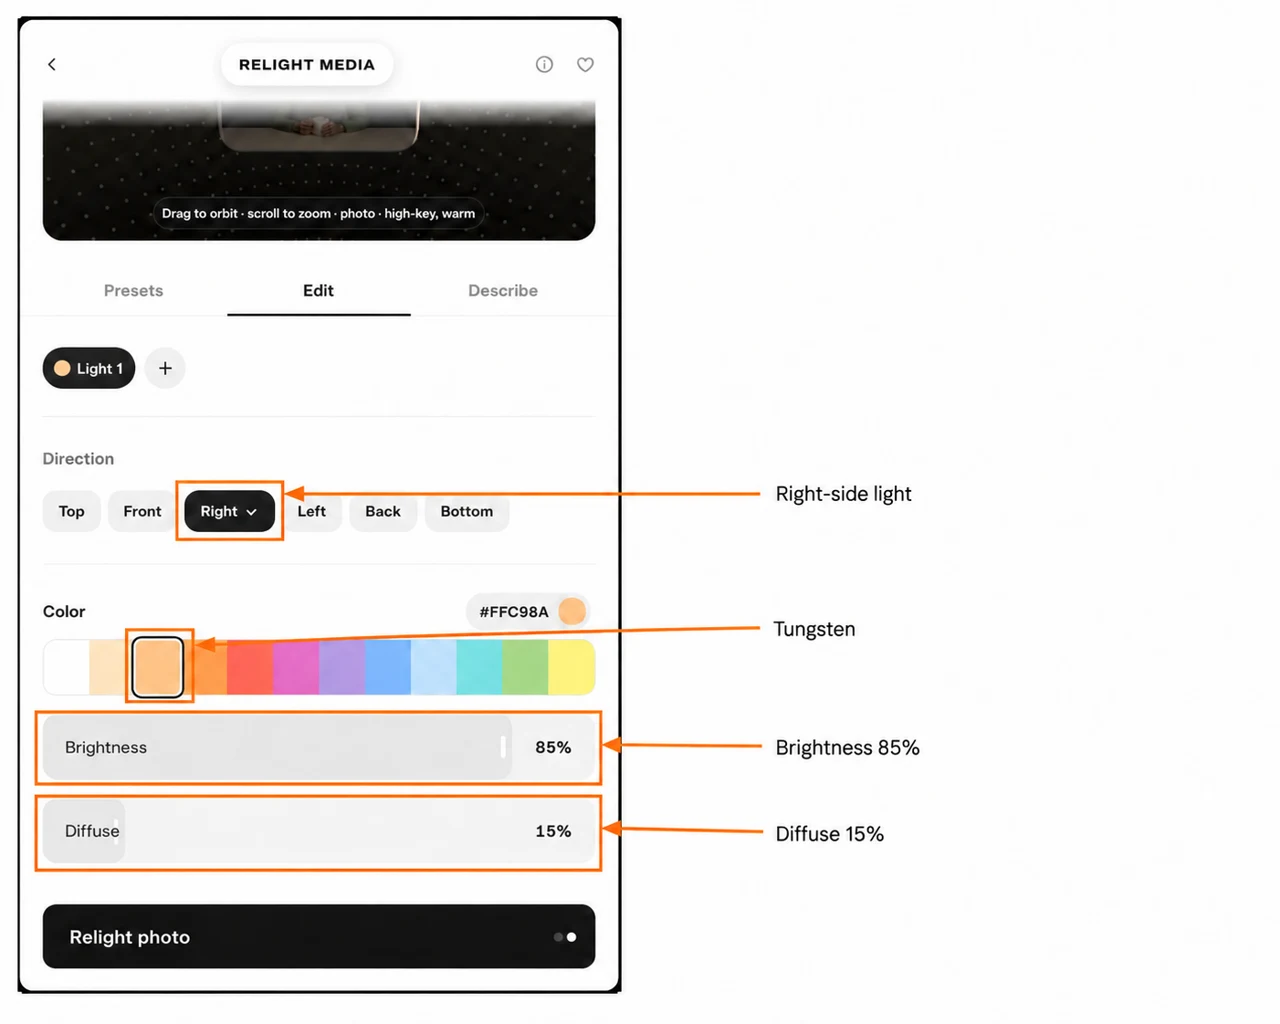
The stronger face contrast and large wall shadow make the change easier to see. I would use it for a more dramatic portrait. The orange cast is less useful when a viewer needs to assess the mug’s actual colour.
Keep extra lights deliberate. Two strong opposing lights can reduce the shadow you were trying to create. We inspected Add light and the individual light chips; our manual generations used one light only.
Workflow 3: Describe — add a lighting brief
Select Describe and write the lighting you want in Describe the light. The checked textbox allowed up to 4,000 characters. I used a short brief focused on direction, shadow and what should stay the same.
Test 5: ask for morning light and wall bands
Our exact text:
Soft morning daylight from camera-left through off-screen blinds, with gentle diagonal shadow bands on the existing gray wall and desk. Keep the face readable, skin color natural, and the sage sweater, hands, mug, pose and framing unchanged. No visible lamps, windows or new objects.
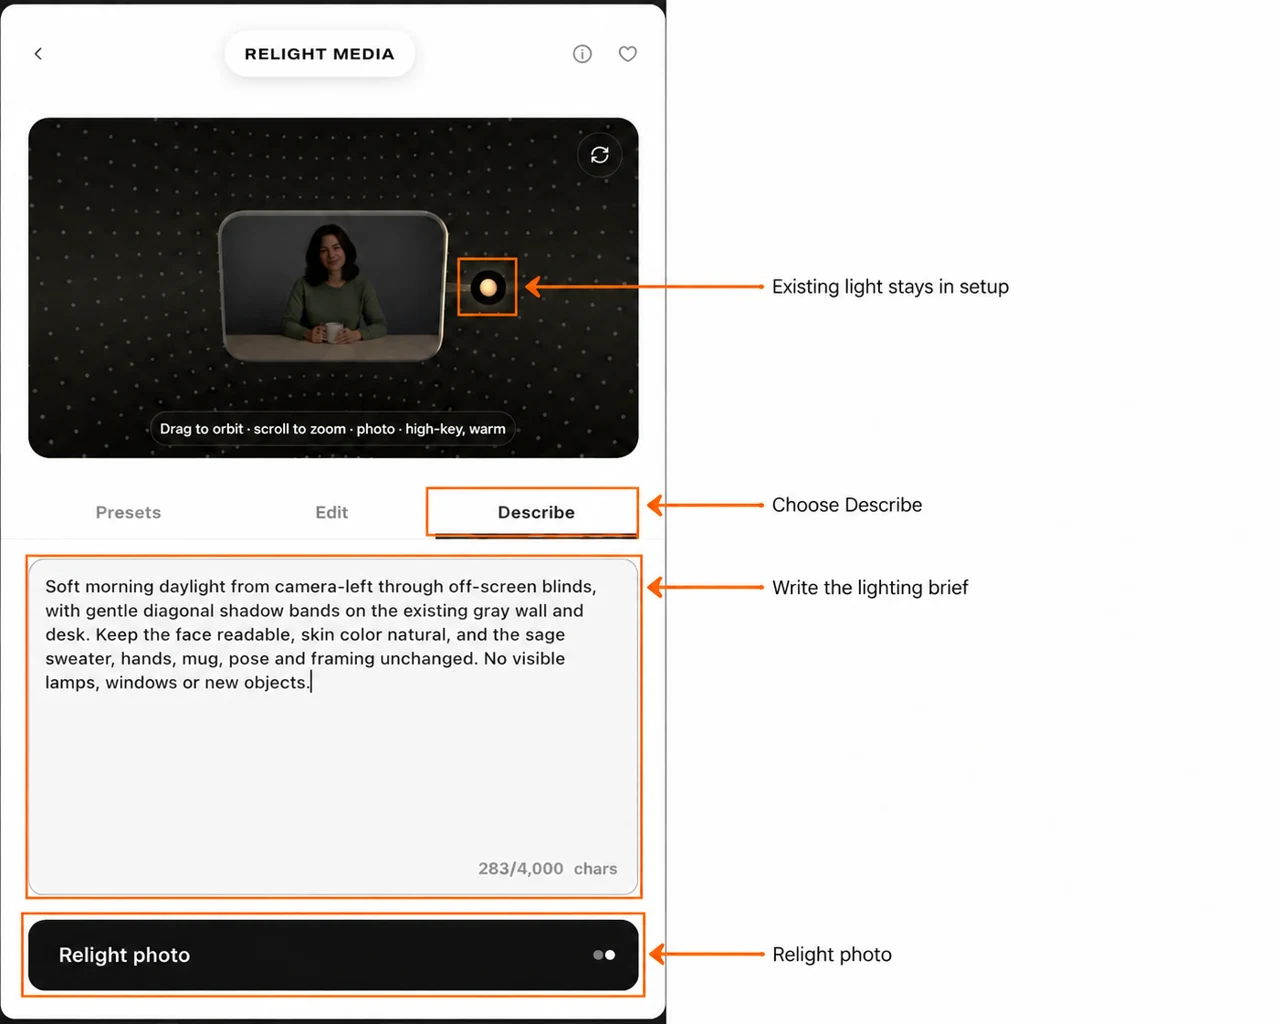
What I learned: the result added a shadow pattern, but this was not a pure morning-daylight comparison. The completed asset’s full prompt contained our earlier “tungsten light from camera-right” instruction and then our new camera-left daylight text.
Before your next attempt, check Edit and make the point, colour and direction agree with your brief. For example, use white light on the left if your text asks for neutral daylight from the left. That is my suggested next setup, not an extra generated test in this guide.
I would also make the requested pattern simpler: “soft bands on the wall” is easier to inspect than a long list of competing effects. Describe can add intent, but it does not guarantee a precise shadow shape.
Open, inspect and download the result
After submission, our app opened a project feed. Wait for the image to finish, then open its details. Check the source thumbnail, full prompt, output dimensions and cost before saving a keeper.
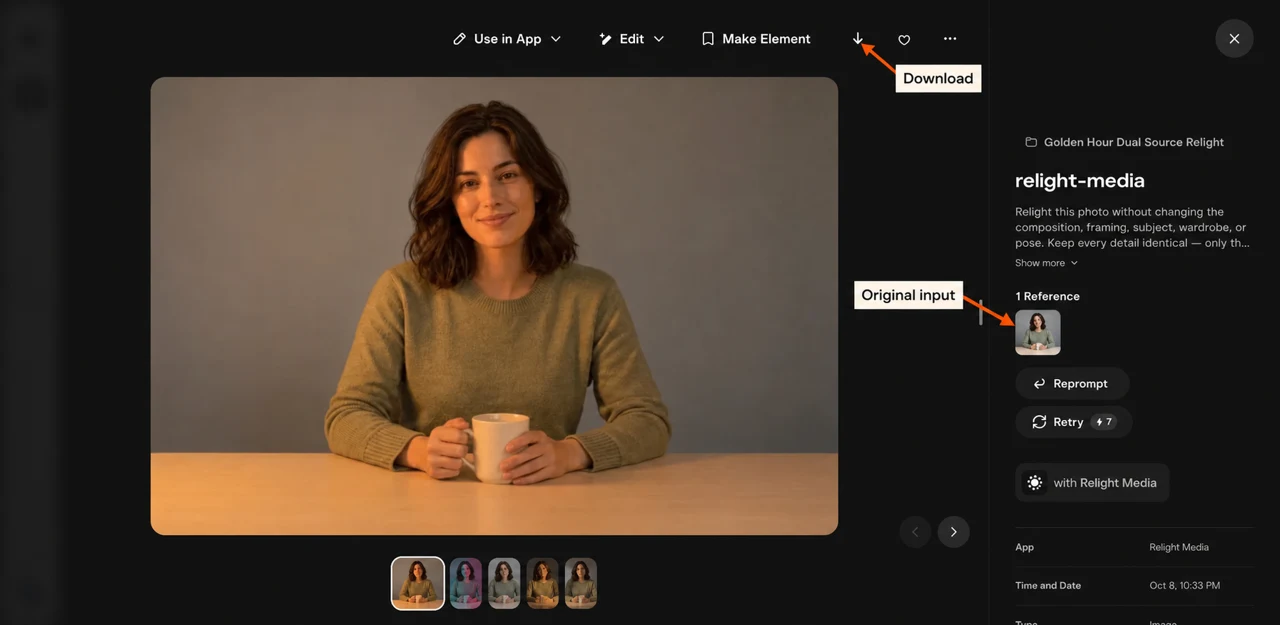
Choose the download arrow at the top of asset details. Our five original downloads measured 1264 × 842 pixels, although the input measured 1280 × 853. We converted the article copies to WebP; the result photos above are those downloaded outputs, not newly made illustrations.
Compare face, hair, hands, mug shape and sweater texture with the original. The broad composition remains recognisable in our tests, but I can see small differences in hair, expression and texture. I would not claim that relighting preserves every detail exactly.
What did our five tests cost?
| Attempt | Quote before submission | Completed asset cost |
|---|---|---|
| Golden Hour | 7–10 credits | 7 |
| Neon Night | 7–10 credits | 7 |
| Edit: soft white, higher point | 7–10 credits | 7 |
| Edit: hard tungsten, right | 7–10 credits | 7 |
| Describe added to manual setup | 7–10 credits | 7 |
| Five photos | Quotes were ranges | 35 credits total |
Our balance started at 419 and settled at 384. Each finished asset listed Cost 7 tokens, matching the combined 35-credit balance change. The account temporarily reserved 10 credits per submission, then returned the unused part. An in-progress balance drop was not the final charge.
These are photo charges from our session, not a promise for every input or a video price. Creating the original source image was separate from these Pika jobs. Check your current quote before generating; downloading an existing result does not need another run.
Choose a result worth keeping
| Check | What I inspect | Next change I would try |
|---|---|---|
| Face | Eyes, mouth and expression compared with source | A simpler setup and gentler light |
| Product colour | Mug and sweater cast | White light instead of coloured swatches |
| Shadows | Direction, edges and wall pattern | One light first; adjust point and Diffuse |
| Bright highlights | Lost skin or ceramic detail | Lower Brightness |
| Setup conflicts | Full prompt versus current tabs | Align manual lights with Describe text |
| Framing and detail | Hands, hair, mug and crop | Keep the original file and compare at full size |
I would begin with one preset, decide what needs changing, then move to Edit. Use Describe for a specific request that matches the setup. Save the input, settings and output together so the next attempt changes something you can name.
Does moving the dot generate a new result?
No. It changes the setup preview. Press Relight photo to submit a paid generation. Check that the dot moved before pressing the button.
Can I turn one of these photos into a clip?
Yes, the completed photo offers an Animate workflow. We did not animate these relighting tests. For a separate clip, follow our Pika image-to-video guide and check that app’s model, duration and cost.
Will a preset change the source file?
Our original stayed attached while each run created a separate result. I keep the original as the input when comparing setups; using a previous result would also carry its earlier changes into the next test.