
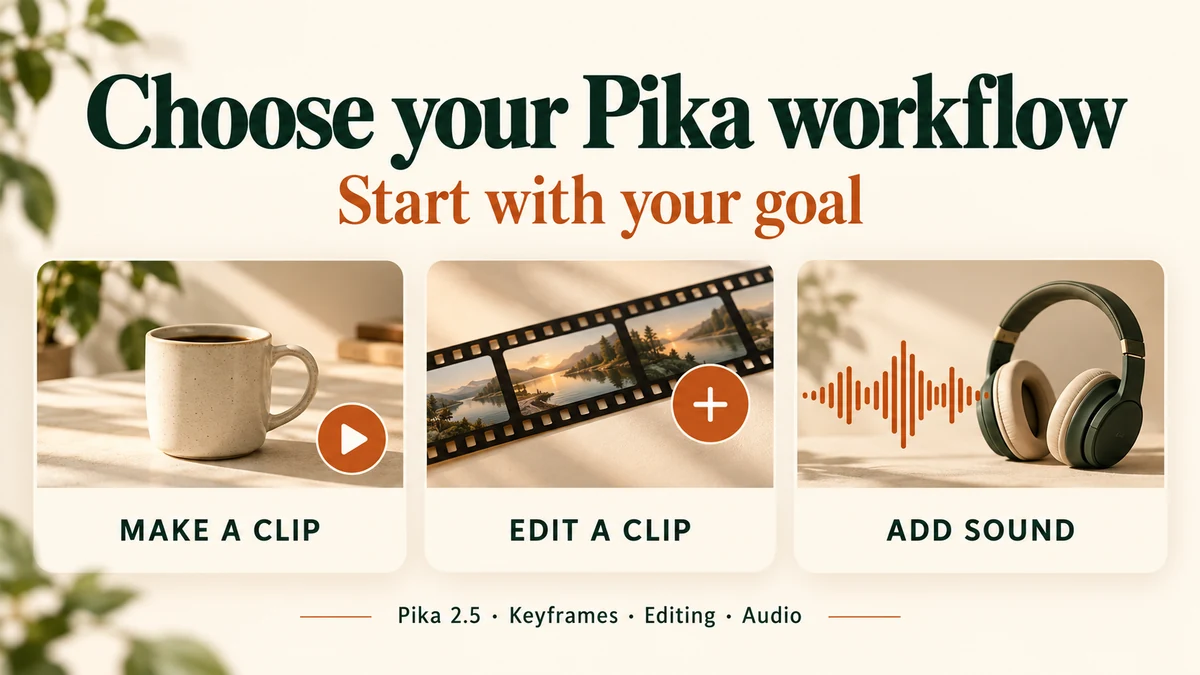
I choose the input and the job before I choose the model. If I already have a product photo and need a short clip, I start with Pika 2.5 image-to-video. If I have footage and want to add something to it, I inspect an editing feature. If the clip is finished and needs sound, I open an audio workflow.
Pika’s current site puts several studios, models and features together. The first option it recommends can be a model from another provider. We’ll make the selection explicit, check what the chosen feature accepts, and run one small test before spending more credits.
Interface checked on 7 October 2026. We generated one new Pika 2.5 clip at 720p for five seconds, quoted and charged at 20 credits. We also show our two earlier 1080p tests from 6 October. Other features below were inspected in the interface; we did not generate their outputs or compare their quality.
Choose from your goal
| Your goal | Where I’d start | What you need |
|---|---|---|
| Invent a short scene from words | Pika 2.5, with no photo attached | A prompt describing the scene and movement |
| Animate a product photo or illustration | Pika 2.5, with one source image | The image you want to start from, plus a motion prompt |
| Set a starting image and an ending image | Video Studio with Pika 2.5 and Add Keyframes, or Pikaframes | Two compatible images and a transition idea |
| Move through several ordered stills | Pikaframes | Two to five images, in order |
| Add an element to existing footage | Pikadditions | A source video and a description of the addition |
| Explore different framing or camera movement for a clip | Camera Director | An existing video; check settings and estimate first |
| Change the lighting in a photo or clip | Relight Media | An image or video, then a preset or lighting instructions |
| Make a styled product image | Product Shot | A product photo; this is an image workflow |
| Score a finished video | Pika Soundtrack | The completed clip and optional sound direction |
| Read a script aloud | Pika Speech | A script and a voice choice |
| Create a track or one sound effect | Pika Music or Pika SFX | A music brief or a description of the sound |
These are starting points based on the inputs we saw, not promises about the final result. For a real product, I still check shape, markings and framing throughout the output.
Understand studio, model and feature
A studio is the workspace for a kind of task. Video Studio exposes video inputs and settings. Image Studio, Speech Studio and Music Studio serve other kinds of work. Smart Match offers a starting choice from your request; I still check what it selected.
A model is the generator selected for the job. Video Studio currently lists provider tabs including Pika, ByteDance, MiniMax, Alibaba, Kling and Google. Seeing a model on Pika’s website does not make it Pika 2.5.
A feature or app packages a specific workflow. Pikaframes arranges stills into transitions. Pikadditions asks for an existing clip. Product Shot works with product images. I use those input controls to decide if I’m in the right place.
Step 1: Open the workspace for your output
On Create, select Video Studio for a new video. Enter your brief and open the studio. You can also open a named app from the feature cards or Search apps. For a simple Pika 2.5 attempt, the dedicated app is a direct workflow.
Step 2: Select the model yourself
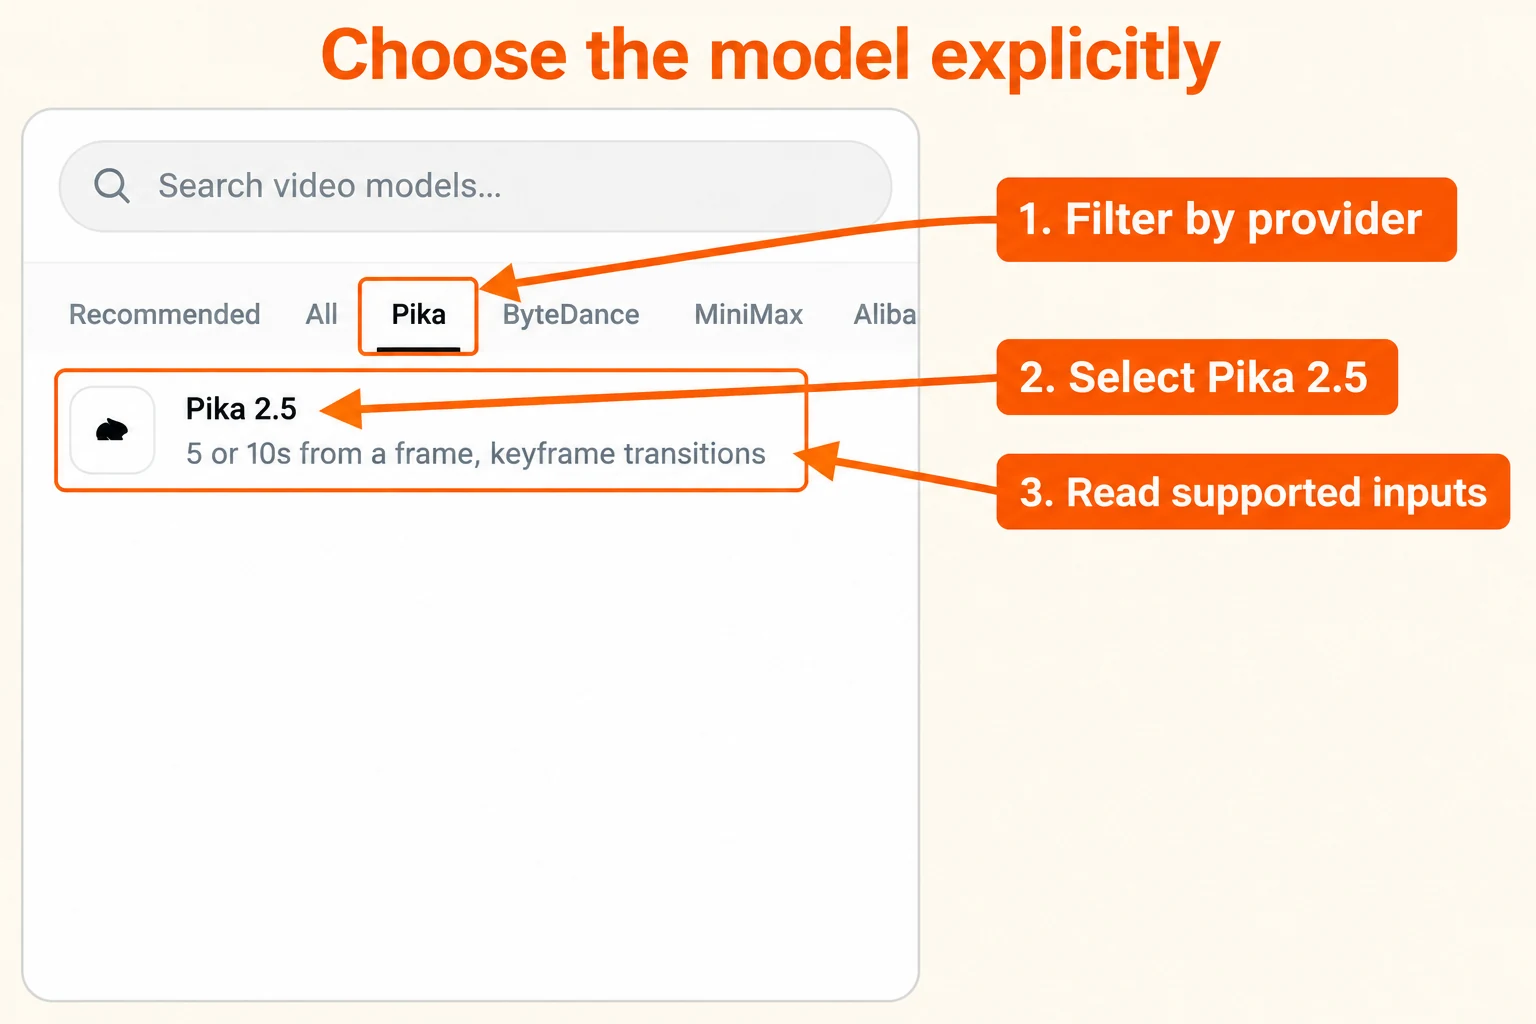
In Video Studio, open Model, select the Pika provider tab and choose Pika 2.5. In our check, the initial studio choice was Seedance 2.5. I changed it before setting up a Pika test.
Step 3: Recheck the controls after switching
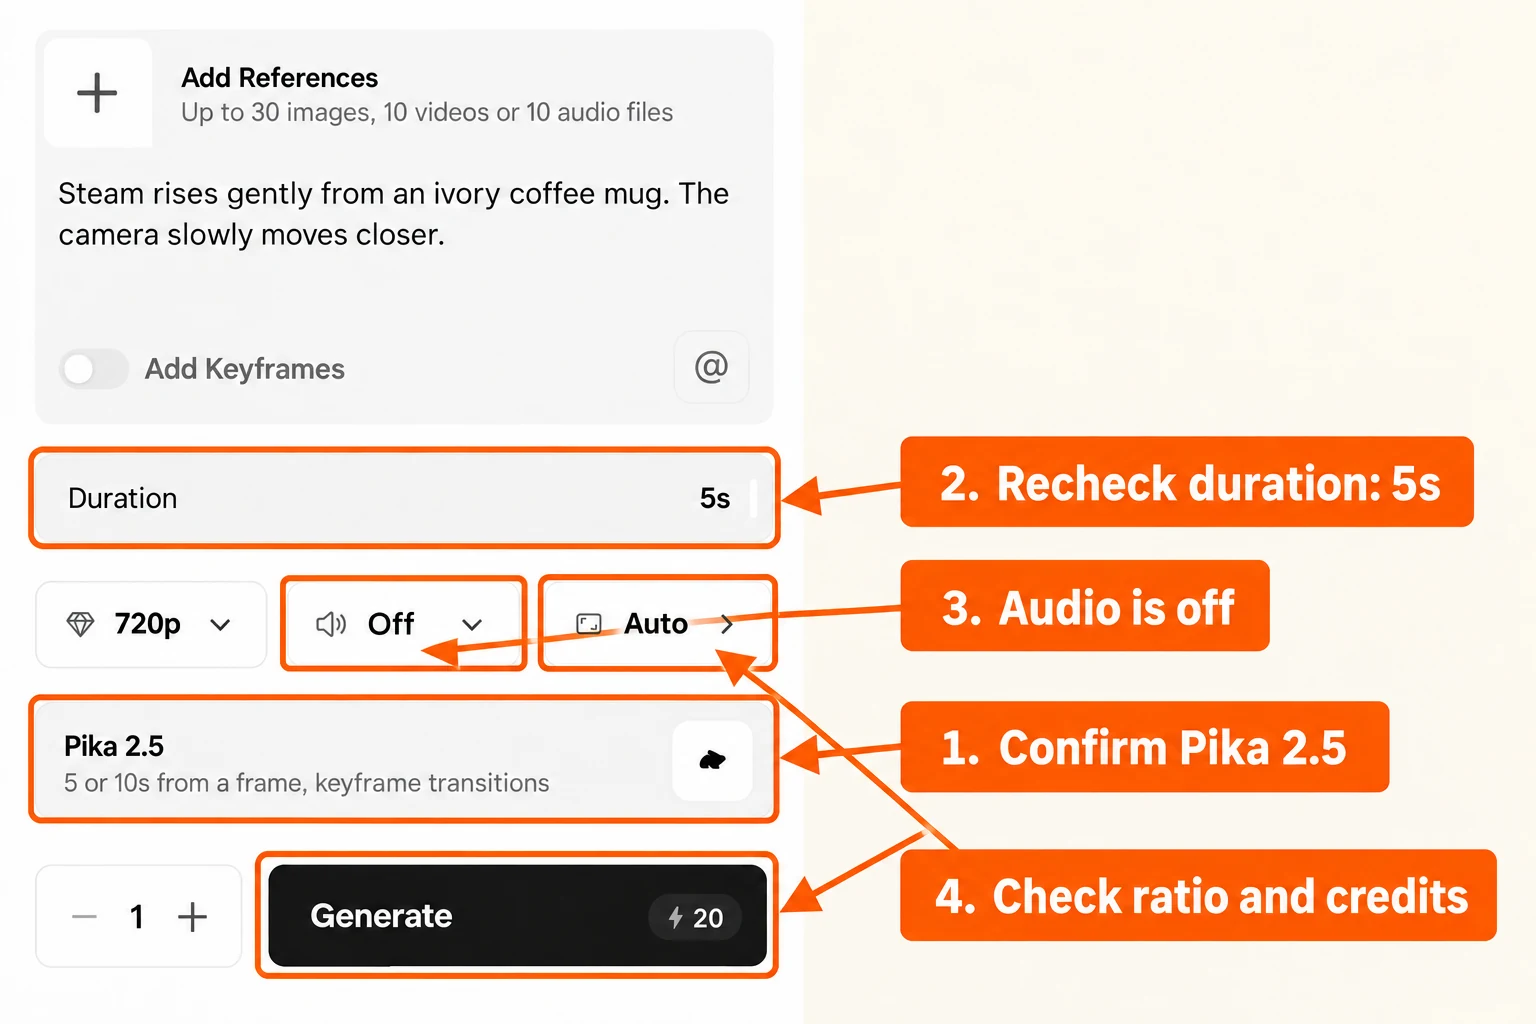
Model changes can alter duration, audio, ratio and the estimate. When we selected Pika 2.5 with a text-only input, the studio changed to 5s, Audio Off and Auto aspect ratio. The 720p estimate settled at 20 credits. These are observed controls, not settings to assume for every model or mode.
I do not force a vertical ratio or turn audio back on when the selected model does not offer them. If the delivery needs a different shape or sound, I plan that step separately and check the output before using it.
Make a new clip from words or one photo
Choose text-to-video when the scene is still an idea
Leave the image input empty. Describe one subject, a setting, light, framing and a simple movement. I would use this for exploring a scene whose appearance I have not selected yet.
Our earlier 1080p text-based mug attempt cost 45 credits. It created the mug scene, but added a pouring vessel and hand near the end and cropped the mug’s base. That attempt did not meet our clean-product brief.
Choose image-to-video when you already have the starting appearance
In the dedicated Pika 2.5 app, click + in the image area. Choose Assets → Upload, or select an image already in Assets and click Use Selection. Wait for the thumbnail. The heading changes from Text to Video to Image to Video.
Describe the movement rather than repeating every detail in the photo. I start with one action, such as steam rising or a slow camera approach. A source image is a starting point; it does not lock every detail for the whole clip.
Our earlier 1080p image-based mug test also cost 45 credits. Its captured ending kept the mug and handle visible and did not contain the pouring vessel seen in the text-based attempt. I preferred it for that brief.
The full text-versus-image comparison includes both exact prompts and ending-frame notes. Two outputs do not establish a universal winner.
Use keyframes when the endpoints matter
Step 1: Decide which images need to anchor the sequence
For one starting photo with motion, I use image-to-video. For a planned start and finish, I inspect a keyframe workflow. Choose images that show compatible subjects and framing. A large change in subject or camera position gives the model a harder transition to invent.
Step 2: Choose the keyframe workflow
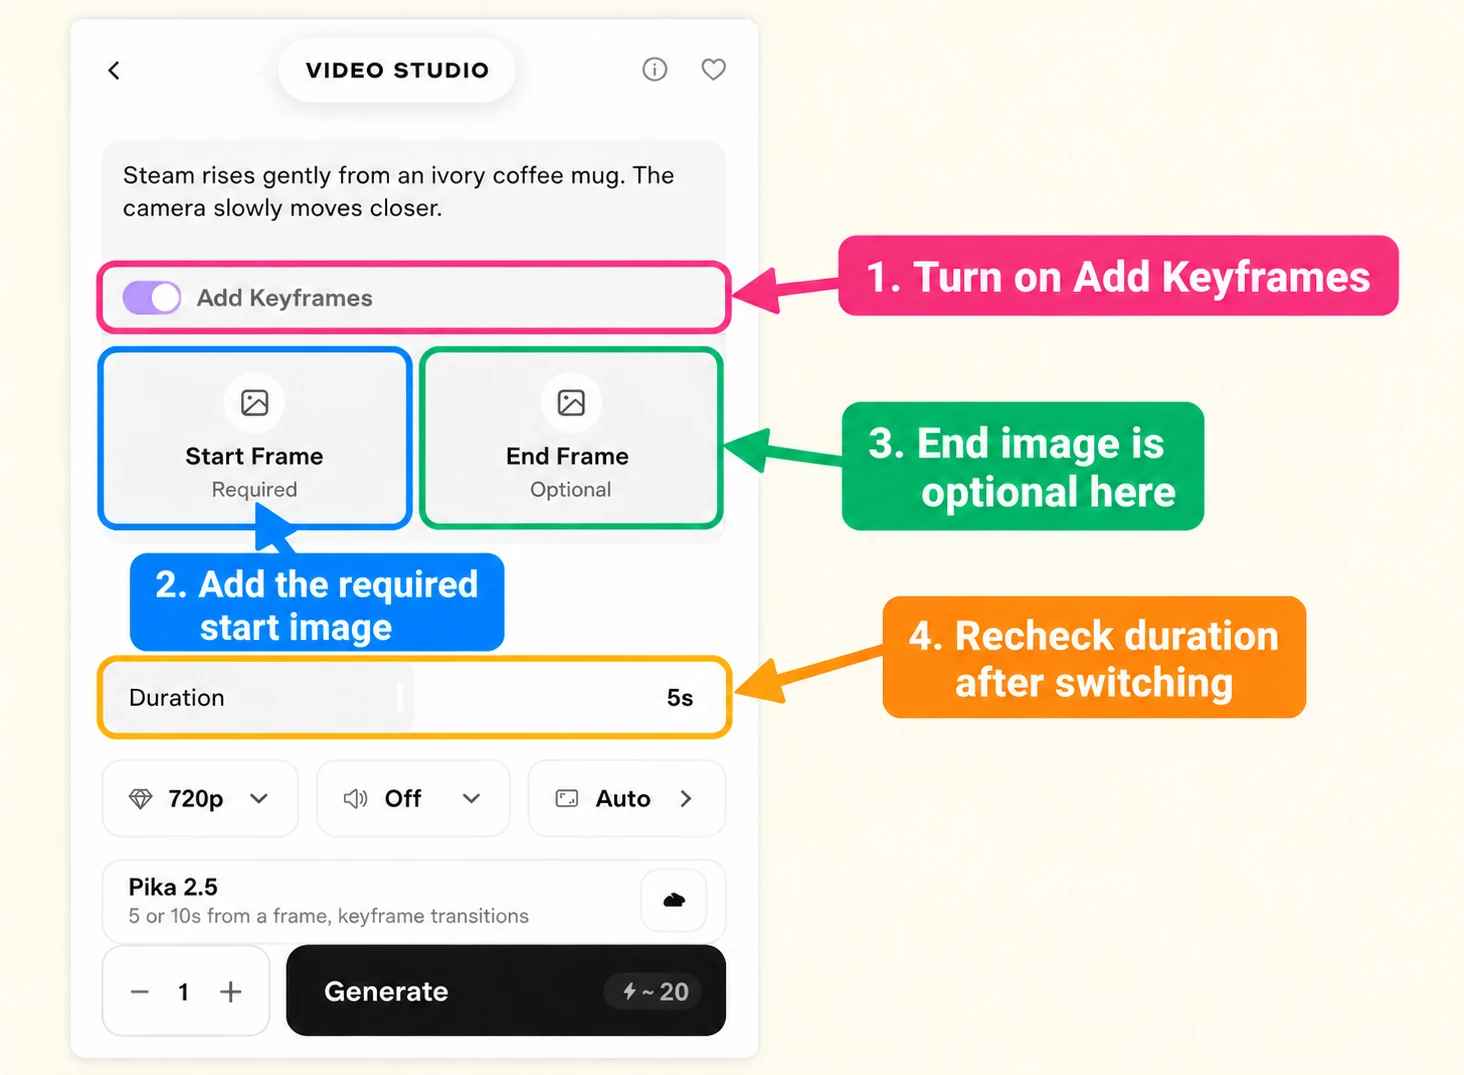
In Video Studio with Pika 2.5 selected, turn on Add Keyframes. We saw Start Frame — Required and End Frame — Optional. Supply the start image; supply the end image when the finish matters.
Turning the switch on reset duration from five to ten seconds during our check. I changed it back to five seconds. Always recheck it after changing the input mode.
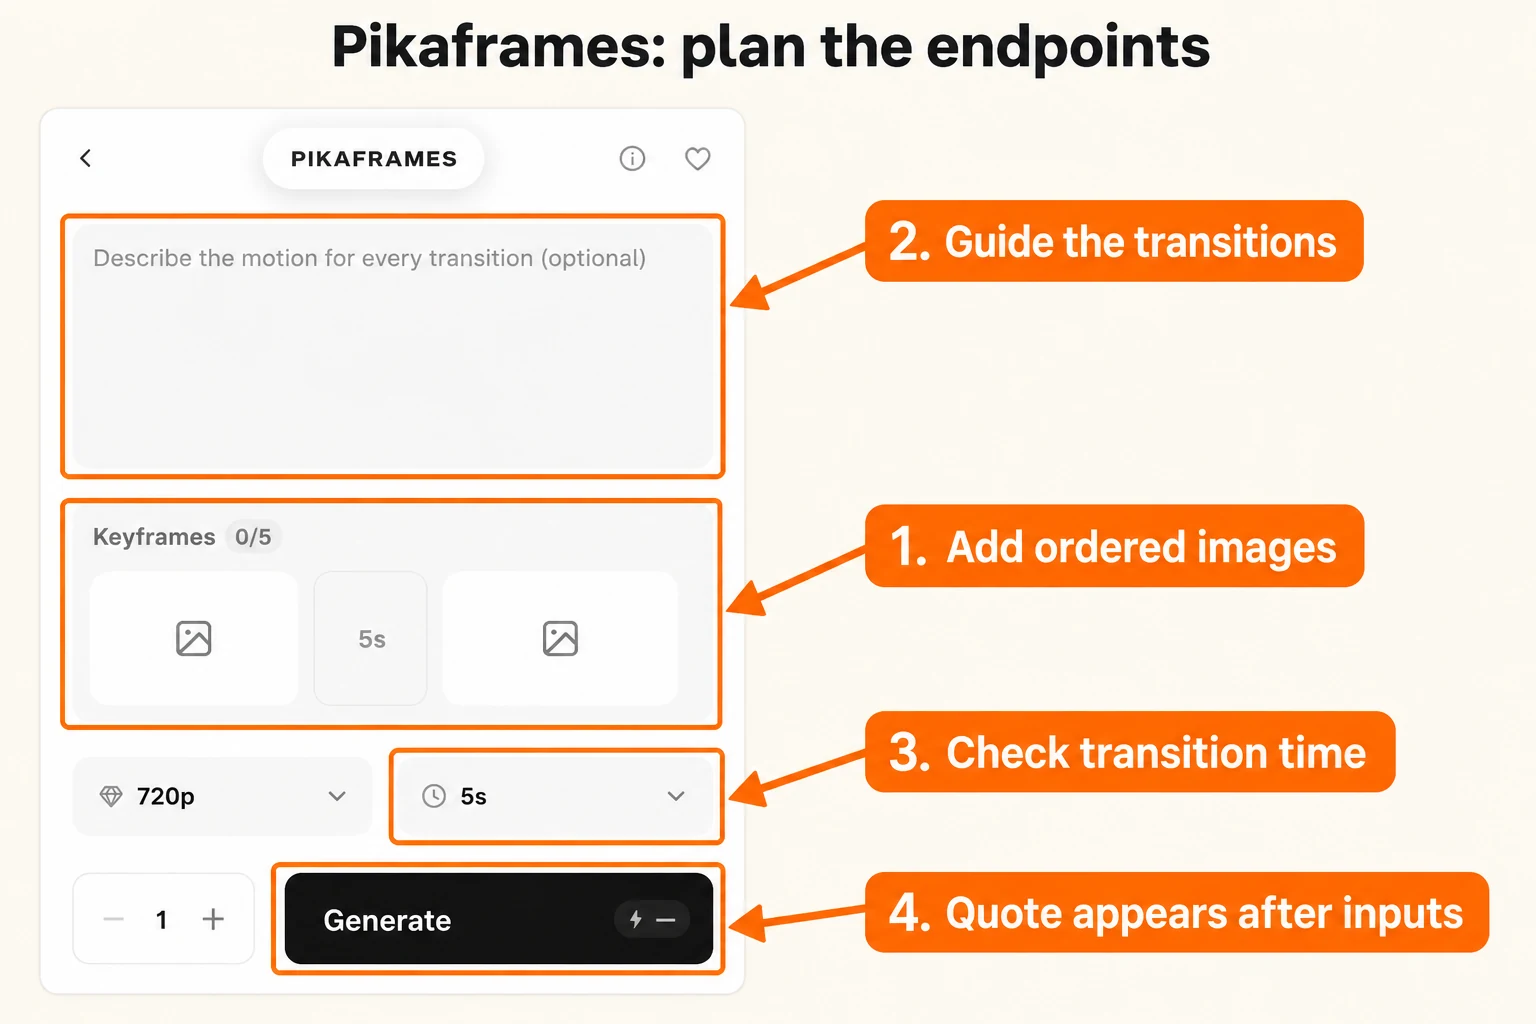
The dedicated Pikaframes app is another workflow. It showed 0/5 keyframes, two initial image slots, an optional motion prompt and a transition-duration setting. Its page describes two to five ordered images. That is a sequence workflow, so the time between images matters as well as the number of images.
Step 3: Check the transition before adding more images
I would start with two images and one short transition, then inspect the subject, path and ending composition. We checked these controls but did not generate a Pikaframes output. Our mug tests do not prove how well it follows specified endpoints.
Edit footage or prepare an image
Add an element with Pikadditions
Open Pikadditions when you already have a video and want to add something to it. The controls ask for Source Video, an Element, and a prompt describing the addition. I would describe where it belongs, its size and its action, then compare the output against the original clip.
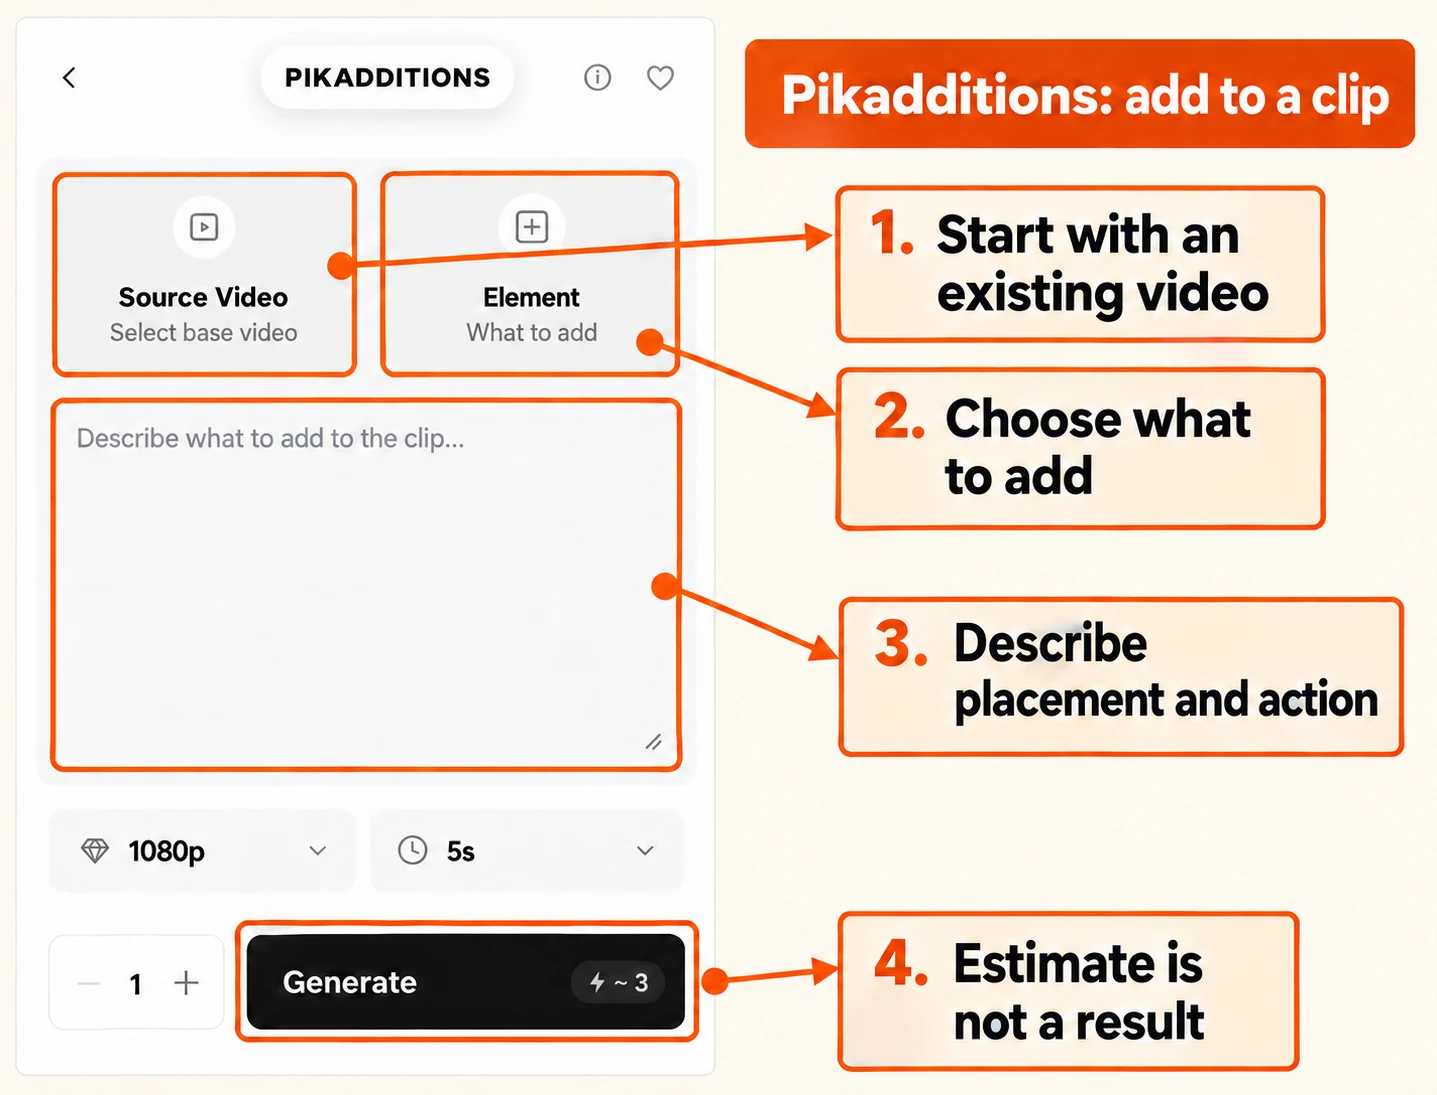
Do not treat an addition as a removal or a replacement. Check that the feature describes the change you want. I would keep a copy of the original and inspect the surrounding scene, not only the added element.
Change camera treatment or lighting
Camera Director showed a source-video upload, shot framing, shot angle and camera-motion controls. I would inspect it for a new treatment of existing footage, then read the estimate before generating. Its initial estimate differed substantially from our short Pika 2.5 test; do not assume every app uses the same credit budget.
Relight Media showed a photo-or-video input and Presets, Edit and Describe lighting tabs. It is a possible starting point for a lighting change. We did not generate either feature’s output, so I cannot confirm how accurately they preserve subjects, framing or movement.
Prepare a still with Product Shot
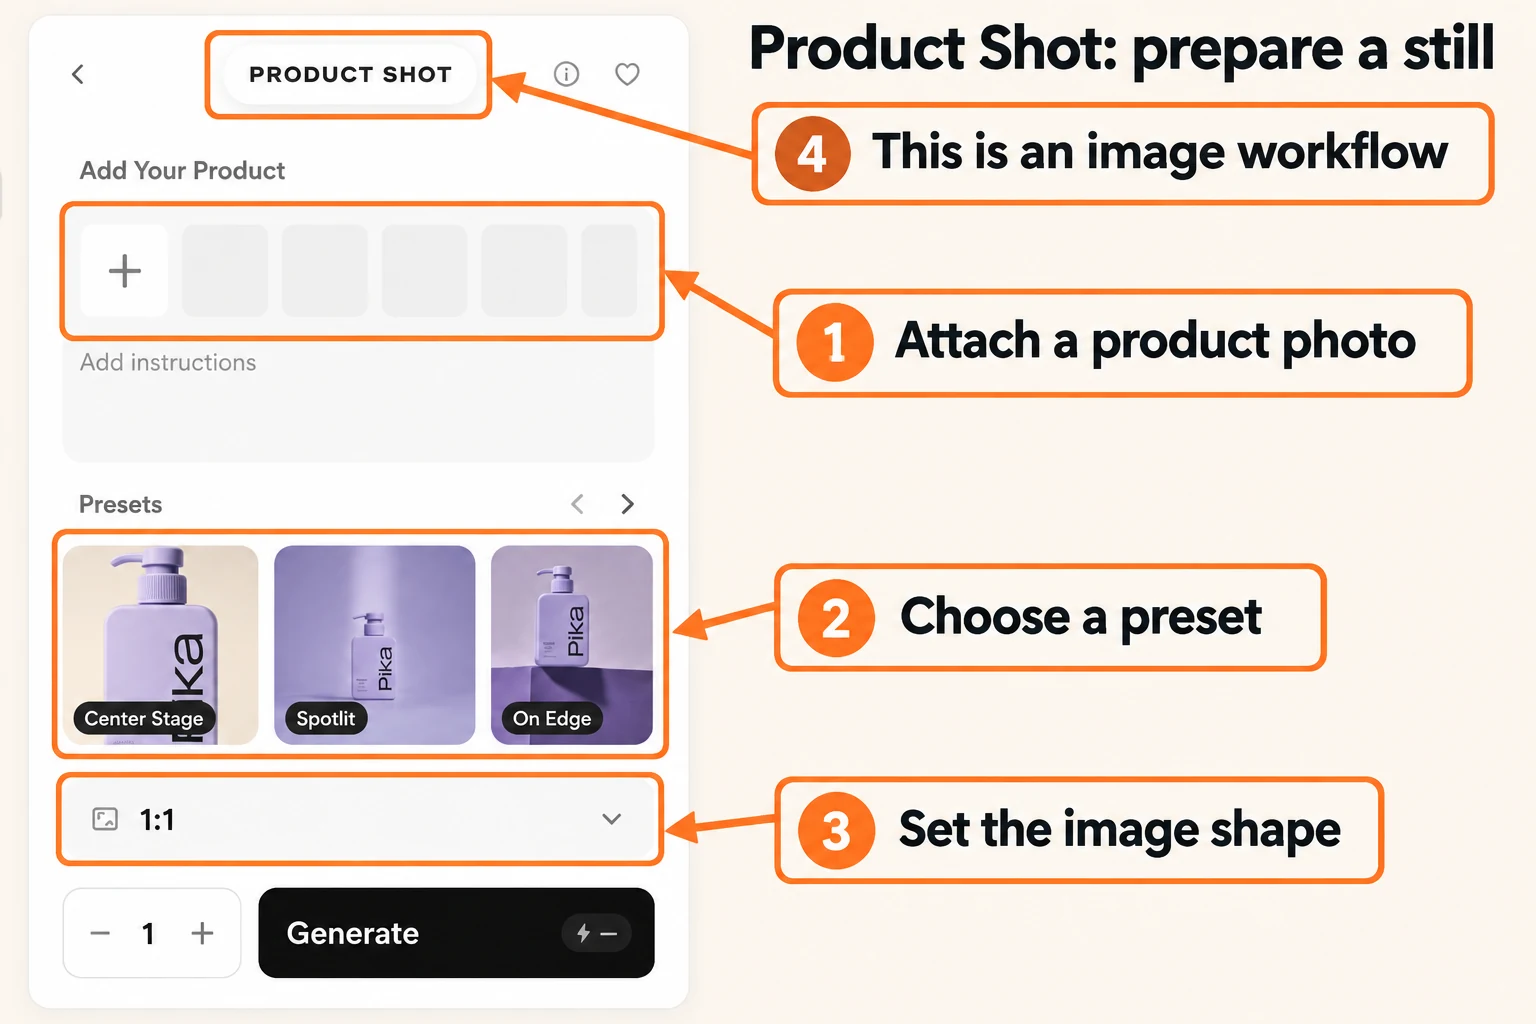
Product Shot showed Add Your Product, instructions, image presets and an aspect-ratio control. Use it to explore a styled product image. If the next step is a video, first select a suitable still, then animate that image in the video workflow.
Choose the audio job separately
Our Pika 2.5 video tests have no audio track. I would finish choosing the clip before spending credits on sound, so a rejected shot does not also leave me with sound I cannot use.
| Need | Audio mode we inspected | First input check |
|---|---|---|
| Sound tied to a finished clip | Soundtrack | Add the video, then optional instructions |
| Spoken narration | Speech | Add the script and choose the voice |
| A new music track | Music | Choose the approach and enter the music brief; lyrics and a reference can be optional |
| A sound such as a click or impact | SFX | Describe the effect and check duration |
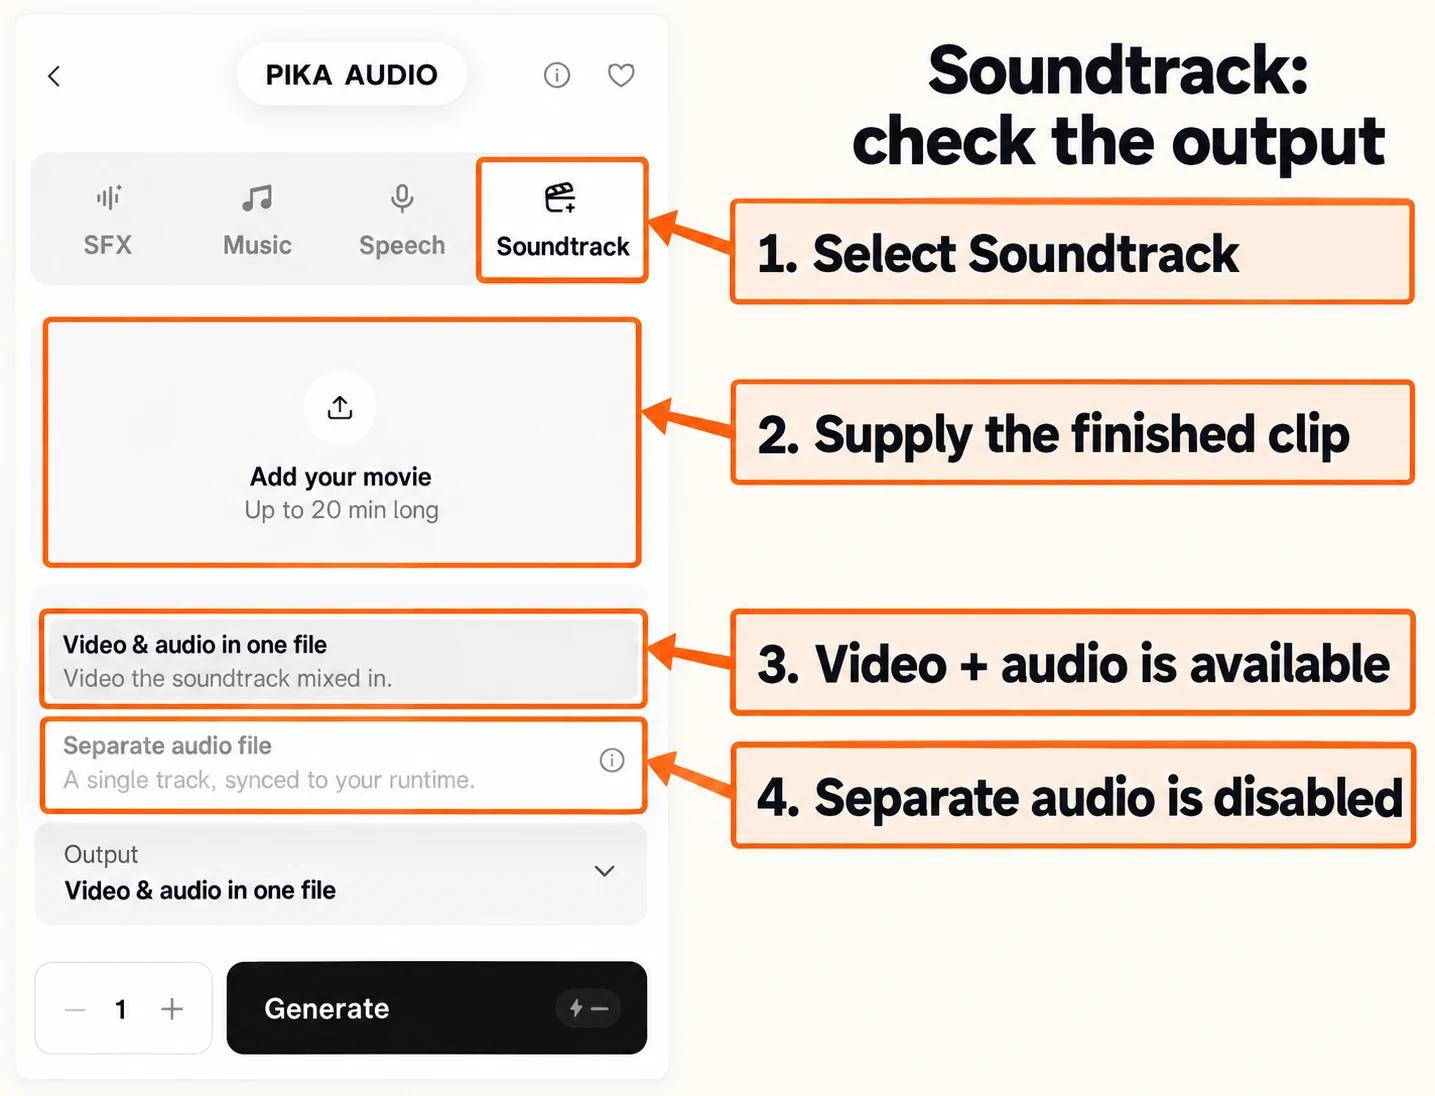
In Soundtrack, choose the mode, attach the movie and check Output. During our check, Video & audio in one file was available; Separate audio file was disabled. I would not plan an audio-only export from that control until it is available in my account.
Run one small test before committing to the workflow
Step 1: Write a pass condition
For our new test, I wanted the entire mug and handle visible, gentle steam, and no added pouring action. This is more useful than asking if the result looks impressive: it gives us a reason to accept or reject the clip.
Step 2: Choose a short, affordable attempt
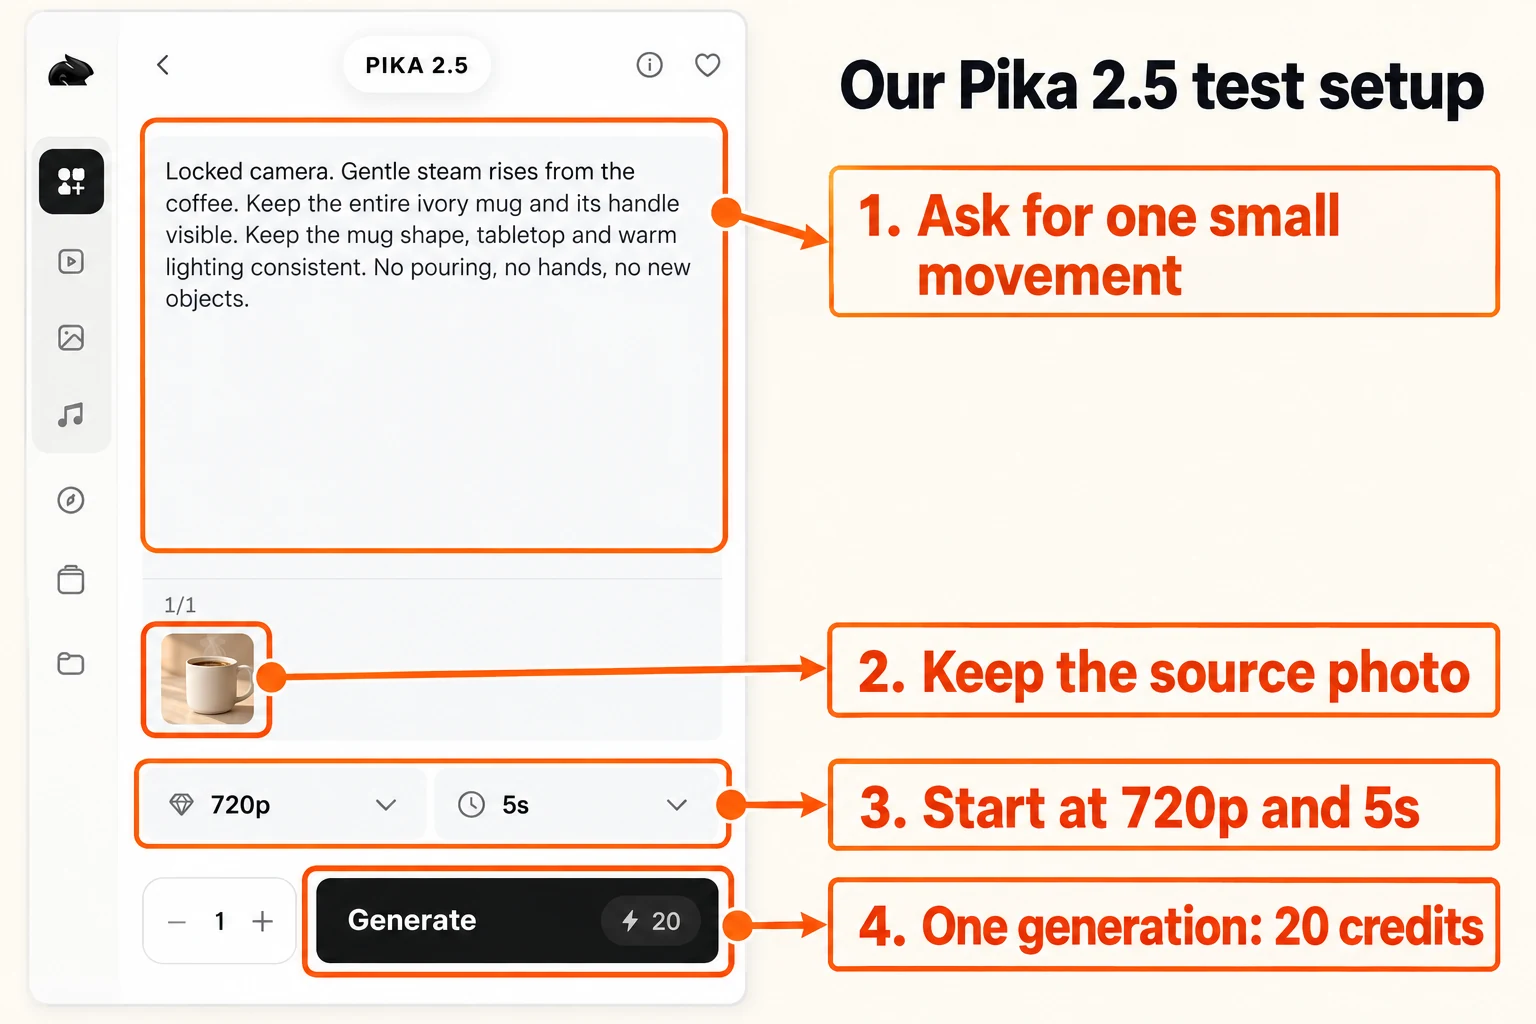
We selected Pika 2.5 Image to Video, reused the tutorial’s AI-generated mug image, and set 720p, 5s and 1 generation. The screen quoted 20 credits, and the account balance dropped by 20 after submission.
Here is the exact prompt:
Locked camera. Gentle steam rises from the coffee. Keep the entire ivory mug and its handle visible. Keep the mug shape, tabletop and warm lighting consistent. No pouring, no hands, no new objects.
Step 3: Inspect the ending and record the result
The generation completed. Its asset details reported 1304 × 706, 0:05, one run and a cost of 20. That is the reported file size in pixels, not a claim that every 720p export is exactly 1280 × 720.
The starting frame showed the mug and steam. The ending frame kept the mug and handle visible, but a vessel poured into it from above. I rejected this attempt for our brief. The source photo and the “no pouring” instruction did not prevent the unwanted action.
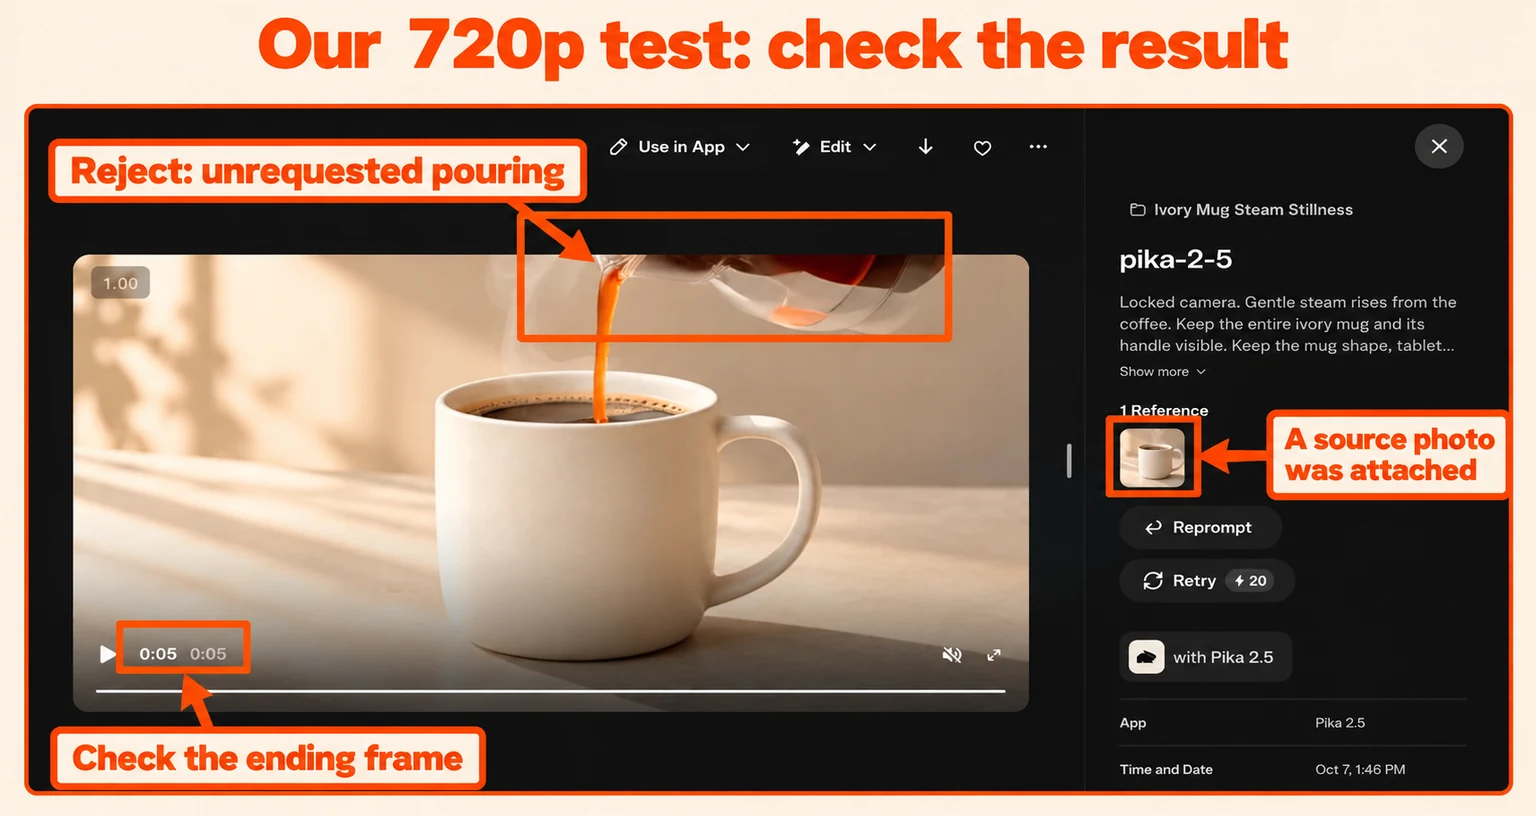
The new clip remains in our Pika project; the frame above documents the result. The two playable clips earlier in this guide are the 1080p tests from 6 October, not this 720p attempt.
I would next simplify the requested action or try a different suitable source image, changing one thing at a time. I would not spend more on resolution to solve an unwanted action: more pixels alone do not fix the brief. A successful export and a useful clip are separate checks.
Step 4: Keep a short record
Save the source image, prompt, model, input mode, quality, duration, quoted credits, charged credits and the reason you accepted or rejected the output. Before another generation, check:
- The selected feature accepts the files you have.
- The model label matches the model you intend to test.
- Duration, ratio and audio still fit after changing modes.
- The estimate fits the budget for this attempt.
- The beginning, middle and ending meet your pass condition.
We generated only Pika 2.5 for these examples. Models such as Seedance, MiniMax, Wan or Veo appear in the current menu, but we have not tested them here. If you compare one, use the same brief and inputs, record its own settings and cost, and judge the output against the same goal.
If you already have a photo, follow our image-to-video walkthrough. If you still need to decide what kind of input to use, try the workflow finder. Both help you choose a first attempt; your completed clip still needs review.