
What is Pika in ChatGPT?
Pika’s ChatGPT plugin lets you ask for images, videos and audio in a conversation, then work with Pika’s creation tools inside that chat. You can describe an idea, choose an app, attach a photo and continue with a follow-up edit. The connection uses your Pika account, so checking the selected model and credit cost is part of the process.
I would use the chat approach when I know the result I want but am still deciding how to make it. “Turn this product photo into a short clip” is a clearer starting point than opening several studios and comparing every setting. We’ll connect the accounts first, explore the choices, and build a small, well-defined request.
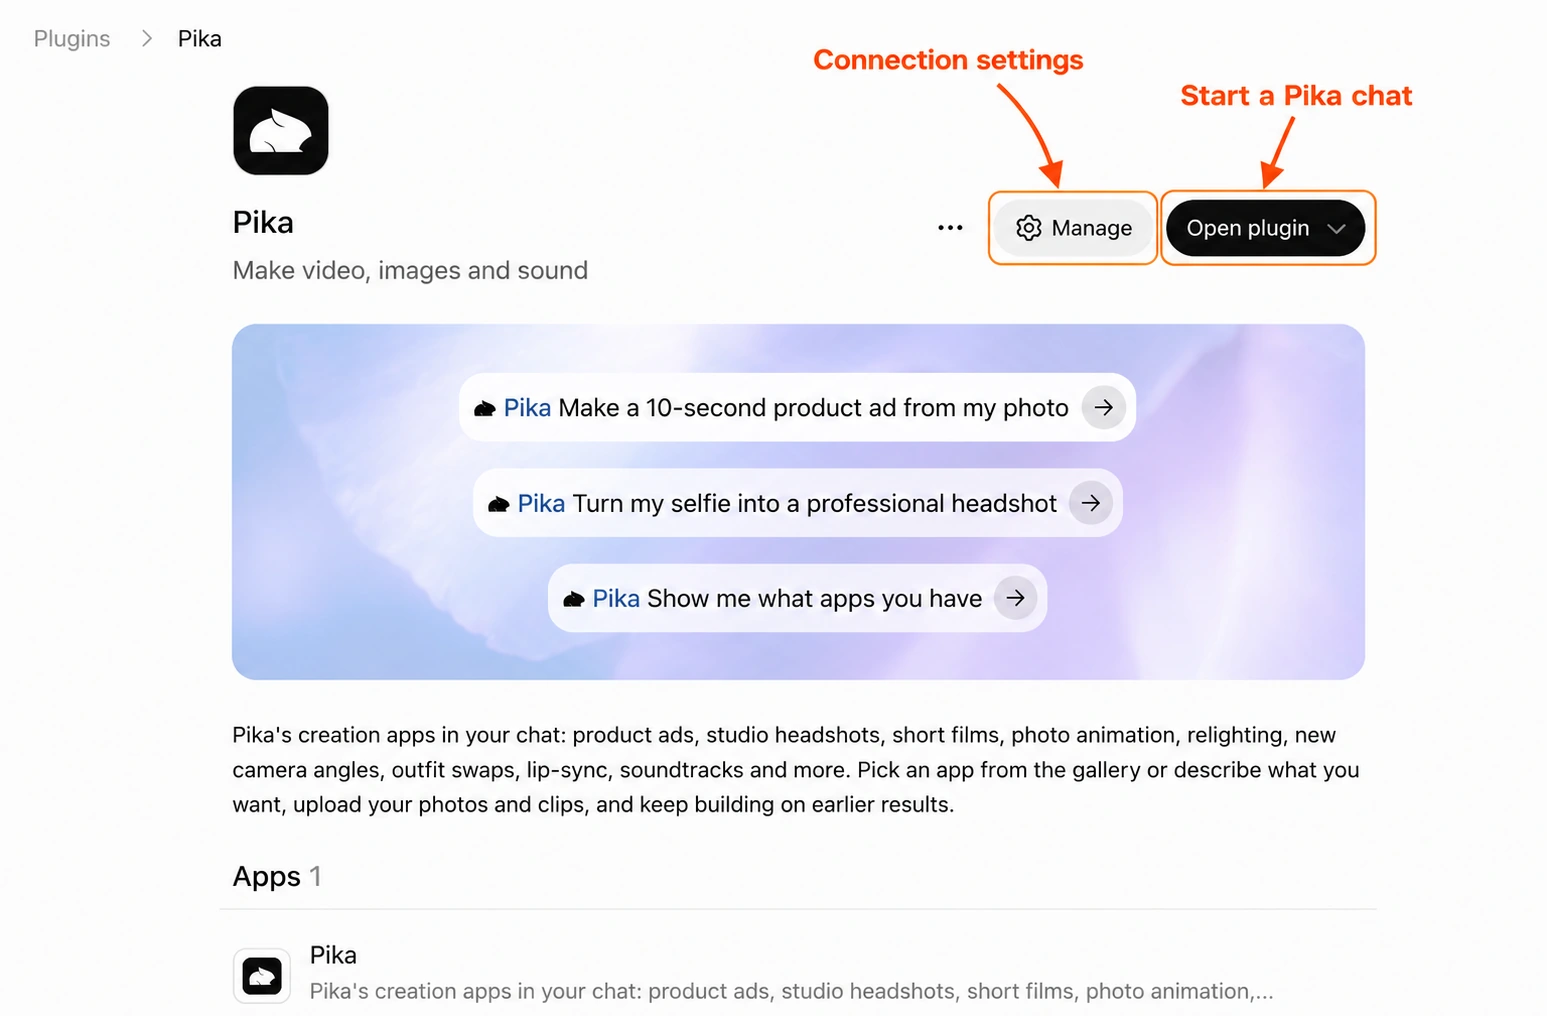
Open the Pika plugin in ChatGPT →
What Pika’s demo shows
Pika’s promotional walkthrough follows a sneaker project from product pictures into a video edit. The frames below show that example. I would use it as a way to plan the work: choose a useful product image first, then decide on movement, camera treatment and sound.
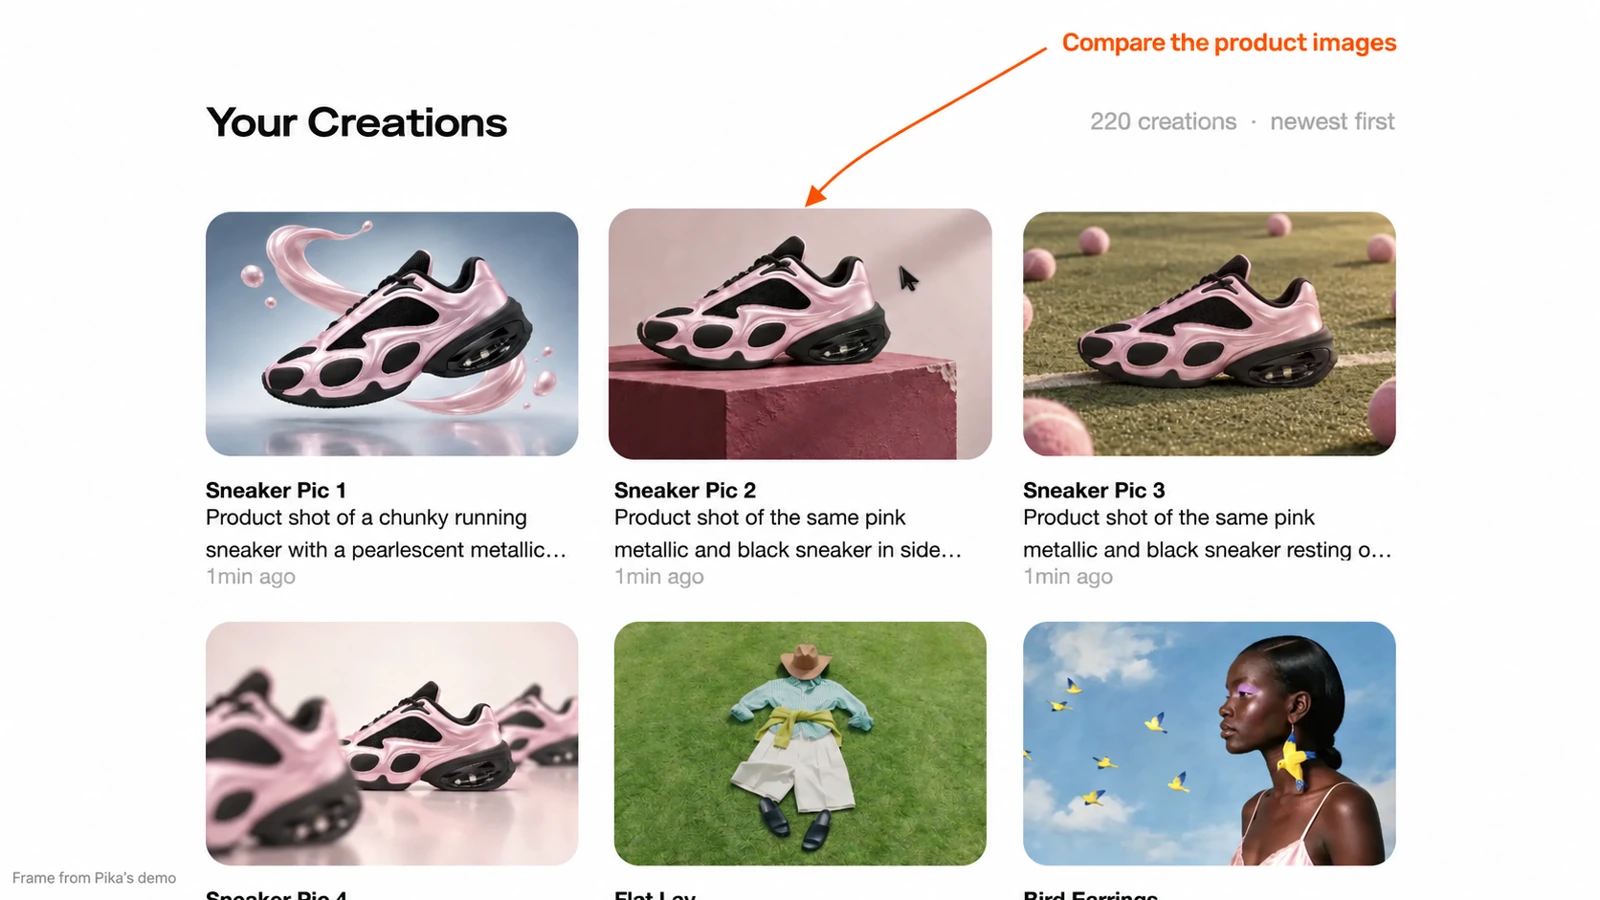
We can apply the same idea to a smaller request: attach one product photo and ask for one new setting. Check the silhouette, materials and important details before requesting more versions. The demo’s range of images illustrates creative options; it does not establish a fixed price or a guaranteed number of results for your account.
Is this useful for your project?
Start here if you want help turning an idea into a clear brief, need to combine picture and sound, or want to change an earlier creation without describing the whole project again. You do not need to write API code for the conversational workflow.
| What you have | What I would ask Pika to do | Best starting choice |
|---|---|---|
| A product photograph | Style it, then plan a short promotional clip | Product Shot or Product Ad |
| A still image | Add one clear movement | Create Video |
| A clip with the wrong mood | Change lighting or colour | Relight Media or Color Grade |
| A finished clip without sound | Add suitable background audio | Pika Soundtrack |
| A script | Read it in a selected voice | Speech Studio |
| A recurring fictional presenter | Prepare a reusable character reference | Character Studio |
| A rough story | Plan consecutive shots before rendering | The pika-video skill |
For a single photo edit, I would keep the request small. For a longer video, I would ask for a shot plan and a total estimate first. A chat can help organise several operations, but those operations may each have their own generation cost.
If you prefer seeing all settings together, our Pika Labs guide covers the website. If you are building generation into your own application, use the API Club guide instead. Connecting the ChatGPT plugin and building an API integration are separate setup tasks.
Step 1: Open the official Pika plugin
Open the plugin link above while signed in to ChatGPT. Confirm the page says Pika, identifies Pika as the developer, and describes video, image and sound creation. Select Install plugin on that page.
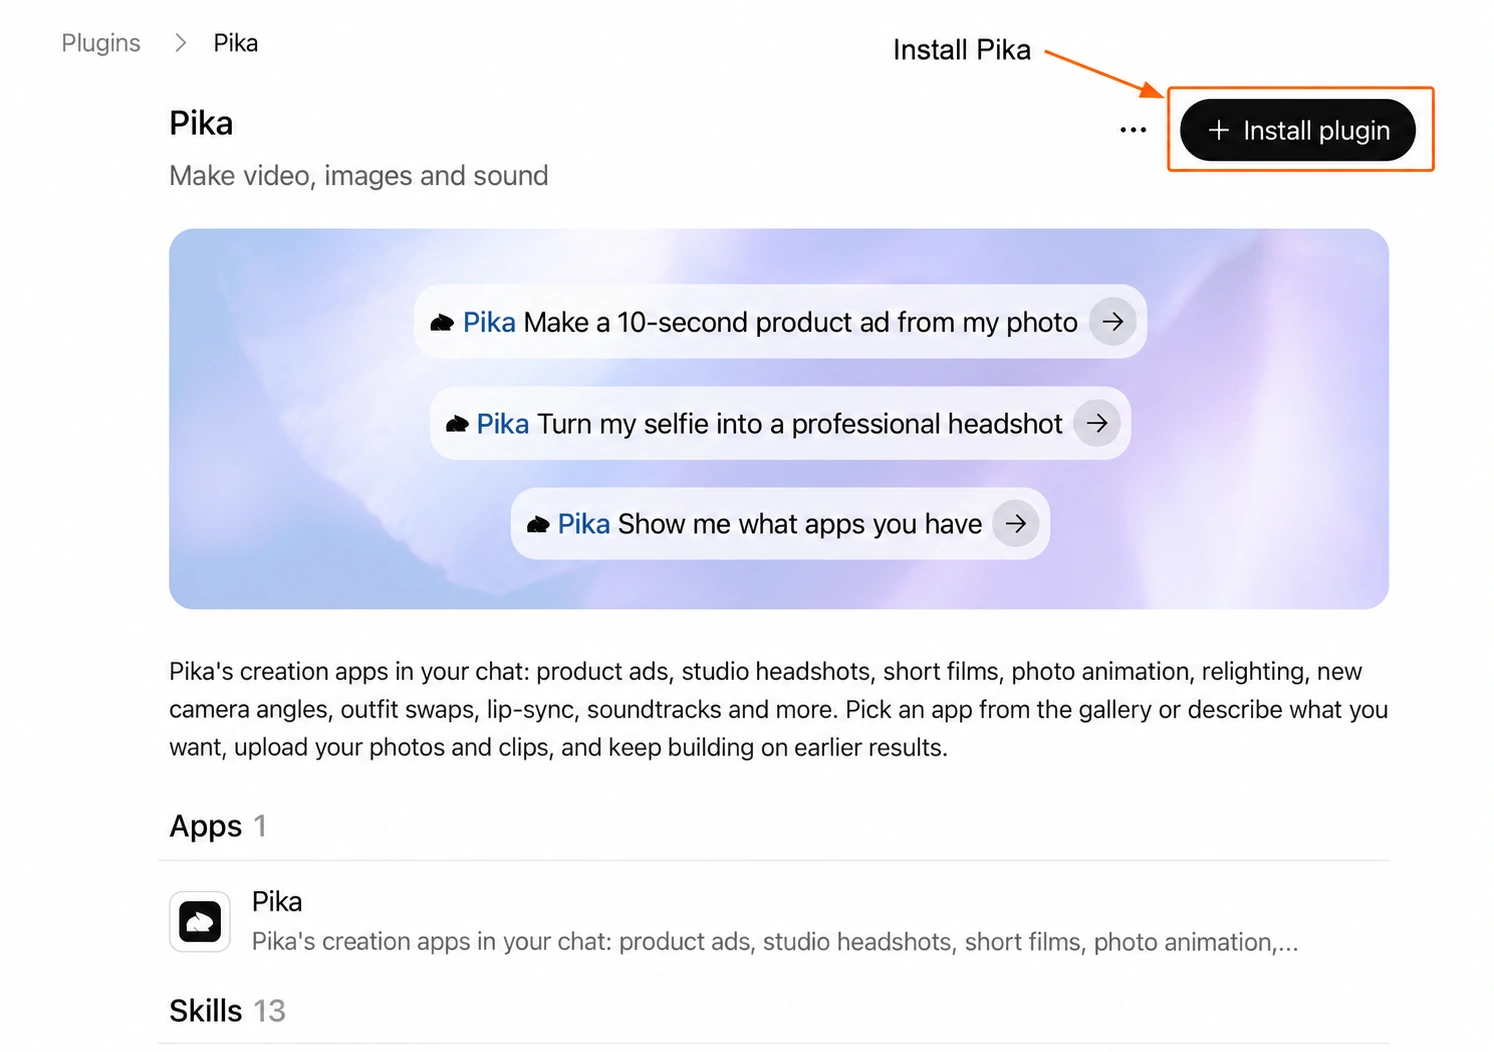
The listing also gives you starter requests. They are useful examples of the kind of instruction you can give: a product ad from a photo, a professional headshot, or a request to see the available apps. You do not need to use a starter exactly as written.
An installed plugin is not necessarily a connected account. Follow the connection screen that appears next, and wait for the completion message before trying a generation. This avoids confusing “I added Pika” with “Pika can use the account I intended.”
Step 2: Review the Pika connection screen
Pika opens a Connect to Pika screen. It identifies the signed-in Pika account, shows ChatGPT as the destination, and explains the requested access: generating images, video and audio and spending your Pika credits.
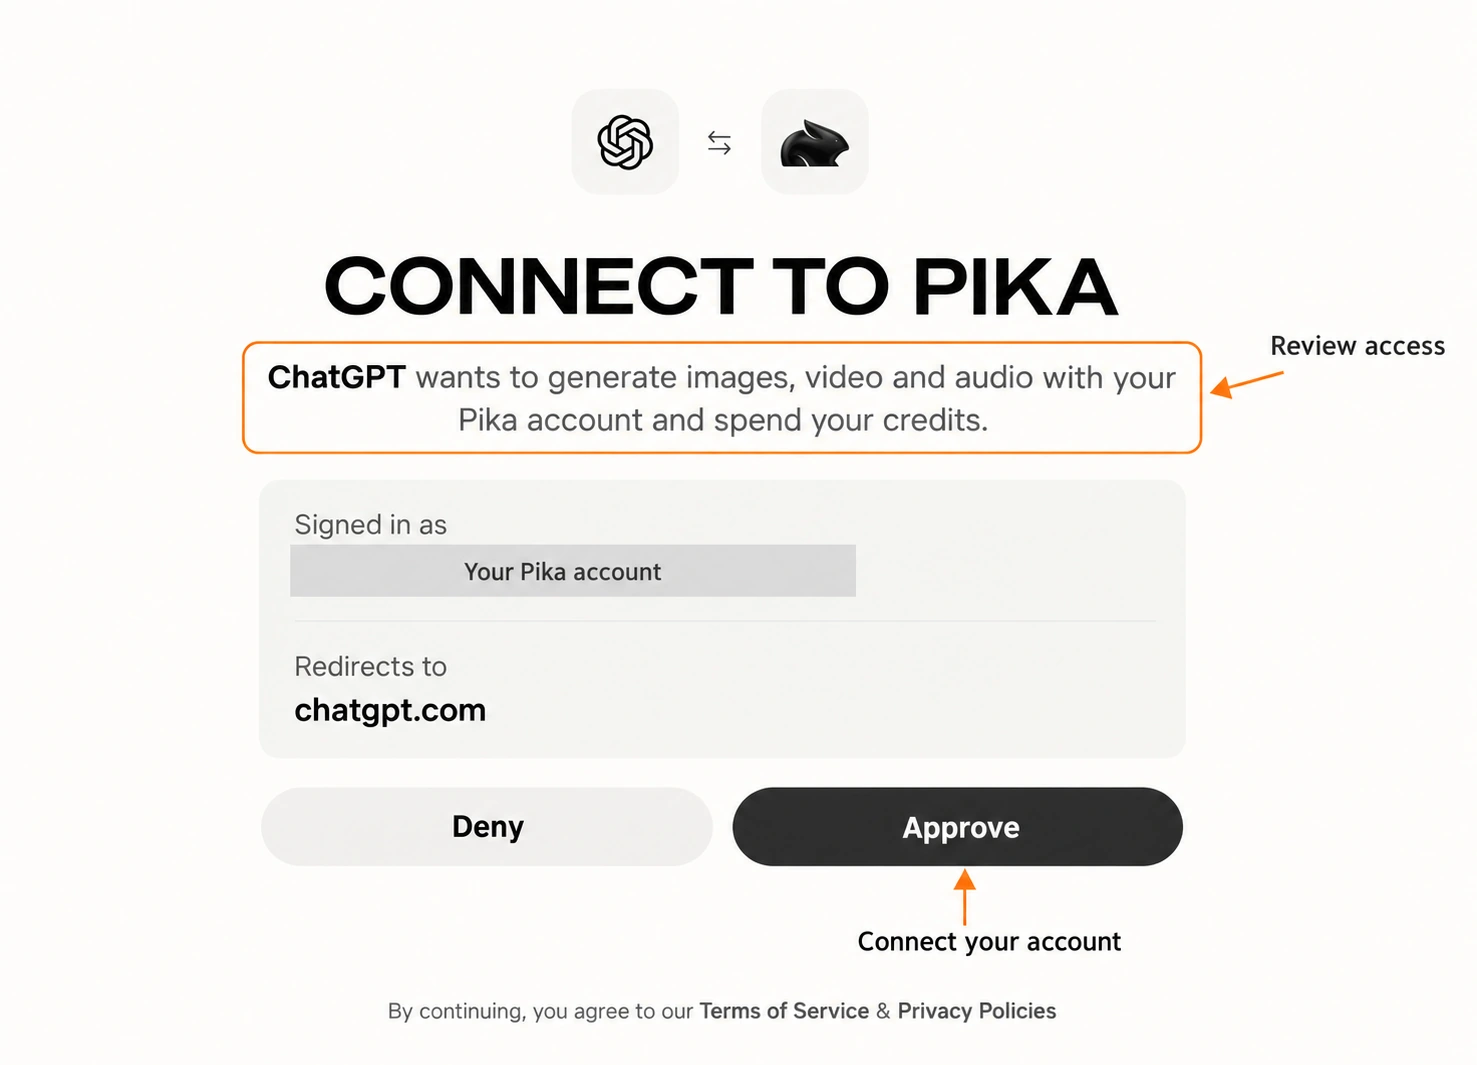
Read this screen rather than treating it as a routine next button. If the account is wrong, choose Deny and correct the sign-in before connecting. If it is the account you want and you accept the stated access and terms, choose Approve.
The plugin listing also explains that relevant chat context and memories may be shared with Pika for a request. I would use a dedicated creative chat, attach only the files needed for that project, and avoid putting unrelated private information in the prompt.
You should not need to paste a Pika password or an API secret into an ordinary chat message to complete this screen. The visible account connection handles the sign-in handoff. Keep credentials out of screenshots, prompts and shared project notes.
Step 3: Complete setup and decide how to approve spending
After connection, ChatGPT shows Pika is ready for use. Choose Set up Pika to start its onboarding conversation. Maybe later lets you leave the optional setup for another time.
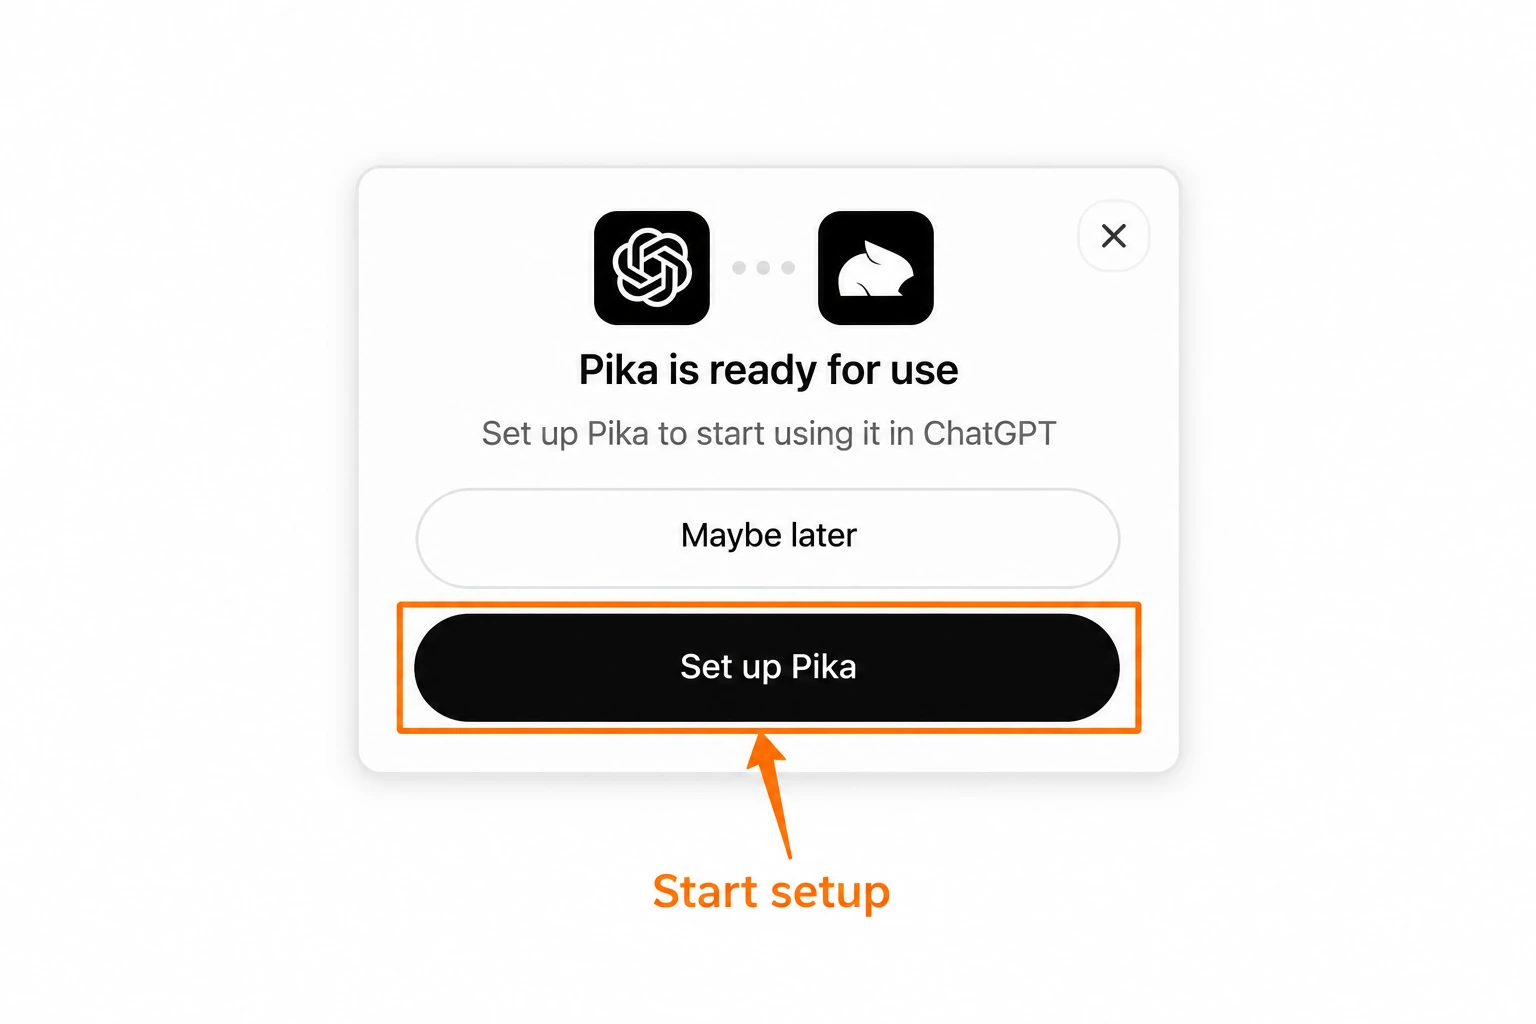
The onboarding skill helps establish what you make and how Pika should ask before spending credits. It can also ask about saving a creative profile. Treat that as a separate preference: a profile may help personalise suggestions, but your current project brief can still contain the information needed for a single task.
For a beginner, I suggest an explicit instruction such as:
Help me use Pika for short product clips. Show me the selected model, settings and credit estimate before each generation. Keep each request to one result. Ask before changing the model or starting a retry.
This makes your intent clear. It does not replace the actual price shown by Pika or guarantee that every request has the same cost. Read the relevant card before approving it, especially after a model, duration or quality change.
Step 4: Open the app gallery and choose one task
Ask “Show me the Pika apps.” The embedded gallery gives you a prompt box, an attachment control, a model selector and starter ideas. Browse the app cards or use the search box to find a specific tool. Some gallery layouts also provide See all apps.
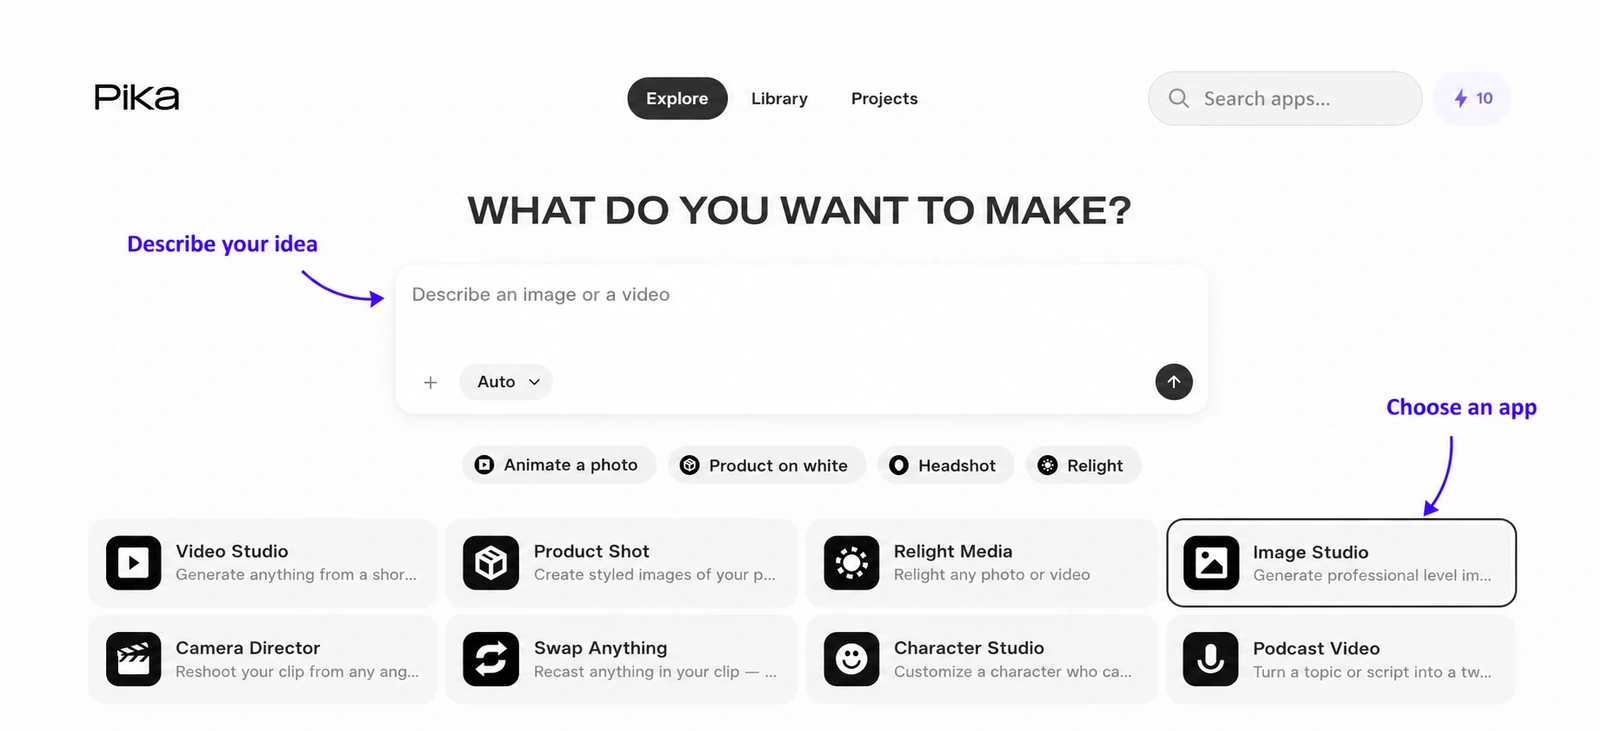
The gallery brings image, video and audio work together. The names, order and number of cards can change. Use the app descriptions to make your choice, and use Library or Projects to return to existing work.
Some useful distinctions: Product Shot styles a product picture; Product Ad builds a promotional video. Speech Studio turns words into spoken audio; Podcast Video includes on-camera presentation. Trim Video shortens an existing clip; Extend Video asks for new material beyond it.
For our example, the subject is an unbranded ivory mug. I would first prepare a clean image, then animate a single movement. This gives us a simple way to evaluate each stage: does the picture have the right object, and does the video keep that object consistent?
Do not select a large production workflow just because it appears first. Match the app to the deliverable. A still for a product page does not need a video model, and a five-second motion study does not need a multi-scene film plan.
Step 5: Select a model and write the brief
The gallery’s model selector includes Auto and named choices. The menu we explored includes Pika 2.5, Seedance 2.5, Kling 3.0 and Veo 3.1 for video, plus image choices such as Nano Banana, GPT Image 2.5 and Seedream 5 Pro.
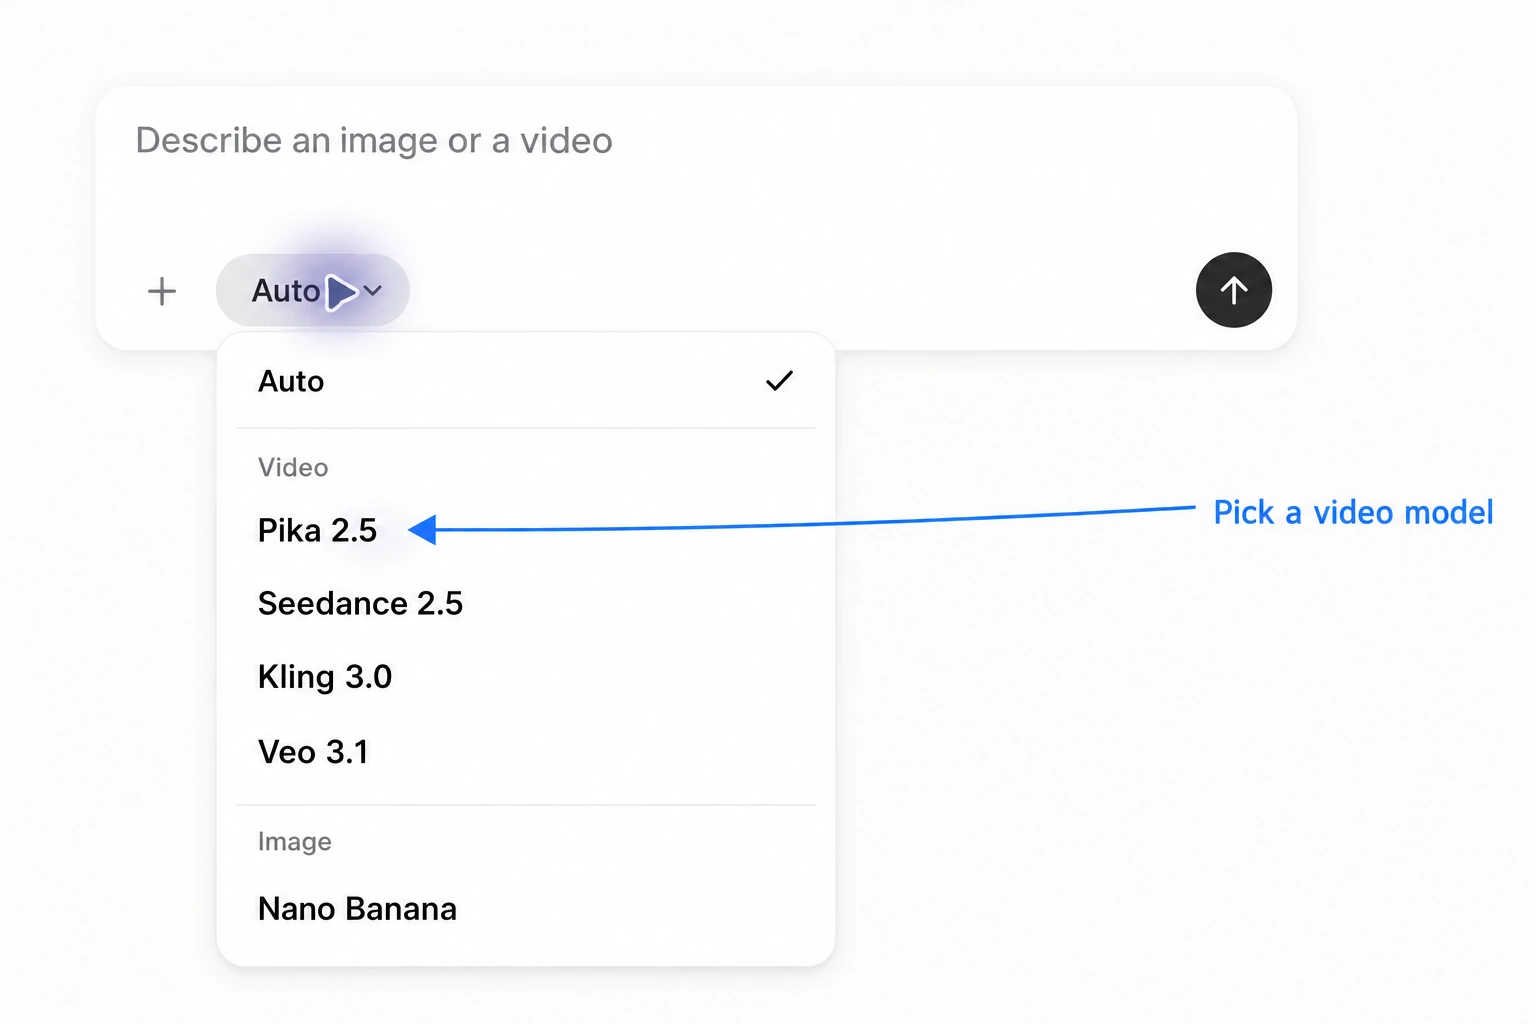
A model name is not a complete set of settings. Ask ChatGPT to confirm the available duration, image size, aspect ratio, audio behaviour and price for your specific operation. A feature in one Pika app does not prove that every other model supports it.
Here is a practical still-image brief:
Use Pika to prepare one product image of an ivory ceramic coffee mug on a beige tabletop. Soft window light comes from the left. Keep the handle fully visible and leave space around the mug. Use a plain background and an unmarked surface. Show the selected image model and price before running it.
For animation, use the chosen picture as the reference and describe the movement:
Animate this mug image with Pika 2.5. Steam rises gently while the camera moves slowly closer. Keep the mug shape, handle, tabletop and lighting consistent. Prepare one five-second clip and show the available settings and price first.
The first brief defines the scene. The second defines what changes over time. I would avoid adding several camera moves, a hand entering frame, pouring coffee and a background transformation to the same short test. One action is easier to inspect and improve.
Step 6: Review the request before creating
Before approving a generation, compare the request with your brief. Check the source image, selected model, output count, duration and quality. If the card provides a Sent to the model section, open it to inspect the actual prompt and settings.
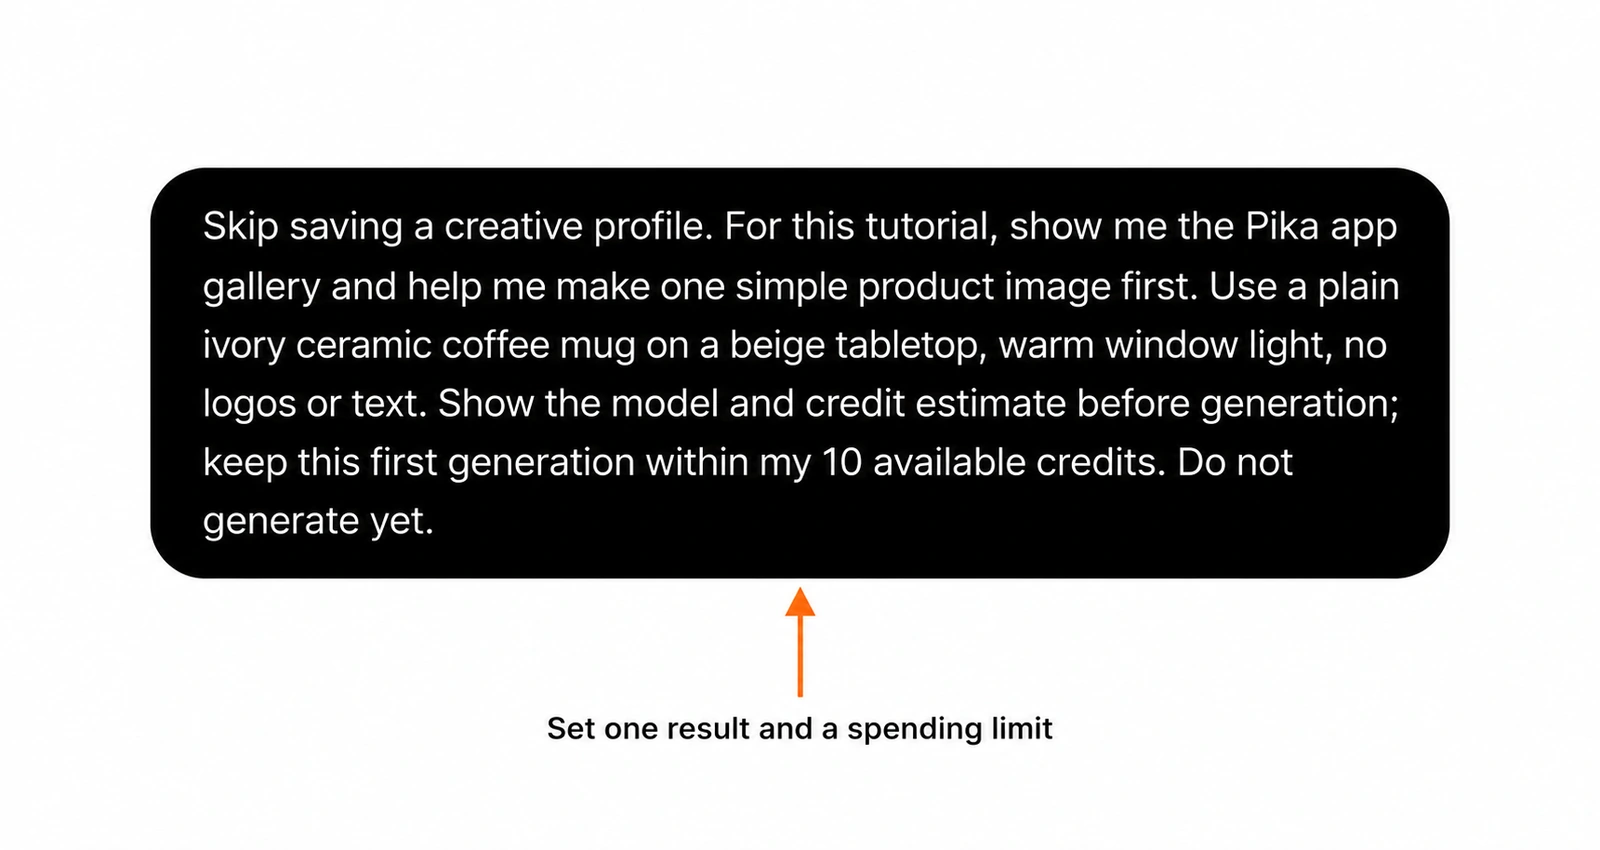
A useful request has two parts: what the media should contain, and what you authorise Pika to run. “Make something good” leaves both unclear. “One five-second mug clip, one result, show the price first” gives you a much better review point.
If the price is shown as a range, budget against the upper end. If the estimate is missing or does not match the selected settings, pause and resolve that before approving. Do not assume a price from another guide, another app or an earlier session applies unchanged.
After starting a job, follow its progress instead of repeatedly sending the same prompt. A retry can create another paid request. When the result is ready, inspect the whole file before asking for an edit: the opening frame alone will not show a sudden shape change halfway through a clip.
For a product video, I would check the silhouette, handle, label area, reflections and background. For speech, I would listen for pronunciation and pacing. For music, I would listen for an ending that works with the planned edit. The right review depends on the deliverable.
How Pika’s 250-credit offer works
Pika announced 250 extra credits after a first plugin generation. Its own website also displays a banner inviting users to generate through the ChatGPT plugin for the extra credits. Installation by itself is not the event described in that offer.
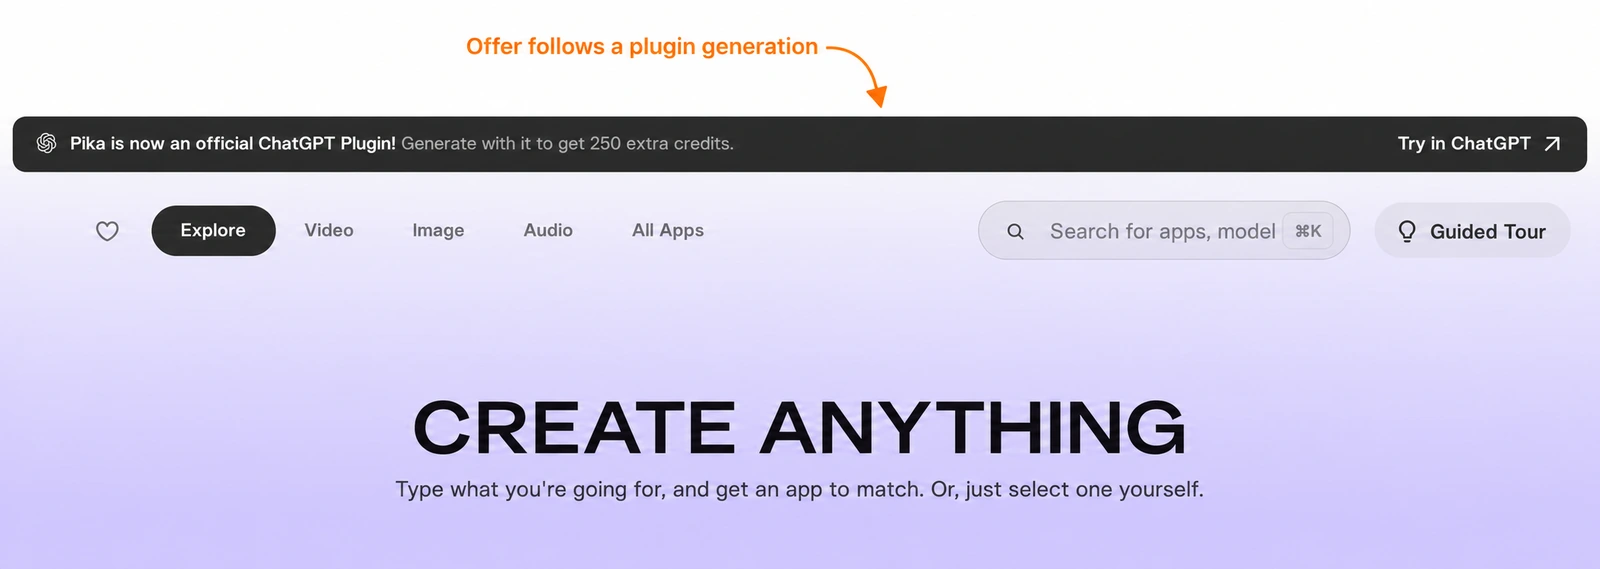
To check your account, note the balance before starting, complete a generation through the connected plugin, then review the balance and available transaction information afterward. Make sure you are checking the same Pika account used on the connection screen.
The resulting balance can reflect both a generation charge and a promotional addition. For example, a hypothetical starting balance of 10 credits, a charge of 2 and an award of 250 would produce 258. That is an arithmetic example, not a quoted image price or a promise about your account.
Read the current promotion before spending money solely to qualify. The announcement does not, by itself, establish an expiry date, a guaranteed processing time or how unusual account situations are handled. If you need help with an award, use the completed job details and account records rather than repeatedly generating in the hope of triggering it.
You can read Pika’s credit announcement for the wording of the offer. Keep promotional credits separate from the cost you are prepared to pay for the project itself.
Commands you can copy into ChatGPT
You can give Pika instructions in ordinary sentences. Start from Open plugin on its installed listing so the conversation has Pika available. In these examples, “Use Pika” identifies the tool we want ChatGPT to use; it is not a special programming command.
How to use / commands in the desktop app
The slash picker selects a skill; the message you write after it describes the task. If your desktop interface offers Pika in that picker, follow these steps:
- Click the message box and type
/. Look for the skill menu that opens beside the composer. - Search for Pika. Choose an item from the menu rather than sending
/as a message. Available labels depend on the installed plugin and interface. - Select the skill for your task. For a new image, look for pika-create. To improve a prompt without generating, look for prompt-image.
- Add your brief in the same message. Include the subject, format, number of results and spending limit. Attach a source file for an edit.
- Send and review the response. Check the model, settings and price before approving a generation.
| Your task | Skill to look for | What to add after selecting it |
|---|---|---|
| Create one image | pika-create | Subject, background, composition and budget |
| Write an image prompt | prompt-image | Your idea and “write the prompt only” |
| Prepare motion instructions | prompt-video | Subject action, camera movement and length |
| Change a previous result | pika-remix | The exact asset and one requested change |
| Add narration | pika-speech | Exact script and voice preference |
| Create music or sound effects | pika-audio | Mood, length and intended use |
Example after selecting pika-create:
Use Pika to generate one product image of an ivory ceramic mug on a beige tabletop. Light it softly from the left and keep the complete handle visible. Show the model and price first. Maximum 10 credits for this one image; do not buy credits or change my plan.
For preparation only: select prompt-image, then write:
Improve this product-photo prompt for Pika. Keep the mug and its complete handle in frame, with space on the right for a headline. Write the prompt only; do not generate.
- Selecting a skill chooses the workflow. It does not supply your creative brief.
- Typing a skill name as plain text does not prove the menu selected it. Use the actual menu item when it is available.
- If Pika is missing, check installation and connection in the same account. You can also open the installed plugin and ask “Use Pika…” in ordinary language.
@references are different. In Pika’s demo they identify existing assets, as shown in the editing walkthrough below. They are not slash commands.
Copy a request for your first creation
How to send your first media request
- Open Pika in ChatGPT and start with one task.
- For an edit or animation, use the attachment control to add your source image or video. Wait for the attachment to appear before sending.
- Copy a request below and replace the subject, length or style with your own details.
- Send it, answer any questions about required inputs, and review the model, settings and credit estimate.
- Approve the specific request through the control or confirmation shown. When it finishes, inspect the media before asking for another version.
I would keep planning and generation in separate messages for a first attempt. “Write the prompt only” asks for preparation. “Generate one version” asks for a media job and can spend Pika credits. A written instruction to show a price first is a preference, so still inspect the actual approval screen.
Show available apps, models or credits
Show me the Pika app gallery. Help me choose an app for a five-second product video. Do not generate anything yet.
Check my Pika credit balance and show the available models for this image-to-video task. Explain the supported settings before I choose.
These are discovery requests. They help you make a choice before asking for a render. Model availability and costs can change, so ask about the particular operation you intend to run.
Generate a new image from text
Use Pika to generate one image of an ivory ceramic mug on a beige tabletop. Show the complete handle on the right, with soft window light from the left and a plain background. Leave space above the mug for text I will add later. Show the image model, size and credit estimate before generating.
No source image is needed for this brief. If you need an exact product, attach its photograph and say to preserve it instead of asking the model to invent the object.
Generate a video from text
Use Pika 2.5 to generate one five-second video of steam rising from an ivory ceramic mug on a tidy wooden desk. Keep the camera steady and the warm morning light constant. No scene cuts. Show the supported aspect ratio, quality and credit cost before starting.
The request supplies a scene and a movement. Keep the duration and settings within the model options offered by the plugin; a prompt cannot enable an unsupported setting.
Animate an uploaded image
Attach the chosen image first, then send:
Use the attached image as the starting image for one five-second Pika 2.5 clip. Steam rises gently as the camera moves slowly closer. Preserve the mug shape, handle, background and lighting. Show the supported settings and price before generating.
I would check that ChatGPT has selected the correct attachment before approving. If several files are present, identify the image by its filename or a clear description.
Edit an image or change a clip’s lighting
Use Pika to edit the attached product image. Change only the background to muted sage green. Keep the mug, handle, camera angle and shadow. Prepare one version and show the cost first.
Open Pika Relight Media for the attached clip. I want warm light from the left while preserving the subject and action. Show the available controls and estimate before applying the change.
Name the part that changes and the parts that stay fixed. For existing footage, choose an editing workflow instead of accidentally requesting an entirely new scene.
Generate music or a sound effect
Use Pika to generate ten seconds of instrumental background music for a quiet coffee clip. Soft acoustic guitar, a light rhythm, no singing and a gentle ending. Show the model and price before generating one track.
Use Pika to generate one sound effect: a ceramic mug placed gently on a wooden table, followed by quiet room ambience. Aim for five seconds if supported. No speech or music. Show the duration options and price first.
Music and effects need different descriptions. For music, explain mood and instruments. For an effect, explain the physical event, sound texture and timing.
Generate speech from an exact script
Use Pika Speech to read this exact script: “A small pause. A warm cup. A better start to your morning.” Show suitable calm voices first. Keep the delivery relaxed, and show the selected voice, model and cost before generating one recording.
Keep the spoken words in quotation marks and the performance directions outside them. If pronunciation matters, ask about it before approving the recording.
Add a soundtrack to a video
Use Pika Soundtrack with the attached video. Add quiet instrumental music that supports the action, with no singing. Show the available settings and credit estimate before generating. Explain how the existing audio will be handled.
Attach the actual clip so the request has a source. Do not assume that adding a soundtrack automatically preserves, replaces or mixes existing speech; check the workflow’s audio options.
Improve a previous result
Use the mug clip from the previous Pika result. Make one variation with slower camera movement. Preserve the product, setting and lighting. Show the settings and new credit estimate before starting.
Open Pika’s upscale options for the selected image. Show the available output sizes and prices. Do not run an upscale until I choose one.
Point to the exact result and ask for one change at a time. A follow-up edit, variation or upscale can be a new paid operation. When you have a result worth keeping, save it before continuing.
All 13 Pika skills: what to use and what to ask
A skill is guidance that helps ChatGPT carry out a kind of task. An app is a creation or editing tool you can choose. A model is the system used for a particular generation. These are related, but they are not interchangeable names for the same thing.
The plugin page exposes its skill descriptions. Open a skill to understand its purpose. You can normally describe your goal in ordinary language; you do not need to memorise internal function names. The examples below turn each skill’s purpose into a useful brief.
1. Onboarding: set a clear starting point
Use onboarding when you have just connected Pika or want to establish how to work together. Tell ChatGPT the kind of content you make, the audience and how you want spending approvals handled. Keep those choices specific enough to help with the next request.
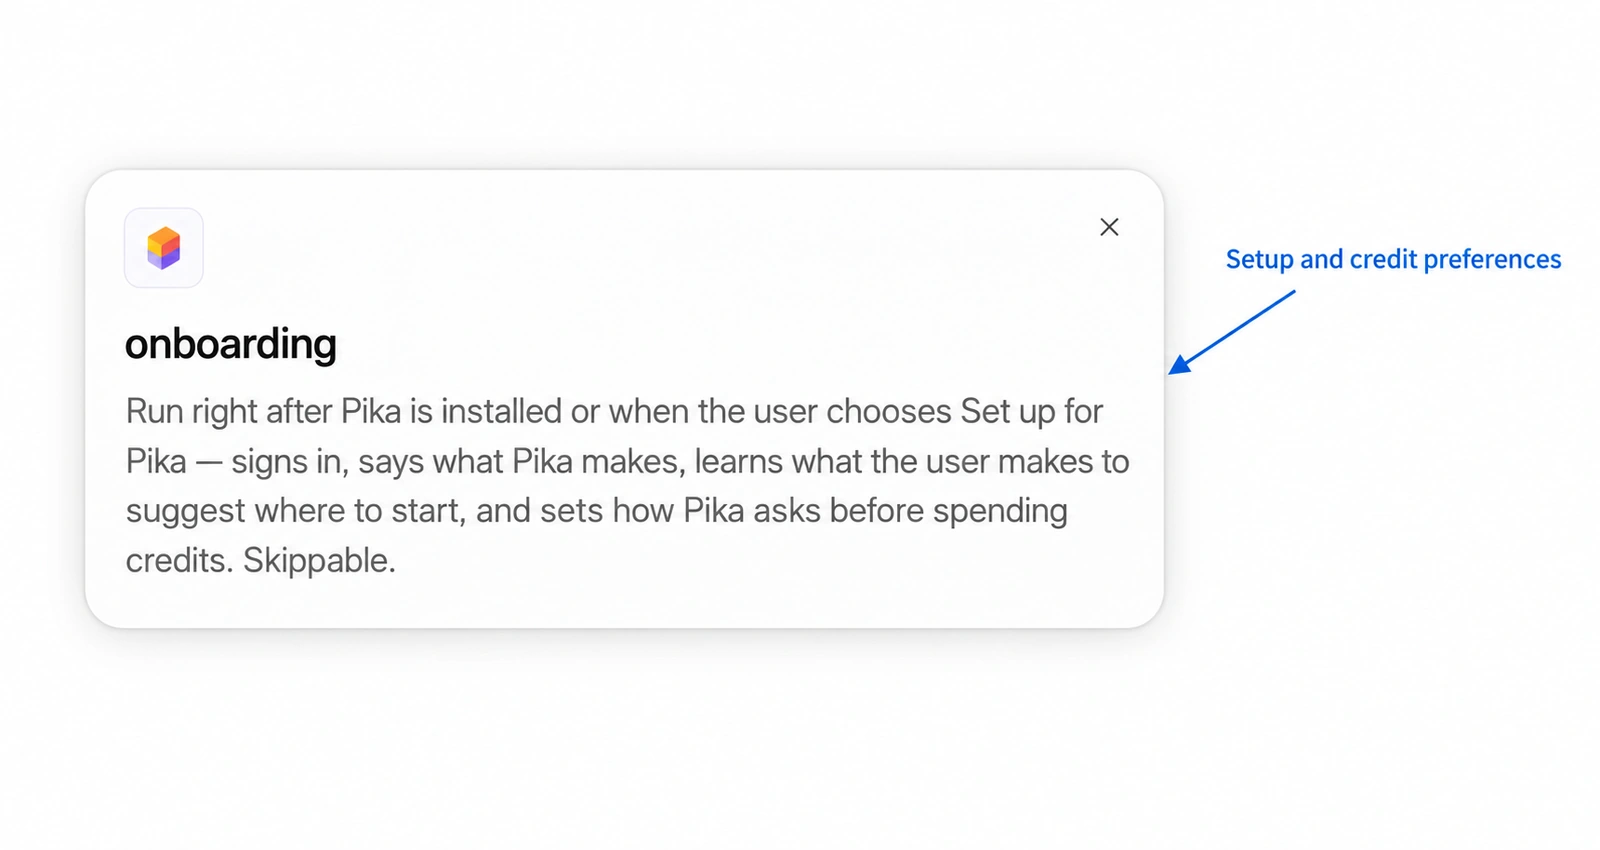
Try this: “Help me set up Pika for short product demonstrations. I want simple scenes, one result at a time and a price review before generation. For this project, use a calm studio style and explain unfamiliar settings in plain language.”
- Start with one real project rather than listing every content type I might make someday. A product photograph, a spoken introduction and a fictional short film need different inputs. A clear first task gives the setup conversation something useful to work toward.
- When asked about saving preferences, decide separately from approving a generation. Agreeing to a creative profile is not the same as approving every future render. Keep the account connection, stored preferences and spending decisions distinct.
2. Pika Create: make or edit a single asset
Use pika-create for a general image, clip or audio request when a more specialised skill is unnecessary. This is a useful starting point for a beginner: describe the deliverable and let ChatGPT help identify the appropriate Pika tool.
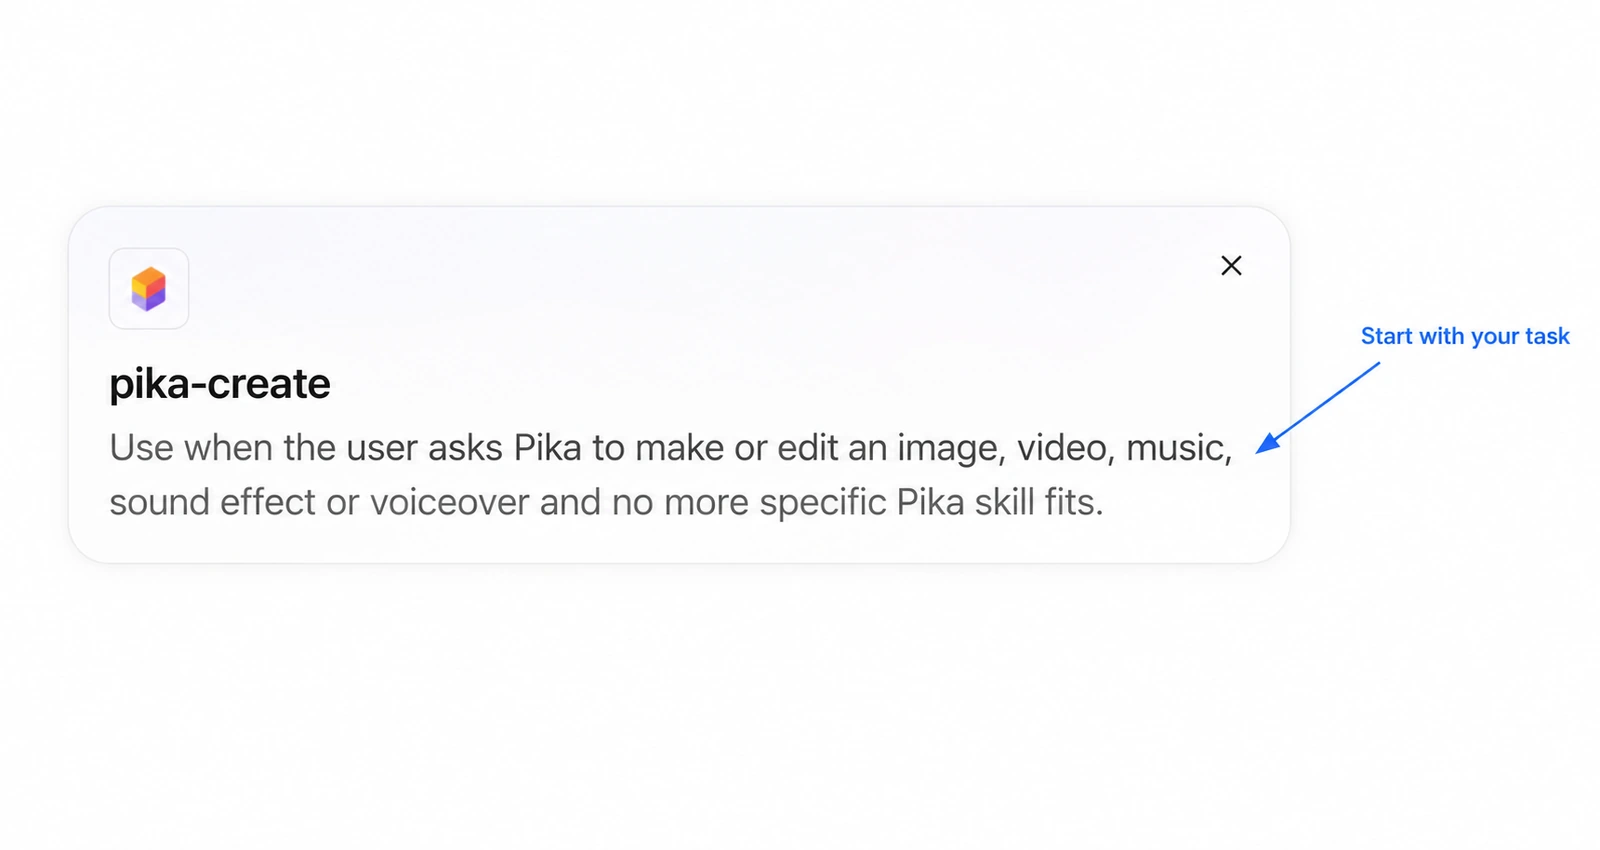
Try this: “Make one clean product picture of an ivory mug on a beige surface. Keep the complete handle inside the frame. I need room on the right for a headline that I will add later. Show the model and price first.”
- For an edit, attach the exact source and name one change. “Change the background to pale blue; keep the mug and its shadow” is easier to evaluate than a long list of unrelated changes. If you need to preserve a logo, check its lettering carefully in the returned file.
- Use this skill to establish the base asset, then choose a more specific follow-up such as animation or upscaling. That keeps the original intent easy to track through the conversation.
3. Prompt Image: turn an idea into a useful image prompt
Use prompt-image before a still-image generation or edit. Give it the subject, framing, lighting, materials and intended use. It helps prepare a prompt for the selected image model; it is not itself a separate finished image.
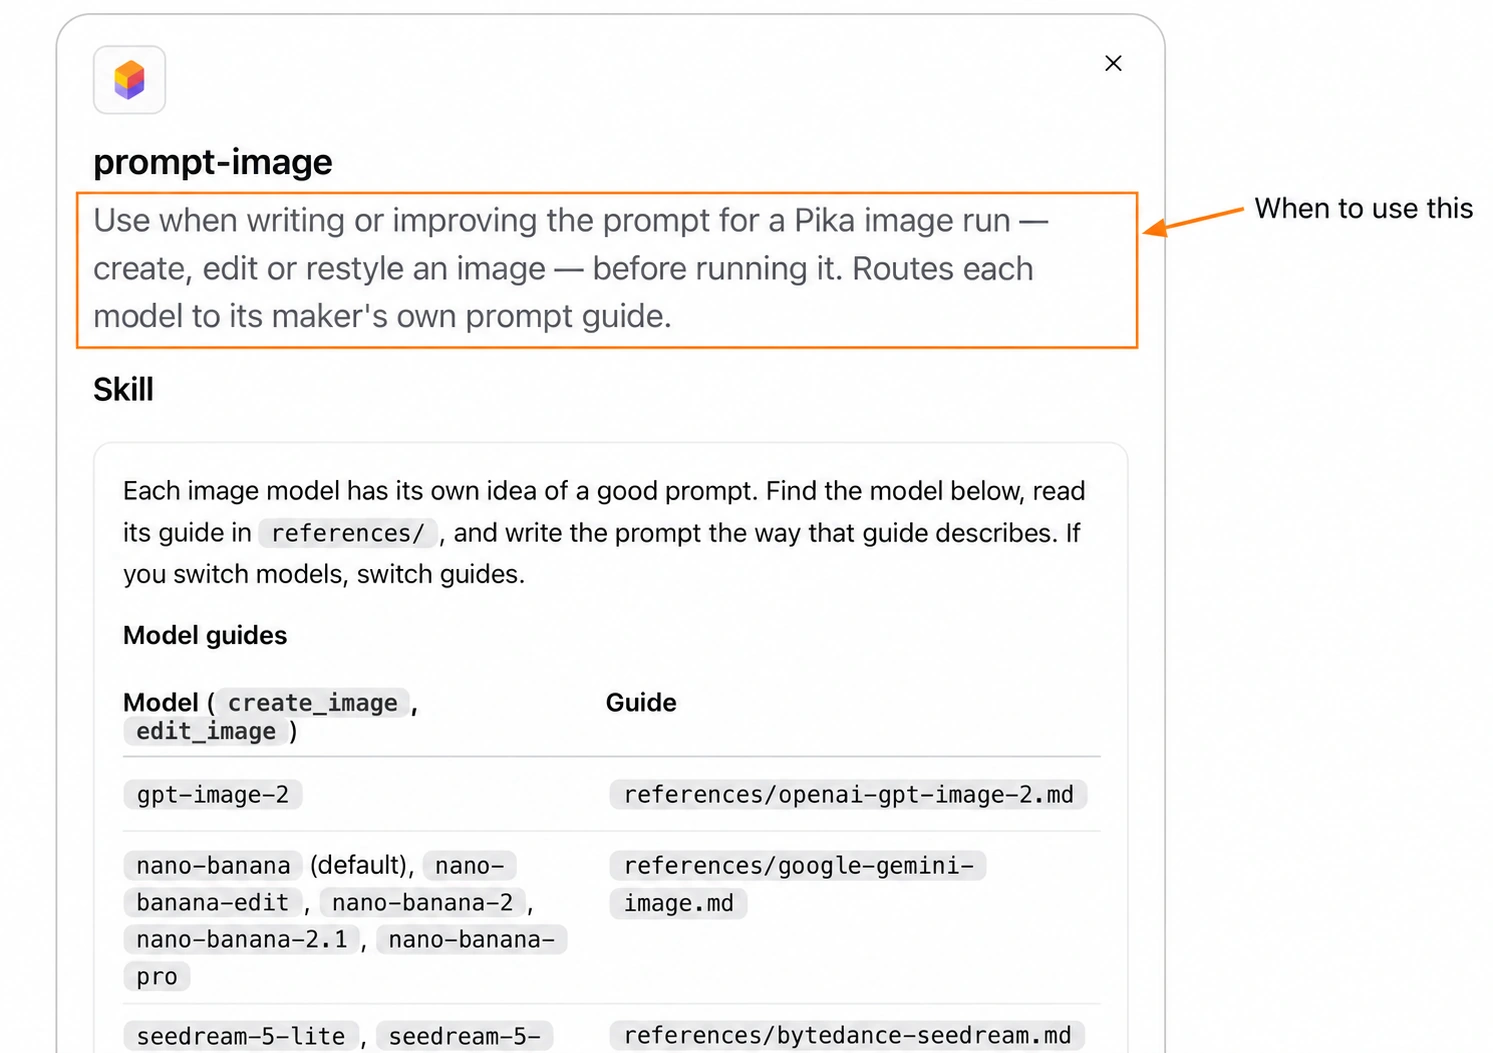
Try this: “Improve this Pika image brief without generating: a cream mug for a coffee brand. I want a three-quarter view, the handle on the right, soft morning light and empty space above. Keep the language concrete and explain which settings belong outside the prompt.”
- Replace broad praise with details you can actually check. “Glossy cream glaze and a soft shadow to the right” gives the model more direction than “premium masterpiece.” State the intended crop so the composition supports your final page or post.
- For multiple references, describe each image’s role. One may define the product; another may define the background colours. Explicit roles help avoid asking the model to copy everything from every reference at once.
4. Prompt Video: describe motion that fits the clip
Use prompt-video to prepare a new video request or clarify an edit. Name the subject, action, camera movement and elements that should stay consistent. Keep the action small enough to fit the requested duration.
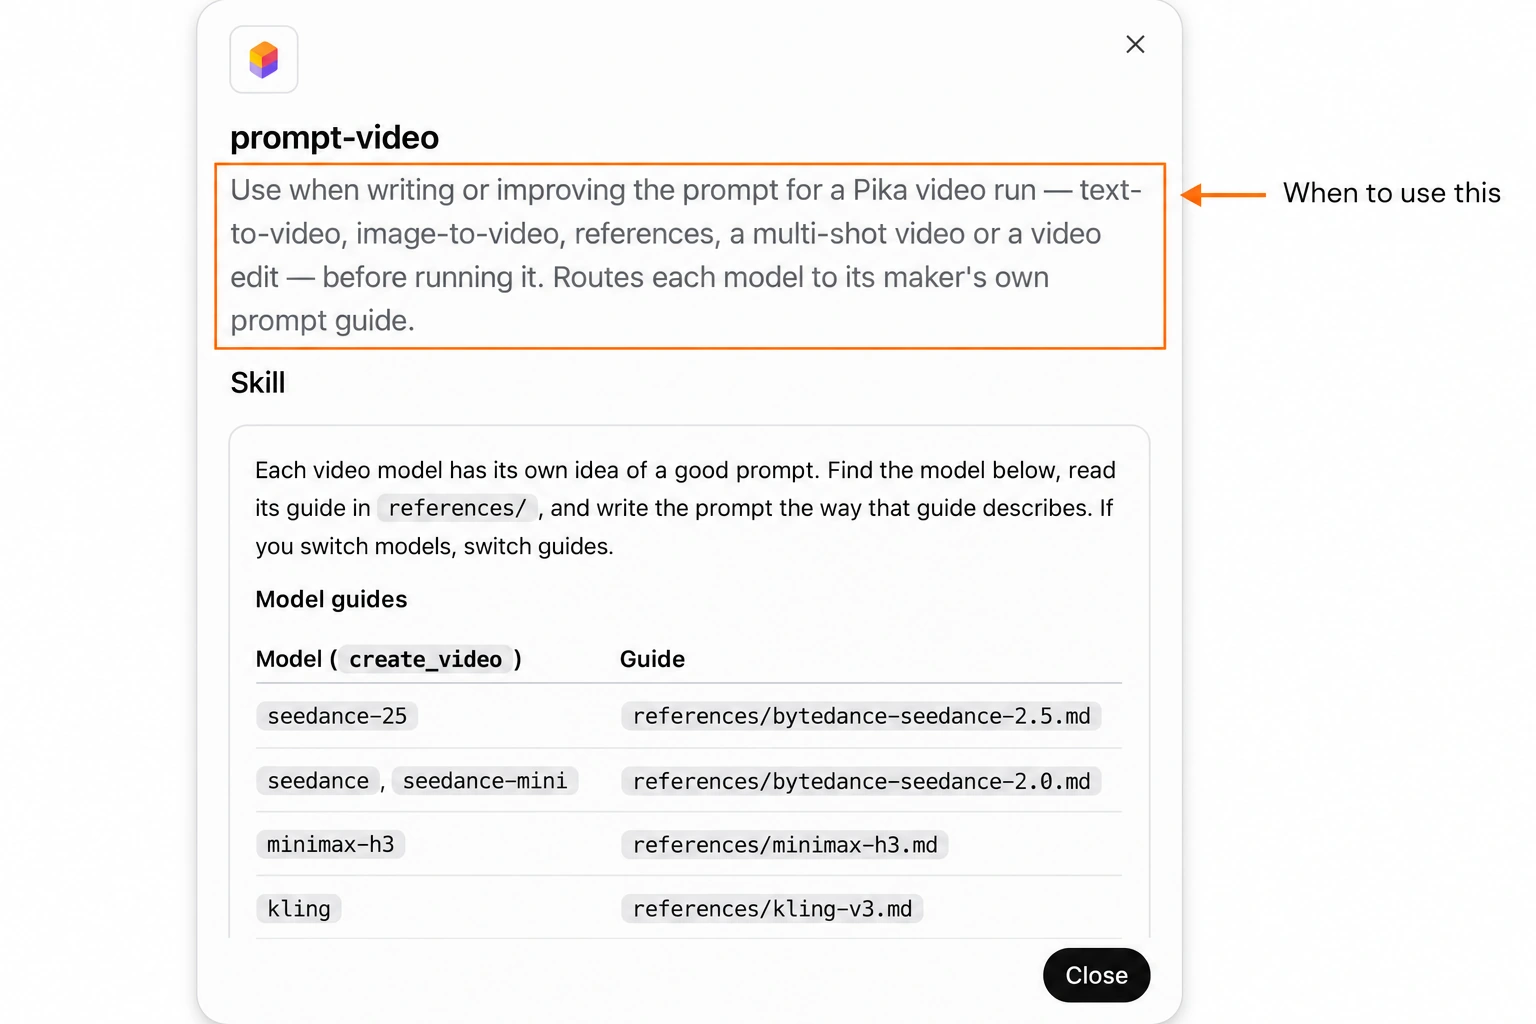
Try this: “Prepare a Pika 2.5 prompt for this mug image. In five seconds, steam rises and the camera makes a gentle push-in. Preserve the handle, surface and warm light. Do not generate yet; show the prompt and supported settings.”
- You can use one camera move per shot. A pan, orbit and zoom in the same short instruction can pull the result in competing directions. For image-to-video, the picture already establishes much of the scene; spend the prompt on what moves and what stays fixed.
- For a sequence, use consecutive shot timings and repeat the important product or character details. Our prompt examples provide more starting points organised around goals and camera motion.
5. Pika Ad: turn a product brief into a promotional video
Use pika-ad when the goal is a product advertisement, commercial or promotion. Prepare a product photo, logo or app screenshot, then explain the audience, offer and action you want the viewer to take.
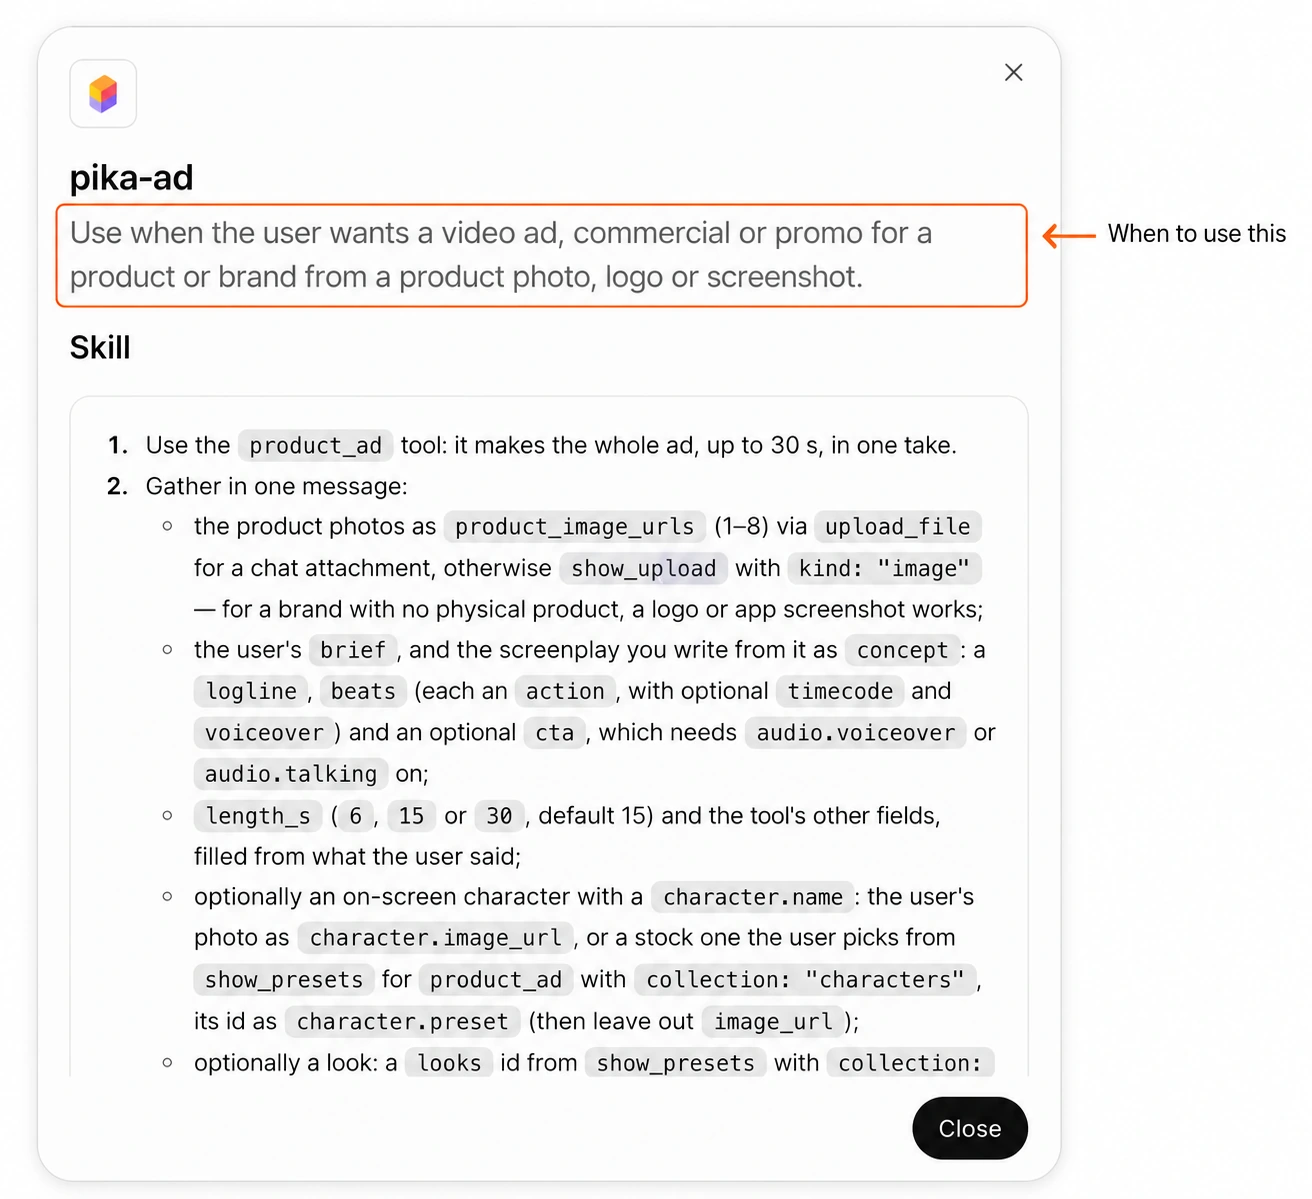
Try this: “Plan a 15-second ad from this mug photo for people who enjoy a quiet morning coffee. Start with steam, show the mug on a tidy desk, and finish with room for my own website text. Keep it calm and product-focused. Show the concept and total quote first.”
- You can review the story before reviewing fine styling. Does the opening show the product quickly? Is there one clear benefit? Is the final action understandable? A beautiful shot cannot repair a confusing offer.
- Do not ask the model to invent product specifications or customer claims. Supply facts yourself, and check any generated lettering, packaging or spoken offer. If exact brand text matters, consider adding it afterward in your normal editor.
6. Pika Character: prepare a recurring fictional person
Use pika-character when you need a named character reference for repeated work. The skill supports starting from a photo, a written description or selected traits, and describes creating a reference sheet saved as a Library character.
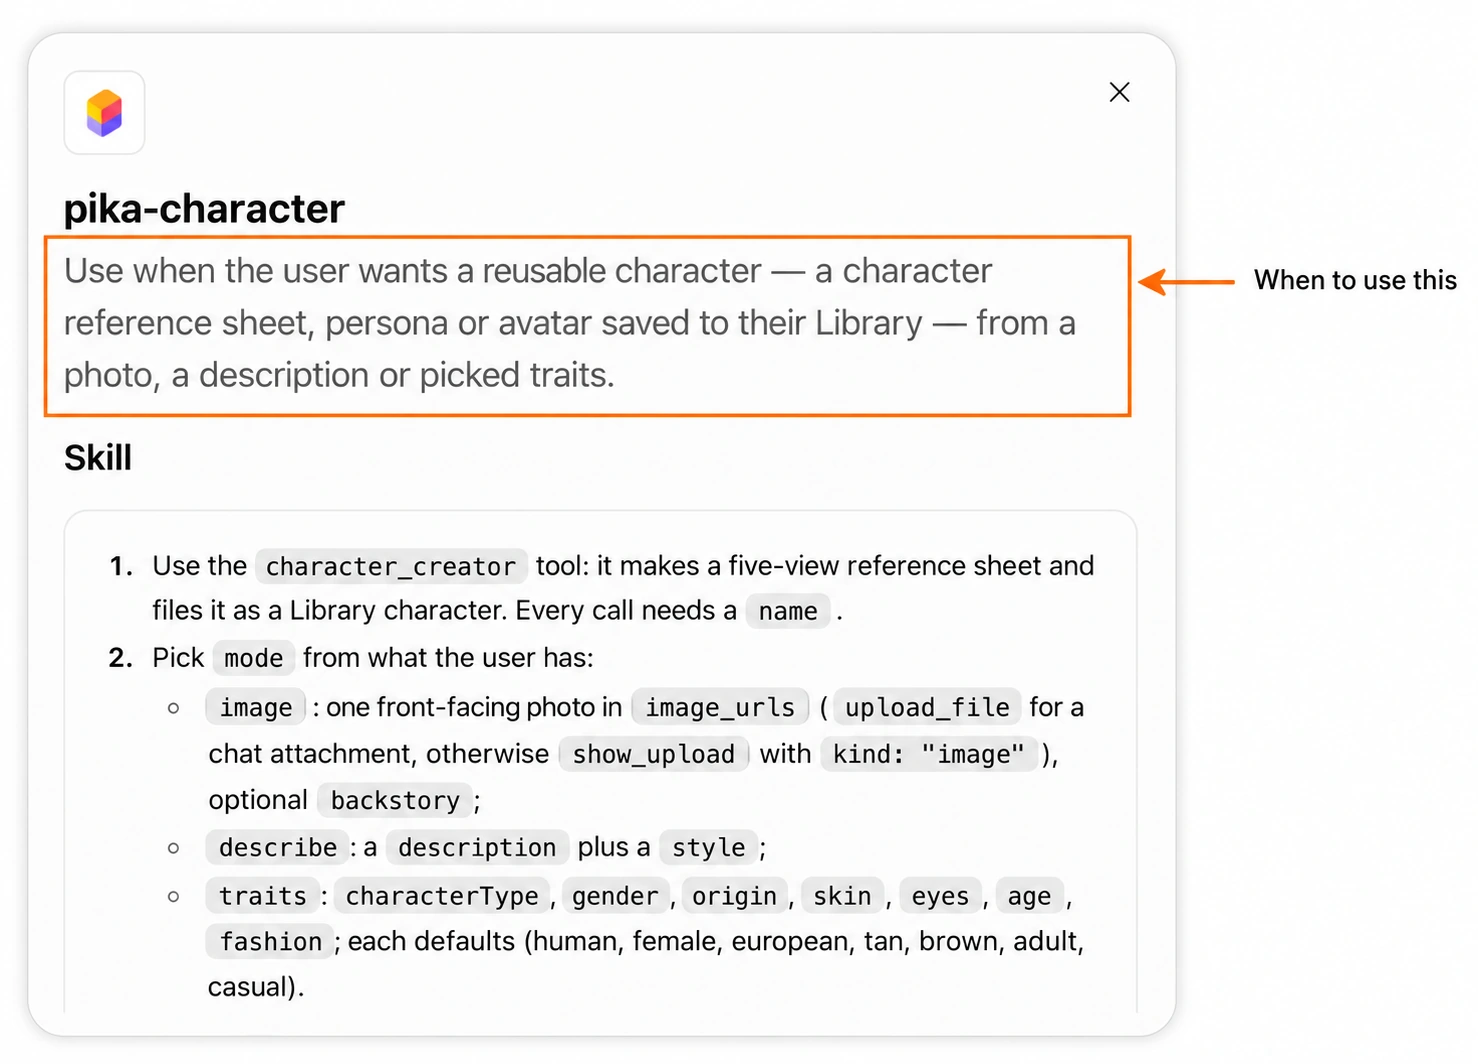
Try this: “Prepare a fictional presenter named Mira: an adult pottery teacher with short dark hair, a sage apron and a friendly expression. Show the style choices and a quote for one character sheet. I want to reuse the same appearance in future mug demonstrations.”
- You can keep the outfit simple at first. Distinctive but uncomplicated clothing makes it easier to judge consistency in later scenes. Record the name, selected reference and essential appearance details so each follow-up points to the same character.
- A saved reference helps define the intended identity; still inspect each new result. Check the face, clothing and body proportions instead of assuming that a repeated name guarantees an exact match in every generation.
7. Pika Camera Director: change the shot around a clip
Use pika-camera-director when the source video is useful but the framing, angle or camera movement needs a different treatment. Its skill describes a single-shot source of 4–30 seconds; prepare a suitable section before asking for a new camera view.
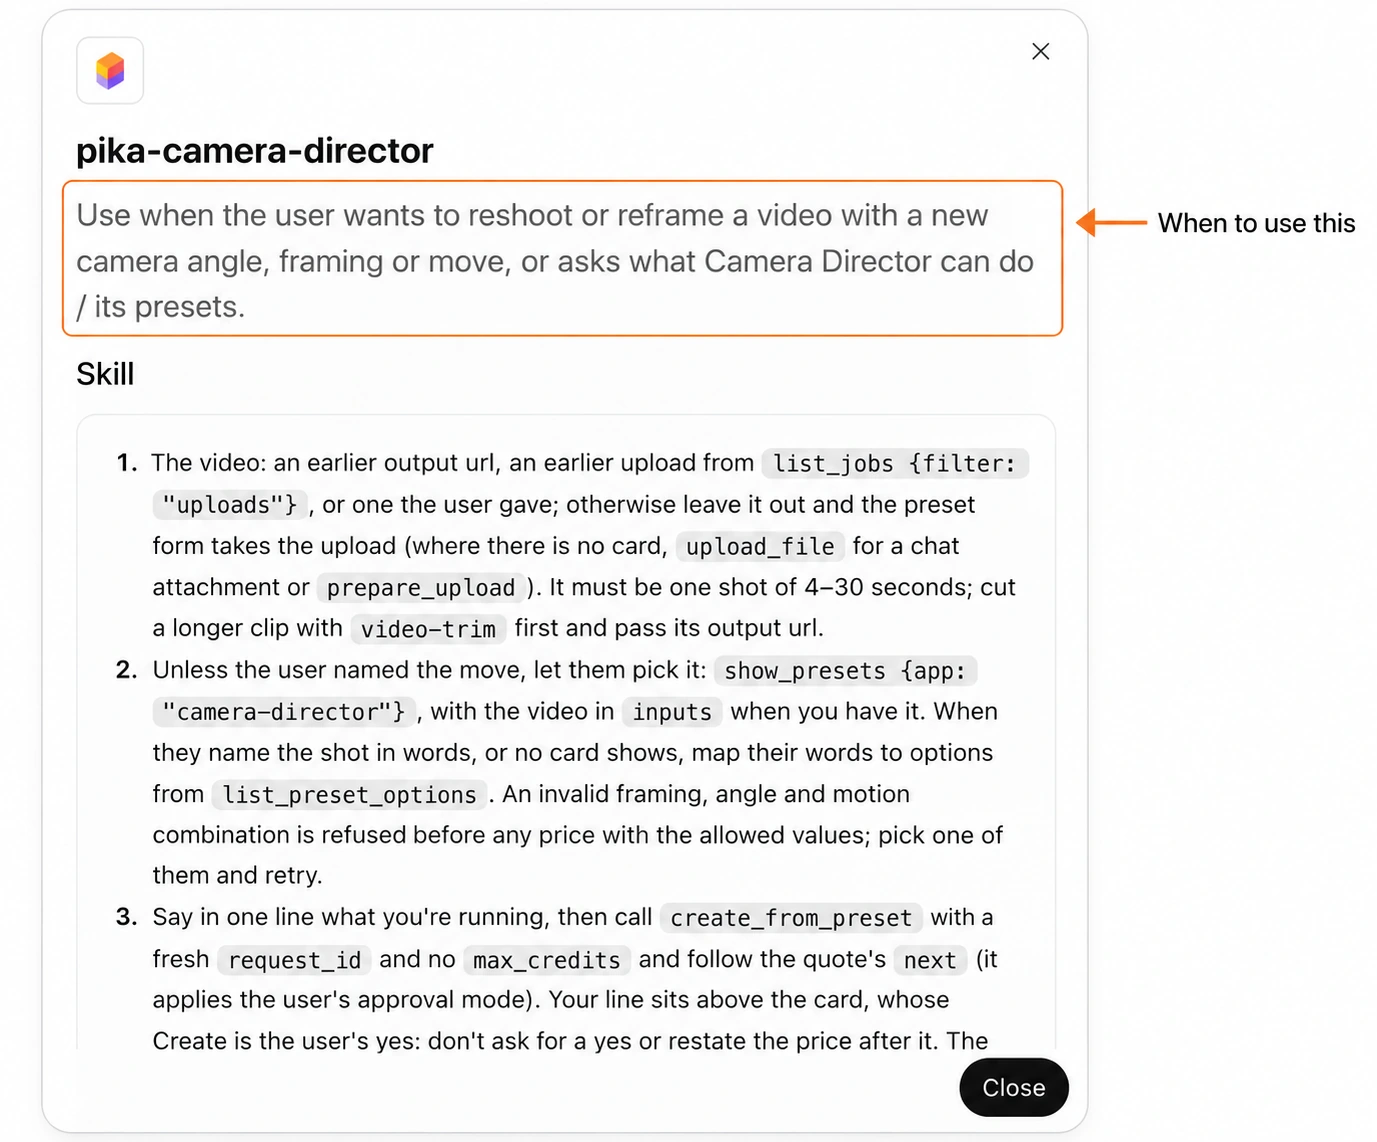
Try this: “Open Camera Director for this five-second product clip. Show the framing, angle and movement choices. I want a closer eye-level view with a steady camera, keeping the mug, action and lighting consistent. Show the quote before rendering.”
- You can compare the result against the source at several moments. A tighter composition is useful only if the product remains convincing. Watch for changes in shape, movement and background details as well as the camera effect itself.
- Keep this separate from an ordinary crop. Asking for a new viewpoint can require generated scene information. If you simply need a shorter clip, trim it; if you need a different format, inspect the relevant resizing options.
8. Pika Remix: continue from an earlier result
Use pika-remix for a follow-up to something Pika has already made. Point to the exact result, then say what should change: another variation, a still-image edit, animation, a longer clip, new lighting or added sound.
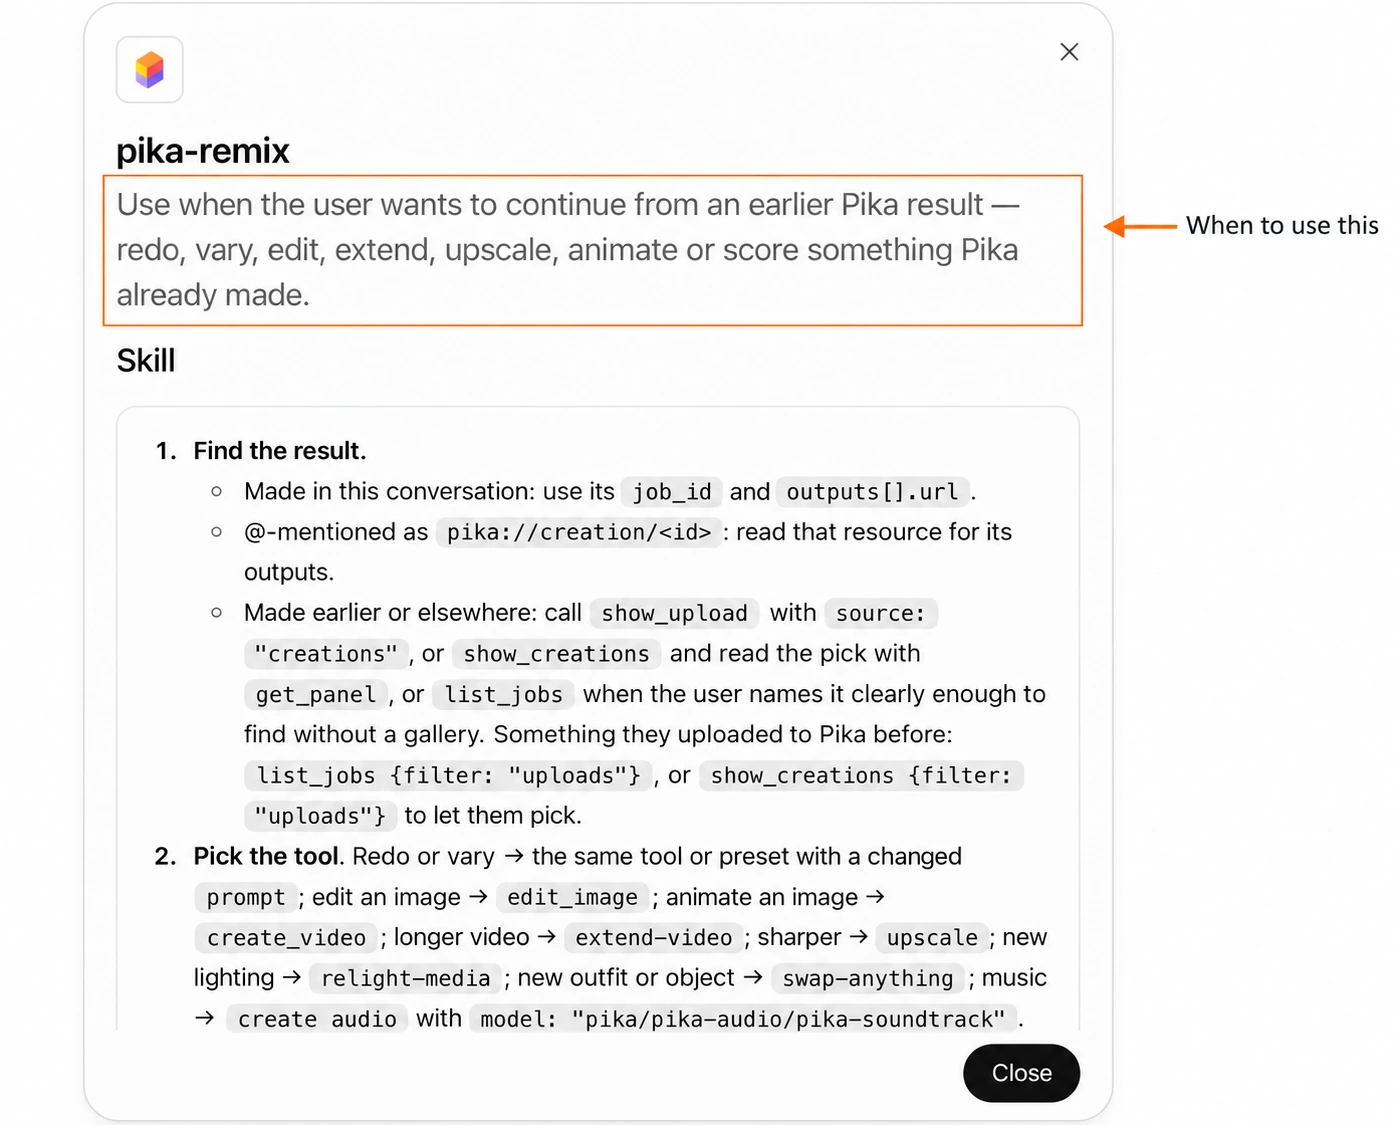
Try this: “Use the mug image from the previous result. Keep the camera angle, handle and tabletop. Change only the background to a muted green. Make one variation and show the price before starting.”
- You can avoid “edit the last one” after discussing several images. Identify it by its thumbnail or description, especially if the conversation contains both uploads and generated files. The right edit applied to the wrong source wastes time and credits.
- Change one major element per attempt. If the new background works but the product changes too much, you have a clear problem to address. Changing the object, light, camera and setting together makes it harder to understand which instruction caused the issue.
9. Pika Upscale: prepare an asset for a larger display
Use pika-upscale when you already like an image or clip and need to inspect higher-resolution options. Start with the best available source and state where the result will appear: a website hero, a presentation, a product detail or another specific use.
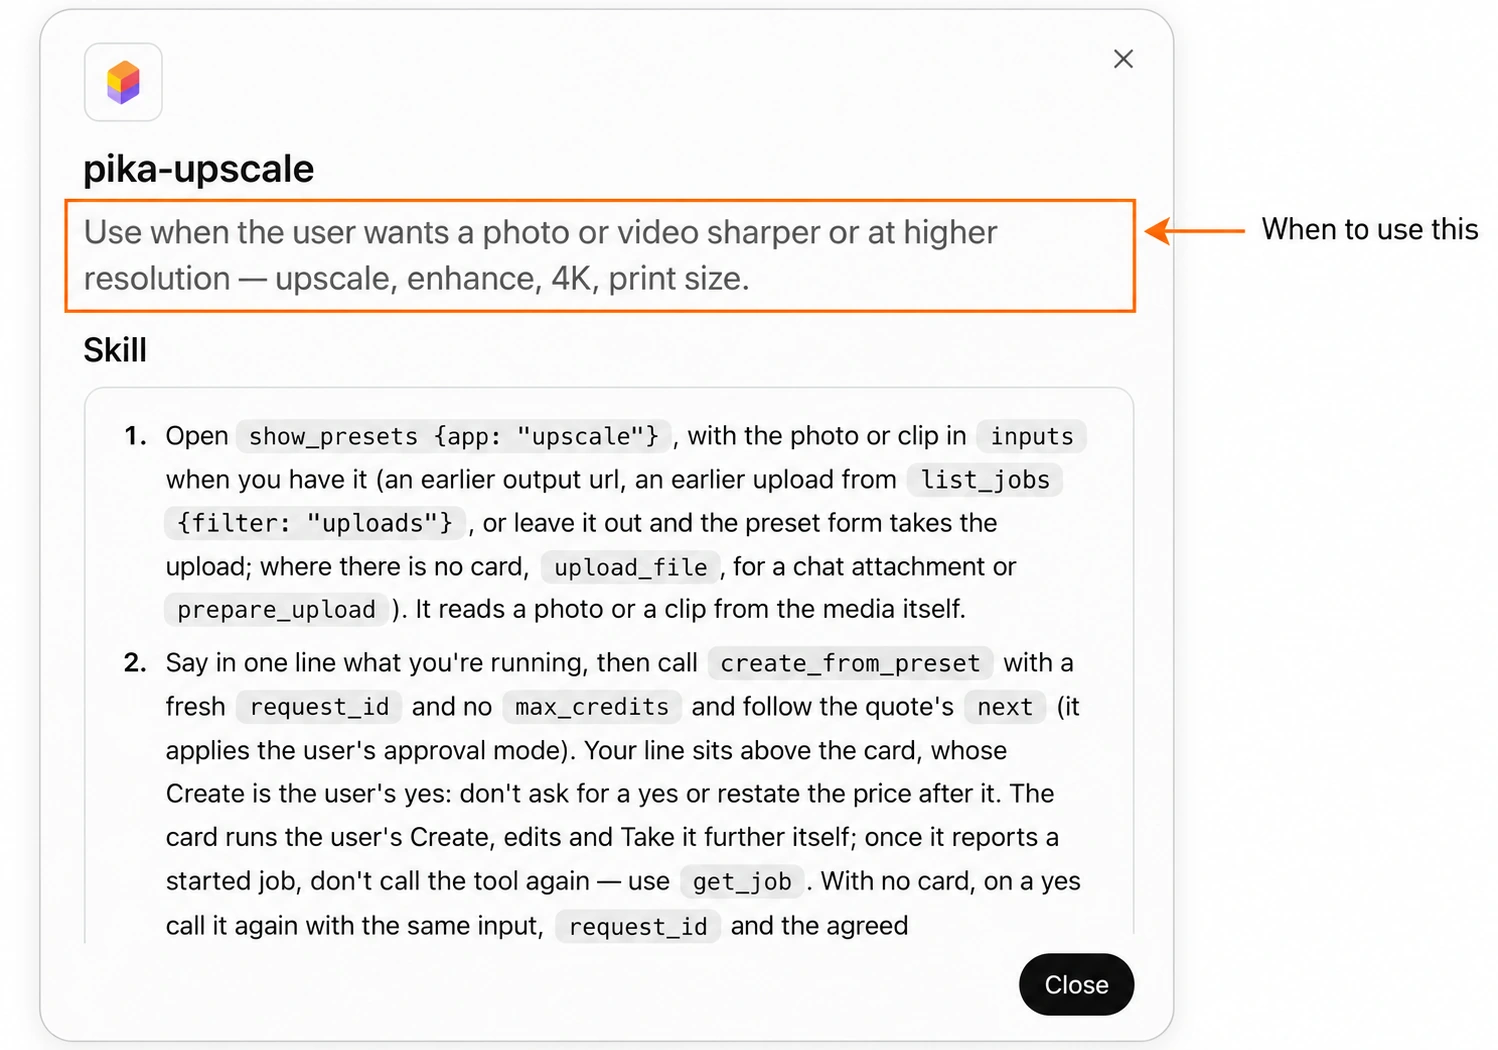
Try this: “Open the upscale options for this product image. I need a larger version for a website banner. Preserve the mug shape, glaze and edge detail. Show the output size and quote before running one version.”
- You can not upscale every draft. First choose the composition you want to keep, then improve the selected asset. This avoids paying to enlarge images that will never be used.
- Review the result at its actual display size and at full size. Sharper-looking edges can be helpful, but invented texture or altered lettering may be harmful. A larger pixel count does not prove that every fine detail is accurate.
10. Pika Audio: music, effects and soundtrack requests
Use pika-audio for music, lyrics-based tracks, sound effects or audio matched to a video. Name the kind of audio first. Then describe the mood, sound sources, duration and how the result should support the picture.
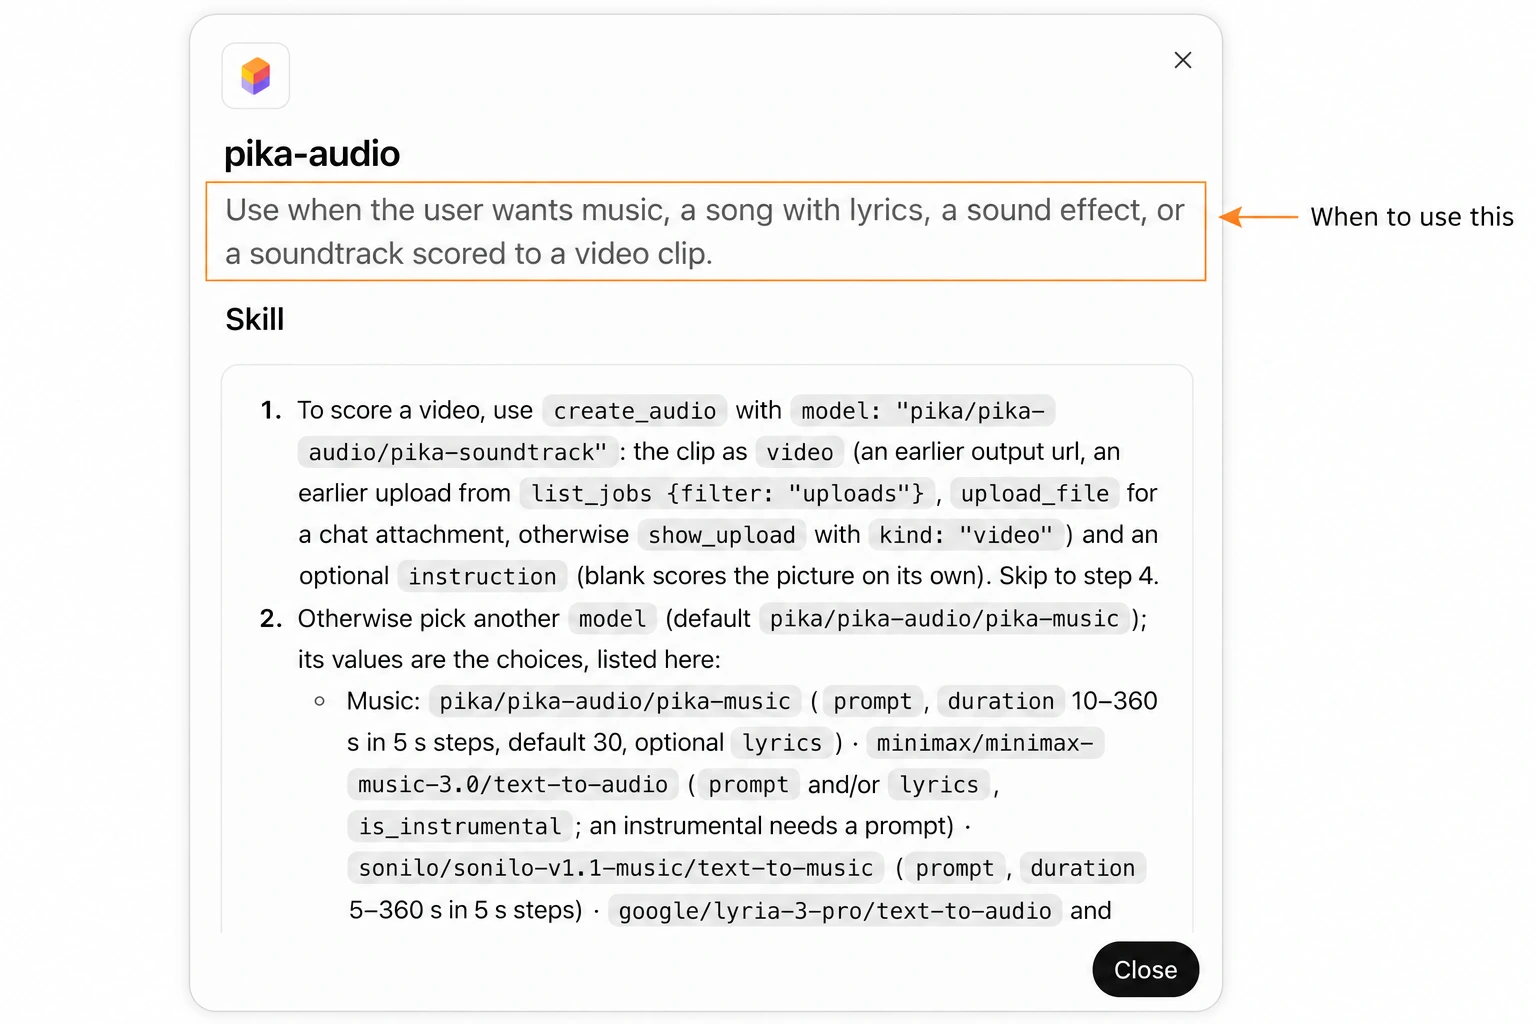
Try this: “Prepare ten seconds of gentle instrumental music for a morning coffee clip: soft acoustic guitar, a light rhythm and a quiet ending. Keep it free of singing. Show the available model and price before generating.”
- For an effect, describe an event rather than a musical mood: “a ceramic mug placed gently on a wooden desk, one clean contact sound in a quiet room.” For a soundtrack, attach the clip so the request has the picture it is meant to support.
- You can listen with the planned voiceover in mind. Dense music can compete with speech. If the clip needs only a small sound cue, a focused effect may serve it better than a full track. See our Pika Music guide for more audio planning examples.
11. Pika Speech: read an exact script aloud
Use pika-speech for narration, a voiceover or another text-to-speech task. Supply the words to be spoken, then choose an appropriate voice. The skill includes several speech model families, so check the selected one rather than assuming every voice shares the same controls.
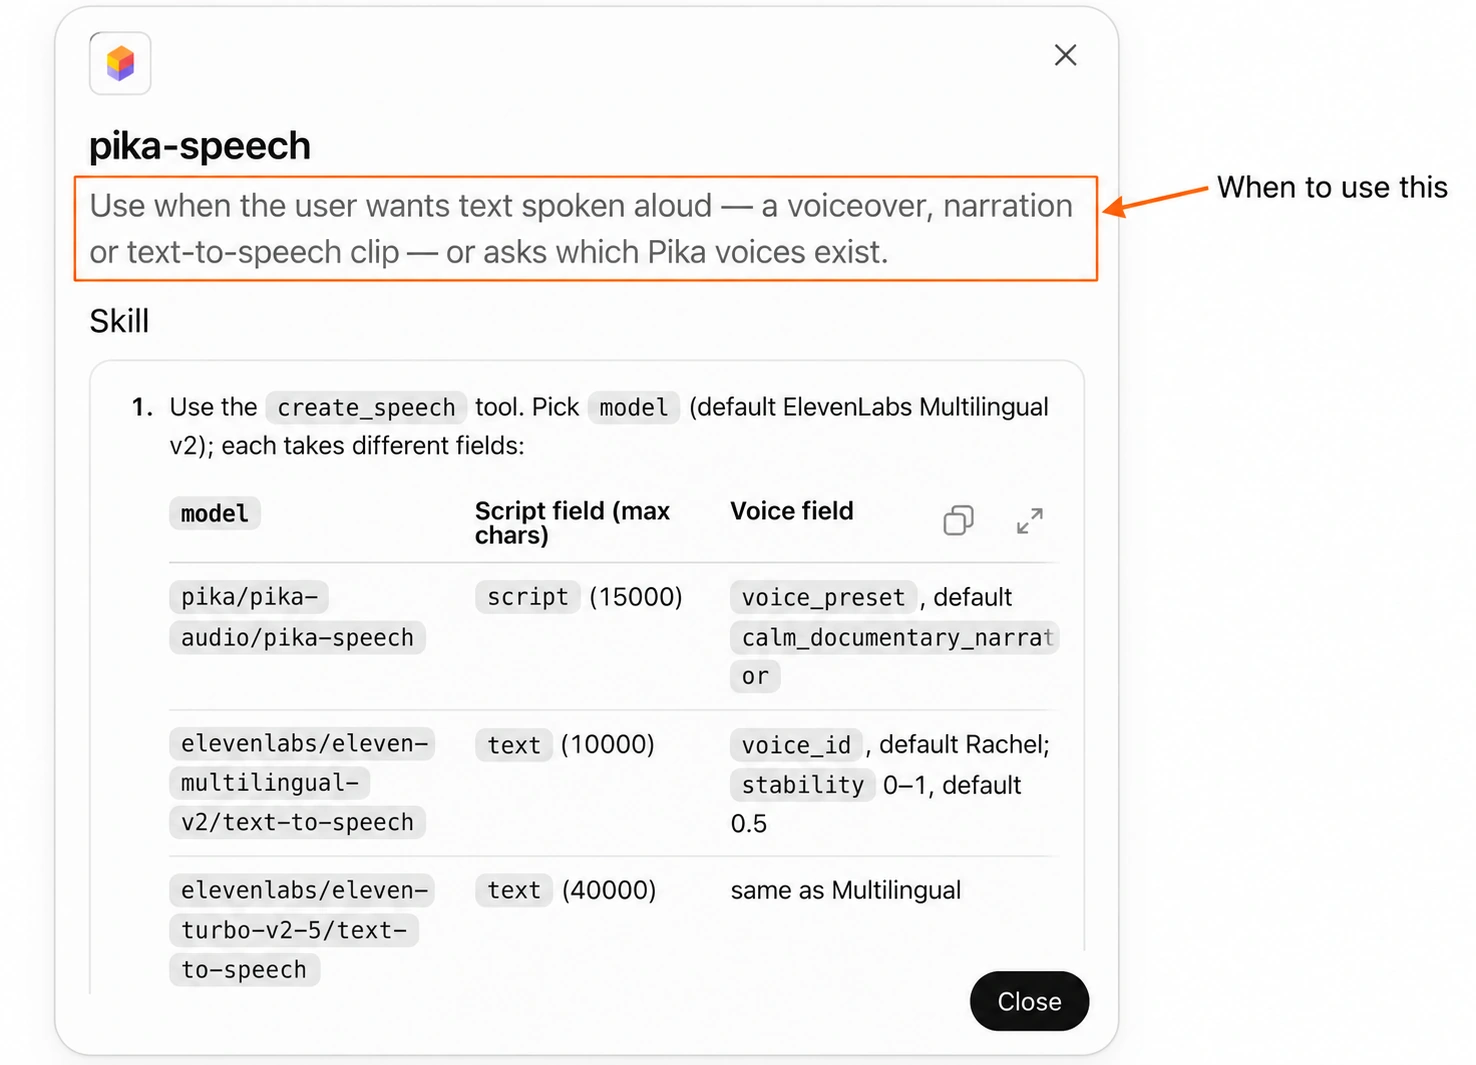
Try this: “Show the Pika speech voice choices for a calm product introduction. Read exactly: ‘A small pause. A warm cup. A better start to your morning.’ Use a relaxed pace and show the price before generating.”
- You can keep instructions outside the quoted script. Otherwise, you risk an unclear request about which words belong in the recording. Explain unusual brand pronunciations before running a long passage.
- Listen to a short sample before committing to a full narration. Check the pauses, emphasis and ending, then adjust the script if necessary. Writing for the ear often means shorter sentences than you would use on a product page.
12. Pika Podcast: plan an on-camera conversation
Use pika-podcast when you want a video conversation, interview, debate or solo presentation. Give the host and guest roles, the topic or exact script, the desired set and the target length.
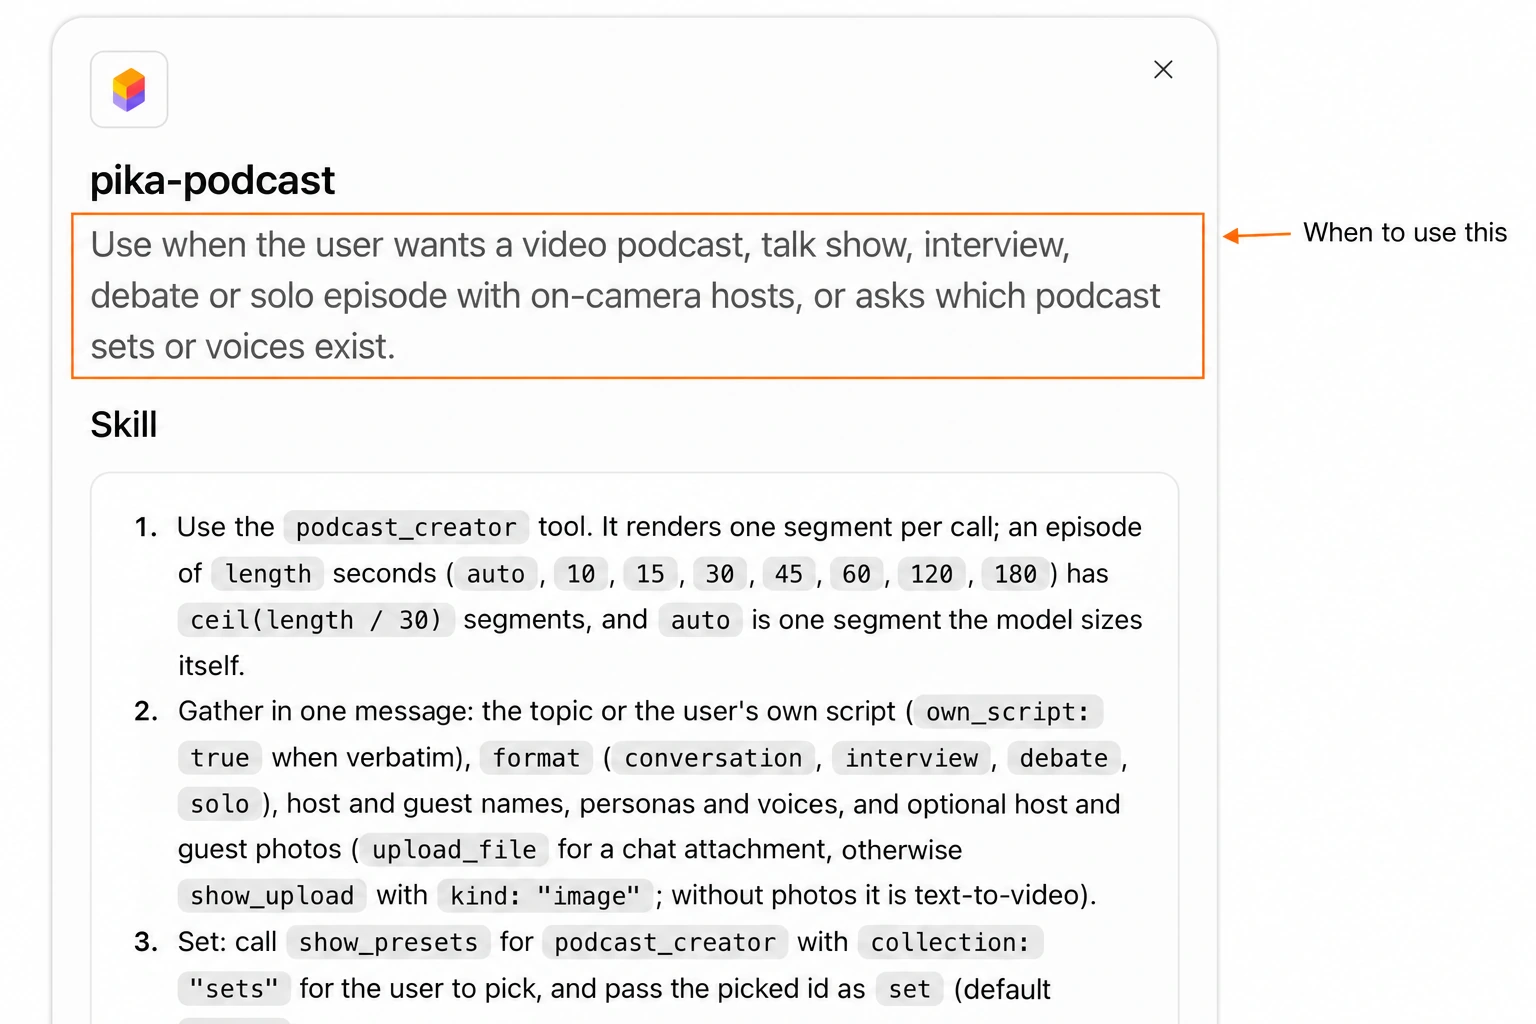
Try this: “Plan a short solo video episode about preparing a product photo for animation. Use one fictional presenter, a simple studio set and a concise script. Show the host, voice, set and total cost before generating.”
- You can begin with a short section rather than a long episode. It gives you a chance to judge the presenter, pacing and set together. Keep the script realistic for the requested length; cramming too many words into a small time slot weakens the delivery.
- For multiple segments, ask for the full episode plan and total estimate. Confirm that the same cast, setting and format carry through. A per-segment price should not be mistaken for the price of the complete assembled episode.
13. Pika Video: organise a sequence of shots
Use pika-video for a story, trailer, montage or explainer with more than one shot. Start by agreeing the sequence. The skill describes a workflow using Seedance 2.5 for consecutive shots, so it should not be confused with a single Pika 2.5 motion test.
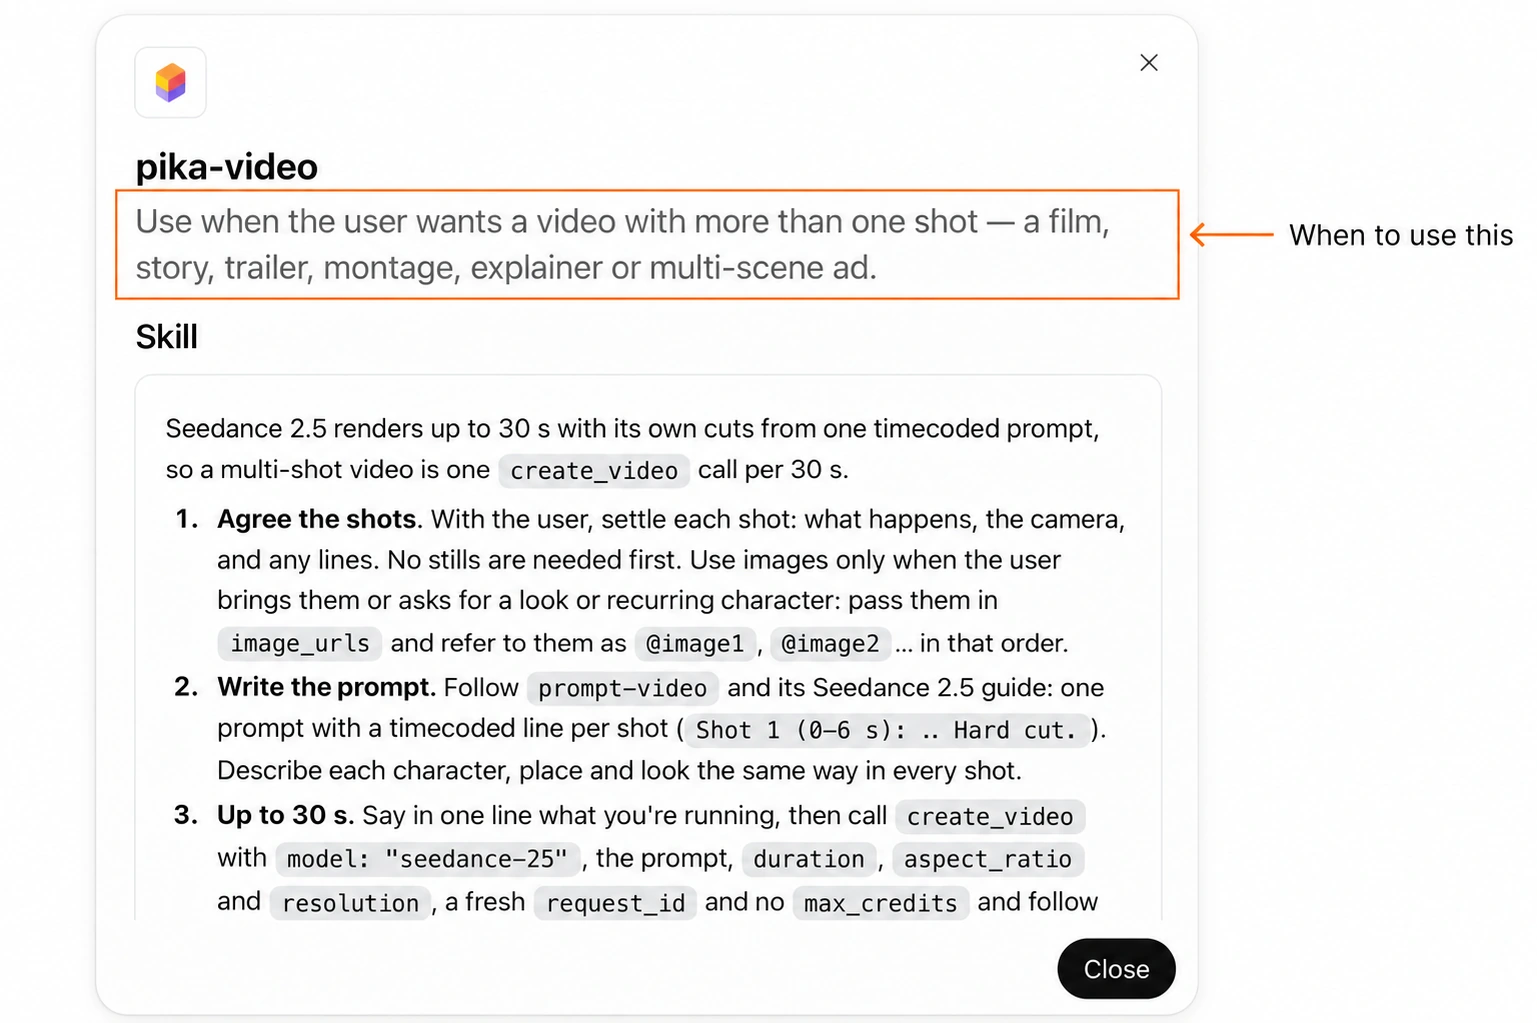
Try this: “Plan a 15-second coffee story in three shots: an empty desk, a mug placed beside a notebook, then steam rising in a closer view. Keep the mug and room consistent. Show the timed shot list and quote before any generation.”
- You can decide what each shot contributes. The first establishes the setting, the second introduces the product, and the third gives the viewer time to notice it. If two shots do the same job, simplify the sequence.
- For a longer piece, ask how it will be split and assembled. Review the cost of all parts, any audio and the final export. Keep references and product descriptions consistent across the parts, then inspect the joins as well as the individual clips.
Follow the demo: product photo to an edited reel
These frames come from Pika’s promotional walkthrough. Use the sequence to plan your own project; the exact editor layout and available controls can differ in your account.
1. Choose the product image you want to keep
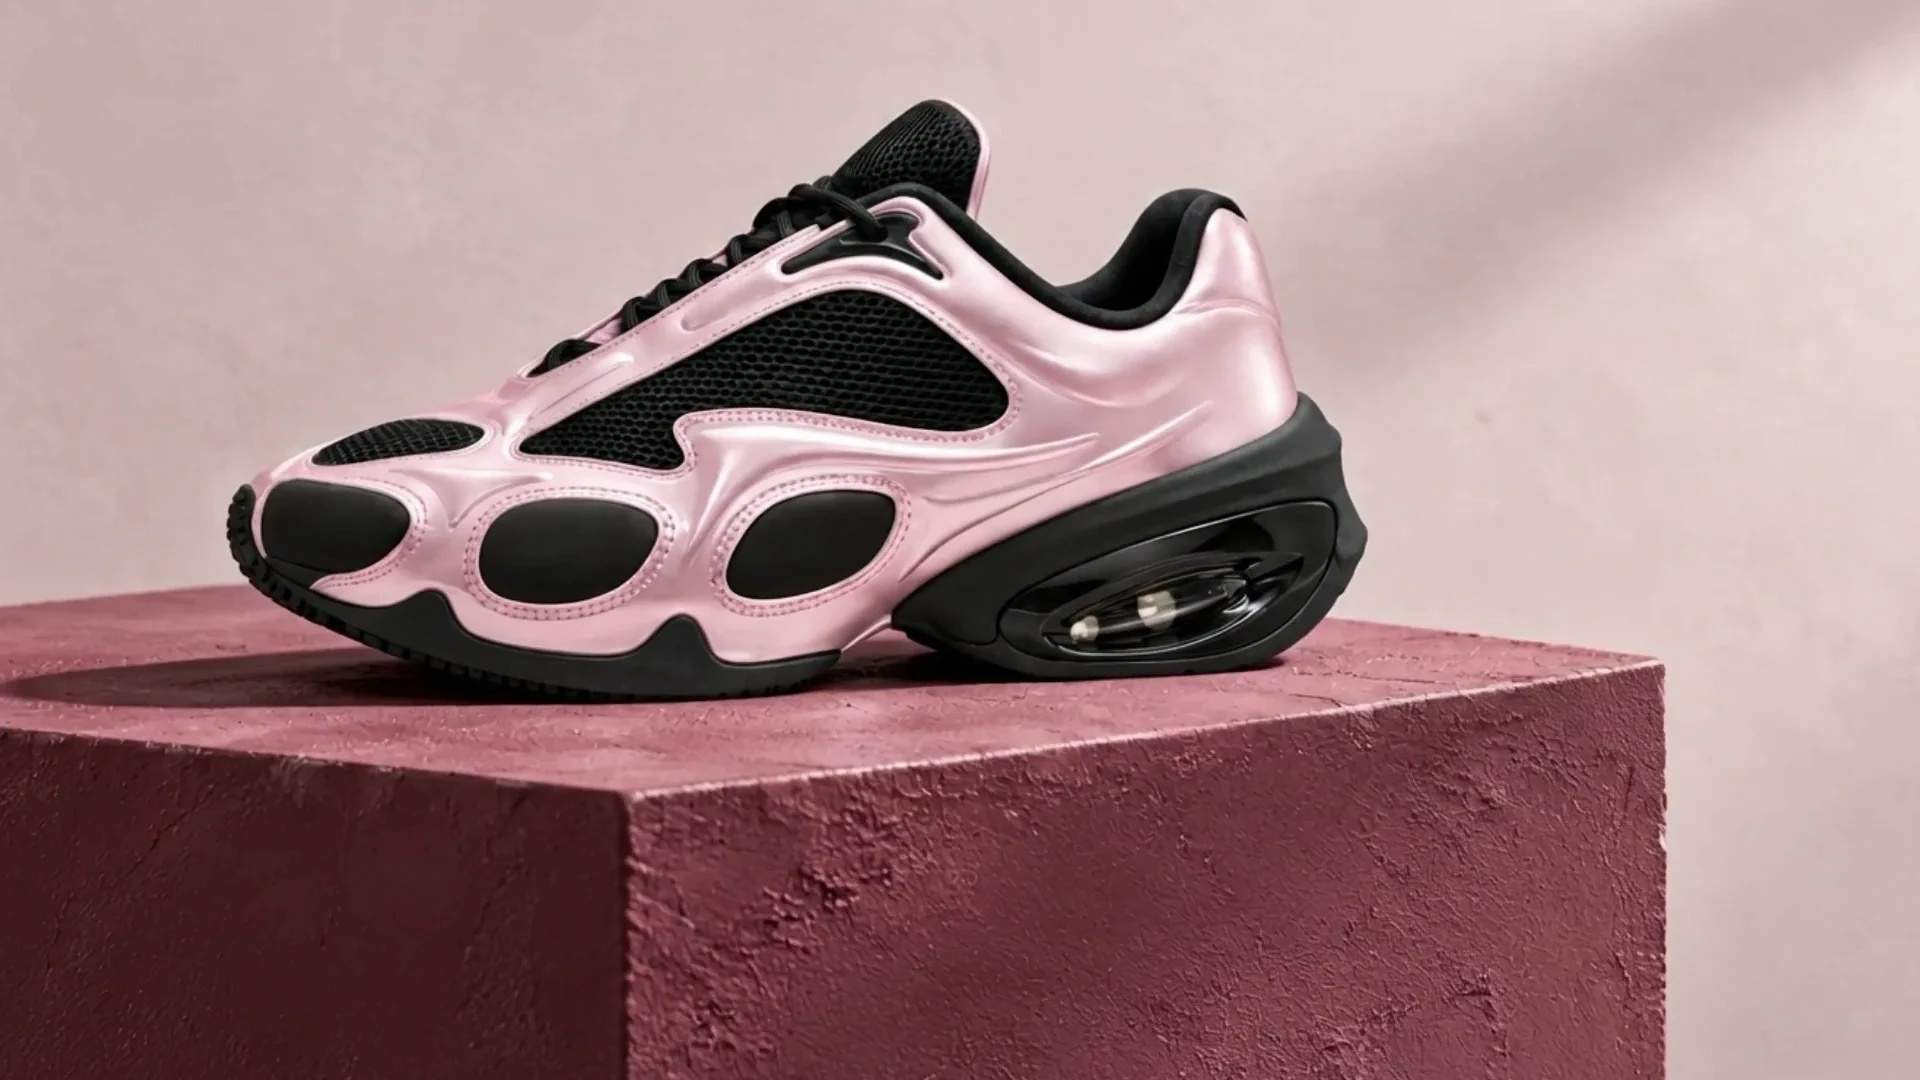
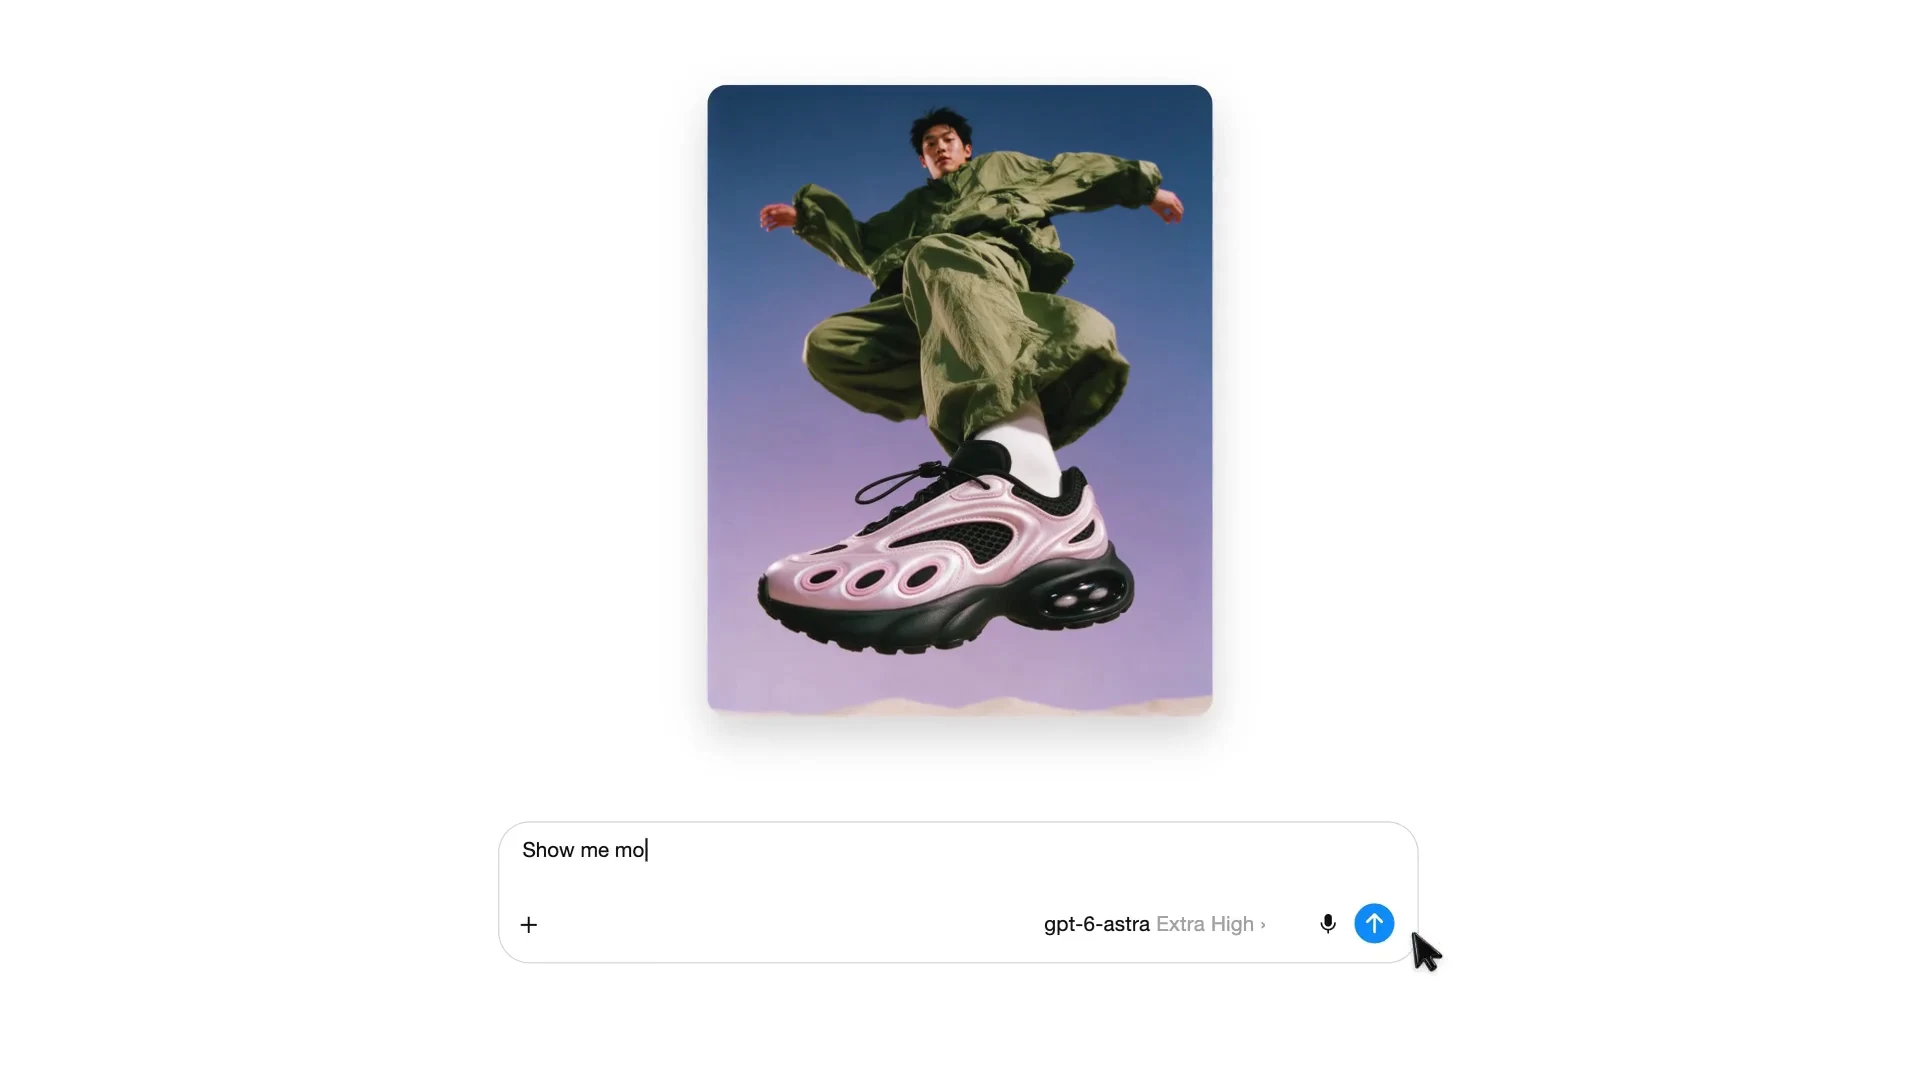
The demo offers several sneaker pictures, then opens one pink studio version. Choose the image before building more work around it.
- Check the product shape, colour and material.
- Inspect logos, straps, laces and other small details.
- Keep the chosen asset available in the conversation for the next step.
2. Combine the product and person references
The next request includes two images and names both assets: “Put @Sneaker Pic 2 on @Model.” The product reference controls the shoes; the person reference identifies the wearer.
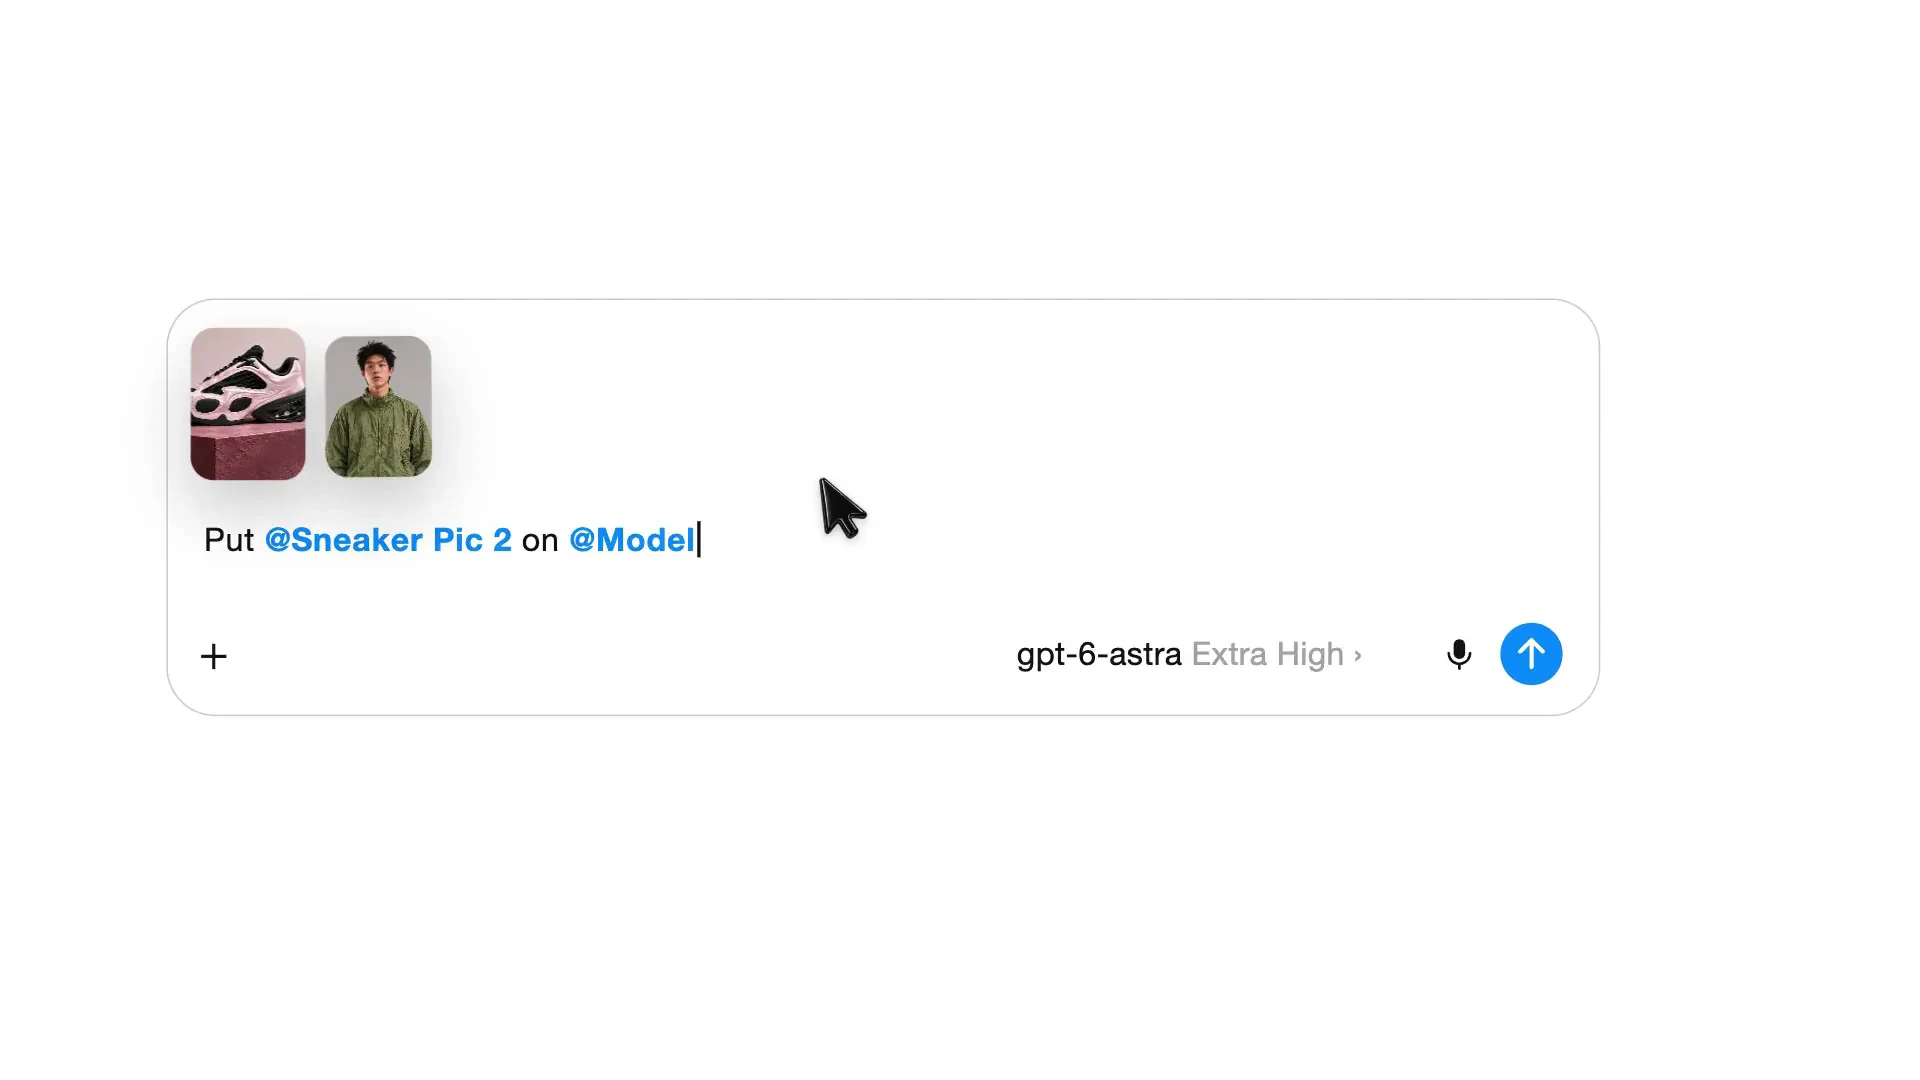
For your own project:
- Attach your product photo and the person reference you have permission to use.
- Identify each image’s role in the message.
- Ask to preserve the product’s colour and design.
- Review the result before animating or changing the scene.
Use the first attached image as the shoe reference and the second as the person reference. Show that person wearing these shoes. Keep the shoe colours and shape. Quote one image before generating.
3. Replace the background with a reference image
The demo attaches a greenhouse picture and asks “Use swap anything to change the background.” Naming the editing tool and providing the intended setting makes the request specific.
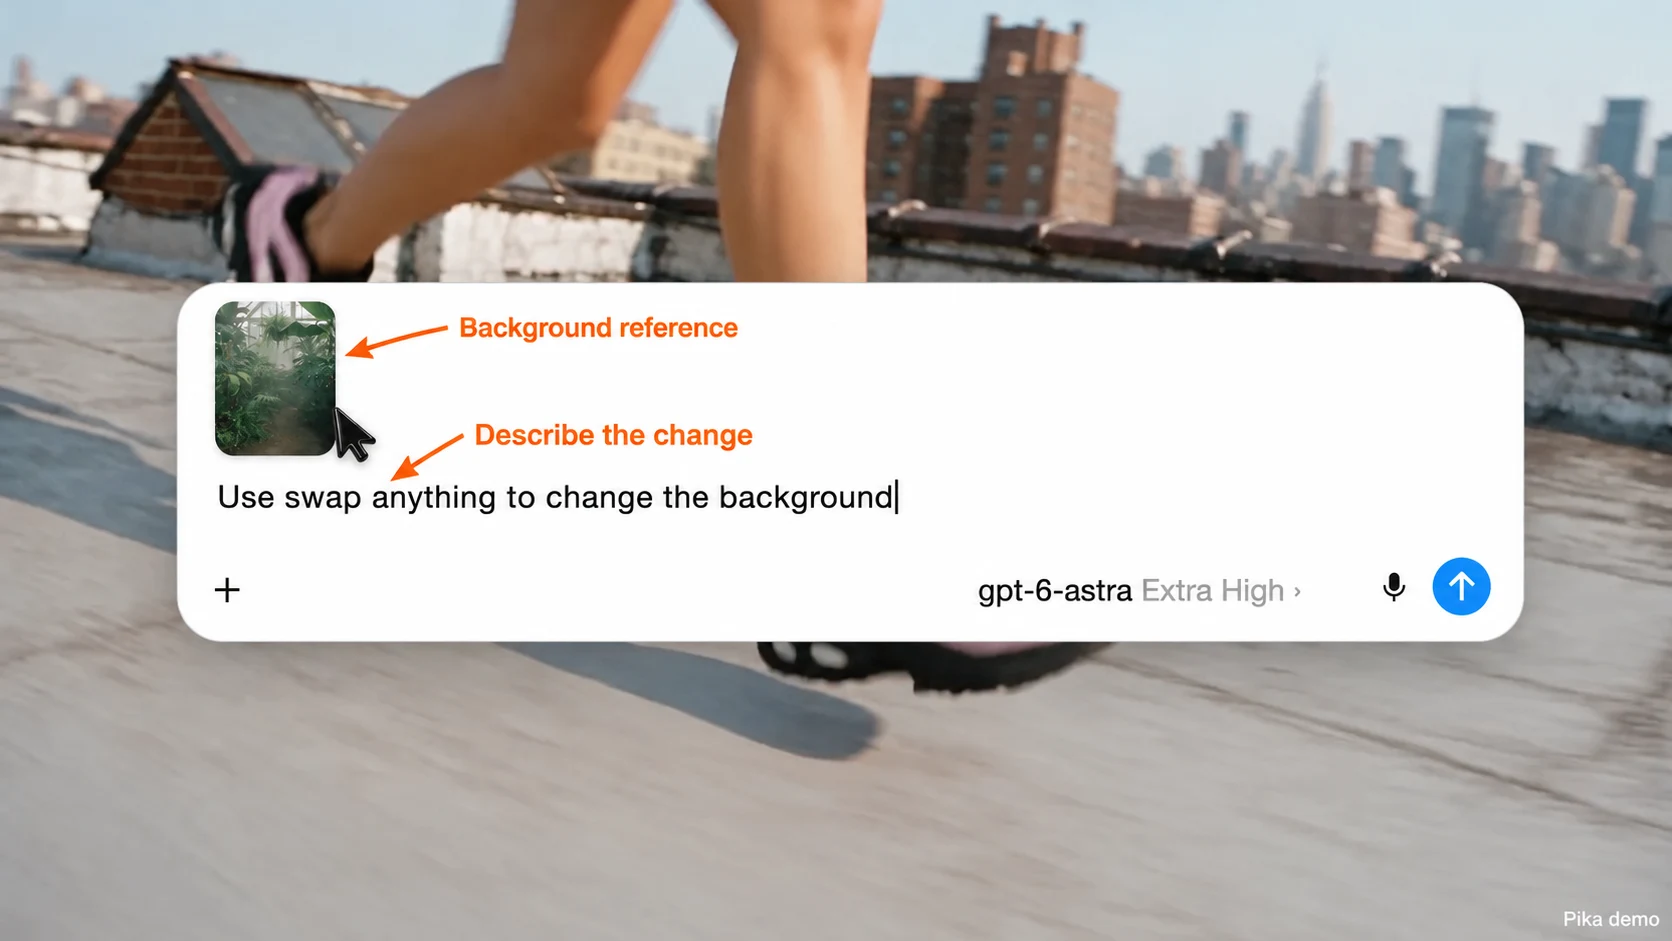
- Provide: the exact clip and a reference for the new background.
- Request: a background change, with the person and product preserved.
- Review: feet, hair edges, shadows and lighting across the whole clip.
Use Swap Anything on this clip. Replace the rooftop background with the greenhouse in the attached image. Preserve the person, shoes and movement. Show the settings and cost before running.
4. Ask for additional camera angles
The demo then asks “Make 2 more angles of this shot and put all three on the timeline.” Its response identifies Camera Director. The preview shows the greenhouse scene beside the editing timeline.
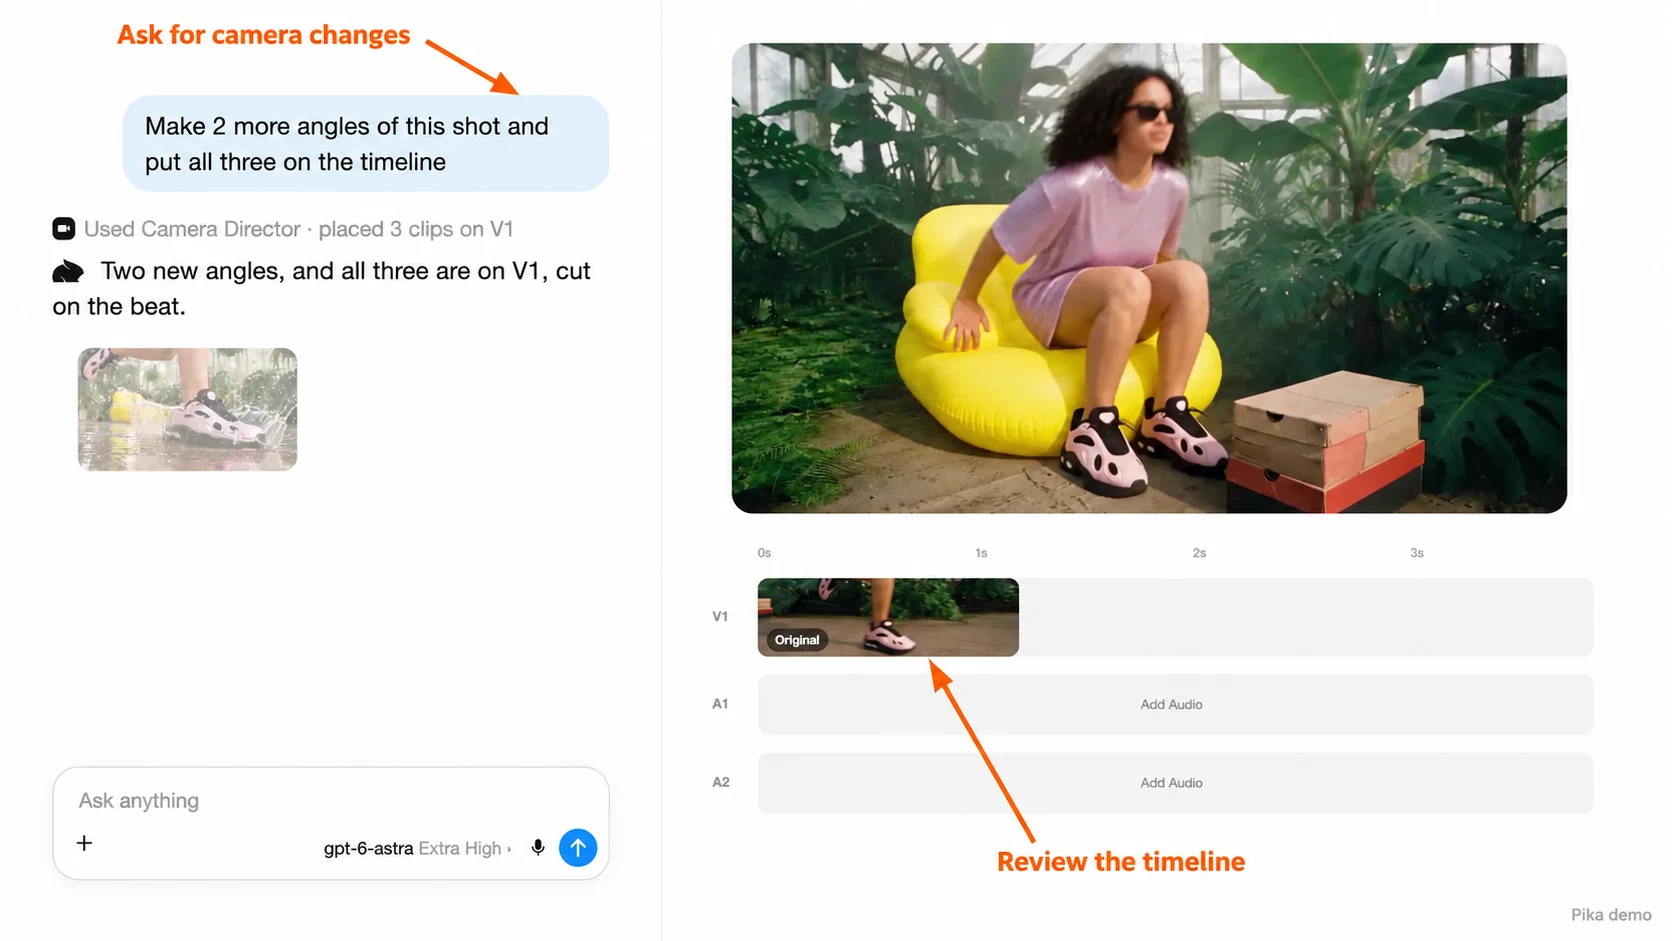
For a controlled request, name the angles rather than asking for random changes:
- Keep the original shot as the opening.
- Ask for a close shot of the shoes and a wider shot of the person.
- Preserve the product and setting in both versions.
- Review each clip before arranging the sequence. Ask for the available editor controls if your interface differs from the demo.
Keep the original clip. Quote two additional camera versions: a close shot of the shoes and a wider shot of the person. Preserve the product and greenhouse setting. Wait for approval before generating.
5. Add sound and shorten the ending
The follow-up in the demo says “Add music and SFX, and shorten the end a bit.” The timeline now shows several shots. For your own edit, specify the final length and sound direction so the request is easier to evaluate.
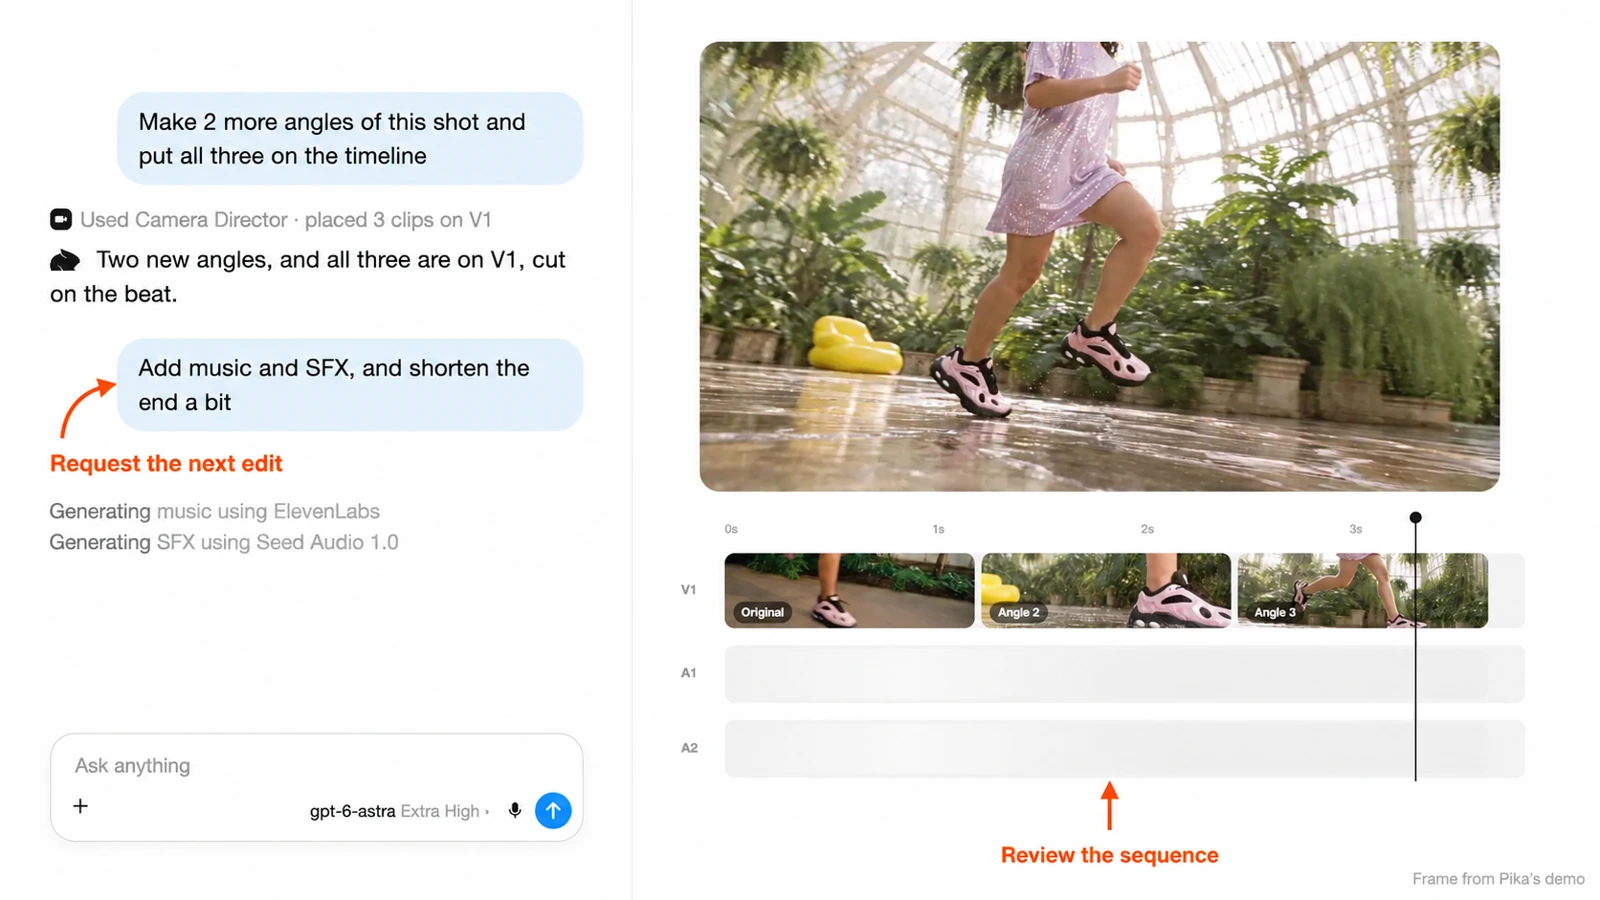
- Music: describe the mood and ask for no vocals if the clip needs room for speech.
- Sound effects: name the action that should make a sound, such as a footstep.
- Trim: give a target duration or identify the section to remove.
- Review: listen for abrupt cuts and check that the final product shot stays on screen long enough to read.
Add quiet, upbeat instrumental music and light footsteps to this edit. Keep the music below the effects. Trim the ending to a total of 10 seconds, keeping the final product shot. Explain the cost before adding generated audio.
Save the chosen files and prompts together. For a website, use a compressed poster image and let readers start playback; one clear example beside its prompt is easier to follow than several competing clips.
Keep costs and retries under control
Use a short first test and one result per request. State your spending preference in words, then check the price shown for the operation. A successful still image does not tell you what its animation, soundtrack or upscale will cost.
When a result is close, identify the specific problem before retrying. “The mug handle changes halfway through” is a useful diagnosis. “Try again, make it better” gives little direction and can lead to another result with the same issue.
Our credit and retry calculator can help organise a budget, but the current Pika quote is the relevant reference for the request you are about to approve. Keep estimated costs and recorded charges separate in your notes.
Manage the connection and protect private details
The installed plugin page has a Manage link. Use the connection settings when you need to review the linked app or find disconnection controls. Removing access is a separate action from deleting a generated file, so read the specific control before using it.
When sharing a tutorial, crop or cover account names, email addresses, private chat titles and unrelated assets. Check the entire screenshot, including sidebars and browser chrome. A useful setup picture does not need to identify the person who captured it.
I would use fictional sample products and characters when teaching the workflow. If a real photo is necessary, use one you are entitled to upload and make the intended transformation clear. Keep private customer material out of an example you plan to publish.
Frequently asked questions
Can I generate Pika videos inside ChatGPT?
The connected plugin provides video creation workflows through ChatGPT. Choose a suitable app and model, supply the required inputs and review the request before generation. The available choices and cost depend on the operation you select.
Do I need an API key for this setup?
The installation shown here uses a Pika account approval screen. It does not ask you to paste an API key into the conversation. Developers building their own integration should follow the separate API Club setup.
Does installing Pika give me 250 credits immediately?
Pika’s announcement ties the extra 250 credits to a first plugin generation. Installation alone is not the qualifying action described. Check the current offer and your account records after completing a generation.
Are the 13 skills thirteen different models?
No. Skills help ChatGPT handle tasks such as ads, speech or prompt preparation. Models are the generation choices used within a workflow. The gallery’s apps are another layer: they organise creation and editing tasks.
Can I use a photo I already have?
The embedded app includes an attachment control, and relevant workflows accept images or clips. Choose the correct source for the task and describe its role. For animation, a clean, well-framed image gives you a clearer starting point.
Can I edit a previous Pika creation?
Use the remix workflow and identify the exact creation. Ask for one clear change while naming the details to preserve. Review the new quote because editing or generating another version can use additional credits.
Which model should I choose first?
Choose according to the task and current supported settings. For a small motion study, I would prepare a simple short-video request and inspect the offered model and price. For a still, choose an image workflow. Do not select a model only because its name sounds newer.
What if ChatGPT cannot show a price or start the task?
Do not keep resubmitting the same generation. Check the Pika connection, required inputs and current app options. If a price or approval is unresolved, settle that before creating. Keep any support message factual and include the relevant job information if a job exists.
Should I use the plugin or the Pika website?
I would use the plugin when conversation helps define the brief or connect several tasks. I would use the website when I want to compare its controls directly. Start with the interface that makes your next decision clearest, and keep the same source assets organised.
For general installation behaviour, see OpenAI’s plugin documentation. Pika’s own listing and the connected app remain the places to check its current creation choices.